
【Android】解析Paint类中MaskFilter的使用
目录结构:
MaskFilter可以用来指定画笔的边缘效果。如果引用开启硬件加速的话,那么MaskFilter将不会起作用。
关闭硬件加速:
android:hardwareAccelerated="false"
Android中有两个已知的MaskFilter实现类,分别是:BlurMaskFilter和EmbossMaskFilter:
BlurMaskFilter:指定模糊样式和影响半径。
EmbossMaskFilter:指定浮雕的光源方向和周围光强度。
在实际中,使用不同的方法可能会有不同的硬件加速情况,比如笔者测试发现drawText默认是关闭硬件加速的,drawRect默认是开启硬件加速的。除了在Application.xml文件中指定硬件加速的开关情况,也可以通过代码来实现:
//不使用硬件加速

myview.setLayerType(View.LAYER_TYPE_SOFTWARE, null);

//...

//使用硬件加速

myview.setLayerType(View.LAYER_TYPE_HARDWARE,null);
1.EmbossMaskFilter
EmbossMaskFilter用于完成浮雕效果,通过PS可以更简单的完成类似的效果。EmbossMaskFilter的唯一构造方法是:
public EmbossMaskFilter (float[] direction,float ambient,float specular,float blurRadius)
这个构造方法在API 28(Android 9.0)中已经被废弃了。
在指定参数的时候需要指定光源方向(direction)、环境光强度(ambient)、镜面反射系数(specular)和模糊半径(blurRadius)。
float[] direction=new float[]{1,1,1};//指定光源方向

float light=0.4f;//指定环境光强度(0~1),0~1表示环境从暗到亮

float specular=6f;//指定镜面反射系数,越接近0,反射光越强。

float blur=3f;//指定模糊半径,值越大,越清晰。

EmbossMaskFilter emboss=new EmbossMaskFilter(direction,light,specular,blur);

if(!canvas.isHardwareAccelerated()){//在未硬件加速的情况下设置效果

    myPaint.setMaskFilter(emboss);

}
如下代码:
protected void onDraw(Canvas canvas) {

    super.onDraw(canvas);

    Paint paint=new Paint();

    paint.setColor(Color.RED);

    paint.setStyle(Style.FILL);

    paint.setTextSize(70);

    float[] direction=new float[]{1,1,1};//指定光源方向

    float light=0.3f;//指定环境光强度

    float specular=5;//指定镜面反射强度

    float blur=5f;//指定模糊程度

    EmbossMaskFilter emboss=new EmbossMaskFilter(direction,light,specular,blur);

    if(!canvas.isHardwareAccelerated()){//如果没有开启硬件加速,就设置浮雕效果

        paint.setMaskFilter(emboss);

    }

    canvas.drawText("test测试", 200,200, paint);//绘制文本

}
效果图: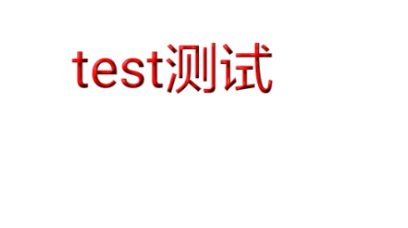
通过改变为不同的参数,可以得到不同的效果。
2.BlurMaskFilter
BlurMaskFilter有一个构造方法如下:
BlurMaskFilter(float radius, BlurMaskFilter.Blur style)
在构建BlurMaskFilter时,需要传入BlurMaskFilter.Blur枚举值,该枚举值有如下4种:
BlurMaskFilter.Blur.INNER 在边界内模糊,边界外不模糊

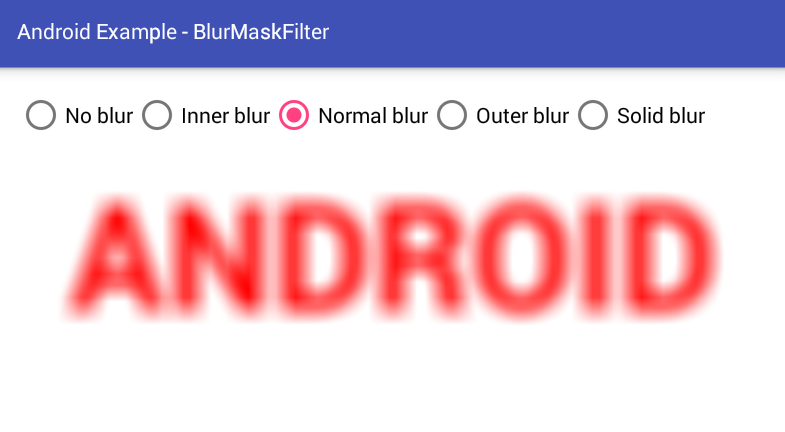
BlurMaskFilter.Blur.NORMAL 在边界内和边界外都模糊

BlurMaskFilter.Blur.OUTER 在边界外模糊,边界内不模糊

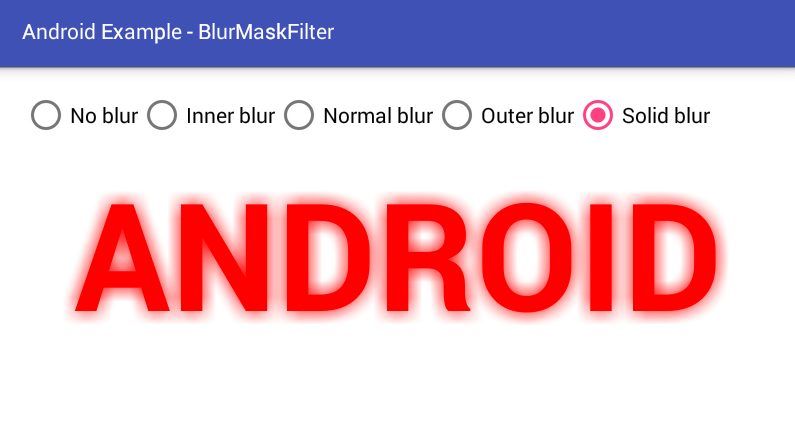
BlurMaskFilter.Blur.SOLID 在边边界内使用solid边框,边界外模糊
下面是使用示例:
activity_main.xml
<RelativeLayout

    xmlns:android="http://schemas.android.com/apk/res/android"

    xmlns:tools="http://schemas.android.com/tools"

    android:id="@+id/rl"

    android:layout_width="match_parent"

    android:layout_height="match_parent"

    android:padding="16dp"

    tools:context=".MainActivity"

    android:background="#ffffff"

    >

    <TextView

        android:id="@+id/tv"

        android:layout_width="match_parent"

        android:layout_height="wrap_content"

        android:layout_centerInParent="true"

        android:text="ANDROID"

        android:textSize="100dp"

        android:textStyle="bold"

        android:textColor="#ff0000"

        android:gravity="center"

        />

    <RadioGroup

        android:id="@+id/rg"

        android:layout_width="wrap_content"

        android:layout_height="wrap_content"

        android:orientation="horizontal"

        >

        <RadioButton

            android:id="@+id/rb_none"

            android:layout_width="wrap_content"

            android:layout_height="wrap_content"

            android:text="No blur"

            />

        <RadioButton

            android:id="@+id/rb_inner"

            android:layout_width="wrap_content"

            android:layout_height="wrap_content"

            android:text="Inner blur"

            />

        <RadioButton

            android:id="@+id/rb_normal"

            android:layout_width="wrap_content"

            android:layout_height="wrap_content"

            android:text="Normal blur"

            />

        <RadioButton

            android:id="@+id/rb_outer"

            android:layout_width="wrap_content"

            android:layout_height="wrap_content"

            android:text="Outer blur"

            />

        <RadioButton

            android:id="@+id/rb_solid"

            android:layout_width="wrap_content"

            android:layout_height="wrap_content"

            android:text="Solid blur"

            />

    </RadioGroup>

</RelativeLayout>
MainActivity.jave
import android.app.Activity;

import android.content.Context;

import android.content.pm.ActivityInfo;

import android.content.res.Resources;

import android.graphics.BlurMaskFilter;

import android.graphics.Paint;

import android.os.Bundle;

import android.view.View;

import android.view.Window;

import android.widget.RadioGroup;

import android.widget.RelativeLayout;

import android.widget.TextView;

public class MainActivity extends Activity {

    Context mContext=null;

    Resources mResources=null;

    RelativeLayout mRelativeLayout=null;

    TextView mTextView=null;

    RadioGroup mRadioGroup=null;

    protected void onCreate(Bundle savedInstanceState) {

        super.onCreate(savedInstanceState);

        setContentView(R.layout.activity_main);

        setRequestedOrientation(ActivityInfo.SCREEN_ORIENTATION_LANDSCAPE);//设置横屏

        mContext = getApplicationContext();

        mResources = getResources();

        mRelativeLayout = (RelativeLayout) findViewById(R.id.rl);

        mTextView = (TextView) findViewById(R.id.tv);

        mRadioGroup = (RadioGroup) findViewById(R.id.rg);

        // Set a checked change listener for RadioGroup

        mRadioGroup.setOnCheckedChangeListener(new RadioGroup.OnCheckedChangeListener() {

            @Override

            public void onCheckedChanged(RadioGroup radioGroup, int i) {

                if (i == R.id.rb_none) {

                    // If no blur is checked

                    // Set the TextView layer type

                    mTextView.setLayerType(View.LAYER_TYPE_SOFTWARE,null);

                    // Clear any previous MaskFilter

                    mTextView.getPaint().setMaskFilter(null);

                }

                if(i == R.id.rb_inner){

                    // If inner blur checked

                    applyBlurMaskFilter(mTextView, BlurMaskFilter.Blur.INNER);

                }

                if(i == R.id.rb_normal){

                    // If normal blur checked

                    applyBlurMaskFilter(mTextView, BlurMaskFilter.Blur.NORMAL);

                }

                if(i == R.id.rb_outer){

                    // If outer blur checked

                    applyBlurMaskFilter(mTextView, BlurMaskFilter.Blur.OUTER);

                }

                if(i == R.id.rb_solid){

                    // If solid blur checked

                    applyBlurMaskFilter(mTextView, BlurMaskFilter.Blur.SOLID);

                }

            }

        });

    }

    // Custom method to apply BlurMaskFilter to a TextView text

    protected void applyBlurMaskFilter(TextView tv, BlurMaskFilter.Blur style){

        // Define the blur effect radius

        float radius = tv.getTextSize()/10;

        // Initialize a new BlurMaskFilter instance

        BlurMaskFilter filter = new BlurMaskFilter(radius,style);

        /*

            public void setLayerType (int layerType, Paint paint)

                Specifies the type of layer backing this view. The layer can be LAYER_TYPE_NONE,

                LAYER_TYPE_SOFTWARE or LAYER_TYPE_HARDWARE.

                A layer is associated with an optional Paint instance that controls how the

                layer is composed on screen.

            Parameters

                layerType : The type of layer to use with this view, must be one of

                    LAYER_TYPE_NONE, LAYER_TYPE_SOFTWARE or LAYER_TYPE_HARDWARE

                paint : The paint used to compose the layer. This argument is optional and can be null. It is ignored when the layer type is LAYER_TYPE_NONE

        */

        /*

            public static final int LAYER_TYPE_SOFTWARE

                Indicates that the view has a software layer. A software layer is backed by

                a bitmap and causes the view to be rendered using Android's software rendering

                pipeline, even if hardware acceleration is enabled.

        */

        // Set the TextView layer type

        tv.setLayerType(View.LAYER_TYPE_SOFTWARE, new Paint());//取消硬件加速

        tv.getPaint().setMaskFilter(filter);

    }

}
效果图: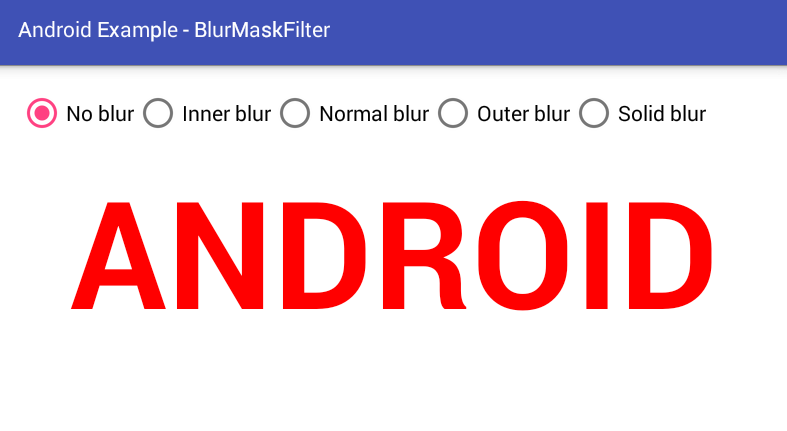


参考文章:
How to use BlurMaskFilter In Android
【Android】解析Paint类中MaskFilter的使用的更多相关文章
- 【Android】解析Paint类中Xfermode的使用
Paint类提供了setXfermode(Xfermode xfermode)方法,Xfermode指明了原图像和目标图像的结合方式.谈到Xfermode就不得不谈它的派生类PorterDuffXfe ...
- 解析C#类中的构造函数
<解析C#类中的构造函数> 一. C#中的构造函数概述: C#中类包含数据成员和函数成员.函数成员提供了操作类中数据的某些功能,包括方法.属性.构造器和终结器.运算符和索引器. 构造函数 ...
- Android Studio查看类中所有方法和属性
ctrl+f3效果: alt+7效果: 注意区别:虽然所有方法都有,但是顺序自己一看效果便知.一个是根据类中的顺序,另一个是根据a-z的开头字母顺序. 百度查了一下快捷键是ctrl+f12.但是自己试 ...
- Android 编程 AMapLocationClientOption 类中的 setNeedAddress 方法用处 (高德地图 com.amap.api.location.AMapLocationClientOption 中的类)
最近在用高德地图来写Android App, 其中有一些 方法是不太理解的,这里写一下 对 高德地图 com.amap.api.location.AMapLocationClientOption ...
- Gson解析POJO类中的泛型参数
在开发Android与API交互的时候,使用Json格式传输,遇到了这样一个情况,返回数据格式POJO类如下: public class ApiResult<T> { private in ...
- Android 编程 AMapLocationClientOption 类中的 setMockEnable (高德地图 com.amap.api.location.AMapLocationClientOption 中的类)
setMockEnable 高德地图中 AMapLocationClientOption 中有一个方法是设置APP是否接受模拟定位的设置,就是方法 setMockEnable //设置是否允许模拟位置 ...
- Spring5源码解析6-ConfigurationClassParser 解析配置类
ConfigurationClassParser 在ConfigurationClassPostProcessor#processConfigBeanDefinitions方法中创建了Configur ...
- 你知道Spring是怎么解析配置类的吗?
彻底读懂Spring(二)你知道Spring是怎么解析配置类的吗? 推荐阅读: Spring官网阅读系列 彻底读懂Spring(一)读源码,我们可以从第一行读起 Spring执行流程图如下: 如果图片 ...
- Android ---paint类
引自:http://www.cnblogs.com/-OYK/archive/2011/10/25/2223624.html Android Paint和Color类 要绘图,首先得调整画笔,待画 ...
随机推荐
- hdu 2825
题解: ac自动机+dp的题目 差不多都一个套路 记录枚举了i位,匹配到自动机上的x位,然后对于匹配了哪些单词状态压缩一下就可以了 代码: #include <bits/stdc++.h> ...
- 【Java】 剑指offer(9) 斐波那契数列及青蛙跳台阶问题
本文参考自<剑指offer>一书,代码采用Java语言. 更多:<剑指Offer>Java实现合集 题目 写一个函数,输入n,求斐波那契(Fibonacci)数列的第n项 ...
- java中对于二位数组的简单操作,进而可以递推复杂操作
1.程序 2.结果 3.内循环的次数 arr[x].length
- 091实战 Nginx配置(日志服务器中关于日志的产生)
一:概括 1.需要配置的概括 定义日志格式 日志的分割字段:^A 日志格式:IP地址^A服务器时间^A请求参数 配置location,记录请求日志到本地磁盘 将数据按照给定的日志格式存储到本地磁盘 二 ...
- 洛谷 P1352 没有上司的舞会【树形DP】(经典)
<题目链接> <转载于>>> > 题目描述: 某大学有N个职员,编号为1~N.他们之间有从属关系,也就是说他们的关系就像一棵以校长为根的树,父结点就是子结点的 ...
- HDU1789 Doing Homework again 做作业【贪心】
题目链接:https://vjudge.net/problem/HDU-1789 题目大意: 给出N个作业的截至日期,和N个作业不交所扣掉的分数,要求输出扣除分数做少的方案. 解析: 与上一道销售商品 ...
- SpringMvc @ResponseBody
一.@Response使用条件 二. @Response在最小配置.jackson的jar包情况下,json中包含的日期类型字段都是以时间戳long类型返回 三. Jack序列化对象转为JSON的限制 ...
- AngularJS checkbox/复选框 根据缓存数据实时显示
想缓存选择按钮时,可以使用这样的方法. index.html <!DOCTYPE html> <html data-ng-app="App"> <he ...
- Python数据可视化系列-02-pyecharts可视化非常cool
pyecharts介绍 pyecharts网站 Pyecharts生成的图像,动态效果非常cool.在HTML上展示很是perfect.matplotlib用于科研,但是pyecharts用于展示和讲 ...
- [BZOJ2238]Mst
[BZOJ2238]Mst 题目大意: 给你一个\(n(n\le50000)\)个点,\(m(m\le10^5)\)条边的无向带权图.\(q(q\le10^5)\)次询问,每次询问去掉一条边后图能否连 ...