JS模板引擎-Mustache模板引擎使用实例1-表格树
1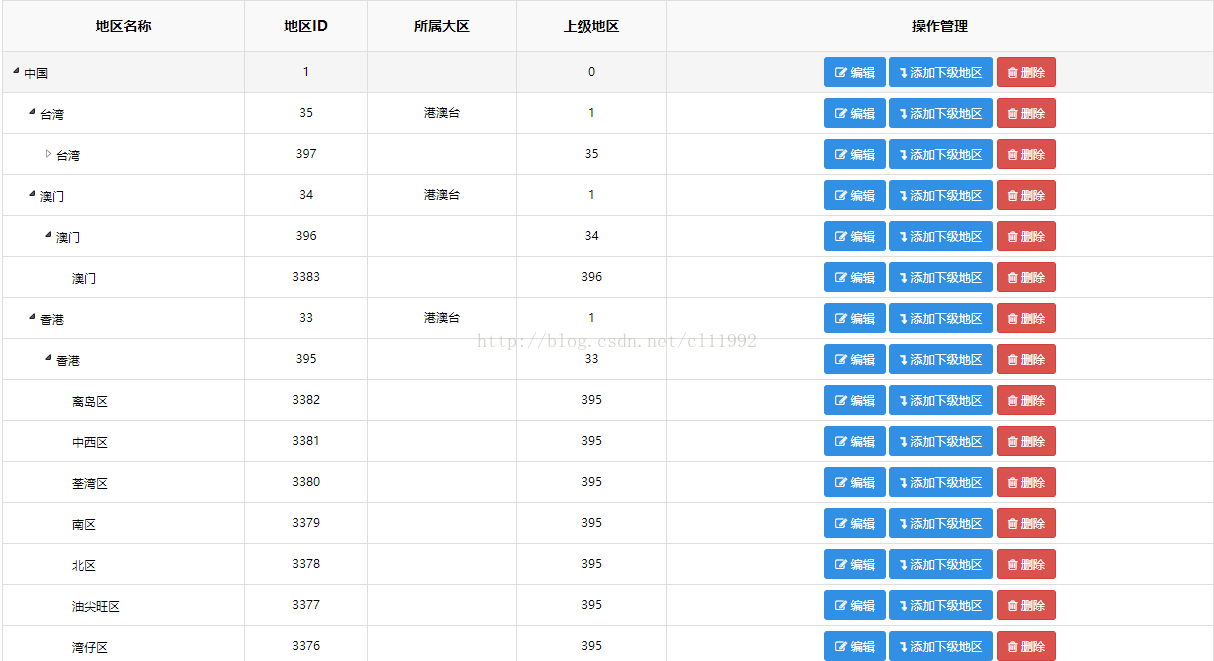
使用实例代码
1.jsp代码
<!DOCTYPE html>

<html lang="zh-CN">

<head>

<title>地区管理</title>

<!-- 表格树控件 -->

<link href="${ctxStatic}/treeTable/themes/vsStyle/treeTable.min.css" rel="stylesheet" type="text/css" />

<script src="${ctxStatic}/treeTable/jquery.treeTable.min.js" type="text/javascript"></script>

<!-- Mustache -->

<script src="${ctxStatic}/common/mustache.min.js" type="text/javascript"></script>

<!-- 业务js -->

<script src="${ctx}/views/admin/logistics/logisticsAreaList.js" type="text/javascript"></script>

</head>

<body>

    <table id="treeTable" class="table table-striped table-bordered table-condensed">

        <thead><tr><th>区域名称</th><th>区域编码</th><th>区域类型</th><th>备注</th><shiro:hasPermission name="sys:area:edit"><th>操作</th></shiro:hasPermission></tr></thead>

        <tbody id="treeTableList"></tbody>

    </table>

    <script type="text/template" id="treeTableTpl">

        <tr id="{{row.id}}" pId="{{pid}}">

            <td><a href="${ctxa}/sys/area/form.do?id={{row.id}}">{{row.name}}</a></td>

            <td>{{row.code}}</td>

            <td>{{dict.type}}</td>

            <td>{{row.remarks}}</td>

            <shiro:hasPermission name="sys:area:edit"><td>

                <a href="${ctxa}/sys/area/form.do?id={{row.id}}">修改</a>

                <a href="${ctxa}/sys/area/delete.do?id={{row.id}}" οnclick="return confirmx('要删除该区域及所有子区域项吗?', this.href)">删除</a>

                <a href="${ctxa}/sys/area/form.do?parent.id={{row.id}}">添加下级区域</a>

            </td></shiro:hasPermission>

        </tr>

    </script>

</body>

</html>
2.logisticsAreaList.js
$(document).ready(function() {

        var tpl = $("#treeTableTpl").html().replace(/(\/\/\<!\-\-)|(\/\/\-\->)/g,"");

        var data = ${fns:toJson(list)}, rootId = "";

        addRow("#treeTableList", tpl, data, rootId, true);

        $("#treeTable").treeTable({expandLevel : });

    });

    function addRow(list, tpl, data, pid, root){

        for (var i=; i<data.length; i++){

            var row = data[i];

            if ((${fns:jsGetVal('row.parentId')}) == pid){

                $(list).append(Mustache.render(tpl, {

                    dict: {

                        type: getDictLabel(${fns:toJson(fns:getDictList('sys_area_type'))}, row.type)

                    }, pid: (root?:pid), row: row

                }));

                addRow(list, tpl, data, row.id);

            }

        }

    }

————————————————

版权声明:本文为CSDN博主「cl11992」的原创文章,遵循 CC 4.0 BY-SA 版权协议,转载请附上原文出处链接及本声明。

原文链接:https://blog.csdn.net/cl11992/article/details/77052471
最近接触使用了 Mustache 模板引擎,发现非常好用,故稍微记录一下我。
mustache的github地址:mustache
mustache用法很简单,大概就以下三步:
1. 拿到渲染模板

var template = $('#tmpl').html();
- 1
- 2
2. 将数据渲染到模板上

Mustache.render(template, data);
- 1
- 2
3. 将渲染后的模板放到想放的dom中

$dom.html(template)
- 1
- 2
很好理解,就是mustache通过内部方法解析html字符串模板,然后将数据渲染上去形成新的html字符串,最后你就可以把它放入页面dom中。
这里记录一些基本语法:
- 基本
data:
{

    "name": "Chris",

    "company": "<b>GitHub</b>"

}
- 1
- 2
- 3
- 4
template
*  {{name}}     {{可以理解为这里面放的是键名}}

*  {{age}}

*  {{company}}

*  {{{company}}}  默认情况下,所有变量都是HTML转义的。如果要渲染未转义的HTML,使用三重括号:{{{}}}

*  {{&company}}   可以使用 & 来取消转义。

*  {{=<% %>=}}  不解析输出

   {{company}}

   <%={{ }}=%>
- 1
- 2
- 3
- 4
- 5
- 6
- 7
- 8
- 9
output
* Chris

*         (因为不存在 age, 所以这里啥也没有)

* <b>GitHub</b>

* <b>GitHub</b>

* <b>GitHub</b>

* {{company}}
- 1
- 2
- 3
- 4
- 5
- 6
- if 遍历语法
{{ #weather }}

    {{ city }}

{{ /weather }}
- 1
- 2
- 3
这可以看做代替了 if 语法,可以用来遍历数据 ( 相当于 if ( weather ) {…} )
条件是:weather 存在 且不为 null, undefined, false, 0, ‘’, []
data:
var data = {

    weather: [

        {

            city: '四川',

            sky: '多云'

        },

        {

            city: '河南',

           sky: '晴'

        }

}
- 1
- 2
- 3
- 4
- 5
- 6
- 7
- 8
- 9
- 10
- 11
template:
<div>

    查看城市天气:

    {{#weather}}

        {{city}}:{{sky}}<br/>

    {{/weather}}

</div>
- 1
- 2
- 3
- 4
- 5
- 6
output:
查看城市天气:

        四川:所云

        河南:晴
- 1
- 2
- 3
- 与上一个相反,weather为 false, null, undefined, [], 0 显示
{{ ^weather }}

    显示无数据

{{ /weather }}
- 1
- 2
- 3
- 遍历 字符串数组
{{ #cities }}

    {{ . }}

{{ /cities }}
- 1
- 2
- 3
data:
var data = {

    cities: ['北京','南京','上海','广东','深圳','西安']

}
- 1
- 2
- 3
template:
<div>

    查看其他城市:

    {{#cities}}

        <a href="javascript:;"> {{.}} </a>

    {{/cities}}

</div>
- 1
- 2
- 3
- 4
- 5
- 6
output:
查看其他城市: 北京 南京 上海 广东 深圳 西安
- 1
- 使用函数
data:
{

     weather: {

         city: '四川',

         weather: '<b>多云</b>',

         min_tempe: 20,

         max_tempe: 30

     }

     tempe: function() {

         return this.min_tempe + '~' + this.max_tempe;

     }

}
- 1
- 2
- 3
- 4
- 5
- 6
- 7
- 8
- 9
- 10
- 11
template:
{{#weather}}

    {{tempe}}

{{/weather}}
- 1
- 2
- 3
output:
20 ~ 30
- 1
网上解释:这里的 function 将在每次迭代时在列表中的当前项的上下文中调用。
我理解的就是 function每次的上下文都要在 渲染时才决定,因此 this 的指向要看具体的执行环境。
这里 temp函数是在 weather中执行的,所以function中的this指向的是 weather
- 比较复杂的函数
网上的例子:
If the value of a section key is a function, it is called with

the section’s literal block of text, un-rendered, as its first argument.

The second argument is a special rendering function that uses the current

view as its view argument. It is called in the context of the current view

object.
- 1
- 2
- 3
- 4
- 5
data:
{

  "name": "Tater",

  "bold": function () {

    return function (text, render) {

      return "<b>" + render(text) + "</b>";

    }

  }

}
- 1
- 2
- 3
- 4
- 5
- 6
- 7
- 8
template:
{{#bold}}Hi {{name}}.{{/bold}}
- 1
output:
<b>Hi Tater.</b>
- 1
没看太懂,应该是在函数中定义render渲染视图方法,至今也没用到过。
还有其他的用法等用到了再记录吧。
JS模板引擎-Mustache模板引擎使用实例1-表格树的更多相关文章
- js模板引擎mustache介绍及实例
在Javascript中 mustache.js是实现mustache模板系统. Mustache是一种没有逻辑的模板语法.它可以应用于HTML.配置文件.源代码等任何地方. 它通过使用散列或对象中提 ...
- Javascript模板引擎mustache.js详解
mustache.js是一个简单强大的Javascript模板引擎,使用它可以简化在js代码中的html编写,压缩后只有9KB,非常值得在项目中使用.本文总结它的使用方法和一些使用心得,内容不算很高深 ...
- Js模板引擎mustache
mustache.js是一个简单强大的Javascript模板引擎,使用它可以简化在js代码中的html编写,压缩后只有9KB,非常值得在项目中使用.本文总结它的使用方法和一些使用心得,内容不算很高深 ...
- 模板引擎mustache.js
Javascript模板引擎mustache.js详解 阅读目录 1. 从一个简单真实的需求讲起 2. mustache的用法 3. mustache的思想 4. {{prop}}标签 5. {{ ...
- 探究Javascript模板引擎mustache.js使用方法
这篇文章主要为大家介绍了Javascript模板引擎mustache.js使用方法,mustache.js是一个简单强大的Javascript模板引擎,使用它可以简化在js代码中的html编写,压缩后 ...
- javascript模板引擎Mustache
Mustache(英文本意:触须,胡须)是基于JavaScript实现的模版引擎,类似于JQuery Template,但是这个模版更加的轻量级,语法更加的简单易用,很容易上手. 下载:https:/ ...
- Web模板引擎—Mustache
Web模板引擎——Mustache 2012年9月12日 BY BELL·12 COMMENTS Web 模板引擎是为了使用户界面与业务数据(内容)分离而产生的,它可以生成特定格式的文档,通常是标准的 ...
- Mustache模板引擎
Mustache是一个Logic-Less模板引擎,即:零逻辑引擎,原因在于它只有标签,没有流程控制语句,这是它与其它模板引擎不同的地方. Mustache小巧玲珑,几乎用各种语言都实现了一遍. Mu ...
- Node.js学习(14)----EJS模板引擎
这个入门教程将从以下几个方面来讲解: 1. 引入EJS 2. 创建一个模板 3. 使用视图工具组件 4. 使用错误处理组件 5. 什么情况下应使用EJS 引入EJS 在我们正式开始前,我们先来做点准备 ...
随机推荐
- JAVA架构师眼中的高并发架构,分布式架构 应用服务器集群
前言 高并发经常会发生在有大活跃用户量,用户高聚集的业务场景中,如:秒杀活动,定时领取红包等. 为了让业务可以流畅的运行并且给用户一个好的交互体验,我们需要根据业务场景预估达到的并发量等因素,来设计适 ...
- h5 中修改input中 placeholder的颜色
input::-webkit-input-placeholder{ color:blue; } input::-moz-placeholder{ /* Mozilla Firefox 19+ */ c ...
- [TJOI2014] 匹配
注:此题无序,也无嵬 正文 我们这题求得事实上是一个最大费用最大流,最后的对每条边进行枚举,额然后,如果最大费用小了,就计入答案.. 算是,比较水吧 还有,一开始WA了两次是因为,dis应初始化为负无 ...
- Ubuntu 系统连接到服务器
Ubuntu 系统连接到服务器 我用的是 Ubuntu18.04 系统 假设你的服务器上的用户名是 root, 域名或者 ip 地址是 xyz 而且配置好了安全组(阿里云的)和云解析 首先要安装 op ...
- 发布开源项目到Jcenter
前言 为了将阿里云短信开箱即用发布到Jcenter仓库,前前后后花费了1天半的时间,把端午节都搭进去了.终于今天收到了Jcenter的消息,自己发布的包被添加到了Jcenter仓库,也算给开源社区做了 ...
- D - Counting Squares
Your input is a series of rectangles, one per line. Each rectangle is specified as two points(X,Y) t ...
- sublime 下载 和 破解
新增可用注册码,无需降级. Sublime Text 3.1 更改了验证方法,之前所有的验证码都已失效,建议降级到3143 版本. 新增3.1 3176 可用注册码 此验证码为sublime text ...
- 【spring】jdbcTemplate之sql参数注入
demo @Repository("jdbcDao") public class JdbcTemplateDao { @Autowired private JdbcTemplate ...
- 今日头条 SEO 研究,值得深思的 5 个问题
在做SEO的过程中,实际上,我并不是“技术挂”更多的是基于搜索原理与大量的实战,总结相关的经验,这么多年,经常养成一个小习惯,总是记录一些工作中遇到的一些小问题与小技巧. 特别是2017年,12月份开 ...
- JS:javascript 函数后面有多个小括号是怎么回事?f( )( )( )...
有时我们看见js函数后面跟着多个小括号是怎么回事?f( )( )( )... f()意思是执行f函数,返回子函数 f()()执行子函数,返回孙函数 f()()()执行孙函数 ()()表示定义并执行,使 ...