
2.3.FastDFS-单机拆分版-与Nginx整合配置
我们在Centos610FastDFS单机模式-FastDFS安装 中已经完成了FastDFS的安装,接下来我们进行FastDFS调度器的安装。
1.找到先前解压出来的fast/conf目录
拷贝 http.conf,mime.types,mod_fastdfs.conf anti-steal.jpg文件
cp http.conf meme.types mod_fastdfs.conf anti-steal.jpg /etc/fdfs/
2.找到解压出来fastdfs-nginx-module/src目录
拷贝 mod_fastdfs.conf文件
cp mod_fastdfs.conf /etc/fdfs/
3.修改mod_fastdfs.conf文件
# tracker路径

base_path=/opt/fastdfs/tracker

# tracker服务

tracker_server=192.168.125.139:

# storage服务端口号

storage_server_port=

# 分组名称

group_name=group1

# 地址中是否包含分组名

url_have_group_name = true

# 存储路径个数

store_path_count=

# 存储路径

store_path0=/opt/fastdfs/data

# 分组个数

group_count =

# 分组配置

[group1]

group_name=group1

storage_server_port=

store_path_count=

store_path0=/opt/fastdfs/data
4.修改 http.conf
vi http.conf
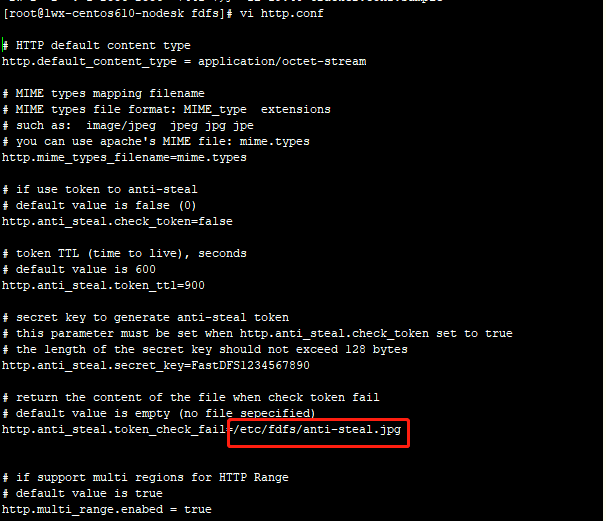
修改为截图中的样子
5.创建软连接
创建M00至存储目录连接
ln -s /opt/fastdfs/data/M00
6.fastdfs-nginx-module,nginx下载
6.1.FastDFS-nginx-module安装
a.下载安装包
wget https://github.com/happyfish100/fastdfs-nginx-module/archive/master.zip
unzip master.zip
6.2Nginx下载
# wget https://nginx.org/download/nginx-1.9.9.zip
wget https://nginx.org/download/nginx-1.9.9.tar.gz

7.nginx安装
nginx安装过程 请点击连接 nginx安装
区别在于 :nginx需要添加fastdfs-nginx-module-master 安装模块,并启用https_ssl模块
./configure --add-module=../fastdfs-nginx-module-master/src/ --with-http_ssl_module
nginx安装好之后
8.nginx配置
cd /usr/local/nginx/conf
mkdir siteconf
vi nginx.conf
在 http节点 里面第一个server 配置之前 ,添加 include siteconf/*.conf
保存退出
cd siteconf
vi fastdfs.conf
# 新增一个服务,监听之前配置开放的端口号

server {

    listen    ; #对应之前tracker.conf开放的端口号

    server_name    localhost;

    location / {

        root   html;

        index   index.html index.htm;

    }

    location ~/group([-])/M00 {

        ngx_fastdfs_module;

    }

    error_page     /50x.html;

    location = /50x.html {

        root   html;

    }

}
至此基于fastdfs-nginx-module的nginx安装完成
启动nginx
service nginx start
浏览器输入 http://192.168.125.139
如果页面正常显示说明nginx安装成功,反之需要检查配置
2.3.FastDFS-单机拆分版-与Nginx整合配置的更多相关文章
- 2.1.FastDFS-单机拆分版-调度器安装配置
Centos610系列配置 我们在Centos610FastDFS单机模式-FastDFS安装 中已经完成了FastDFS的安装,接下来我们进行FastDFS调度器的安装. 1.找到FastDFS配置 ...
- 2.0.FastDFS单机模式综合版
Centos610系列配置 1.什么是FastDFS? FastDFS是一个开源的分布式文件系统,她对文件进行管理,功能包括:文件存储.文件同步.文件访问(文件上传.文件下载)等,解决了大容量存储和负 ...
- 2.1.FastDFS-单机拆分版-单机版安装配置
Centos610系列配置 1.什么是FastDFS? FastDFS是一个开源的分布式文件系统,她对文件进行管理,功能包括:文件存储.文件同步.文件访问(文件上传.文件下载)等,解决了大容量存储和负 ...
- fastdfs集群版搭建(一)- storage集群搭建与统一入口访问
前言 接着上篇博客:详细的最新版fastdfs单机版搭建,今天来讲讲fastdfs的集群搭建,限于篇幅,今天先搭建stoarge集群,并实现统一的http访问方式: 没看我上篇博客的小伙伴,最好先去瞅 ...
- springboot+shiro+redis(单机redis版)整合教程-续(添加动态角色权限控制)
相关教程: 1. springboot+shiro整合教程 2. springboot+shiro+redis(单机redis版)整合教程 3. springboot+shiro+redis(集群re ...
- FastDFS教程Ⅰ-文件服务器安装与Nginx配置
1.简介 FastDFS是一个开源的轻量级分布式文件系统,它对文件进行管理,功能包括:文件存储.文件同步.文件访问(文件上传.文件下载)等,解决了大容量存储和负载均衡的问题.特别适合以文件为载 ...
- springboot+shiro+redis(单机redis版)整合教程
相关教程: 1. springboot+shiro整合教程 2. springboot+shiro+redis(集群redis版)整合教程 3.springboot+shiro+redis(单机red ...
- FastDFS单节点安装 & FastDFS+Nginx整合
安装环境 FastDFS_v5.05.tar.gz(http://sourceforge.net/projects/fastdfs/files/) fastdfs-nginx-module ...
- Nginx 整合 FastDFS 实现文件服务器
原文地址:Nginx 整合 FastDFS 实现文件服务器 博客地址:http://www.extlight.com 一.前言 本篇衔接<FastDFS 环境搭建>内容进行讲解,上篇文章我 ...
随机推荐
- adb 无线连接手机设备
连接语法: $ adb connect ip:port 断开连接: $ adb disconnect ip:port 可能遇到问题:unable to connect to 192.168.199.2 ...
- FineUIPro/Mvc/Core v6.1.0 发布了!
FineUIPro/Mvc/Core v6.1.0 正式发布了(2019-12-25),这个版本主要是BUG修正,并增加了一些新特性,建议升级到此版本. 在列举新版本特性之前,我们先来回顾下每次发布大 ...
- vscode中vim插件对ctrl键的设置
vim配置 在使用中经常想使用ctrl-c,虽然在vscode中有配置选项可以让vim与ctrl键解绑,但是这样就使用不了vim的VISUAL BLOCK.所以进行了自定义设置. 设置 - Vim C ...
- rancher三节点k8s集群部署例子
rancher三节点k8s集群部署例子 待办 https://rorschachchan.github.io/2019/07/25/使用Rancher2-1部署k8s/
- <meta charset="utf-8" name="viewport" content="width=device-width, initial-scale=1.0, minimum-scale=0.5, maximum-scale=2.0, user-scalable=yes"/>
<meta charset="utf-8" name="viewport" content="width=device-width, initi ...
- drc实现
原理参考之前转载的matlab上关于DRC的描述. 目前主要实现了compressor和expander. compressor: Limit: expander: 实现代码: #include< ...
- 【Python】 注释
确保对模块, 函数, 方法和行内注释使用正确的风格 Python中的注释有单行注释和多行注释: Python中单行注释以 # 开头,例如:: # 这是一个注释 print("Hello, W ...
- Modelsim, Debussy联合仿真Xilinx
http://wenku.baidu.com/view/8363d40003d8ce2f006623e9.html 另外一个博客 生成Xilinx库 先调用ISE的simulation librar ...
- thinkphp 接收文件并处理
html前台文件,上传到控制器,thinkphp处理它 前台 <form action="{:url('product/brand_addcl')}" enctype=&qu ...
- linx下跑多个tomcat
1.修改server.xml文件 <Server port="8005" shutdown="SHUTDOWN"> <Connector po ...