
K8s中Pod健康检查源代码分析
了解k8s中的Liveness和Readiness
Liveness:
表明是否容器正在运行。如果liveness探测为fail,则kubelet会kill掉容器,并且会触发restart设置的策略。默认不设置的情况下,该状态为success.
Readiness:
表明容器是否可以接受服务请求。如果readiness探测失败,则endpoints控制器会从endpoints中摘除该Pod IP。在初始化延迟探测时间之前,默认是Failure。如果没有设置readiness探测,该状态为success。
代码分析
基于Kubernetes 1.11.0
1.启动探测
在kubelet启动是时候会启动健康检查的探测:
kubelet.go中Run方法
...

kl.probeManager.Start() //启动探测服务

...
2.看一下probeManager都做了哪些事情
prober_manager.go中我们看一下这段代码:
// Manager manages pod probing. It creates a probe "worker" for every container that specifies a

// probe (AddPod). The worker periodically probes its assigned container and caches the results. The

// manager use the cached probe results to set the appropriate Ready state in the PodStatus when

// requested (UpdatePodStatus). Updating probe parameters is not currently supported.

// TODO: Move liveness probing out of the runtime, to here.

type Manager interface {

    // AddPod creates new probe workers for every container probe. This should be called for every

    // pod created.

    AddPod(pod *v1.Pod)

    // RemovePod handles cleaning up the removed pod state, including terminating probe workers and

    // deleting cached results.

    RemovePod(pod *v1.Pod)

    // CleanupPods handles cleaning up pods which should no longer be running.

    // It takes a list of "active pods" which should not be cleaned up.

    CleanupPods(activePods []*v1.Pod)

    // UpdatePodStatus modifies the given PodStatus with the appropriate Ready state for each

    // container based on container running status, cached probe results and worker states.

    UpdatePodStatus(types.UID, *v1.PodStatus)

    // Start starts the Manager sync loops.

    Start()

}
这是一个Manager的接口声明,该Manager负载pod的探测。当执行AddPod时,会为Pod中每一个容器创建一个执行探测任务的worker, 该worker会对所分配的容器进行周期性的探测,并把探测结果缓存。当UpdatePodStatus方法执行时,该manager会使用探测的缓存结果设置PodStatus为近似Ready的状态: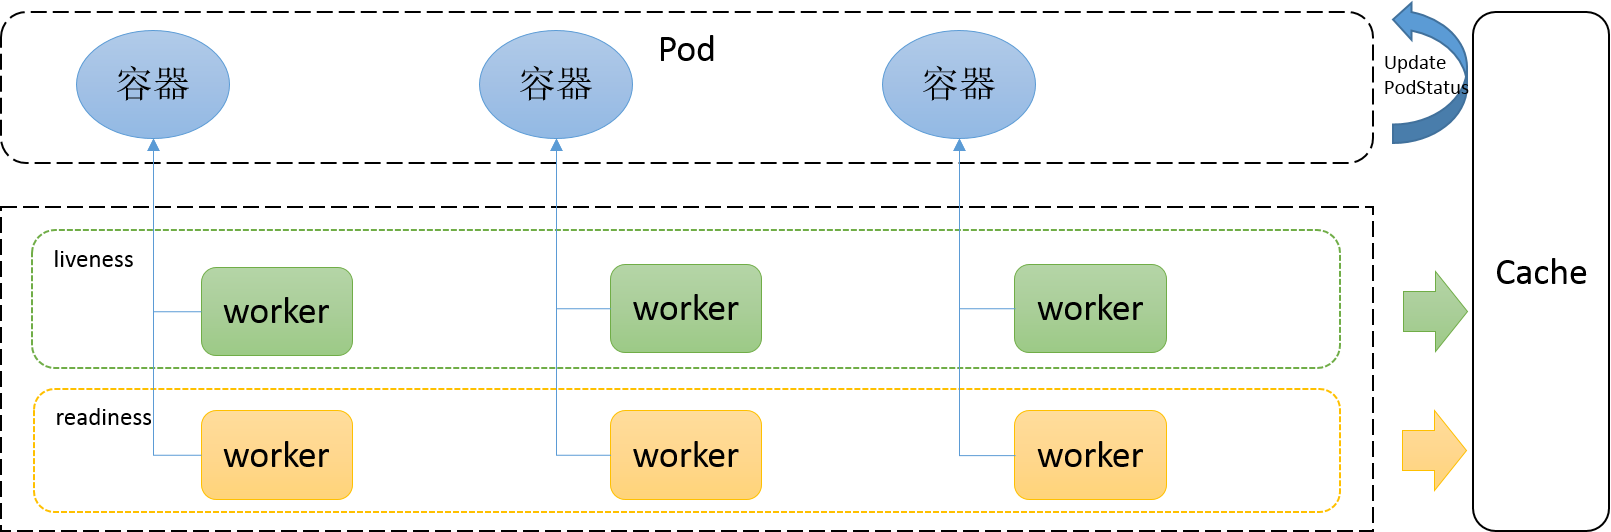
3.一“探”究竟
先看一下探测的struct
type Probe struct {

    // The action taken to determine the health of a container

    Handler `json:",inline" protobuf:"bytes,1,opt,name=handler"`

    // Number of seconds after the container has started before liveness probes are initiated.

    // More info: https://kubernetes.io/docs/concepts/workloads/pods/pod-lifecycle#container-probes

    // +optional

    InitialDelaySeconds int32 `json:"initialDelaySeconds,omitempty" protobuf:"varint,2,opt,name=initialDelaySeconds"`

    // Number of seconds after which the probe times out.

    // Defaults to 1 second. Minimum value is 1.

    // More info: https://kubernetes.io/docs/concepts/workloads/pods/pod-lifecycle#container-probes

    // +optional

    TimeoutSeconds int32 `json:"timeoutSeconds,omitempty" protobuf:"varint,3,opt,name=timeoutSeconds"`

    // How often (in seconds) to perform the probe.

    // Default to 10 seconds. Minimum value is 1.

    // +optional

    PeriodSeconds int32 `json:"periodSeconds,omitempty" protobuf:"varint,4,opt,name=periodSeconds"`

    // Minimum consecutive successes for the probe to be considered successful after having failed.

    // Defaults to 1. Must be 1 for liveness. Minimum value is 1.

    // +optional

    SuccessThreshold int32 `json:"successThreshold,omitempty" protobuf:"varint,5,opt,name=successThreshold"`

    // Minimum consecutive failures for the probe to be considered failed after having succeeded.

    // Defaults to 3. Minimum value is 1.

    // +optional

    FailureThreshold int32 `json:"failureThreshold,omitempty" protobuf:"varint,6,opt,name=failureThreshold"`

}
initialDelaySeconds: 表示容器启动之后延迟多久进行liveness探测
timeoutSeconds:每次执行探测的超时时间
periodSeconds:探测的周期时间
successThreshold:最少连续几次探测成功的次数,满足该次数则认为success。
failureThreshold:最少连续几次探测失败的次数,满足该次数则认为fail
Handler:
不论是liveness还是readiness都支持3种类型的探测方式:执行命令、http方式以及tcp方式。
// Handler defines a specific action that should be taken

// TODO: pass structured data to these actions, and document that data here.

type Handler struct {

    // One and only one of the following should be specified.

    // Exec specifies the action to take.

    // +optional

    Exec *ExecAction `json:"exec,omitempty" protobuf:"bytes,1,opt,name=exec"`

    // HTTPGet specifies the http request to perform.

    // +optional

    HTTPGet *HTTPGetAction `json:"httpGet,omitempty" protobuf:"bytes,2,opt,name=httpGet"`

    // TCPSocket specifies an action involving a TCP port.

    // TCP hooks not yet supported

    // TODO: implement a realistic TCP lifecycle hook

    // +optional

    TCPSocket *TCPSocketAction `json:"tcpSocket,omitempty" protobuf:"bytes,3,opt,name=tcpSocket"`

}
接下来看一下prober.go中的runProbe方法。
func (pb *prober) runProbe(probeType probeType, p *v1.Probe, pod *v1.Pod, status v1.PodStatus, container v1.Container, containerID kubecontainer.ContainerID) (probe.Result, string, error) {

    timeout := time.Duration(p.TimeoutSeconds) * time.Second

    if p.Exec != nil {

        glog.V(4).Infof("Exec-Probe Pod: %v, Container: %v, Command: %v", pod, container, p.Exec.Command)

        command := kubecontainer.ExpandContainerCommandOnlyStatic(p.Exec.Command, container.Env)

        return pb.exec.Probe(pb.newExecInContainer(container, containerID, command, timeout))

    }

    if p.HTTPGet != nil {

        scheme := strings.ToLower(string(p.HTTPGet.Scheme))

        host := p.HTTPGet.Host

        if host == "" {

            host = status.PodIP

        }

        port, err := extractPort(p.HTTPGet.Port, container)

        if err != nil {

            return probe.Unknown, "", err

        }

        path := p.HTTPGet.Path

        glog.V(4).Infof("HTTP-Probe Host: %v://%v, Port: %v, Path: %v", scheme, host, port, path)

        url := formatURL(scheme, host, port, path)

        headers := buildHeader(p.HTTPGet.HTTPHeaders)

        glog.V(4).Infof("HTTP-Probe Headers: %v", headers)

        if probeType == liveness {

            return pb.livenessHttp.Probe(url, headers, timeout)

        } else { // readiness

            return pb.readinessHttp.Probe(url, headers, timeout)

        }

    }

    if p.TCPSocket != nil {

        port, err := extractPort(p.TCPSocket.Port, container)

        if err != nil {

            return probe.Unknown, "", err

        }

        host := p.TCPSocket.Host

        if host == "" {

            host = status.PodIP

        }

        glog.V(4).Infof("TCP-Probe Host: %v, Port: %v, Timeout: %v", host, port, timeout)

        return pb.tcp.Probe(host, port, timeout)

    }

    glog.Warningf("Failed to find probe builder for container: %v", container)

    return probe.Unknown, "", fmt.Errorf("Missing probe handler for %s:%s", format.Pod(pod), container.Name)

}
1.执行命令方式
通过newExecInContainer方法调用CRI执行命令:
// ExecAction describes a "run in container" action.

type ExecAction struct {

    // Command is the command line to execute inside the container, the working directory for the

    // command  is root ('/') in the container's filesystem. The command is simply exec'd, it is

    // not run inside a shell, so traditional shell instructions ('|', etc) won't work. To use

    // a shell, you need to explicitly call out to that shell.

    // Exit status of 0 is treated as live/healthy and non-zero is unhealthy.

    // +optional

    Command []string `json:"command,omitempty" protobuf:"bytes,1,rep,name=command"`

}
2.http GET方式
通过http GET方式进行探测。
Port:表示访问容器的端口
Host:表示访问的主机,默认是Pod IP
// HTTPGetAction describes an action based on HTTP Get requests.

type HTTPGetAction struct {

    // Path to access on the HTTP server.

    // +optional

    Path string `json:"path,omitempty" protobuf:"bytes,1,opt,name=path"`

    // Name or number of the port to access on the container.

    // Number must be in the range 1 to 65535.

    // Name must be an IANA_SVC_NAME.

    Port intstr.IntOrString `json:"port" protobuf:"bytes,2,opt,name=port"`

    // Host name to connect to, defaults to the pod IP. You probably want to set

    // "Host" in httpHeaders instead.

    // +optional

    Host string `json:"host,omitempty" protobuf:"bytes,3,opt,name=host"`

    // Scheme to use for connecting to the host.

    // Defaults to HTTP.

    // +optional

    Scheme URIScheme `json:"scheme,omitempty" protobuf:"bytes,4,opt,name=scheme,casttype=URIScheme"`

    // Custom headers to set in the request. HTTP allows repeated headers.

    // +optional

    HTTPHeaders []HTTPHeader `json:"httpHeaders,omitempty" protobuf:"bytes,5,rep,name=httpHeaders"`

}
3.tcp方式
通过设置主机和端口即可进行tcp方式访问
// TCPSocketAction describes an action based on opening a socket

type TCPSocketAction struct {

    // Number or name of the port to access on the container.

    // Number must be in the range 1 to 65535.

    // Name must be an IANA_SVC_NAME.

    Port intstr.IntOrString `json:"port" protobuf:"bytes,1,opt,name=port"`

    // Optional: Host name to connect to, defaults to the pod IP.

    // +optional

    Host string `json:"host,omitempty" protobuf:"bytes,2,opt,name=host"`

}
此处脑洞一下:如果三种探测方式都设置了,会如何执行处理?
思考
通过k8s部署生产环境应用时,建议设置上liveness和readiness, 这也是保障服务稳定性的最佳实践。
另外由于Pod Ready不能保证实际的业务应用Ready可用,在最新的 1.14 版本中新增了一个Pod Readiness Gates 特性 。通过这个特性,可以保证应用Ready后进而设置Pod Ready。
结尾
针对上面的脑洞:如果三种探测方式都设置了,会如何执行处理?
答:我们如果在Pod中设置多个探测方式,提交配置的时候会直接报错:
此处继续源代码:在validation.go中validateHandler中进行了限制(也为上面Handler struct提到的"One and only one of the following should be specified."提供了事实依据)
func validateHandler(handler *core.Handler, fldPath *field.Path) field.ErrorList {

    numHandlers := 0

    allErrors := field.ErrorList{}

    if handler.Exec != nil {

        if numHandlers > 0 {

            allErrors = append(allErrors, field.Forbidden(fldPath.Child("exec"), "may not specify more than 1 handler type"))

        } else {

            numHandlers++

            allErrors = append(allErrors, validateExecAction(handler.Exec, fldPath.Child("exec"))...)

        }

    }

    if handler.HTTPGet != nil {

        if numHandlers > 0 {

            allErrors = append(allErrors, field.Forbidden(fldPath.Child("httpGet"), "may not specify more than 1 handler type"))

        } else {

            numHandlers++

            allErrors = append(allErrors, validateHTTPGetAction(handler.HTTPGet, fldPath.Child("httpGet"))...)

        }

    }

    if handler.TCPSocket != nil {

        if numHandlers > 0 {

            allErrors = append(allErrors, field.Forbidden(fldPath.Child("tcpSocket"), "may not specify more than 1 handler type"))

        } else {

            numHandlers++

            allErrors = append(allErrors, validateTCPSocketAction(handler.TCPSocket, fldPath.Child("tcpSocket"))...)

        }

    }

    if numHandlers == 0 {

        allErrors = append(allErrors, field.Required(fldPath, "must specify a handler type"))

    }

    return allErrors

}
本文作者:元毅
本文为云栖社区原创内容,未经允许不得转载。
K8s中Pod健康检查源代码分析的更多相关文章
- Kubernetes中Pod健康检查
目录 1.何为健康检查 2.探针分类 2.1.LivenessProbe探针(存活性探测) 2.2.ReadinessProbe探针(就绪型探测) 3.探针实现方法 3.1.Container Exe ...
- Knative Serving 健康检查机制分析
作者| 阿里云智能事业群技术专家牛秋霖(冬岛) 导读:从头开发一个Serverless引擎并不是一件容易的事情,今天咱们就从Knative的健康检查说起.通过健康检查这一个点来看看Serverles ...
- kubernetes之pod健康检查
目录 kubernetes之pod健康检查 1.概述和分类 2.LivenessProbe探针(存活性探测) 3.ReadinessProbe探针(就绪型探测) 4.探针的实现方式 4.1.ExecA ...
- 如何从Serilog请求日志记录中排除健康检查终结点
这是在ASP.NET Core 3.X中使用Serilog.AspNetCore系列文章的第四篇文章:. 第1部分-使用Serilog RequestLogging减少日志详细程度 第2部分-使用Se ...
- Java中arraylist和linkedlist源代码分析与性能比較
Java中arraylist和linkedlist源代码分析与性能比較 1,简单介绍 在java开发中比較经常使用的数据结构是arraylist和linkedlist,本文主要从源代码角度分析arra ...
- 在.NET Core 中实现健康检查
.NET Core中提供了开箱即用的运行状况检查,首先,我将在.NET Core API应用程序中执行运行状况检查,接下来,我们将使用DbContext集成SQL Server或数据库的运行状况检查, ...
- 如何在 ASP.Net Core 中实现 健康检查
健康检查 常用于判断一个应用程序能否对 request 请求进行响应,ASP.Net Core 2.2 中引入了 健康检查 中间件用于报告应用程序的健康状态. ASP.Net Core 中的 健康检查 ...
- k8s 中 Pod 的控制器
k8s 中 Pod 的控制器 前言 Replication Controller ReplicaSet Deployment 更新 Deployment 回滚 deployment StatefulS ...
- pod健康检查(liveness probe存活探针&&readiness probe 可读性探针)
在Kubernetes集群当中,我们可以通过配置liveness probe(存活探针)和readiness probe(可读性探针)来影响容器的生存周期.参考文档:https://kubernete ...
随机推荐
- 【springmvc学习】常用注解总结
@Controller 在springmvc中,我们用它来告诉前端控制器,他这个类是controller,也就是springmvc的一个对象了,我们在spring.xml配置文件中用<conte ...
- jnhs-Myeclipse 10注册教程unable to access jarfile cracker.jar
直接双击jar文件就可以 打开后,随便写一个名字 然后复制LICENSE_KEY的内容,打开myeclipse 在Code那里粘贴你刚才复制的内容,然后点击Save & Active Now ...
- 下载android4.4.2源代码全过程(附已下载的源代码)
版权声明:本文为博主原创文章,未经博主同意不得转载. https://blog.csdn.net/maosidiaoxian/article/details/36625727 今天在下载andriod ...
- NLog系列之NLong.config变量配置篇
$ {cached} - 将缓存应用于另一个布局输出. $ {db-null} - 为数据库渲染DbNull $ {exception} - 通过调用Logger方法之一提供的异常信息 $ {lev ...
- JavaBean与Map的相互转换
package com.bizvane.utils.tools; import java.lang.reflect.Field; import java.util.Arrays; import jav ...
- vue-eslint配置文件
做项目的时候,我把eslint设置为了false,可想而知提交会产生的冲突 让我一个一个解决肯定不可能的,eslint的rule很多 在vue的配置文件.eslintrc.js中配置以下选项 这样只需 ...
- 用 Python 写一个 NoSQL 数据库Python
NoSQL 这个词在近些年正变得随处可见. 但是到底 “NoSQL” 指的是什么? 它是如何并且为什么这么有用? 在本文, 我们将会通过纯 Python (我比较喜欢叫它, “轻结构化的伪代码”) 写 ...
- NoSQL最新现状和趋势:云NoSQL数据库将成重要增长引擎
NoSQL最早起源于1998年,但从2009年开始,NoSQL真正开始逐渐兴起和发展.回望历史应该说NoSQL数据库的兴起,完全是十年来伴随互联网技术,大数据数据的兴起和发展,NoSQL在面临大数据场 ...
- ACdream 1007 (快速幂)
题目链接 a + b Time Limit: 2000/1000MS (Java/Others)Memory Limit: 128000/64000KB (Java/Others) Problem D ...
- switch或判断
<?php $num1 = 1; $num2 = 2; function int($num){ switch($num){ case 1: case 2: echo "1或2" ...