【FastDFS】小伙伴们说在CentOS 8服务器上搭建FastDFS环境总报错?
写在前面
在【冰河技术】微信公众号的【分布式存储】专题中,我们分别搭建了单节点FastDFS环境和高可用FastDFS集群环境。但是,之前的环境都是基于CentOS 6.8服务器进行搭建的。很多小伙伴反馈说:自己在CentOS 8服务器上,按照我写的文章搭建FastDFS环境时,会失败!看到小伙伴们的这些问题,我今天就给大家分享下如何在CentOS 8服务器上搭建FastDFS环境。
什么是FastDFS?
这里,我就摘录下百度百科上对于FastDFS的描述。
FastDFS是一个开源的轻量级分布式文件系统,它对文件进行管理,功能包括:文件存储、文件同步、文件访问(文件上传、文件下载)等,解决了大容量存储和负载均衡的问题。特别适合以文件为载体的在线服务,如相册网站、视频网站等等。
FastDFS为互联网量身定制,充分考虑了冗余备份、负载均衡、线性扩容等机制,并注重高可用、高性能等指标,使用FastDFS很容易搭建一套高性能的文件服务器集群提供文件上传、下载等服务。
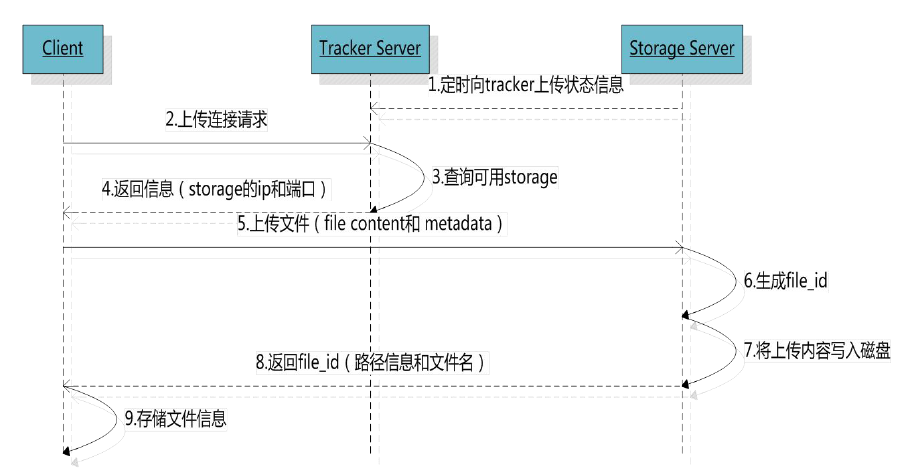
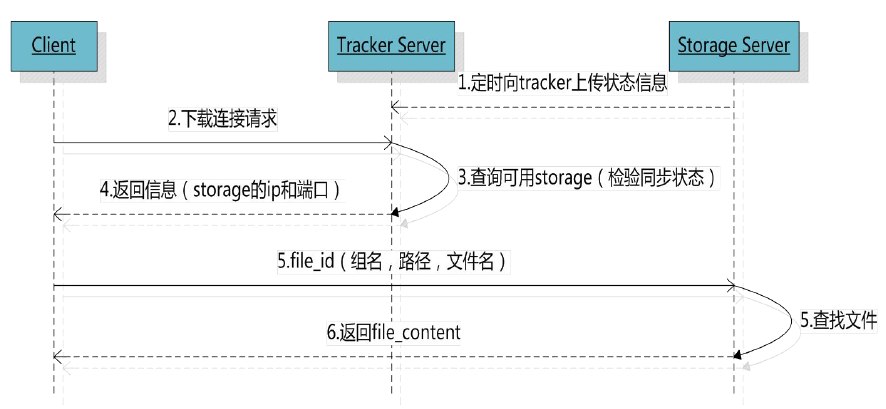
文件上传下载流程
这里,我们用两张图分别来说明下FastDFS文件上传和下载的过程。这样,小伙伴们也能一目了然的看到FastDFS的执行流程。
文件上传
文件下载
了解了FastDFS的这些基本知识之后。接下来,我们就一起来看看如何在CentOS 8服务器上搭建FastDFS环境。
服务器版本
在正式开始搭建FastDFS环境之前,我们先确定下服务器的版本,这里我使用的CentOS服务器的内核版本为:release 8.1.1911,如下所示。
[root@binghe lib]# cat /etc/redhat-release

CentOS Linux release 8.1.1911 (Core)
下载FastDFS
这里,我们使用的FastDFS版本为6.0.6,官方的地址为:https://github.com/happyfish100
在FastDFS 6.0.6中,有三个子模块,如下所示。
fastdfs v6.06

libfastcommon v1.0.43

fastdfs-nginx-module   v 1.22
我们可以在CentOS 8服务器的命令行执行如下命令来下载这些模块。
[root@binghe source]# wget https://github.com/happyfish100/fastdfs/archive/V6.06.tar.gz

[root@binghe source]# wget https://github.com/happyfish100/fastdfs-nginx-module/archive/V1.22.tar.gz

[root@binghe source]# wget https://github.com/happyfish100/libfastcommon/archive/V1.0.43.tar.gz
下载Nginx
Nginx的官方网址为:http://nginx.org/
我们可以在CentOS 8服务器命令行输入如下命令下载Nginx。
[root@binghe source]# wget http://nginx.org/download/nginx-1.17.8.tar.gz
安装FastDFS依赖
[root@binghe dest]# yum install gcc gcc-c++

[root@binghe dest]# yum install libtool zlib zlib-devel openssl openssl-devel

[root@binghe dest]# yum -y install pcre pcre-devel libevent libevent-devel perl unzip net-tools wget
安装libfastcommon
解压libfastcommon的压缩包
[root@binghe source]# tar -zxvf V1.0.43.tar.gz
编译并安装
[root@binghe source]# cd libfastcommon-1.0.43/

[root@binghe libfastcommon-1.0.43]# ./make.sh && ./make.sh install
测试安装结果
[root@binghe libfastcommon-1.0.43]# ls /usr/lib64|grep libfastcommon

libfastcommon.so

[root@binghe libfastcommon-1.0.43]# ls /usr/lib|grep libfastcommon

libfastcommon.so
编译安装fastdfs
解压FastDFS
[root@binghe source]# tar -zxvf V6.06.tar.gz
安装FastDFS
[root@binghe source]# cd fastdfs-6.06/

[root@binghe fastdfs-6.06]# ./make.sh && ./make.sh install
查看FastDFS的安装情况
[root@binghe fastdfs-6.06]# ls /usr/bin|grep fdfs

fdfs_appender_test

fdfs_appender_test1

fdfs_append_file

fdfs_crc32

fdfs_delete_file

fdfs_download_file

fdfs_file_info

fdfs_monitor

fdfs_regenerate_filename

fdfs_storaged

fdfs_test

fdfs_test1

fdfs_trackerd

fdfs_upload_appender

fdfs_upload_file
修改FastDFS配置文件
[root@binghe fastdfs-6.06]# cd /etc/fdfs/

[root@binghe fdfs]# cp storage.conf.sample storage.conf

[root@binghe fdfs]# cp client.conf.sample client.conf

[root@binghe fdfs]# cp tracker.conf.sample tracker.conf
启动FastDFS
启动tracker服务
(1)创建tracker服务所需的目录
[root@binghe fdfs]# mkdir /data/fastdfs

[root@binghe fdfs]# mkdir /data/fastdfs/tracker

[root@binghe fdfs]# chmod 777 /data/fastdfs/tracker
(2)配置tracker服务
修改 tracker.conf 文件。
[root@binghe fdfs]# vi /etc/fdfs/tracker.conf
只修改base_path一项的值为我们在上面所创建的目录即可。
base_path = /data/fastdfs/tracker
(3)启动 tracker 服务
[root@binghe fdfs]# /etc/init.d/fdfs_trackerd start
(4)检查tracker服务启动是否成功
[root@binghe fdfs]# ps auxfww | grep fdfs

root      15067  0.0  0.0  12320   964 pts/0    S+   01:14   0:00  |   |           \_ grep --color=auto fdfs

root      15026  0.0  0.1  90160  5940 ?        Sl   01:13   0:00 /usr/bin/fdfs_trackerd /etc/fdfs/tracker.conf
能看到 fdfs_trackerd,表示tracker服务启动成功
(5)检查tracker服务是否已绑定端口 22122
[root@binghe dest]# netstat -anp | grep 22122

tcp        0      0 0.0.0.0:22122           0.0.0.0:*               LISTEN      15026/fdfs_trackerd
说明: 22122端口是在/etc/fdfs/tracker.conf中定义的。如下所示:
# the tracker server port

port = 22122
启动storage服务
(1)创建storage服务所需的目录
[root@binghe fdfs]# mkdir /data/fastdfs/storage

[root@binghe fdfs]# chmod 777 /data/fastdfs/storage/
(2)配置storage服务
编辑storage的配置文件:
[root@binghe fdfs]# vi /etc/fdfs/storage.conf
各配置项包括:
配置base_path为上面所创建的storage目录,其中,store_path 为存储所在的目录,可以设置多个,注意从0开始。
base_path = /data/fastdfs/storage

store_path0 = /data/fastdfs/storage
配置tracker_server的ip和端口。
tracker_server = 192.168.175.100:22122
指定http服务的端口
http.server_port = 80
(3)启动storage服务
[root@binghe fdfs]# /etc/init.d/fdfs_storaged start

正在启动 fdfs_storaged (via systemctl):                   [  确定  ]
(4)检查storage服务启动是否成功?
[root@binghe fdfs]# ps auxfww | grep fdfs

root      15630  0.0  0.0  12320   972 pts/0    S+   15:46   0:00  |   |           \_ grep --color=auto fdfs

root      15026  0.0  0.1 155696  6964 ?        Sl   15:13   0:00 /usr/bin/fdfs_trackerd /etc/fdfs/tracker.conf

root      15573  2.7  1.7 150736 66292 ?        Sl   15:45   0:02 /usr/bin/fdfs_storaged /etc/fdfs/storage.conf
说明:看到fdfs_storaged,表示storage服务启动成功
(5)检查storage服务是否已绑定到端口:23000?
[root@binghe fdfs]# netstat -anp | grep 23000

tcp        0      0 0.0.0.0:23000           0.0.0.0:*               LISTEN      15573/fdfs_storaged
说明:23000 端口是在配置文件 /etc/fdfs/storage.conf中定义的,如下所示。
# the storage server port

port = 23000
配置客户端文件
(1)配置客户端要使用的client.conf
[root@binghe fdfs]# vi /etc/fdfs/client.conf
以下两项配置用到的tracker目录和服务器地址端口
base_path = /data/fastdfs/tracker

tracker_server = 192.168.175.100:22122
(2)从客户端的配置可以看到:客户端只需要了解tracker_server的信息,Tracker server作用也正是负载均衡和调度
(3)Storage server作用是文件存储,客户端上传的文件最终存储在 Storage 服务器上。
安装nginx及fastdfs-nginx-module
解压nginx:
[root@binghe source]# tar -zxvf nginx-1.17.8.tar.gz
解压fastdfs-nginx-module
[root@binghe source]# tar -zxvf V1.22.tar.gz
修改config文件
修改config文件,把/usr/local 替换成 /usr
[root@binghe source]# cd fastdfs-nginx-module-1.22/

[root@binghe fastdfs-nginx-module-1.22]# cd src

[root@binghe src]# vi config
配置Nginx
Nginx配置,添加fastdfs-nginx-module和http_stub_status_module 模块
[root@binghe fdfs]# cd /usr/local/source/nginx-1.17.8/

[root@binghe nginx-1.17.8]# ./configure --prefix=/usr/local/soft/nginx --with-http_stub_status_module --add-module=/usr/local/source/fastdfs-nginx-module-1.22/src/
编译安装Nginx
[root@binghe nginx-1.17.8]# make && make install
检查安装是否成功?
[root@binghe nginx-1.17.8]# ls /usr/local/soft/ | grep nginx

nginx
验证Nginx配置
[root@binghe fdfs]# /usr/local/soft/nginx/sbin/nginx -V

nginx version: nginx/1.17.8

built by gcc 8.3.1 20190507 (Red Hat 8.3.1-4) (GCC)

configure arguments: --prefix=/usr/local/soft/nginx --with-http_stub_status_module --add-module=/usr/local/source/fastdfs-nginx-module-1.22/src/
配置fastdfs-nginx-module
复制配置文件
[root@binghe nginx-1.17.8]# cp /usr/local/source/fastdfs-nginx-module-1.22/src/mod_fastdfs.conf /etc/fdfs/
编辑配置文件
[root@binghe nginx-1.17.8]# vi /etc/fdfs/mod_fastdfs.conf
配置以下几项
connect_timeout=10

tracker_server=192.168.175.100:22122

url_have_group_name = true

store_path0=/data/fastdfs/storage
复制Web配置文件
复制另两个web访问用到配置文件到fdfs配置目录下:
[root@binghe nginx-1.17.8]# cd /usr/local/source/fastdfs-6.06/conf/

[root@binghe conf]# cp http.conf /etc/fdfs/

[root@binghe conf]# cp mime.types /etc/fdfs/
配置nginx
编辑nginx的配置文件:
[root@binghe conf]# vi /usr/local/soft/nginx/conf/nginx.conf
在server listen 80 的这个server配置下面,
增加一个location
location ~/group([0-9]) {

	root  /data/fastdfs/storage/data;

	ngx_fastdfs_module;

}
启动nginx
启动Nginx
[root@binghe storage]# /usr/local/soft/nginx/sbin/nginx
检查nginx是否已成功启动
[root@binghe storage]# ps auxfww | grep nginx

root      24590  0.0  0.0  12320   980 pts/0    S+   16:44   0:00  |   |           \_ grep --color=auto nginx

root      24568  0.0  0.0  41044   428 ?        Ss   16:44   0:00  \_ nginx: master process /usr/local/soft/nginx/sbin/nginx

nobody    24569  0.0  0.1  74516  4940 ?        S    16:44   0:00      \_ nginx: worker process
测试图片上传
(1)命令行上传图片
[root@binghe storage]# /usr/bin/fdfs_upload_file /etc/fdfs/client.conf /home/binghe/image/test.jpg

group1/M00/00/00/Ch8FQl9txnyAfrePAADhyYH1AP4653.jpg
注意fdfs所返回的地址,我们需要使用这个地址进行访问
(2)打开浏览器:访问这个地址
http://192.168.175.100/group1/M00/00/00/Ch8FQl9txnyAfrePAADhyYH1AP4653.jpg
可以看到图片
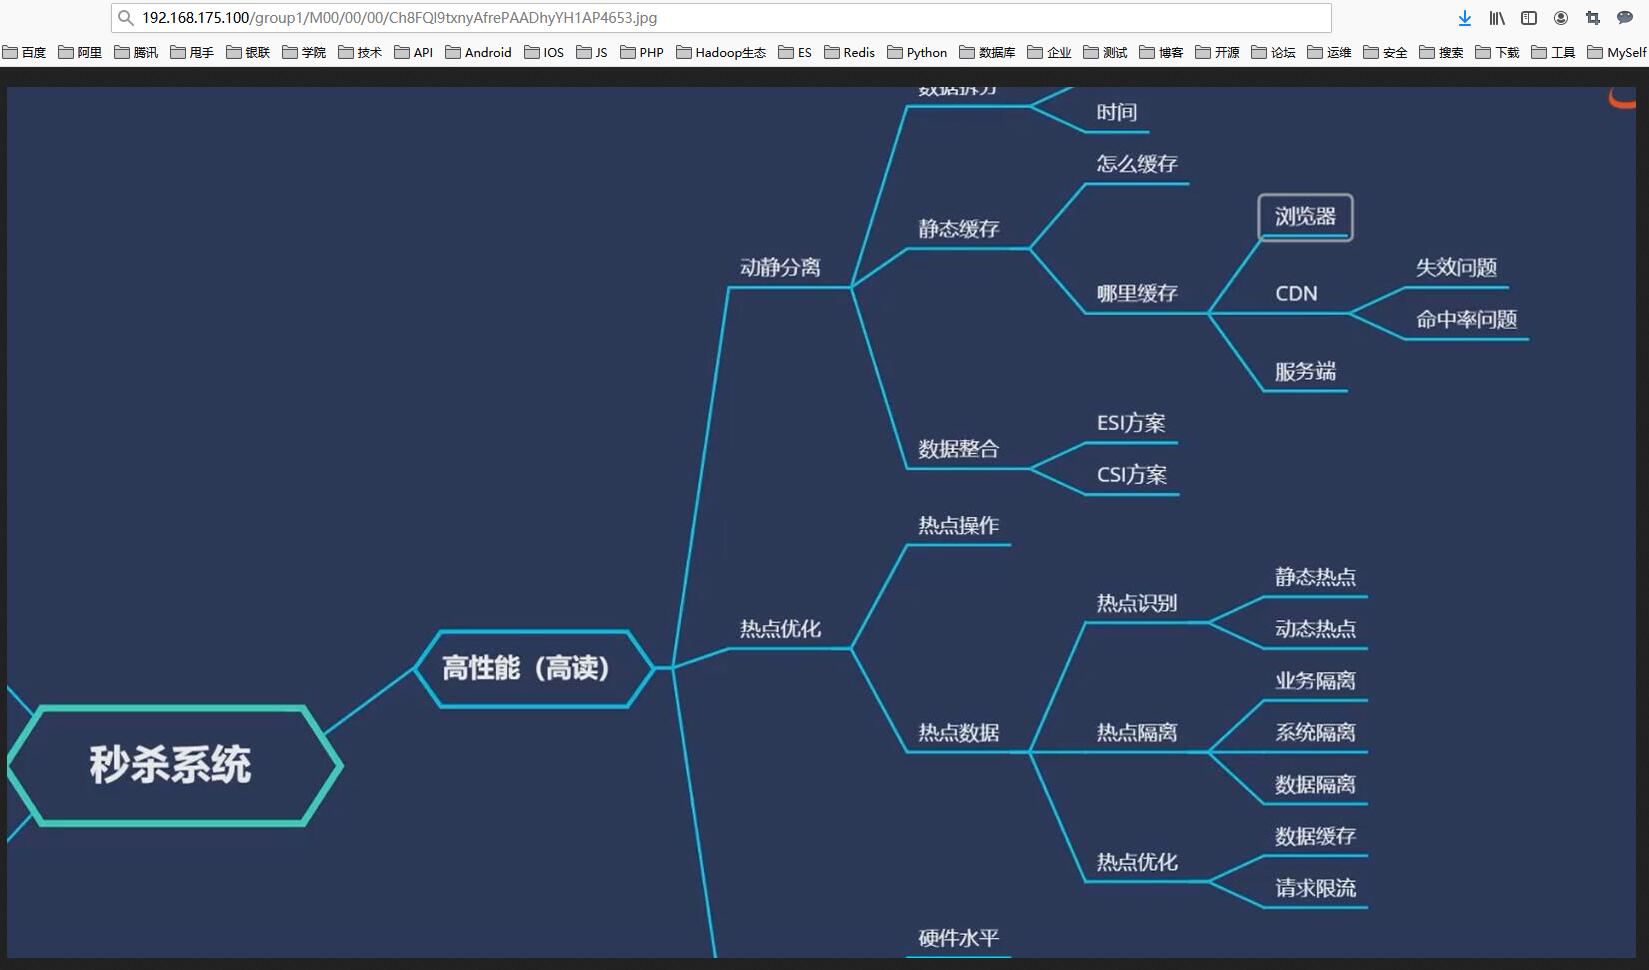
其中,192.168.175.100是拼接的本地服务器的ip
我门可以通过命令行来查看图片在服务器上的真实存储路径。
[root@binghe data]# pwd

/data/fastdfs/storage/data

[root@binghe data]# ls 00/00

Ch8FQl9txnyAfrePAADhyYH1AP4653.jpg
可见/group1/M00这两个目录是由fdfs所管理生成的目录,它们分别代表fdfs生成的组名和磁盘
FastDFS其他命令
查看fdfs的版本
[root@binghe data]# fdfs_monitor /etc/fdfs/client.conf | grep version

[2020-09-24 01:58:01] DEBUG - base_path=/data/fastdfs/tracker, connect_timeout=5, network_timeout=60, tracker_server_count=1, anti_steal_token=0, anti_steal_secret_key length=0, use_connection_pool=0, g_connection_pool_max_idle_time=3600s, use_storage_id=0, storage server id count: 0

version = 6.06
查看fdfs的运行状态
[root@binghe data]# fdfs_monitor /etc/fdfs/client.conf
好了,今天我们就到这儿吧,我是冰河,我们下期见!!
【FastDFS】小伙伴们说在CentOS 8服务器上搭建FastDFS环境总报错?的更多相关文章
- 在CentOS 8服务器上搭建FastDFS环境
什么是FastDFS? 这里,我就摘录下百度百科上对于FastDFS的描述. FastDFS是一个开源的轻量级分布式文件系统,它对文件进行管理,功能包括:文件存储.文件同步.文件访问(文件上传.文件下 ...
- 阿里云CentOS Linux服务器上搭建邮件服务器遇到的问题
参考文章: 阿里云CentOS Linux服务器上用postfix搭建邮件服务器 Linux系统下邮件服务器的搭建(Postfix+Dovecot) 本来想自己搭建邮件服务器,但是看到一篇资料表示阿里 ...
- 在服务器上搭建node环境
一般公司的发布是后台人员完成的,但是作为开发不会发布项目还是有点不高级的感觉 因为没有搭建虚拟机于是就直接在我阿里云的服务器上搭建了node环境, 第一步,前往node官网下载linux下的阿里云的镜 ...
- 基于CentOS 8服务器来搭建FastDFS高可用集群环境
服务器版本 我们在服务器的命令行输入如下命令来查看服务器的内核版本. [root@localhost lib]# cat /etc/redhat-release CentOS Linux releas ...
- 在linux服务器上搭建nvidia-docker环境
docker相当于一个容器,其可以根据你所需要的运行环境构建相应的运行环境,此时各个环境之间彼此隔离,就不会存在在需要跑一个新的代码的时候破坏原来跑的代码所需要的环境,各个环境之间彼此隔离开,好像一个 ...
- 服务器上搭建web环境
一.安装tomcat [root@localhost ~]# mkdir tomcat-src --新建文件夹 [root@localhost ~]# cd tomcat-src ...
- Linux服务器上搭建测试环境(war包+tomcat)
悟空CRM项目环境部署(Java war项目) 在/root目录下创建一个文件夹(名字自取). ls命令查看一下是否创建成功,看到了新建的文件夹说明创建成功. tomcat和war包的准备:可以使用X ...
- nginx服务器上遇到了acces denied,报错是fastCGI只要好好修改配置就行了
猜想: 懵逼 实践: 首先通用的方法,并没有解决问题. 1.修改php-fpm配置文件vim /etc/php-fpm.d/www.confuser = nginx 编辑用户为nginx ...
- 在邮箱服务器上执行Powershell命令Get-MessageTrackingLog 报错
开启对应的服务即可. 中文环境: 英文环境:
随机推荐
- 个人项目作业WC(JAVA)
GitHub地址:https://github.com/1666403186/WC 一.题目描述 Word Count1. 实现一个简单而完整的软件工具(源程序特征统计程序).2. 进行单元测试.回归 ...
- Improved robustness of reinforcement learning policies upon conversion to spiking neuronal network platforms applied to Atari Breakout game
郑重声明:原文参见标题,如有侵权,请联系作者,将会撤销发布! arXiv:1903.11012v3 [cs.LG] 19 Aug 2019 Neural Networks, 25 November 2 ...
- 【译】Database Profiling with Visual Studio
你是否在排查运行缓慢的 web 应用程序时怀疑是数据库层造成的?以前排查数据库层需要特定的工具,现在可以使用 Visual Studio 的 Performance Explorer 中的数据库分析工 ...
- Hive 常见面试题(一)
面试题: hive 内部表和外部表的区别? hive 是如何实现分区的? Hive 有哪些方式保存元数据,各有哪些优缺点? hive中order by.distribute by.sort by和cl ...
- JAVA虚拟机故障诊断总结
一.JAVA运行时数据区 1.堆(-Xmx与-Xms):所有线程共享. 目的:用来存放对象实例.所有对象实例和数组都要在堆上分配内存.JAVA堆是垃圾收集器管理的主要区域 ...
- python+requests+unittest执行自动化接口测试
1.安装requests.xlrd.json.unittest库 <1>pip 命令安装: pip install requestspip install xlrdpip install ...
- laravel使用snappy生成pdf问题及过程(本地环境)
1.安装过程可以按照这里进行https://packagist.org/packages/barryvdh/laravel-snappy 其中要按装好 "barryvdh/laravel-s ...
- 深入了解Kafka【五】Partition和消费者的关系
1.消费者与Partition 以下来自<kafak权威指南>第4章. 假设主题T1有四个分区. 1.1.一个消费者组 1.1.1.消费者数量小于分区数量 只有一个消费者时,消费者1将收到 ...
- HTML语言基本单词与css基本单词
DOCTYPE 文档 html 网页 head 头部 body 主体 title 题目 p 段落 color 颜色 style 样式 backgroun ...
- 获取.properties配置文件属性值
public class TestProperties { /** * * @Title: printAllProperty * @Description: 输出所有配置信息 * @param pro ...