2. 单主机 Elasticsearch 双节点或多节点集群环境部署
我已经买了一年的腾讯云轻量级服务器,并且安装好了ES,也做了一些系统配置,比如 修改vm.max_map_count、修改文件描述符数量
同时,也用ES安装目录下的
bin/elasticsearch脚本尝试了第一次启动 ES,并且用https://localhost:9200来访问它。本文,我打算在我的腾讯云服务器上搭一个双节点的环境,并且用上 kibana 来管理。
网上给出了两种方案:
- 把 elasticsearch.tar.gz 解压多次到不同的文件夹,每个文件夹作为一个节点,然后分别修改每个文件夹中的 elasticsearch.yml,再分别启动。比如 Elasticsearch 在本地单机多节点部署集群
- 把 elasticsearch.tar.gz 解压一次,然后准备多个YAML配置文件,然后启动时,每个节点用上不同的配置文件。比如 配置Elasticsearch
我倾向于第2种,可以把集群中的各个节点的配置文件放到一个文件夹下,方便查看。
1. 查看可执行文件 elasticsearch
使用命令 more bin/elasticsearch 查看启动脚本,如下图所示:
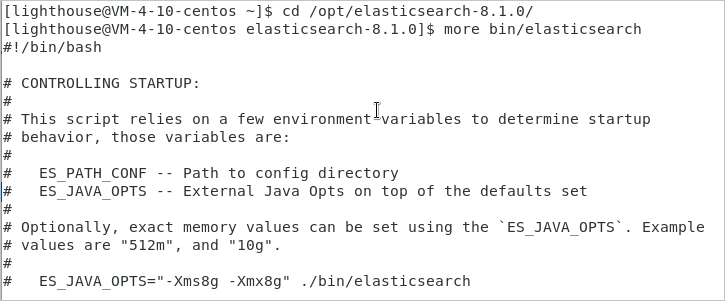
从启动脚本 elasticsearch 的头部注释可以看出,可以使用
ES_PATH_CONF=/path/to/custom/config ./bin/elasticsearch
这样的命令来指定启动节点时,使用不同的配置文件!
有了思路之后,接下来就开始实践。
2. 准备两个配置文件
| 配置项 | 节点1 | 节点2 |
|---|---|---|
| 节点名称 | node1 | node2 |
| 配置文件目录 | /opt/config/es-cluster/node1/ | /opt/config/es-cluster/node2/ |
| data目录 | /var/lib/es-cluster/node1 | /var/lib/es-cluster/node2 |
| log目录 | /var/log/es-cluster/node1 | /var/log/es-cluster/node2 |
执行以下命令创建目标文件夹和文件:
[lighthouse@centos ~]$ cd /opt

[lighthouse@centos opt]$ sudo mkdir config

[lighthouse@centos opt]$ cd config

[lighthouse@centos config]$ sudo mkdir es-cluster

[lighthouse@centos config]$ sudo chown elastic:elastic es-cluster/

[lighthouse@centos config]$ ls -al

total 12

drwxr-xr-x   3  root     root     4096  0ct  9  17:59  .

drwxr-xr-x.  6  root     root     4096  0ct  9  17:59  ..

drwxr-xr-x.  2  elastic  elastic  4096  0ct  9  17:59  es-cluster

[lighthouse@centos config]$ su elastic

Password:

[elastic@centos config]$ cd es-cluster

[elastic@centos es-cluster]$ mkdir node1

[elastic@centos es-cluster]$ mkdir node2

[elastic@centos es-cluster]$ touch node1/elasticsearch.yml

[elastic@centos es-cluster]$ touch node2/elasticsearch.yml

[elastic@centos es-cluster]$ exit

[lighthouse@centos es-cluster]$ cd /var/lib

[lighthouse@centos lib]$ sudo mkdir es-cluster

[lighthouse@centos lib]$ cd es-cluster

[lighthouse@centos es-cluster]$ sudo mkdir node1

[lighthouse@centos es-cluster]$ sudo mkdir node2

[lighthouse@centos es-cluster]$ cd ..

[lighthouse@centos lib]$ sudo chown -R elastic:elastic es-cluster/

[lighthouse@centos lib]$ cd /var/log

[lighthouse@centos log]$ sudo mkdir es-cluster

[lighthouse@centos log]$ cd es-cluster

[lighthouse@centos es-cluster]$ sudo mkdir node1

[lighthouse@centos es-cluster]$ sudo mkdir node2

[lighthouse@centos es-cluster]$ cd ..

[lighthouse@centos log]$ sudo chown -R elastic:elastic es-cluster/
修改 node1/elasticsearch.yml 内容如下:
cluster.name: es-cluster

node.name: node1

node.roles: ["master", "data", "ingest"]

network.host: 10.0.4.10

http.port: 9200

transport.port: 9300

path:

  data: /var/lib/es-cluster/node1

  logs: /var/log/es-cluster/node1

discovery.seed_hosts:

  - 10.0.4.10:9300

  - 10.0.4.10:9301

cluster.initial_master_nodes:

  - node1

  - node2

xpack.security.enabled: false

xpack.security.transport.ssl.enabled: false
修改 node2/elasticsearch.yml 内容如下:
cluster.name: es-cluster

node.name: node2

node.roles: ["master", "data", "ingest"]

network.host: 10.0.4.10

http.port: 9201

transport.port: 9301

path:

  data: /var/lib/es-cluster/node2

  logs: /var/log/es-cluster/node2

discovery.seed_hosts:

  - 10.0.4.10:9300

  - 10.0.4.10:9301

cluster.initial_master_nodes:

  - node1

  - node2

xpack.security.enabled: false

xpack.security.transport.ssl.enabled: false
3. 启动两个es实例
[lighthouse@centos es-cluster]$ su elastic

Password:

[elastic@centos es-cluster]$ cd /opt/elasticsearch-8.1.0

[elastic@centos elasticsearch-8.1.0]$ ES_PATH_CONF=/opt/config/es-cluster/node1 ES_JAVA_OPTS="-Xms256m -Xmx256m" ./bin/elasticsearch -d

[elastic@centos elasticsearch-8.1.0]$ ES_PATH_CONF=/opt/config/es-cluster/node2 ES_JAVA_OPTS="-Xms256m -Xmx256m" ./bin/elasticsearch -d
首次尝试启动时,遇到异常报错 Exception in thread "main" java.nio.file.NoSuchFileException: /opt/config/es-cluster/node1/jvm.options
于是,执行命令拷贝 jvm.options 文件:
[elastic@centos elasticsearch-8.1.0]$ cp config/jvm.options /opt/config/es-cluster/node1

[elastic@centos elasticsearch-8.1.0]$ cp config/jvm.options /opt/config/es-cluster/node2
类似地,还会出现错误 ERROR: no log4j2.properties found; tried [/opt/config/es-cluster/node2] and its subdirectories
因此,执行命令拷贝 log4j2.properties 文件:
[elastic@centos elasticsearch-8.1.0]$ cp config/log4j2.properties /opt/config/es-cluster/node1

[elastic@centos elasticsearch-8.1.0]$ cp config/log4j2.properties /opt/config/es-cluster/node2
4. Kibana
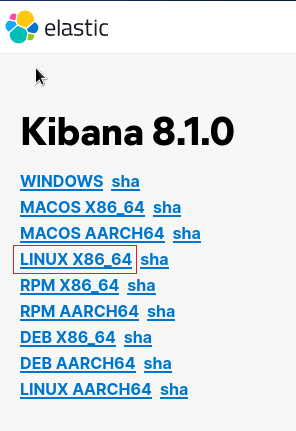
4.1 下载Kibana
https://www.elastic.co/cn/downloads/past-releases#kibana
选择:8.1.0版本下载,如下图所示:

选择:LINUX_X86_64,如下图所示:
解压并把 kibana 移动到目标文件夹:
[lighthouse@centos Downloads]$ tar -zxvf kibana-8.1.0-linux-x86_64.tar.gz

[lighthouse@centos Downloads]$ sudo mv kibana-8.1.0 /opt/kibana-8.1.0
4.2 修改kibana.yml配置
使用命令 cd /opt/kibana-8.1.0/config 进入配置文件夹,再用命令 vim kibana.yml 修改文件
server.port: 5601

server.host: "10.0.4.10"

elasticsearch.hosts: ["http://10.0.4.10:9200"]

server.publicBaseUrl: "http://10.0.4.10:5601"
server.publicBaseUrl is missing and should be configured when running in a production environment. Some features may not behave correctly. See the documentation.
报错解决方案
4.3 启动kibana
nohup ./bin/kibana --allow-root & > /dev/null 2>&1
kibana 使用
ps -ef|grep kibana是查不到进程的,主要原因大概是因为 kibana 是 node 写的。所以 kibana 运行的时候是运行在 node 里面。所以,可以使用
ps -ef|grep node查看到进程。
kibana 启动成功后,可以在浏览器中访问:

选择 Explore on my own,新手暂时不需要添加整合 Add integrations。
2. 单主机 Elasticsearch 双节点或多节点集群环境部署的更多相关文章
- MySQL+MGR 单主模式和多主模式的集群环境 - 部署手册 (Centos7.5)
MySQL Group Replication(简称MGR)是MySQL官方于2016年12月推出的一个全新的高可用与高扩展的解决方案.MGR是MySQL官方在5.7.17版本引进的一个数据库高可用与 ...
- Centos7.5基于MySQL5.7的 InnoDB Cluster 多节点高可用集群环境部署记录
一. MySQL InnoDB Cluster 介绍MySQL的高可用架构无论是社区还是官方,一直在技术上进行探索,这么多年提出了多种解决方案,比如MMM, MHA, NDB Cluster, G ...
- Kafka 单节点多Kafka Broker集群
Kafka 单节点多Kafka Broker集群 接前一篇文章,今天搭建一下单节点多Kafka Broker集群环境. 配置与启动服务 由于是在一个节点上启动多个 Kafka Broker实例,所以我 ...
- windows单节点下安装es集群
linux下的es的tar包,拖到windows下,配置后,启动bin目录下的bat文件,也是可以正常运行的. 从linux下拷的tar包,需要修改虚拟机的内存elasticsearch.in.bat ...
- redhat6.5 redis单节点多实例3A集群搭建
在进行搭建redis3M 集群之前,首先要明白如何在单节点上完成redis的搭建. 单节点单实例搭建可以参看这个网:https://www.cnblogs.com/butterflies/p/9628 ...
- ElasticSearch高可用集群环境搭建和分片原理
1.ES是如何实现分布式高并发全文检索 2.简单介绍ES分片Shards分片技术 3.为什么ES主分片对应的备分片不在同一台节点存放 4.索引的主分片定义好后为什么不能做修改 5.ES如何实现高可用容 ...
- ELK 中的elasticsearch 集群的部署
本文内容 背景 ES集群中第一个master节点 ES slave节点 本文总结 Elasticsearch(以下简称ES)搭建集群的经验.以 Elasticsearch-rtf-2.2.1 版本为例 ...
- Redis 单例、主从模式、sentinel 以及集群的配置方式及优缺点对比(转)
摘要: redis作为一种NoSql数据库,其提供了一种高效的缓存方案,本文则主要对其单例,主从模式,sentinel以及集群的配置方式进行说明,对比其优缺点,阐述redis作为一种缓存框架的高可用性 ...
- ElasticSearch 5.2.2 集群环境的搭建
在之前 ElasticSearch 搭建好之后,我们通过 elasticsearch-header 插件在查看 ES 服务的时候,发现 cluster-health 显示的是 YELLOW. Why? ...
随机推荐
- powershell和cmd对比
前言 计算机啊这东西,本质上是硬件和软件的综合体.如果只有硬件没有软件的话,这也是台辣鸡而已.而计算机软件中最靠近硬件的一层,就是操作系统层. 操作系统有很多种,比如Unix/Linux/Mac OS ...
- 【原创】Selenium获取请求头、响应头
本文仅供学习交流使用,如侵立删! Selenium获取请求头.响应头 操作环境 win10 . mac Python3.9 selenium.seleniumwire selenium是没有办法直接获 ...
- 正则表达式实战:最新豆瓣top250爬虫超详细教程
检查网页源代码 首先让我们来检查豆瓣top250的源代码,一切网页爬虫都需要从这里开始.F12打开开发者模式,在元素(element)页面通过Ctrl+F直接搜索你想要爬取的内容,然后就可以开始编写正 ...
- Redis 07 有序集合
参考源 https://www.bilibili.com/video/BV1S54y1R7SB?spm_id_from=333.999.0.0 版本 本文章基于 Redis 6.2.6 Zset 就是 ...
- dentry的引用计数不对导致的crash
[17528853.189372] python invoked oom-killer: gfp_mask=0xd0, order=0, oom_score_adj=-998[17528853.189 ...
- 2020牛客NOIP赛前集训营-提高组(第三场) C - 牛半仙的妹子Tree (树链剖分)
昨天教练问我:你用树剖做这道题,怎么全部清空状态呢? 我:???不是懒标记就完了??? 教练:树剖不是要建很多棵线段树吗,不止log个,你要一个一个清? 我:为什么要建很多棵线段树? ...
- 好好回答下 TCP 和 UDP 的区别
写了这么多篇关于 TCP 和 UDP 的文章,还没有好好聊过这两个协议的区别,这篇文章我们就来开诚布公的谈一谈. 关于 TCP 和 UDP ,想必大家都看过一张这样的图. 有一个小姑娘在对着瓶口慢慢的 ...
- 完全解析Array.apply(null, { length: 1000 })
Array.apply(null, { length: 1000 }) 点击打开视频讲解更加详细 在阅读VueJS教程时有这么段demo code: render: function (createE ...
- KingbaseFlySync 专用机版本升级
关键字: KingbaseFlySync.Linux.x86_64.mips64el.aarch64.Java 专线机版本升级 1.备份kfs配置文件和rename问题,kufl目录 fsrepctl ...
- Java开发学习(三十二)----Maven多环境配置切换与跳过测试的三种方式
一.多环境开发 我们平常都是在自己的开发环境进行开发, 当开发完成后,需要把开发的功能部署到测试环境供测试人员进行测试使用, 等测试人员测试通过后,我们会将项目部署到生成环境上线使用. 这个时候就有一 ...