centos 7.5 最小化安装
参考:https://www.tecmint.com/centos-7-installation/
===================================================
centos安装时的分区
最少有一个根分区(/),存放系统文件及程序
一个swap分区,相当于window的虚拟内存,一般是物理内存的1.5倍(<8G时);如果物理内存大于8G,swap分区配置8-16G即可,太大无用
/boot分区,引导分区,存放系统引导文件,如linux内核;所有文件大小一般只有几十MB,可以设置100-200MB
/boot,ext4,200M,强制为主分区
========================分割线=======================
This tutorial will guide you on how to perform a minimal installation of latest version of CentOS 7.0, using the binary DVD ISO image, an installation that is best suitable for developing a future customizable server platform, with no Graphical User Interface, where you can install only the software that you need.
Installation of CentOS 7
If you want to find out more about what’s new in this release of CentOS 7.0 holds and download links, I suggest reading the previous article on release announcements:
Requirements
- CentOS 7.0 DVD ISO
CentOS 7.0 Installation Process
1. After downloading the last version of CentOS using above links or using official CentOS download page. Burn it to a DVD or create a bootable USB stick using LiveUSB Creator called Unetbootin.
2. After you have created the installer bootable media, place your DVD/USB into your system appropriate drive, start the computer, select your bootable unit and the first CentOS 7 prompt should appear. At the prompt choose Install CentOS 7 and press [Enter] key.
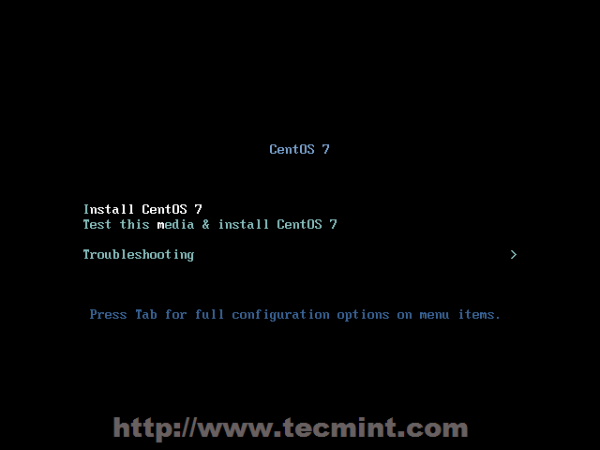
CentOS 7 Boot Menu
3. The system will start loading media installer and a Welcome screen should appear. Select your Installation Process Language, that will assist you through the entire installation procedure and click on Continue.

CentOS Installer Loading
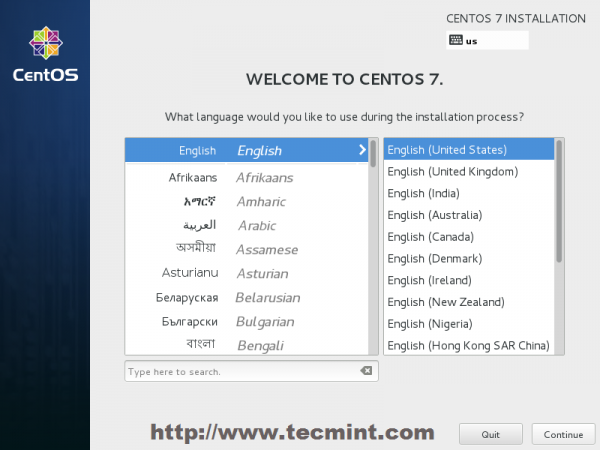
Select Installation Process Language
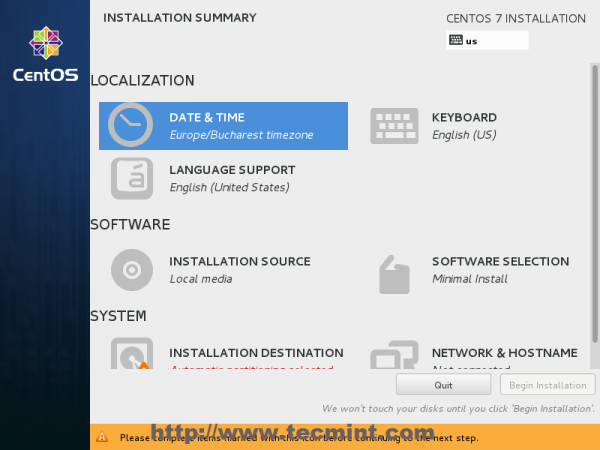
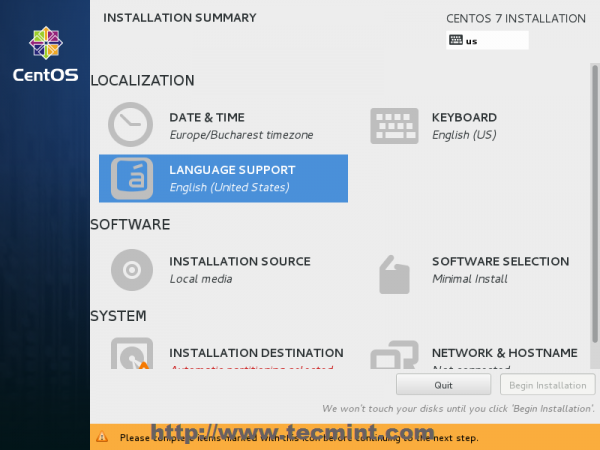
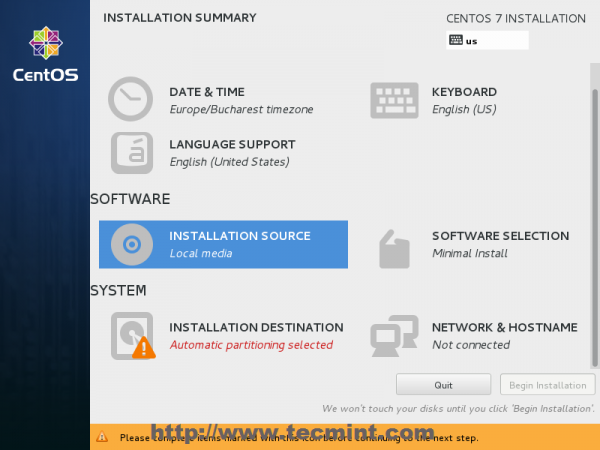
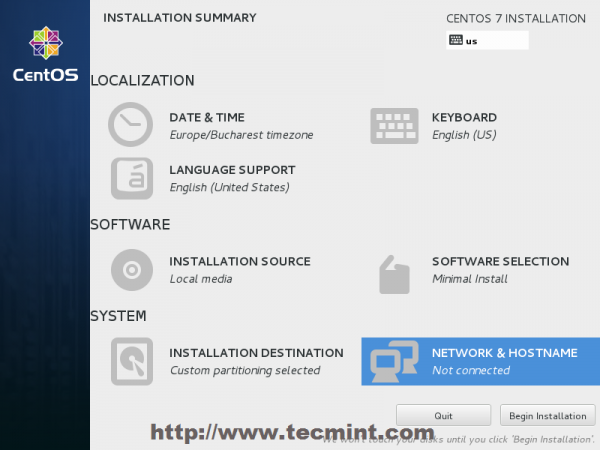
4. The next step, present screen prompt is Installation Summary. It contains a lot of options to fully customize your system. First thing you may want to setup is your time settings. Click on Date & Time and select your server physical location from the provided map and hit on upper Done button to apply configuration.
Select Date & Time and Location
5. The next step is to choose your Language Support and Keyboard settings. Choose your main and extra language for your system and when you’re finished hit on Done button.
Select Language and Keyboard
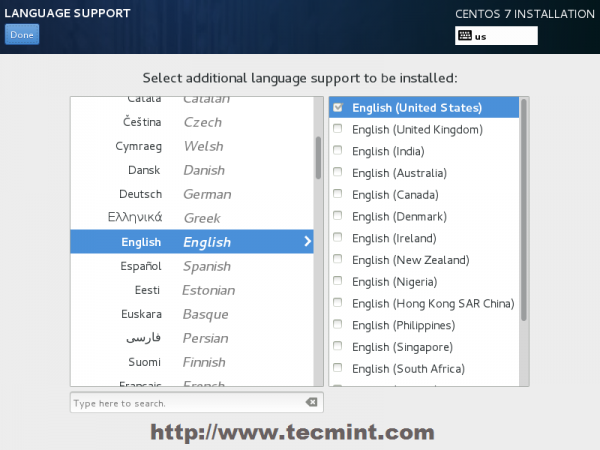
Select English Language
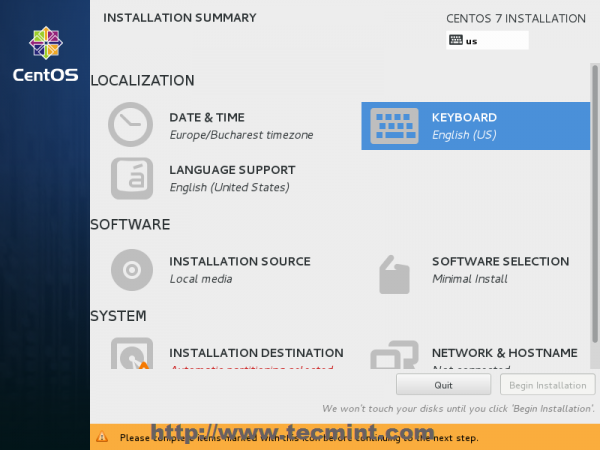
6. The same way choose your Keyboard Layout by hitting the plus button and test your keyboard configuration using the right input filed. After you finish setting up your keyboard, again hit on upper Done button to apply changes and go back to main screen on Installation Summary.
Choose Keyboard Layout
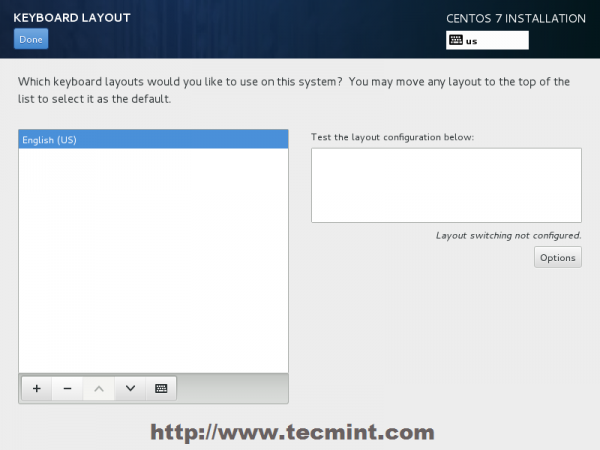
Choose English Keyboard
7. On the next step you can customize your installation by using other Installation Sources than your local DVD/USB media, such as a network locations using HTTP, HTTPS, FTP or NFS protocols and even add some additional repositories, but use this methods only if you know what you’re doing. So leave the default Auto-detected installation media and hit on Done to continue.
Choose Installation Sources
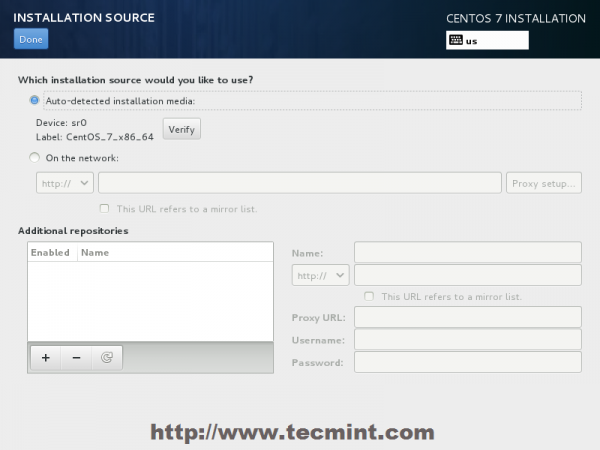
Auto Detect Installation Type
8. On the next step you can choose your system installation software. On this step CentOS offers a lot of Server and Desktop platform environments that you choose from, but, if you want a high degree of customization, especially if you are going to use CentOS 7 to run as a server platform, then I suggest you select Minimal Installwith Compatibility Libraries as Add-ons, which will install a minimal basic system software and later you can add other packages as your needs require using yum groupinstall command.
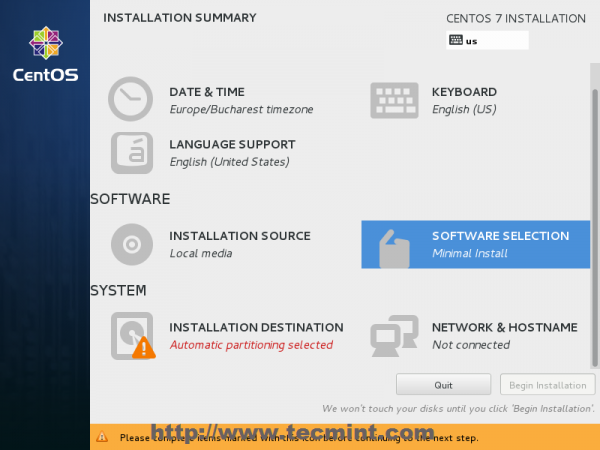
Software Selection
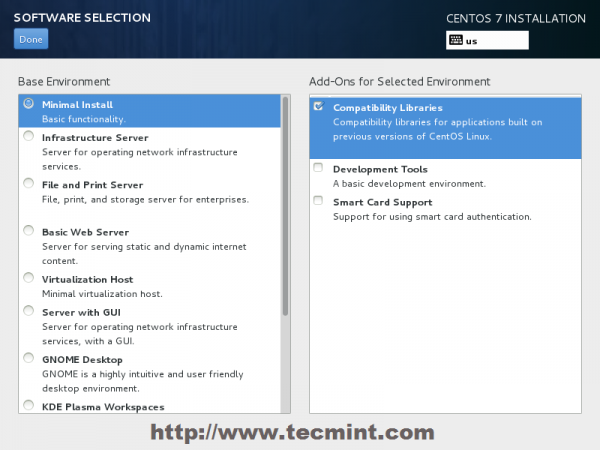
Select CentOS 7 Minimal Install
9. Now it’s time to partition your hard-drive. Click on Installation Destination menu, select your disk and choose I will configure partitioning.
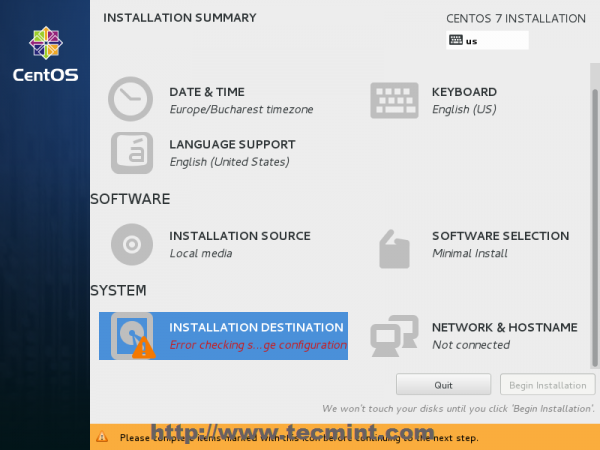
Choose Installation Destination
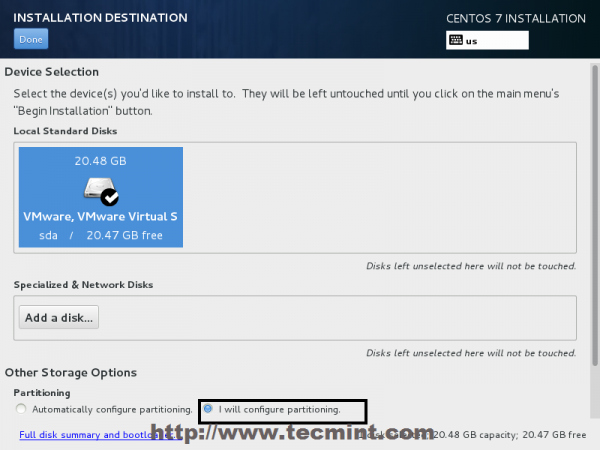
Installation Device Selection
10. On the next screen, choose LVM (Logical Volume Manager) as partition layout and, then, click on Click here to create them automatically, option which will create three system partition using XFS filesystem, automatically redistributing your hard-disk space and gathering all LVS into one big Volume Group named centos.
- /boot – Non LVM
- /(root) – LVM
- Swap – LVM
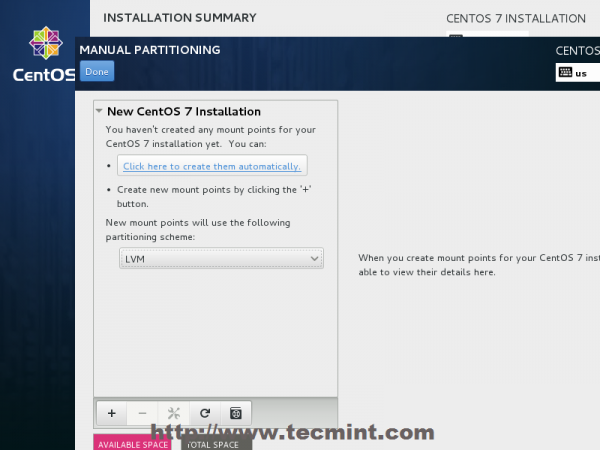
Select LVM Partition Type
Create Partitions
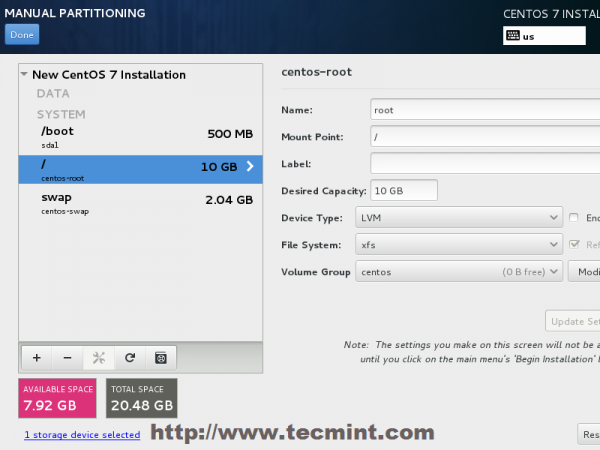
11. If you are not pleased with the default partition layout done automatically by the installer you can completely add, modify or resize your partition scheme and when you finish hit on Done button and Accept Changes on the Summary of Changes prompt.
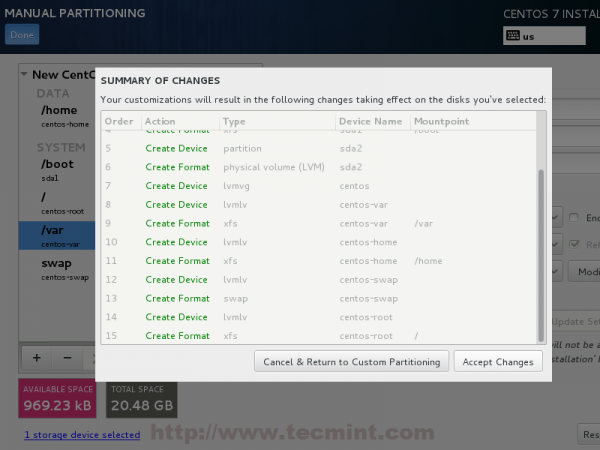
Summary of Partition Changes
NOTE: For those users, who have hard-disks more than 2TB in size, the installer automatically will convert partition table to GPT, but if you wish to use GPT table on smaller disks than 2TB, then you should use the argument inst.gpt to the installer boot command line in order to change the default behaviour.
12. The next step is to set your system hostname and enable networking. Click on Network & Hostname label and type your system FQDN (Fully Qualified Domain Name) on Hostname filed, then enable your Network interface, switching the top Ethernet button to ON.
If you have a functional DHCP server on you network then it will automatically configure all your network setting for enabled NIC, which should appear under your active interface.
Set System Hostname
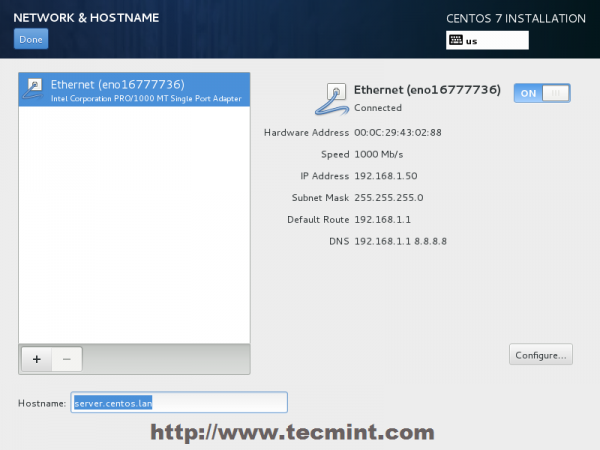
Enable Ethernet Interface
13. If your system will be destined as a server it’s better to set static network configuration on Ethernet NIC by clicking on Configure button and add all your static interface settings like in the screenshot below, and when you’re finished hit on Save button, disable and enable Ethernet card by switching the button to OFF and ON, and, then hit on Done to apply setting and go back to main menu.
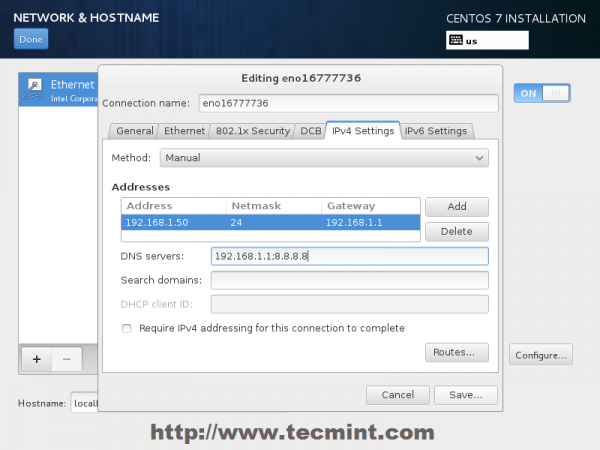
Enter Network Settings
14. Now it’s time to start installation process by pressing on Begin Installation button and set up a strong password for root account.
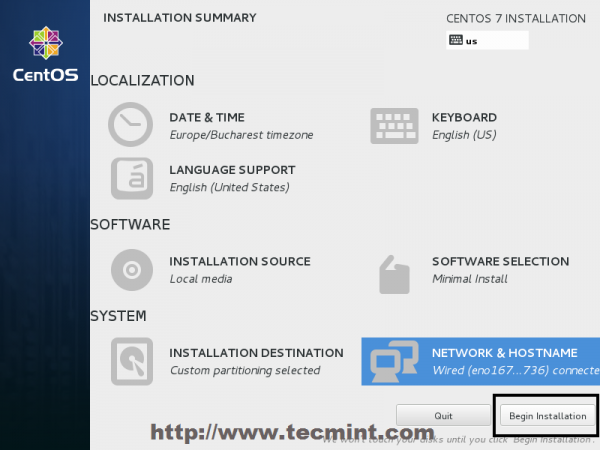
Click on Begin Installation
Select Root Password
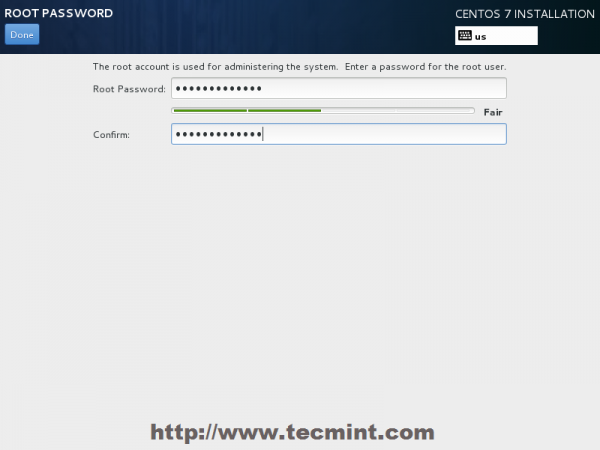
Enter Root Password
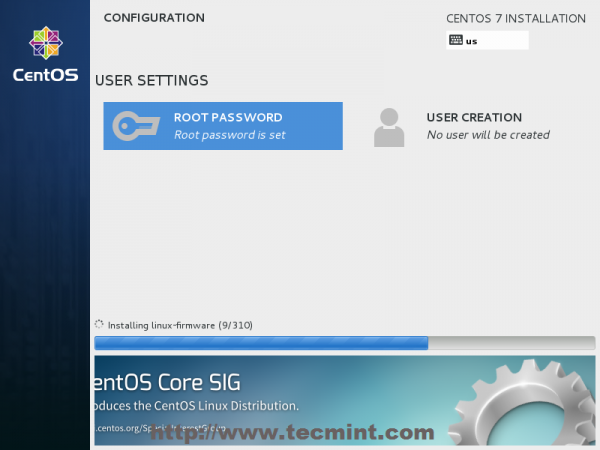
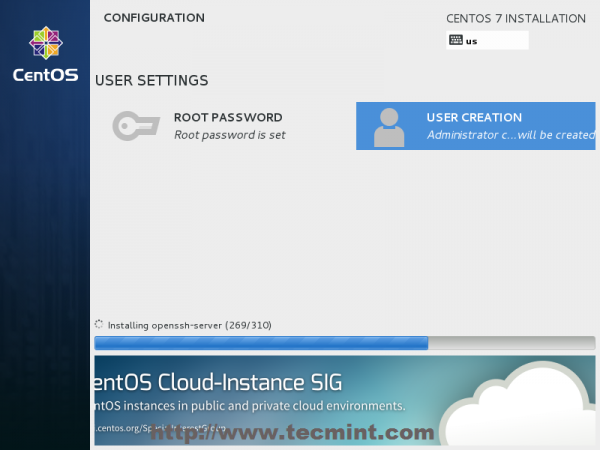
15. After you finish setting up a strong password for root account move to User Creation and create your first system user. You can designate this user to become a System Admin with root privileges using sudo command by checking the box Make this user administrator, then click on Done to go back on main menu and wait for the installation process to finish.
CentOS 7 Installation Process
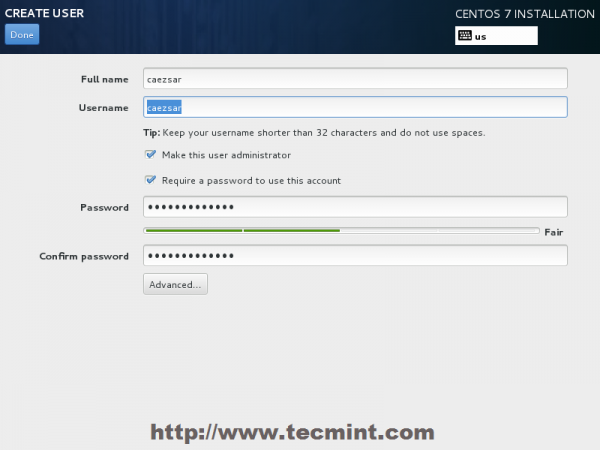
User Creation and Set Password
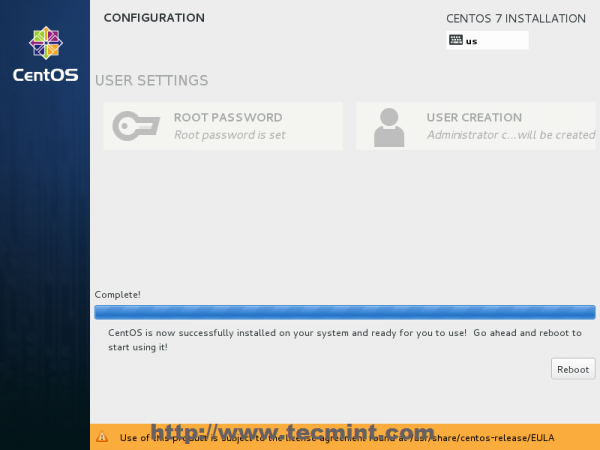
16. After the installation process finishes, the installer will show a successfully message on screen, demanding to reboot your system in order to use it.
CentOS 7 Installation Complete
Congratulation! You have now installed last version of CentOS on your bare new machine. Remove any installation media and reboot your computer so you can login to your new minimal CentOS 7 environment and perform other system tasks, such as update you system and install other useful software needed to run day to day tasks.
centos 7.5 最小化安装的更多相关文章
- CentOS 6,7最小化安装后再安装图形界面
CentOS 6.2最小化安装后再安装图形界面 在安装CentOS 6.2时发现它没有提示我要怎么安装,而是“自作主张”地给我选择了最小化安装,结果装完之后只有终端界面,因为有时候不得不用图形界面,所 ...
- CentOS 6.x 最小化安装推荐安装的依赖包和修改内核参数
CentOS 6.x 最小化安装推荐安装的依赖包 我在日常工作中,新建的xenserver的虚拟机,CentOS release 6.9 (Final)操作系统,采用最小化安装,后续很多操作需要各种依 ...
- CentOS 7 在最小化安装之后进行安装Apache服务,httpd-2.4.34
此博文是CentOS 7 在最小化安装之后进行安装Apache服务的操作步骤,httpd版本为httpd-2.4.34. 一.基本服务环境搭建 安装apache需要的基本环境:apr apr-util ...
- CentOS 7.6最小化安装(系统盘和数据盘分离安装)
CentOS 7.6最小化安装(系统盘和数据盘分离安装) 作者:尹正杰 版权声明:原创作品,谢绝转载!否则将追究法律责任. 一.创建虚拟机 鉴于大家使用的平台操作系统可能不尽相同,博主精力有限,仅演示 ...
- 基于CentOS 7下最小化安装的操作系统搭建Zabbix3.0环境
环境说明 系统版本:CentOS Linux release 7.3.1611 (Core) 内核版本:3.10.0-514.el7.x86_64 Httpd版本:Apache/2.4.6 (Cent ...
- centos 虚拟机中最小化安装,无法上网的解决方法
无法上网原因:因为最小化安装以后,centos 默认未开启网卡 解决方法进入 /etc/sysconfig/network-scripts/ifcfg-enp0s3 文件中 进入编辑模式,将 ONBO ...
- centos 7.0最小化安装 查看yum 所有安装的软件包~
使用命令 yum list installed [root@localhost ~]# yum list installed 已加载插件:fastestmirror base | 3.6 kB 00: ...
- CentOS Minimal版最小化安装后VMware联网详解
最近想搞个mailman邮件列表,又不想在我常用的CentOS 6.4上做实验,怕破坏了环境,于是就想装个试验机,又嫌它占空间太大,于是找了半天发现CentOS 6.0的minimal版本最适合了,装 ...
- Centos 6.4最小化安装后的优化(1)
一.更新yum官方源 Centos 6.4系统自带的更新源速度比较慢,相比各位都有所感受,国内的速度慢的让人受不了.为了让centos6.4系统使用速度更快的yum更新源,一般都会选择更换源,详细步骤 ...
随机推荐
- UITableView__cell 距tableview顶端有间距
UITableView__cell 距tableview顶端有间距 如何去掉这个间距呢?解决方法如下: //top 为cell距顶端的间距 (一般为负值) self.formTable.con ...
- 一款jquery和css3实现的卡通人物动画特效
之前为大家分享了很多jquery和css3的动画实例.今天给大家带来一款非常炫的jquery和css3实现的卡通人物动画特效.效果图如下: 在线预览 源码下载 实现的代码. html代码: < ...
- hdu6153 扩展kmp求一个字符串的后缀在另一个字符串出现的次数。
/** 题目:hdu6153 链接:http://acm.hdu.edu.cn/showproblem.php?pid=6153 题意:给定两个串,求其中一个串t的每个后缀在另一个串s中出现的次数乘以 ...
- 删除Cookies
网上一堆删除Cookies的JS代码 但是都删不了,找了好久终于在MSDN的论坛找到一个方法 function ClearCookie(name) { ****; var expDate = new ...
- Android性能测试框架Emmagee
目前移动设备,尤其是Android设备,相对于过去的J2me时代,硬件有大幅度的提高,并且更新地非常快,可以安装和运行更多的应用. 但是目前安卓市场对于应用的要求并不如苹果商店那么严格,Android ...
- hadoop杂记-为什么会有Map-reduce v2 (Yarn)
转自:http://www.cnblogs.com/LeftNotEasy/archive/2012/02/18/why-yarn.html 前言: 有一段时间没有写博客了(发现这是我博客最常见的开头 ...
- [web开发] php优势 - PHP与ASP.NET的比较
php 优势 - PHP与ASP.NET的比较 如今当提到 Web 开发时,您有许多选择.这些方法中许多都涉及到预处理 — 即,利用特定的标记将代码嵌入到 HTML 页面中,这些标记告诉预处理器,它们 ...
- 快速开发 jQuery 插件的 10 大技巧(转)
1. 把你的代码全部放在闭包里面 这是我用的最多的一条.但是有时候在闭包外面的方法会不能调用.不过你的插件的代码只为你自己的插件服务,所以不存在这个问题,你可以把所有的代码都放在闭包里面.而方法可能应 ...
- Codeforces Round #266 (Div. 2)
http://codeforces.com/contest/466 噗,b没写出来啊.a写完后过了40分钟了啊,罚时4次啊!果然太弱 总结: a题看错题,没有考虑m>=n其实也是可行的,导致调了 ...
- sdut 2152:Balloons(第一届山东省省赛原题,DFS搜索)
Balloons Time Limit: 1000MS Memory limit: 65536K 题目描述 Both Saya and Kudo like balloons. One day, the ...