Kvm--03 kvm克隆,桥接网络,热添加
1.Kvm克隆
1). 完整克隆
[root@gjy /opt]# virsh shutdown centos7        #只有关机状态才能克隆

Domain centos7 is being shutdown

[root@gjy /opt]# virsh list --all

Id Name State

----------------------------------------------------

- centos6 shut off

- centos7 shut off

--auto-clone     #从原始客户机配置中自动生成克隆名称和存储路径。

-o                #原始客户机名称;必须为关闭或者暂停状态。

[root@gjy /opt]# virt-clone --auto-clone -o centos7 -n centos7-v1

Allocating 'centos72-clone.qcow2' | 10 GB 00:01:01

Clone 'centos7-v1' created successfully.

[root@gjy /opt]# virsh list --all

Id Name State

----------------------------------------------------

- centos6 shut off

- centos7 shut off

- centos7-v1 shut off        #克隆主机名称

[root@gjy /opt]# ll

total 11851148

-rw-r--r-- 1 qemu qemu 3916431360 2019-07-22 22:03 CentOS-6.8-x86_64-bin-DVD1.iso

-rw------- 1 root root 1468268544 2019-08-30 21:07 centos7-clone.qcow2     #克隆机的镜像文件

-rw-r--r-- 1 root root 1752956928 2019-08-30 21:05 centos7.qcow2

-rw-r--r-- 1 root root 11534336 2019-08-30 21:05 centos7-add01.qcow2

-rw-r--r-- 1 qemu qemu 4588568576 2019-07-22 17:58 CentOS-7-x86_64-DVD-1810.iso

[root@gjy /opt]# ll /etc/libvirt/qemu/

total 20

drwxr-xr-x 2 root root 6 2019-07-23 10:28 autostart

-rw------- 1 root root 3906 2019-07-22 22:11 centos6.xml

-rw------- 1 root root 4377 2019-08-30 21:06 centos7-v1.xml        #克隆机的配置文件

-rw------- 1 root root 4365 2019-07-23 16:23 centos7.xml

drwx------ 3 root root 42 2019-07-22 17:03 networks
2). 链接克隆
Kvm手动克隆虚拟机:
1:创建基于链接克隆的虚拟磁盘文件
1:创建基于链接克隆的虚拟磁盘文件

    qemu-img create -f qcow2 -b old_disk new_disk

2:备份centos7的虚拟机配置文件,另存为centos7-v2

3:修改centos7-v2的虚拟机配置文件

    a:<name>centos7-v2</name>

    b:删除uuid

    c:删除mac address

    d:修改虚拟机磁盘路径

4:导入centos7-v2

5:检查是否正常启动

6:编写自动化脚本
自动化脚本
[root@kvm01 opt]# vim link_clone.sh

#!/bin/bash

Old_name=$1

New_name=$2

#1.关闭宿主机

virsh  shutdown  $Old_name &>/dev/null

sleep 3

#2.导出宿主机配置信息

virsh  dumpxml	$Old_name > /opt/${New_name}.xml

#3.创建基于宿主机的磁盘文件

qemu-img create  -f  qcow2 -b /opt/${Old_name}.qcow2   /opt/${New_name}.qcow2 &>/dev/null

#4.编辑配置文件

sed  -i   "s#$Old_name#$New_name#g"   /opt/${New_name}.xml

sed  -i  '/uuid/d'  /opt/${New_name}.xml

sed  -i  '/mac address/d'  /opt/${New_name}.xml

#5.导入配置

virsh  define  /opt/${New_name}.xml  &>/dev/null

#6.启动测试

virsh  start  $New_name  &>/dev/null

#7.console登录

virsh  console $New_name
链接克隆方法二:
步骤:

#1.创建磁盘文件

[root@gjy /opt]# qemu-img create -f qcow2 -b centos7.qcow2 centos07.qcow2

#2.从磁盘启动创建

[root@gjy /opt]# virt-install --virt-type kvm --os-type=linux --os-variant rhel7 --name centos07 --memory 1024 --vcpus 1 --disk /opt/centos07.qcow2 --boot hd --network network=default --graphics vnc,listen=0.0.0.0 --noautoconsole
2.kvm虚拟机的桥接网络
创建一个桥接网络,执行命令
[root@gjy ~]# virsh iface-bridge eth0 br0

Created bridge br0 with attached device eth0

Bridge interface br0 started

[root@gjy ~]# cat /etc/sysconfig/network-scripts/ifcfg-br0

DEVICE="br0"

ONBOOT="yes"

TYPE="Bridge"

BOOTPROTO="none"

IPADDR="10.0.0.100"

NETMASK="255.255.255.0"

GATEWAY="10.0.0.254"

IPV6INIT="yes"

IPV6_AUTOCONF="yes"

DHCPV6C="no"

STP="on"

DELAY="0"

[root@gjy ~]# cat /etc/sysconfig/network-scripts/ifcfg-eth0

DEVICE=eth0

ONBOOT=yes

BRIDGE="br0"

#查看DNS

[root@kvm01 opt]# cat /etc/resolv.conf

# Generated by NetworkManager

nameserver 223.5.5.5

nameserver 223.6.6.6

#查看桥接网络信息

[root@gjy ~]# brctl show

bridge name    bridge id        STP enabled    interfaces

br0        8000.000c2990428b    yes        eth0

virbr0        8000.5254007cc337    yes        virbr0-nic
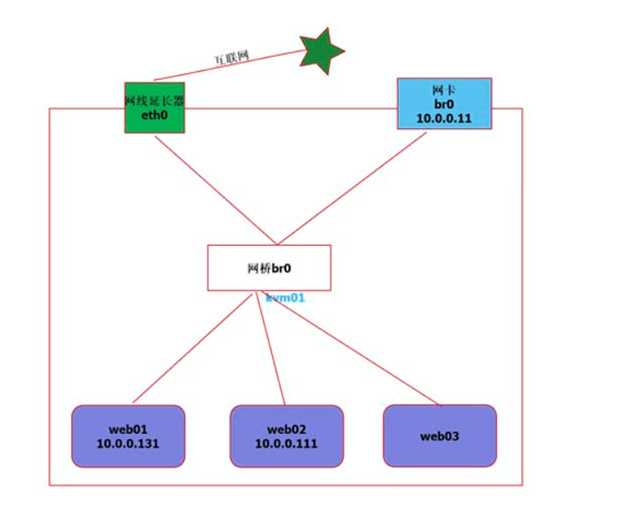
NAT模式
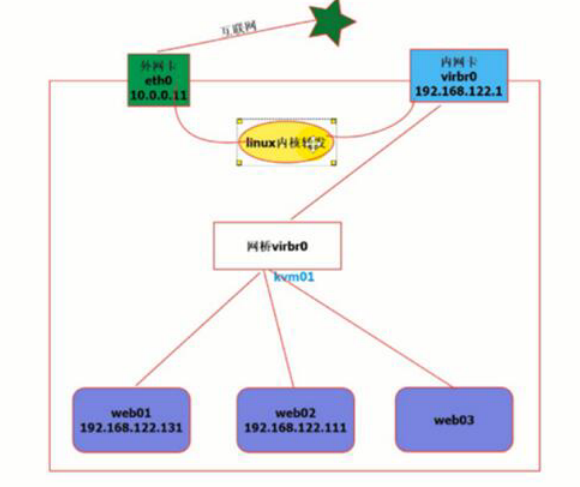
桥接模式上网原理
#关闭主机centos7

[root@gjy ~]# virsh shutdown centos7

Domain centos7 is being shutdown

[root@gjy ~]# virsh list --all

Id Name State

----------------------------------------------------

- centos6 shut off

- centos7 shut off

- centos7-v1 shut off

#修改配置文件

[root@gjy ~]# virsh edit centos7

74 <interface type='bridge'>        #类型修改为bridge

75 <mac address='52:54:00:59:9d:20'/>

76 <source bridge='br0'/>        #类型和名称

77 <model type='virtio'/>

78 <address type='pci' domain='0x0000' bus='0x00' slot='0x03' function='0x0'/>

79 </interface>

#启动主机

[root@gjy ~]# virsh start centos7

Domain centos7 started

[root@gjy ~]# virsh list --all

Id Name State

----------------------------------------------------

2 centos7 running

- centos6 shut off

- centos7-v1 shut off

#连接修改网卡信息

[root@gjy ~]# virsh console centos7

[root@centos7 ~]# cat /etc/sysconfig/network-scripts/ifcfg-eth0

TYPE="Ethernet"

BOOTPROTO="none"

NAME="eth0"

DEVICE="eth0"

ONBOOT="yes"

IPADDR="10.0.0.101"

NETMASK="255.255.255.0"

GATEWAY="10.0.0.254"

DNS1="223.5.5.5"

#重启网络

[root@centos7 ~]# systemctl restart network

[root@centos7 ~]# systemctl stop NetworkManager

[root@centos7 ~]# systemctl disable NetworkManager

#测试上网

[root@centos7 ~]# ping baidu.com

PING baidu.com (39.156.69.79) 56(84) bytes of data.

64 bytes from 39.156.69.79 (39.156.69.79): icmp_seq=1 ttl=128 time=29.5 ms

64 bytes from 39.156.69.79 (39.156.69.79): icmp_seq=2 ttl=128 time=30.5 ms

#本地直接连接kvm虚拟机

[C:\~]$ ssh root@10.0.0.101

Connecting to 10.0.0.101:22...

Connection established.

To escape to local shell, press 'Ctrl+Alt+]'.

Last failed login: Fri Aug 30 23:46:16 CST 2019 from 10.0.0.1 on ssh:notty

There was 1 failed login attempt since the last successful login.

Last login: Fri Aug 30 23:26:26 2019

[root@centos7 ~]#
3.在线热添加网卡,cpu
1). 热添加网卡
[root@kvm01 opt]# virsh

#添加网卡查看帮助

virsh # attach-interface --help

virsh # attach-interface  centos7 --type bridge --source br0

Interface attached successfully

#剥离网卡查看帮助

virsh # detach-interface  --help

#查看mac地址

virsh # domiflist  centos7

Interface  Type       Source     Model       MAC

-------------------------------------------------------

vnet1      bridge     br0        virtio      52:54:00:2a:28:7e

vnet2      bridge     br0        rtl8139     52:54:00:12:8f:f1

#查看有几块硬盘

virsh # domblklist  centos7

Target     Source

------------------------------------------------

vda        /opt/centos7.qcow2

hda        -

#去掉网卡

virsh # detach-interface  web02 --type bridge --mac  52:54:00:48:9a:ab

Interface detached successfully
查看网络接口:

添加virtio类型
#临时添加

virsh # attach-interface  web02 --type bridge --source br0 --model virtio

Interface attached successfully

virsh # domiflist web02

Interface  Type       Source     Model       MAC

-------------------------------------------------------

vnet0      bridge     br0        rtl8139     52:54:00:6f:13:34

vnet3      bridge     br0        rtl8139     52:54:00:97:7f:5f

vnet4      bridge     br0        virtio      52:54:00:87:22

#永久添加

virsh # attach-interface  web02 --type bridge --source br0 --model virtio --config

Interface attached successfully
2). 热添加内存
#查看帮助

[root@kvm01 opt]# virt-install  --help|grep mem

  --memory MEMORY       Configure guest memory allocation. Ex:

                        --memory 1024 (in MiB)

                        --memory 512,maxmemory=1024

#kvm虚拟机在线热添加内存

[root@kvm01 opt]# virt-install --virt-type kvm --os-type=linux --os-variant rhel7 --name web05 --memory 512,maxmemory=4048 --vcpus 1 --disk /opt/web03.qcow2 --boot hd --network bridge=br0  --graphics vnc,listen=0.0.0.0 --noautoconsole

Starting install...

Domain creation completed.

[root@kvm01 opt]# virsh list --all

 Id    Name                           State

----------------------------------------------------

 23    web05                          running

 -     w                              shut off

[root@kvm01 opt]# virsh vncdisplay web05

:2
ssh连接

#查看帮助

virsh # setmem --help

#临时热添加内存(--live可加可不加)

virsh # setmem web05 2048M --live

#永久增大内存(热添加内存到配置文件中,但不能超过指定的最大内存)

virsh # setmem web05 2048M --config
3). 热添加cpu参数
[root@kvm01 opt]# virt-install --help|grep cpu

                        --vcpus 5,maxvcpus=10,cpuset=1-4,6,8

#kvm虚拟机在线热添加cpu

[root@kvm01 opt]# virt-install --virt-type kvm --os-type=linux --os-variant rhel7 --name web05 --memory 512,maxmemory=4048 --vcpus 1,maxvcpus=10  --disk /opt/web03.qcow2 --boot hd --network bridge=br0  --graphics vnc,listen=0.0.0.0 --noautoconsole

Starting install...

Domain creation completed.
查看cpu核数
#查看官方帮助
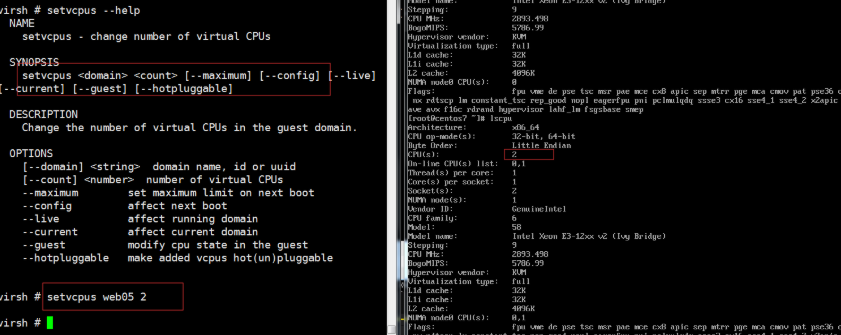
virsh # setvcpus --help
setvcpus <domain> <count> [--maximum] [--config] [--live] [--current] [--guest] [--hotpluggable]
#热添加cpu核数(但不能超过指定核数)
virsh # setvcpus web05 2
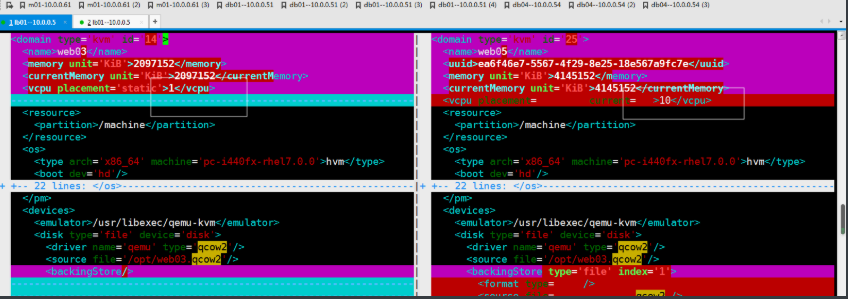
对比查看vnc
#关机

[root@kvm01 opt]# virsh destroy web05

Domain web05 destroyed

#删除

[root@kvm01 opt]# virsh undefine web05

Domain web05 has been undefined

[root@kvm01 opt]# virt-install --virt-type kvm --os-type=linux --os-variant rhel7 --name web05 --memory 512,maxmemory=4048 --vcpus 1,maxvcpus=10  --disk /opt/web03.qcow2 --boot hd --network bridge=br0  --graphics vnc,listen=0.0.0.0 --noautoconsole

Starting install...

Domain creation completed.

#备份配置文件

[root@kvm01 opt]# virsh dumpxml web05 > /tmp/web05.xml

#对比配置文件

[root@kvm01 opt]# vimdiff web03.xml  /tmp/web05.xml
对比配置文件,查看cpu
注意:单台资源最大添加,不能超过宿主机
Kvm--03 kvm克隆,桥接网络,热添加的更多相关文章
- Kvm 简介 安装 使用 桥接网络
KVM 全称是 基于内核的虚拟机(Kernel-based Virtual Machine),它是一个 Linux 的一个内核模块,该内核模块使得 Linux 变成了一个 Hypervisor: 它由 ...
- KVM虚拟机安装及桥接网络配置
1.查看CPU是否支持intel或AMD的虚拟技术 cat /proc/cpuinfo | grep -E "vmx|svm" --color --vmx intel的CPU sv ...
- kvm上已安装的虚拟机修改为桥接网络
kvm上安装的虚拟机默认使用的nat网络格式,现在已经调整kvm主机为桥接方式了,但是已经安装的虚拟机还是nat方式,所以需要修改一下 让KVM虚拟主机使用桥接网络br0 修改虚拟机的配置文件,默认存 ...
- KVM/QEMU桥接网络设置及kvm资料
KVM/QEMU桥接网络设置 配置kvm的网络有2种方法.其一,默认方式为用户模式网络(Usermode Networking),数据包由NAT方式通过主机的接口进行传送.其二,使用桥接方式(Brid ...
- kvm热添加和热迁移
a.热添加磁盘 1.创建磁盘 qemu-img create -f qcow2 web01-add01.qcow2 5G 2.附加磁盘设备 virsh attach-disk web01 /opt/w ...
- KVM -> 虚拟机在线热添加技术_04
热添加技术 1.KVM在线热添加硬盘
- KVM热添加技术
1.KVM热添加的种类 硬盘.网卡.内存.cpu 2.KVM热添加硬盘 1.在宿主机上创建硬盘 qemu-img create -f qcow2 /opt/web02_add01.qcow2 10G ...
- KVM桥接网络
1.什么是桥接网络 桥接网络:是指直接连接物理网络 桥接与NAT的区别:NAT是通过共享主机ip的方式进行上网,在你本地局域网内,别人是无法看到的:而桥接网络,是虚拟机通过dhcp的方式获取一个ip地 ...
- 【转】libvirt kvm 虚拟机上网 – Bridge桥接
libvirt kvm 虚拟机上网 – Bridge桥接 2013 年 7 月 3 日 / 东东东 / 暂无评论 目录 [hide] 1 Bridge桥接原理 2 在host机器配置桥接网络 2.1 ...
随机推荐
- Ajax工作原理及C/S与B/S的区别
工作原理 Ajax 基本上就是把 JavaScript 技术和 XMLHttpRequest 对象放在 Web 表单和服务器之间.当用户填写表单时,数据发送给一些 JavaScript 代码而不是直接 ...
- python 脚本编译成可执行二进制(exe)
本文python3,pyinstaller也支持py2 cmd下载模块pyinstaller 首先: pip install pyinstaller 其次: cmd下进入需要编译的xxx.py文件目录 ...
- JavaWeb(七):EL表达式、自定义标签和JSTL
一.EL表达式 语法 el.jsp <%@page import="java.util.Date"%> <%@page import="com.atgu ...
- LeetCode--058--最后一个单词(java)
给定一个仅包含大小写字母和空格 ' ' 的字符串,返回其最后一个单词的长度. 如果不存在最后一个单词,请返回 0 . 说明:一个单词是指由字母组成,但不包含任何空格的字符串. 示例: 输入: &quo ...
- 021:自定义path(或url)转换器
1.实现如下需求:用户可以根据articles/list/方式获取文章,其中文章分类是采用如下分类,实例如下: 第一种:获取python分类下的文章:/article/python/ 第二种:获取py ...
- 2018 ACM-ICPC 中国大学生程序设计竞赛线上赛 D Merchandise (斜率优化)
Description: The elderly aunts always like to look for bargains and preferential merchandise. Now th ...
- 前端开发本地存储之cookie
1.cookie cookie是纯文本,没有可执行代码,是指某些网站为了辨别用户身份.进行 session 跟踪而储存在用户本地终端(浏览器)上的数据(通常经过加密).当用户访问了某个网站的时候,我们 ...
- K短路模板POJ 2449 Remmarguts' Date
Time Limit: 4000MS Memory Limit: 65536K Total Submissions:32863 Accepted: 8953 Description &qu ...
- div 上禁止复制的css实现方法
div { -webkit-touch-callout: none; -webkit-user-select: none; -khtml-user-select: none; -moz-user-se ...
- 使用IDEA在引入Schema空间时报错URI is not registered解决方法以及Idea @Autowired取消提示 方法
使用IDEA在引入Schema空间时报错URI is not registered解决方法以及Idea @Autowired取消提示 方法 Idea @Autowired取消提示 spring b ...