
【黑金原创教程】【FPGA那些事儿-驱动篇I 】【实验一】流水灯模块
实验一:流水灯模块
对于发展商而言,动土仪式无疑是最重要的任务。为此,流水灯实验作为低级建模II的动土仪式再适合不过了。废话少说,我们还是开始实验吧。
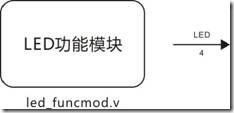
图1.1 实验一建模图。
如图1.1 所示,实验一有名为 led_funcmod的功能模块。如果无视环境信号(时钟信号还有复位信号),该功能模块只有一组输出端,亦即4位LED信号。接下来让我们来看具体内容:
led_funcmod.v
1. module led_funcmod
2. (
3. input CLOCK, RESET,
4. output [3:0]LED
5. );
.csharpcode, .csharpcode pre
{
font-size: small;
color: black;
font-family: consolas, "Courier New", courier, monospace;
background-color: #ffffff;
/*white-space: pre;*/
}
.csharpcode pre { margin: 0em; }
.csharpcode .rem { color: #008000; }
.csharpcode .kwrd { color: #0000ff; }
.csharpcode .str { color: #006080; }
.csharpcode .op { color: #0000c0; }
.csharpcode .preproc { color: #cc6633; }
.csharpcode .asp { background-color: #ffff00; }
.csharpcode .html { color: #800000; }
.csharpcode .attr { color: #ff0000; }
.csharpcode .alt
{
background-color: #f4f4f4;
width: 100%;
margin: 0em;
}
.csharpcode .lnum { color: #606060; }
以上内容为出入端声明。
6. parameter T1S = 26'd50_000_000; //1Hz
7. parameter T100MS = 26'd5_000_000; //10Hz
8. parameter T10MS = 26'd500_000; //100Hz
9. parameter T1MS = 26'd50_000; //1000Hz
10.
.csharpcode, .csharpcode pre
{
font-size: small;
color: black;
font-family: consolas, "Courier New", courier, monospace;
background-color: #ffffff;
/*white-space: pre;*/
}
.csharpcode pre { margin: 0em; }
.csharpcode .rem { color: #008000; }
.csharpcode .kwrd { color: #0000ff; }
.csharpcode .str { color: #006080; }
.csharpcode .op { color: #0000c0; }
.csharpcode .preproc { color: #cc6633; }
.csharpcode .asp { background-color: #ffff00; }
.csharpcode .html { color: #800000; }
.csharpcode .attr { color: #ff0000; }
.csharpcode .alt
{
background-color: #f4f4f4;
width: 100%;
margin: 0em;
}
.csharpcode .lnum { color: #606060; }
以上内容为常量声明。分别是1秒至1毫秒。
11. reg [3:0]i;
12. reg [25:0]C1;
13. reg [3:0]D;
14. reg [25:0]T;
15. reg [3:0]isTag;
16.
17. always @ ( posedge CLOCK or negedge RESET )
18. if( !RESET )
19. begin
20. i <= 4'd0;
21. C1 <= 26'd0;
22. D <= 4'b0001;
23. T <= T1S;
24. isTag <= 4'b0001;
25. end
26. else
.csharpcode, .csharpcode pre
{
font-size: small;
color: black;
font-family: consolas, "Courier New", courier, monospace;
background-color: #ffffff;
/*white-space: pre;*/
}
.csharpcode pre { margin: 0em; }
.csharpcode .rem { color: #008000; }
.csharpcode .kwrd { color: #0000ff; }
.csharpcode .str { color: #006080; }
.csharpcode .op { color: #0000c0; }
.csharpcode .preproc { color: #cc6633; }
.csharpcode .asp { background-color: #ffff00; }
.csharpcode .html { color: #800000; }
.csharpcode .attr { color: #ff0000; }
.csharpcode .alt
{
background-color: #f4f4f4;
width: 100%;
margin: 0em;
}
.csharpcode .lnum { color: #606060; }
以上内容是相关的寄存器声明以及复位操作。寄存器i用来指向步骤,寄存器C1用来计数,寄存器D用来暂存结果和驱动输出,寄存器T用来暂存计数量,isTag则用来暂存延迟标签。
27. case( i )
28.
29. 0:
30. if( C1 == T -1) begin C1 <= 26'd0; i <= i + 1'b1; end
31. else begin C1 <= C1 + 1'b1; D <= 4'b0001; end
32.
33. 1:
34. if( C1 == T -1) begin C1 <= 26'd0; i <= i + 1'b1; end
35. else begin C1 <= C1 + 1'b1; D <= 4'b0010; end
36.
37. 2:
38. if( C1 == T -1) begin C1 <= 26'd0; i <= i + 1'b1; end
39. else begin C1 <= C1 + 1'b1; D <= 4'b0100; end
40.
41. 3:
42. if( C1 == T -1) begin C1 <= 26'd0; i <= i + 1'b1; end
43. else begin C1 <= C1 + 1'b1; D <= 4'b1000; end
44.
45. 4:
46. begin isTag <= { isTag[2:0], isTag[3] }; i <= i + 1'b1; end
47.
48. 5:
49. if( isTag[0] ) begin T <= T1S; i <= 4'd0; end
50. else if( isTag[1] ) begin T <= T100MS; i <= 4'd0; end
51. else if( isTag[2] ) begin T <= T10MS; i <= 4'd0; end
52. else if( isTag[3] ) begin T <= T1MS; i <= 4'd0; end
53.
54. endcase
55.
56. assign LED = D;
57.
58. endmodule
.csharpcode, .csharpcode pre
{
font-size: small;
color: black;
font-family: consolas, "Courier New", courier, monospace;
background-color: #ffffff;
/*white-space: pre;*/
}
.csharpcode pre { margin: 0em; }
.csharpcode .rem { color: #008000; }
.csharpcode .kwrd { color: #0000ff; }
.csharpcode .str { color: #006080; }
.csharpcode .op { color: #0000c0; }
.csharpcode .preproc { color: #cc6633; }
.csharpcode .asp { background-color: #ffff00; }
.csharpcode .html { color: #800000; }
.csharpcode .attr { color: #ff0000; }
.csharpcode .alt
{
background-color: #f4f4f4;
width: 100%;
margin: 0em;
}
.csharpcode .lnum { color: #606060; }
以上内容为是核心操作以及输出驱动声明。步骤0~3用来实现流水灯效果。最初,每个步骤的停留时间是 1秒,然后步骤0~3按顺序执行便会产生流水效果。步骤4是用来切换模式,步骤5则是根据isTag的内容再为 T寄存器载入不同的延迟内容,如 [0] 延迟1秒,[1] 延迟100毫妙,[2] 延迟10毫妙,[3] 延迟1毫妙。默认下为模式0(第24行),既延迟1秒(第23行)。
这个实验所在乎的内容根本不是实验结果而是低级建模II本身。假若比较《建模篇》的流水实验,低级建模I与低级建模II之间是有明显的差距。首先,低级建模II再也不见计数器或者定时器等周边操作。再者,低级建模II的整合度很高,例如步骤0~3:
1. 0:
2. if( C1 == T -1) begin C1 <= 26'd0; i <= i + 1'b1; end
3. else begin C1 <= C1 + 1'b1; D <= 4'b0001; end
4. 1:
5. if( C1 == T -1) begin C1 <= 26'd0; i <= i + 1'b1; end
6. else begin C1 <= C1 + 1'b1; D<= 4'b0010; end
7. 2:
8. if( C1 ==T -1) begin C1 <= 26'd0; i <= i + 1'b1; end
9. else begin C1 <= C1 + 1'b1; D <= 4'b0100; end
10. 3:
11. if( C1 == T -1) begin C1 <= 26'd0; i <= i + 1'b1; end
12. else begin C1 <= C1 + 1'b1; D <= 4'b1000; end
.csharpcode, .csharpcode pre
{
font-size: small;
color: black;
font-family: consolas, "Courier New", courier, monospace;
background-color: #ffffff;
/*white-space: pre;*/
}
.csharpcode pre { margin: 0em; }
.csharpcode .rem { color: #008000; }
.csharpcode .kwrd { color: #0000ff; }
.csharpcode .str { color: #006080; }
.csharpcode .op { color: #0000c0; }
.csharpcode .preproc { color: #cc6633; }
.csharpcode .asp { background-color: #ffff00; }
.csharpcode .html { color: #800000; }
.csharpcode .attr { color: #ff0000; }
.csharpcode .alt
{
background-color: #f4f4f4;
width: 100%;
margin: 0em;
}
.csharpcode .lnum { color: #606060; }
代码1.1
内容如代码1.1所示,步骤0~3每个步骤示意一段完整的小操作,例如步骤0为4’b0001保持一段时间,步骤1为4’b0010保持一段时间,步骤2~3也是如此。其中 -1也考虑了步骤切换的时间。假设流水间隔要求1毫妙,那么每个步骤都会准确无误停留50000个时钟。事实上,步骤0也可以换成比较方便的写法,如代码1.2所示:
1. reg [3:0] D = 4’b0001;
2. ......
3. 0,1,2,3:
4. if( C1 == T -1) begin D <= { D[2:0], D[3] }; C1 <= 26'd0; i <= i + 1'b1; end
5. else begin C1 <= C1 + 1'b1; end
.csharpcode, .csharpcode pre
{
font-size: small;
color: black;
font-family: consolas, "Courier New", courier, monospace;
background-color: #ffffff;
/*white-space: pre;*/
}
.csharpcode pre { margin: 0em; }
.csharpcode .rem { color: #008000; }
.csharpcode .kwrd { color: #0000ff; }
.csharpcode .str { color: #006080; }
.csharpcode .op { color: #0000c0; }
.csharpcode .preproc { color: #cc6633; }
.csharpcode .asp { background-color: #ffff00; }
.csharpcode .html { color: #800000; }
.csharpcode .attr { color: #ff0000; }
.csharpcode .alt
{
background-color: #f4f4f4;
width: 100%;
margin: 0em;
}
.csharpcode .lnum { color: #606060; }
代码1.2
代码1.2表示,只要寄存器D准备好初值,例如 4’b0001,那么步骤0~3都可以共享同样的操作,如此一来会大大减少行数,节省空间。好奇的同学一定觉得疑惑,既然代码1.2的写法那么方便,反之笔者为何要选择代码1.1的写法呢?原因很单纯,那是为了清晰模块内容,以致我们容易脑补时序。感觉上,两者虽然都差不多,但是我们只要仔看,我们便会发现 ... 代码1.2它虽然书写方便,可是细节模糊而且内容也不直观。
在此,笔者需要强调!低级建模II虽然有整合技巧让操作变得更加便捷,不过比起整合它更加注重表达能力以及清晰度。这样做的关键是为了发挥主动思想,以便摆脱无谓的仿真。所以说,如果读者想和低级建模II作朋友,建模之前应该优先考虑内容的清晰度,而不是内容的精简性。如果内容即精简又直观,这种情况当然是最好的结果。
至于实验一是没有仿真的必要,因为内容足够直白,这种程度足以脑补时序。最后笔者还要说道,实验一虽然没有什么学习的价值,但是实验一要表达的信息也非常清楚,即低级建模II是注重清晰,直观的建模技巧。此外,实验一也可以作为学习的热身。
【黑金原创教程】【FPGA那些事儿-驱动篇I 】【实验一】流水灯模块的更多相关文章
- [黑金原创教程] FPGA那些事儿《设计篇 III》- 图像处理前夕·再续
简介 一本为入门图像处理的入门书,另外还教你徒手搭建平台(片上系统),内容请看目录. 注意 为了达到最好的实验的结果,请准备以下硬件. AX301开发板, OV7670摄像模块, VGA接口显示器, ...
- [黑金原创教程] FPGA那些事儿《设计篇 II》- 图像处理前夕·续
简介 一本为入门图像处理的入门书,另外还教你徒手搭建平台(片上系统),内容请看目录. 注意 为了达到最好的实验的结果,请准备以下硬件. AX301开发板, OV7670摄像模块, VGA接口显示器, ...
- [黑金原创教程] FPGA那些事儿《设计篇 I》- 图像处理前夕
简介 一本为入门图像处理的入门书,另外还教你徒手搭建平台(片上系统),内容请看目录. 注意 为了达到最好的实验的结果,请准备以下硬件. AX301开发板, OV7670摄像模块, VGA接口显示器, ...
- [黑金原创教程] FPGA那些事儿《数学篇》- CORDIC 算法
简介 一本为完善<设计篇>的书,教你CORDIC算法以及定点数等,内容请看目录. 贴士 这本教程难度略高,请先用<时序篇>垫底. 目录 Experiment 01:认识CORD ...
- 【黑金原创教程】【FPGA那些事儿-驱动篇I 】连载导读
前言: 无数昼夜的来回轮替以后,这本<驱动篇I>终于编辑完毕了,笔者真的感动到连鼻涕也流下来.所谓驱动就是认识硬件,还有前期建模.虽然<驱动篇I>的硬件都是我们熟悉的老友记,例 ...
- 【黑金原创教程】【FPGA那些事儿-驱动篇I 】原创教程连载导读【连载完成,共二十九章】
前言: 无数昼夜的来回轮替以后,这本<驱动篇I>终于编辑完毕了,笔者真的感动到连鼻涕也流下来.所谓驱动就是认识硬件,还有前期建模.虽然<驱动篇I>的硬件都是我们熟悉的老友记,例 ...
- 【黑金原创教程】【FPGA那些事儿-驱动篇I 】实验二:按键模块① - 消抖
实验二:按键模块① - 消抖 按键消抖实验可谓是经典中的经典,按键消抖实验虽曾在<建模篇>出现过,而且还惹来一堆麻烦.事实上,笔者这是在刁难各位同学,好让对方的惯性思维短路一下,但是惨遭口 ...
- 【黑金原创教程】【FPGA那些事儿-驱动篇I 】实验七:PS/2模块① — 键盘
实验七:PS/2模块① — 键盘 实验七依然也是熟烂的PS/2键盘.相较<建模篇>的PS/2键盘实验,实验七实除了实现基本的驱动以外,我们还要深入解PS/2时序,还有PS/2键盘的行为.不 ...
- 【黑金原创教程】【FPGA那些事儿-驱动篇I 】实验六:数码管模块
实验六:数码管模块 有关数码管的驱动,想必读者已经学烂了 ... 不过,作为学习的新仪式,再烂的东西也要温故知新,不然学习就会不健全.黑金开发板上的数码管资源,由始至终都没有改变过,笔者因此由身怀念. ...
随机推荐
- hdu 5726(二分)
GCD Time Limit: / MS (Java/Others) Memory Limit: / K (Java/Others) Total Submission(s): Accepted Sub ...
- UITextView
一.由于IOS中的UITextField不支持文本换行,在需要换行的时候.我们可以用UITextView来解决这一问题. 二.创建步骤 1.初始化并设置位置和大小 UITextView *text ...
- Debian修改ssh端口和禁止root远程登陆设置
linux修改端口22vi /etc/ssh/sshd_config找到#port 22将前面的#去掉,然后修改端口 port 1234重启服务就OK了service sshd restart或/et ...
- [openwrt 项目开发笔记]: 传送门
“Openwrt 项目开发笔记”系列传送门: [Openwrt 项目开发笔记]:Openwrt平台搭建(一) (2014-07-11 00:11) [Openwrt 项目开发笔记]:Openwrt平台 ...
- Asp.Net Web API 2第十五课——Model Validation(模型验证)
前言 阅读本文之前,您也可以到Asp.Net Web API 2 系列导航进行查看 http://www.cnblogs.com/aehyok/p/3446289.html 本文参考链接文章地址htt ...
- 在Github上注册账户
首先打开网址:https://github.com/ 进行注册 注册完成后进入邮箱验证 在右上角创建一个简单的项目仓库 创建完成
- 使用grunt合并压缩js、css文件
需要了解的知识: 1.nodejs的安装与命令行使用 2.nodejs安装应用 3.grunt的初步了解 本文已假定读者已经熟悉以上知识. 好,我们继续: 任务1:将src目录下的所有zepto及插件 ...
- js关于事件
摘要:事件在Web前端领域有很重要的地位,很多重要的知识点都与事件有关.本文旨在对常用的事件相关知识做一个汇总和记录. 在前端中,有一个很重要的概念就是事件.我对于事件的理解就是使用者对浏览器进行的一 ...
- duilib进阶教程 -- Container控件的bug (14)
在<duilib进阶教程 -- TreeView控件的bug (9)>里,Alberl发现了两个bug,并解决了其中一个,现在教程已经接近尾声啦,所以Alberl就解决了另外一个bug. ...
- PoolMon 使用
PoolMon 显示 PoolMon 在命令窗口中显示有关池内存分配的数据列.使用箭头键.PAGE UP 和 PAGE DOWN 键在数据间滚动. 注意 若要查看全部 PoolMon 显示,则 ...