Spring示例工程
---------------siwuxie095
创建一个基于
Spring IoC
的小程序的步骤:
- 建立
Spring
工程 - 编写
Java
文件 - 编写配置文件
- 运行示例工程
示例:
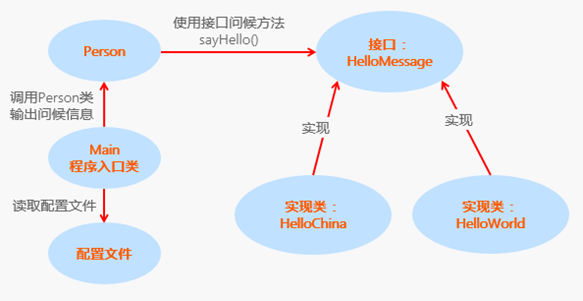
一个人,在中国时用中文问候大家;在外国时,用英语问候大家
人的具体位置,由
Spring
的配置环境来决定的:·
当配置为中国时,则问候:"大家好"·
当配置为外国时,则问候:"Hello everybody"
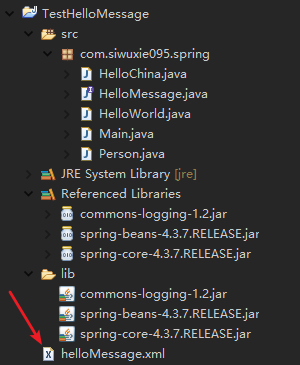
工程名:TestHelloMessage
包名:com.siwuxie095.spring
类名:HelloMessage.java、HelloChina.java、HelloWorld.java、
Person.java、Main.java(主类)
打开资源管理器,在工程 TestHelloMessage 文件夹下,创建一个
文件夹:lib,在其中放入三个必需的 jar 包:
(1)spring-core-4.3.7.RELEASE.jar
(2)spring-beans-4.3.7.RELEASE.jar
(3)commons-logging-1.2.jar
选择三个
jar 包,右键->Build Path->Add to Build Path
工程结构目录如下:

HelloMessage.java:
|
package com.siwuxie095.spring; //接口 HelloMessage,用于定义输出问候信息 public interface HelloMessage { /** * 方法的简写,因为接口中只允许存在抽象方法和全局常量 * 所以 public 和 abstract 可以省略掉 */ public String sayHello(); } |
HelloChina.java:
|
package com.siwuxie095.spring; // HelloChina 是接口的实现类,用于输出 public class HelloChina implements HelloMessage { @Override public String sayHello() { return } } |
HelloWorld.java:
|
package com.siwuxie095.spring; // HelloWorld 是接口的实现类,用于输出 Hello everybody public class HelloWorld implements HelloMessage { @Override public String sayHello() { return } } |
Person.java:
|
package com.siwuxie095.spring; //Person类,用于调用 HelloMessage 接口,输出问候信息 public class Person {
//将HelloMessage作为一个属性,用于向大家输出问候信息 private HelloMessage helloMessage; public HelloMessage getHelloMessage() { return helloMessage; } public this.helloMessage = helloMessage; }
/** * 用于调用HelloMessage接口向用户输出问候信息, * 具体的问候信息,由Spring的配置文件来分配和决定: * 1.当配置文件中分配给person的是HelloChina的实体时,则输出"大家好"的信息 * 2.当配置文件中分配给person的是HelloWorld的实体时,则输出"Hello everybody"的信息 */ public String sayHello() { return this.helloMessage.sayHello(); }
} |
Main.java(主类):
|
package com.siwuxie095.spring; import org.springframework.beans.factory.support.DefaultListableBeanFactory; import org.springframework.beans.factory.xml.XmlBeanDefinitionReader; import org.springframework.core.io.FileSystemResource; import org.springframework.core.io.Resource; public class Main { /** * 代码段(1)和(2)等效 * 因为 Spring 3.1 之后已经废弃 XmlBeanFactory * 所以这里注释掉(2),使用(1) * 但(2)依然可用,导入相关包和类即可 */ public static
//(1) //使用 FileSystemResource 来读取配置文件 Resource resource=new FileSystemResource("helloMessage.xml"); DefaultListableBeanFactory factory=new DefaultListableBeanFactory(); XmlBeanDefinitionReader reader=new XmlBeanDefinitionReader(factory); reader.loadBeanDefinitions(resource); //从IOC容器中获取Person类的实例 //Person person=(Person)b.getBean("Person"); Person person= (Person) factory.getBean("person"); //使用person类示例来输出问候信息 String str=person.sayHello(); System.out.println("The Person is currently saying:"+str);
// //(2) // //使用 FileSystemResource() 读取配置文件 helloMessage.xml // Resource resource=new FileSystemResource("helloMessage.xml"); // //使用 XmlBeanFactory() 加载配置文件,启动 IoC 容器 // BeanFactory factory=new XmlBeanFactory(resource); // //从 IoC 容器中获取 Person 类的实例 // Person person=(Person) factory.getBean("person"); // String str=person.sayHello(); // System.out.println("The person is currently saying:"+str);
} } |
创建配置文件
helloMessage.xml:
|
<?xml <beans xmlns:xsi="http://www.w3.org/2001/XMLSchema-instance" xsi:schemaLocation="http://www.springframework.org/schema/beans http://www.springframework.org/schema/beans/spring-beans.xsd"> <!-- id 和 class 是 bean 的属性,id 是唯一标识,class 是对应的类名(完全限定名) --> <bean </bean> <bean </bean>
<!-- 为 person 添加属性,该属性引用了bean:helloWorld --> <!-- 此时,person 就和 helloWorld 建立了依赖关系 --> <!-- 也可以引用 helloChina,只需要修改 ref 属性即可 --> <!-- 它们之间的依赖关系,根据配置文件决定,具体配置谁,控制权由原来的对象本身转移到配置文件中 --> <bean <property </bean> </beans> |
此时,工程结构目录一览:
运行一览:

Spring Bean 和 JavaBean 的区别:
【made by siwuxie095】
Spring示例工程的更多相关文章
- 使用方法拦截机制在不修改原逻辑基础上为 spring MVC 工程添加 Redis 缓存
首先,相关文件:链接: https://pan.baidu.com/s/1H-D2M4RfXWnKzNLmsbqiQQ 密码: 5dzk 文件说明: redis-2.4.5-win32-win64.z ...
- Ubuntu下使用VS Code创建Spring Boot工程
目的 我们将在Ubuntu桌面系统下,使用VS Code(Visual Studio Code)编辑器从零开始创建一个Spring Boot工程,并实现一个简单的RESTful风格接口.使用这套流程的 ...
- Spring Boot工程发布到Docker
先聊聊闲话 搞过企业级的application运维的同仁肯定深有感触,每个application的功能交叉错杂,数据交换就让人焦头烂额(当然这和顶层业务设计有关系), 几十个application发布 ...
- 【AT91SAM3S】英倍特串口示例工程05-UART中,串口是怎样初始化的
在这个示例工程的main.c文件中,进入main之后,没有发现串口功能的任何配置.直接使用了printf这个东西进行输出.将软件下载到开发板上之后,在电脑端使用串口软件,可以看板子有数据发来.说明这个 ...
- Springboot(一):使用Intellij中的Spring Initializr来快速构建Spring Boot工程
使用Intellij中的Spring Initializr来快速构建Spring Boot工程 New---Project 可以看到图所示的创建功能窗口.其中Initial Service Url指向 ...
- spring cloud 工程构建
https://blog.csdn.net/zhou199252/article/details/80745151 https://blog.csdn.net/forezp/article/detai ...
- SpringCloud核心教程 | 第一篇: 使用Intellij中的Spring Initializr来快速构建Spring Cloud工程
spring cloud简介 spring cloud 为开发人员提供了快速构建分布式系统的一些工具,包括配置管理.服务发现.断路器.路由.微代理.事件总线.全局锁.决策竞选.分布式会话等等.它运行环 ...
- SpringCloud核心教程 | 第二篇: 使用Intellij中的maven来快速构建Spring Cloud工程
spring cloud简介 spring cloud 为开发人员提供了快速构建分布式系统的一些工具,包括配置管理.服务发现.断路器.路由.微代理.事件总线.全局锁.决策竞选.分布式会话等等.它运行环 ...
- activiti学习2:示例工程activiti-explorer.war的使用
目录 activiti学习2:示例工程activiti-explorer.war的使用 一.搭建开发环境 二.运行示例工程 三.示例工程功能演示 1. 创建流程图 2. 部署流程图 3. 启动流程 4 ...
随机推荐
- 自动分割nginx服务的日志文件
nginx服务每天都会产生大量的日志信息,时间一长导致日志文件容量很大,会影响系统性能.通过以下shell代码,配合crontab定时执行可实现nginx日志定时分割的功能. #!/bin/bash ...
- Kattis - names Palindrome Names 【字符串】
题目链接 https://open.kattis.com/problems/names 题意 给出一个字符串 有两种操作 0.在字符串的最末尾加一个字符 1.更改字符串中的一个字符 求最少的操作步数使 ...
- js完美实现table分页
// JavaScript Document /** * js分页类 * @param iAbsolute 每页显示记录数 * @param sTableId 分页表格属性ID值,为String * ...
- nginx配置大全
nginx配置大全
- Spring Cloud之Feign客户端超时时间配置
关于雪崩效应: 默认情况下tomcat只有一个线程去处理客户端发送的所有请求.高并发情况下,如果客户端请求都在同一接口,tomcat的所有线程池去处理,导致其他接口服务访问不了,等待. Tomcat有 ...
- spring boot拦截器
实现自定义拦截器只需要3步: 1.创建我们自己的拦截器类并实现 HandlerInterceptor 接口. 2.创建一个Java类继承WebMvcConfigurerAdapter,并重写 addI ...
- UOJ130 【NOI2015】荷马史诗
本文版权归ljh2000和博客园共有,欢迎转载,但须保留此声明,并给出原文链接,谢谢合作. 本文作者:ljh2000 作者博客:http://www.cnblogs.com/ljh2000-jump/ ...
- HIVE- 大数据运维之hive管理
我现在在一家公司负责大数据平台(CDH平台)的运维管理,最常遇见的问题我总结出来,并且继续在下面更新.希望方便自己以后trouble shooting以及方便各位同行解决问题与学习. 关于做运维有几个 ...
- HDU 4089 Activation:概率dp + 迭代【手动消元】
题目链接:http://acm.hdu.edu.cn/showproblem.php?pid=4089 题意: 有n个人在排队激活游戏,Tomato排在第m个. 每次队列中的第一个人去激活游戏,有可能 ...
- PyCharm配置过程记录
也可以通过命令行来上传和下载git bash here 同步最新代码到本地: git fetch git pull 上传文件至git仓库: git commit git push 安装第三方模块方式 ...