JAVA 同步实现原理
Synchronized的基本使用
Synchronized是Java中解决并发问题的一种最常用的方法,也是最简单的一种方法。Synchronized的作用主要有三个:
- 确保线程互斥的访问同步代码
- 保证共享变量的修改能够及时可见
- 有效解决重排序问题。
从语法上讲,Synchronized总共有三种用法:
- 修饰普通方法
- 修饰静态方法
- 修饰代码块
接下来我就通过几个例子程序来说明一下这三种使用方式(为了便于比较,三段代码除了Synchronized的使用方式不同以外,其他基本保持一致)。
- 没有同步的情况
package com.paddx.test.concurrent;

public class SynchronizedTest {

    public void method1(){

        System.out.println("Method 1 start");

        try {

            System.out.println("Method 1 execute");

            Thread.sleep(3000);

        } catch (InterruptedException e) {

            e.printStackTrace();

        }

        System.out.println("Method 1 end");

    }

    public void method2(){

        System.out.println("Method 2 start");

        try {

            System.out.println("Method 2 execute");

            Thread.sleep(1000);

        } catch (InterruptedException e) {

            e.printStackTrace();

        }

        System.out.println("Method 2 end");

    }

    public static void main(String[] args) {

        final SynchronizedTest test = new SynchronizedTest();

        new Thread(new Runnable() {

            @Override

            public void run() {

                test.method1();

            }

        }).start();

        new Thread(new Runnable() {

            @Override

            public void run() {

                test.method2();

            }

        }).start();

    }

}
执行结果如下,线程1和线程2同时进入执行状态,线程2执行速度比线程1快,所以线程2先执行完成,这个过程中线程1和线程2是同时执行的。
Method 1 start

Method 1 execute

Method 2 start

Method 2 execute

Method 2 end

Method 1 end
- 对普通方法同步
package com.paddx.test.concurrent;

public class SynchronizedTest {

    public synchronized void method1(){

        System.out.println("Method 1 start");

        try {

            System.out.println("Method 1 execute");

            Thread.sleep(3000);

        } catch (InterruptedException e) {

            e.printStackTrace();

        }

        System.out.println("Method 1 end");

    }

    public synchronized void method2(){

        System.out.println("Method 2 start");

        try {

            System.out.println("Method 2 execute");

            Thread.sleep(1000);

        } catch (InterruptedException e) {

            e.printStackTrace();

        }

        System.out.println("Method 2 end");

    }

    public static void main(String[] args) {

        final SynchronizedTest test = new SynchronizedTest();

        new Thread(new Runnable() {

            @Override

            public void run() {

                test.method1();

            }

        }).start();

        new Thread(new Runnable() {

            @Override

            public void run() {

                test.method2();

            }

        }).start();

    }

}
执行结果如下,跟代码段一比较,可以很明显的看出,线程2需要等待线程1的method1执行完成才能开始执行method2方法。
Method 1 start

Method 1 execute

Method 1 end

Method 2 start

Method 2 execute

Method 2 end
- 静态方法(类)同步
package com.paddx.test.concurrent;

 public class SynchronizedTest {

     public static synchronized void method1(){

         System.out.println("Method 1 start");

         try {

             System.out.println("Method 1 execute");

             Thread.sleep(3000);

         } catch (InterruptedException e) {

             e.printStackTrace();

         }

         System.out.println("Method 1 end");

     }

     public static synchronized void method2(){

         System.out.println("Method 2 start");

         try {

             System.out.println("Method 2 execute");

             Thread.sleep(1000);

         } catch (InterruptedException e) {

             e.printStackTrace();

         }

         System.out.println("Method 2 end");

     }

     public static void main(String[] args) {

         final SynchronizedTest test = new SynchronizedTest();

         final SynchronizedTest test2 = new SynchronizedTest();

         new Thread(new Runnable() {

             @Override

             public void run() {

                 test.method1();

             }

         }).start();

         new Thread(new Runnable() {

             @Override

             public void run() {

                 test2.method2();

             }

         }).start();

     }

 }
执行结果如下,对静态方法的同步本质上是对类的同步(静态方法本质上是属于类的方法,而不是对象上的方法),所以即使test和test2属于不同的对象,但是它们都属于SynchronizedTest类的实例,所以也只能顺序的执行method1和method2,不能并发执行。
Method 1 start

Method 1 execute

Method 1 end

Method 2 start

Method 2 execute

Method 2 end
- 代码块同步
package com.paddx.test.concurrent;

public class SynchronizedTest {

    public void method1(){

        System.out.println("Method 1 start");

        try {

            synchronized (this) {

                System.out.println("Method 1 execute");

                Thread.sleep(3000);

            }

        } catch (InterruptedException e) {

            e.printStackTrace();

        }

        System.out.println("Method 1 end");

    }

    public void method2(){

        System.out.println("Method 2 start");

        try {

            synchronized (this) {

                System.out.println("Method 2 execute");

                Thread.sleep(1000);

            }

        } catch (InterruptedException e) {

            e.printStackTrace();

        }

        System.out.println("Method 2 end");

    }

    public static void main(String[] args) {

        final SynchronizedTest test = new SynchronizedTest();

        new Thread(new Runnable() {

            @Override

            public void run() {

                test.method1();

            }

        }).start();

        new Thread(new Runnable() {

            @Override

            public void run() {

                test.method2();

            }

        }).start();

    }

}
执行结果如下,虽然线程1和线程2都进入了对应的方法开始执行,但是线程2在进入同步块之前,需要等待线程1中同步块执行完成。
Method 1 start

Method 1 execute

Method 2 start

Method 1 end

Method 2 execute

Method 2 end
Synchronized 原理
先通过反编译下面的代码来看看Synchronized是如何实现对代码块进行同步的
package com.paddx.test.concurrent;

public class SynchronizedDemo {

    public void method() {

        synchronized (this) {

            System.out.println("Method 1 start");

        }

    }

}
反编译结果
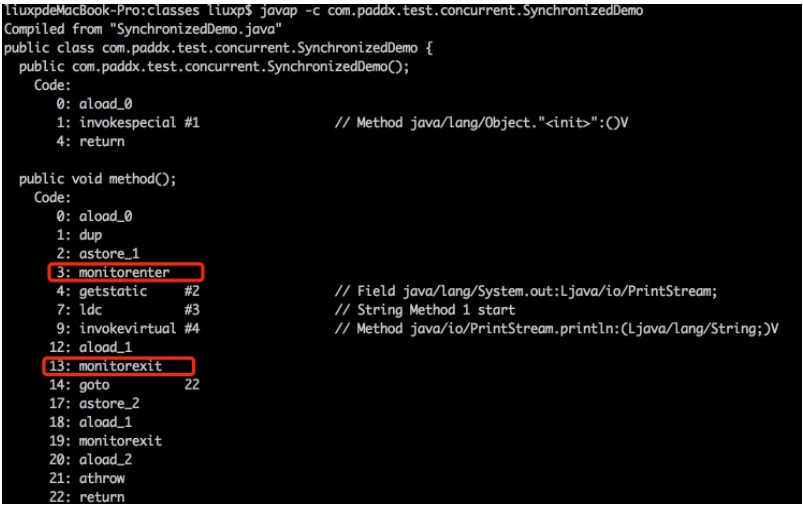
关于这两条指令的作用,我们直接参考JVM规范中描述: ` Each object is associated with a monitor. A monitor is locked if and only if it has an owner. The thread that executes monitorenter attempts to gain ownership of the monitor associated with objectref, as follows: • If the entry count of the monitor associated with objectref is zero, the thread enters the monitor and sets its entry count to one. The thread is then the owner of the monitor. • If the thread already owns the monitor associated with objectref, it reenters the monitor, incrementing its entry count. • If another thread already owns the monitor associated with objectref, the thread blocks until the monitor’s entry count is zero, then tries again to gain ownership. `
每个对象有一个监视器锁(monitor)。当monitor被占用时就会处于锁定状态,线程执行monitorenter指令时尝试获取monitor的所有权,过程如下:
- 如果monitor的进入数为0,则该线程进入monitor,然后将进入数设置为1,该线程即为monitor的所有者。
- 如果线程已经占有该monitor,只是重新进入,则进入monitor的进入数加1.
- 如果其他线程已经占用了monitor,则该线程进入阻塞状态,直到monitor的进入数为0,再重新尝试获取monitor的所有权。
monitorexit: ` The thread that executes monitorexit must be the owner of the monitor associated with the instance referenced by objectref. The thread decrements the entry count of the monitor associated with objectref. If as a result the value of the entry count is zero, the thread exits the monitor and is no longer its owner. Other threads that are blocking to enter the monitor are allowed to attempt to do so.`
- 执行monitorexit的线程必须是objectref所对应的monitor的所有者。
- 指令执行时,monitor的进入数减1,如果减1后进入数为0,那线程退出monitor,不再是这个monitor的所有者。其他被这个monitor阻塞的线程可以尝试去获取这个 monitor 的所有权。
通过这两段描述,我们应该能很清楚的看出 Synchronized的实现原理
Synchronized的语义底层是通过一个monitor的对象来完成,其实wait/notify等方法也依赖于monitor对象,这就是为什么只有在同步的块或者方法中才能调用wait/notify等方法,否则会抛出java.lang.IllegalMonitorStateException的异常的原因。
我们再来看一下同步方法的反编译结果:
package com.paddx.test.concurrent;

public class SynchronizedMethod {

    public synchronized void method() {

        System.out.println("Hello World!");

    }

}
反编译结果
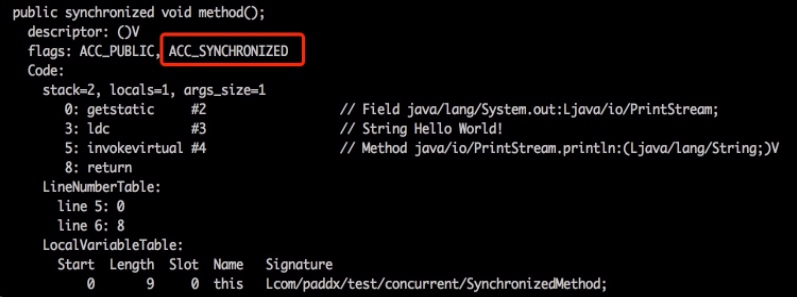
从反编译的结果来看,方法的同步并没有通过指令monitorenter和monitorexit来完成(理论上其实也可以通过这两条指令来实现),不过相对于普通方法,其常量池中多了ACC_SYNCHRONIZED标示符。JVM就是根据该标示符来实现方法的同步的:当方法调用时,调用指令将会检查方法的 ACC_SYNCHRONIZED 访问标志是否被设置,如果设置了,执行线程将先获取monitor,获取成功之后才能执行方法体,方法执行完后再释放monitor。在方法执行期间,其他任何线程都无法再获得同一个monitor对象。 其实本质上没有区别,只是方法的同步是一种隐式的方式来实现,无需通过字节码来完成。
运行结果解释
有了对Synchronized原理的认识,再来看上面的程序就可以迎刃而解了。
- 代码段2结果: 虽然method1和method2是不同的方法,但是这两个方法都进行了同步,并且是通过同一个对象去调用的,所以调用之前都需要先去竞争同一个对象上的锁(monitor),也就只能互斥的获取到锁,因此,method1和method2只能顺序的执行。
- 代码段3结果: 虽然test和test2属于不同对象,但是test和test2属于同一个类的不同实例,由于method1和method2都属于静态同步方法,所以调用的时候需要获取同一个类上monitor(每个类只对应一个class对象),所以也只能顺序的执行。
- 代码段4结果: 对于代码块的同步实质上需要获取Synchronized关键字后面括号中对象的monitor,由于这段代码中括号的内容都是this,而method1和method2又是通过同一的对象去调用的,所以进入同步块之前需要去竞争同一个对象上的锁,因此只能顺序执行同步块。
总结
Synchronized是通过对象内部的一个叫做监视器锁(monitor)来实现的。但是监视器锁本质又是依赖于底层的操作系统的Mutex Lock来实现的。而操作系统实现线程之间的切换这就需要从用户态转换到内核态,这个成本非常高,状态之间的转换需要相对比较长的时间,这就是为什么Synchronized效率低的原因。
因此,这种依赖于操作系统Mutex Lock所实现的锁我们称之为“重量级锁”。JDK中对Synchronized做的种种优化,其核心都是为了减少这种重量级锁的使用。JDK1.6以后,为了减少获得锁和释放锁所带来的性能消耗,提高性能,引入了“偏向锁”和“轻量级锁”。无锁 --> 偏向锁 --> 轻量级 --> 重量级
原文地址:http://awingger.com/2017/10/25/JAVA%E5%90%8C%E6%AD%A5%E5%8E%9F%E7%90%86%E5%88%86%E6%9E%90/
JAVA 同步实现原理的更多相关文章
- Java 同步代码块 - Synchronized Blocks
java锁实现原理: http://blog.csdn.net/endlu/article/details/51249156 The synchronized keyword can be used ...
- Java中多线程原理详解
Java是少数的集中支持多线程的语言之一,大多数的语言智能运行单独的一个程序块,无法同时运行不同的多个程序块,Java的多线程机制弥补了这个缺憾,它可以让不同的程序块一起运行,这样可以让程序运行更加顺 ...
- Java HashMap工作原理及实现
Java HashMap工作原理及实现 2016/03/20 | 分类: 基础技术 | 0 条评论 | 标签: HASHMAP 分享到:3 原文出处: Yikun 1. 概述 从本文你可以学习到: 什 ...
- 全面解读Java NIO工作原理(4)
全面解读Java NIO工作原理(4) 2011-12-14 10:31 Rollen Holt Rollen Holt的博客 我要评论(0) 字号:T | T JDK 1.4 中引入的新输入输出 ( ...
- java同步和互斥【用具体程序说明】
java同步和互斥[用具体程序说明] 所有对象都自动含有单一的锁,也就是所有对象都有且只有唯一的锁,所以当某个任务(线程)访问一个类A中含有sycnhronized的方法是,那么 ...
- dubbo_远程同步调用原理
Dubbo缺省协议采用单一长连接和NIO异步通讯,适合于小数据量大并发的服务调用,以及服务消费者机器数远大于服务提供者机器数的情况. Dubbo缺省协议,使用基于mina1.1.7+hessian3. ...
- Java LinkedHashMap工作原理及实现
Java LinkedHashMap工作原理及实现 原文出处: Yikun 1. 概述 在理解了#7 介绍的HashMap后,我们来学习LinkedHashMap的工作原理及实现.首先还是类似的,我们 ...
- 10分钟看懂, Java NIO 底层原理
目录 写在前面 1.1. Java IO读写原理 1.1.1. 内核缓冲与进程缓冲区 1.1.2. java IO读写的底层流程 1.2. 四种主要的IO模型 1.3. 同步阻塞IO(Blocking ...
- 死磕 java同步系列之AQS起篇
问题 (1)AQS是什么? (2)AQS的定位? (3)AQS的实现原理? (4)基于AQS实现自己的锁? 简介 AQS的全称是AbstractQueuedSynchronizer,它的定位是为Jav ...
随机推荐
- D. Time to Raid Cowavans 分块暴力,感觉关键在dp
http://codeforces.com/contest/103/problem/D 对于b大于 sqrt(n)的,暴力处理的话,那么算出每个的复杂度是sqrt(n),就是把n分成了sqrt(n)段 ...
- Spring Boot 测试 junit
import org.junit.Test; import org.junit.runner.RunWith; import org.springframework.beans.factory.ann ...
- Docker 镜像制作 CentOS+JDK+Tomcat
[root@localhost createImages]# ls apache-tomcat-.tar.gz server-jre-8u121-linux-x64.tar.gz [root@loca ...
- 【密码学】SHA1算法实现及详解
1 SHA1算法简介 安全哈希算法(Secure Hash Algorithm)主要适用于数字签名标准(Digital Signature Standard DSS)里面定义的数字签名算法(Digit ...
- 【Linux】ubuntu安装jdk-6u45-linux-x64.bin
for : Android4.4源码编译 环境 : ubuntu12.04_desktop_amd64 1. 1.1.jdk-6u45-linux-x64.bin 放置于 /home 1.2.命令&q ...
- 张高兴的 .NET Core IoT 入门指南:(四)使用 SPI 进行通信
什么是 SPI 和上一篇文章的 I2C 总线一样,SPI(Serial Peripheral Interface,串行外设接口)也是设备与设备间通信方式的一种.SPI 是一种全双工(数据可以两个方向同 ...
- Shell 学习—AWK介绍
Shell 学习—AWK = = = 安装awk root@kiki-desktop:~/shell# apt-get install gawk gawk-doc = = = awk 是一种程序语言. ...
- Promise 用es5的基础实现
只实现 then 和 catch function promise(fn) { var state = 'pending'; // 声明函数 var nowResolve = function (ar ...
- JDBC连接数据库(Servlet+JSP)
JDBC(Java Database connectivity),是连接数据库的一种方式.后面的框架Mybatis和Hibernate等都封装的是JDBC.在JDBC中常用的API有4个:Driver ...
- 配置Linux环境
安装mariadb +主从复制https://www.cnblogs.com/pyyu/p/9467289.html 参考博客 redis https://www.cnblogs.com/pyyu/p ...