
CentOS7下SSH服务学习笔记
测试环境:
[root@nmserver-7 ~]# uname -a
Linux nmserver-7.test.com 3.10.0-514.el7.centos.plus.i686 #1 SMP Wed Jan 25 12:55:04 UTC 2017 i686 i686 i386 GNU/Linux
[root@nmserver-7 ~]# cat /etc/redhat-release
CentOS release 7.3.1611 (AltArch)
[root@nmserver-7 ~]#
1、SSH服务安装
linux系统安装后默认已经开启ssh服务,并且包含ssh所有需要的软件了,但是还是有必要了解下已经安装的ssh是那个包提供的,
[root@nmserver-7 ~]# whereis sshd
sshd: /usr/sbin/sshd /usr/share/man/man8/sshd.8.gz
[root@nmserver-7 ~]# rpm -qf /usr/sbin/sshd
openssh-server-6.6.1p1-31.el7.i686
[root@nmserver-7 ~]#
也就是说假如没有ssh服务的话我们可以通过yum安装openssh-server来重新启动ssh服务
那么openssh-server都在系统中安装了什么文件?
[root@nmserver-7 ~]# rpm -ql openssh-server
/etc/pam.d/sshd
/etc/ssh/sshd_config #配置文件位置
/etc/sysconfig/sshd
/usr/lib/fipscheck/sshd.hmac
/usr/lib/systemd/system/sshd-keygen.service
/usr/lib/systemd/system/sshd.service
/usr/lib/systemd/system/sshd.socket
/usr/lib/systemd/system/sshd@.service
/usr/libexec/openssh/sftp-server
/usr/sbin/sshd
/usr/sbin/sshd-keygen
/usr/share/man/man5/moduli.5.gz
/usr/share/man/man5/sshd_config.5.gz
/usr/share/man/man8/sftp-server.8.gz
/usr/share/man/man8/sshd.8.gz
/var/empty/sshd
2、SSH服务启动
CentOS7.3下SSH服务的启动
[root@nmserver-7 ~]# systemctl stop sshd #停止
[root@nmserver-7 ~]# systemctl start sshd #开始
[root@nmserver-7 ~]# systemctl restart sshd #重启
[root@nmserver-7 ~]# systemctl status sshd
● sshd.service - OpenSSH server daemon
Loaded: loaded (/usr/lib/systemd/system/sshd.service; enabled; vendor preset: enabled)
Active: active (running) since 四 2017-08-24 16:32:52 CST; 1s ago
Docs: man:sshd(8)
man:sshd_config(5)
Process: 2863 ExecStart=/usr/sbin/sshd $OPTIONS (code=exited, status=0/SUCCESS)
Main PID: 2864 (sshd)
CGroup: /system.slice/sshd.service
└─2864 /usr/sbin/sshd
8月 24 16:32:51 nmserver-7.test.com systemd[1]: Starting OpenSSH server d...
8月 24 16:32:52 nmserver-7.test.com systemd[1]: PID file /var/run/sshd.pi...
8月 24 16:32:52 nmserver-7.test.com sshd[2864]: Server listening on 0.0.0...
8月 24 16:32:52 nmserver-7.test.com sshd[2864]: Server listening on :: po...
8月 24 16:32:52 nmserver-7.test.com systemd[1]: Started OpenSSH server da...
Hint: Some lines were ellipsized, use -l to show in full.
查看ssd服务端口是否正常,
[root@nms ~]# netstat -tlnp |grep ssh
tcp 0 0 0.0.0.0:22 0.0.0.0:* LISTEN 1207/sshd
tcp 0 0 :::22 :::* LISTEN 1207/sshd
3、SSH原理(SSH服务器端与客户端的连接步骤)
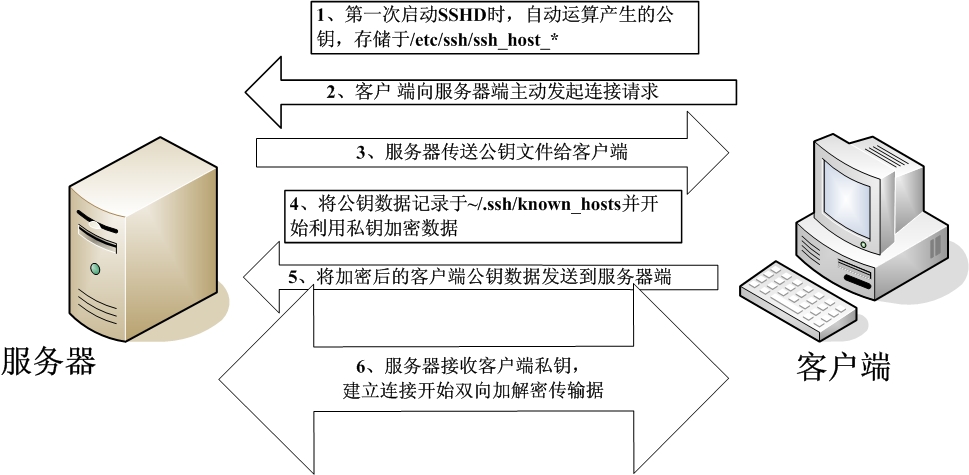
step1:服务器建立公钥文件
每一次启动sshd服务时,该服务会主动去找/etc/ssh/ssh_host*文件,若系统刚安装完成,会没有公钥文件,
sshd会主动计算出这些需要的公钥文件,同时也会计算出服务器自己需要的私钥文件。
step2:客户端主动连接要求
若客户端想要连接到ssh服务器,则需要使用适当的客户端程序来连接,linux系统默认已经安装openssh-clients,包含SSH客户端;
windows下常用的客户端连接工具有xShell、SecureCart、Putty等
step3:服务器传送公钥文件给客户端
接收到客户端的要求后,服务器便将第一个步骤取的公钥文件以明码的形式传送给客户端;
step4:客户端记录/比对服务器的公钥数据及随机计算自己的公私钥;
客户端将接收到的公钥数据记录到客户端的用户主目录内的 ~/.ssh/known_hosts文件里,之后则开始计算客户端自己的公私钥数据;
step5:返回客户端的公私钥数据到服务器端
用户将自己的公钥传送给服务器,此时服务器具有服务器的私钥和客户端的公钥,而客户端具有服务器的公钥及客户端自己的私钥,你会看到,
在此次连接的服务器与客户端的密钥系统(公钥+私钥)并不一样,因此,才称为非对称密钥系统;
step6:服务器接收客户端的公钥开始双向加解密
(1)服务器到客户端:服务器传送数据时,使用客户端的公钥加密后进行发送,客户端接收后,用自己的私钥解密;
(2)客户端到服务器:客户端传送数据时,使用服务器的公钥进行加密数据然后发送给服务器,服务器接收后用服务器的私钥解密数据;
4、SSHD服务器配置
SSHD服务器的详细设置都放在/etc/ssh/sshd_config配置文件中,在配置文件中,只要是未被注释的设置值即为“默认值”
[root@nmserver-7 ssh]# cat /etc/ssh/sshd_config
# $OpenBSD: sshd_config,v 1.93 2014/01/10 05:59:19 djm Exp $
# This is the sshd server system-wide configuration file. See
# sshd_config(5) for more information.
# This sshd was compiled with PATH=/usr/local/bin:/usr/bin
# The strategy used for options in the default sshd_config shipped with
# OpenSSH is to specify options with their default value where
# possible, but leave them commented. Uncommented options override the
# default value.
# If you want to change the port on a SELinux system, you have to tell
# SELinux about this change.
# semanage port -a -t ssh_port_t -p tcp #PORTNUMBER
#
#Port 22
#ssh默认使用22端口,也可以使用多个Port,例如想要开放sshd在22和2200,则多加一行内容为:Port 2200 然后重启SSHD服务即可;
#AddressFamily any
#ListenAddress 0.0.0.0
#ListenAddress ::
#监听的主机网卡,默认值是监听所有接口的SSH要求
# The default requires explicit activation of protocol 1
#Protocol 2
#选择SSH协议版本,默认支持V2 如要支持旧版本V1,则改为“Protocol 2,1”
# HostKey for protocol version 1
#HostKey /etc/ssh/ssh_host_key #ssh 版本使用的私钥
# HostKeys for protocol version 2
HostKey /etc/ssh/ssh_host_rsa_key #ssh 版本2使用的RSA私钥
#HostKey /etc/ssh/ssh_host_dsa_key
HostKey /etc/ssh/ssh_host_ecdsa_key #ssh 版本2使用的ECDSA私钥
HostKey /etc/ssh/ssh_host_ed25519_key
#说明主机Private Key 放置的位置,默认使用上面文件
# Lifetime and size of ephemeral version 1 server key
#KeyRegenerationInterval 1h
#ServerKeyBits 1024 #设置生产密钥的位数
# Ciphers and keying
#RekeyLimit default none
# Logging
# obsoletes QuietMode and FascistLogging
#SyslogFacility AUTH #当有人使用SSH登录系统的时候,SSH会记录信息;
SyslogFacility AUTHPRIV
#LogLevel INFO #设置日志等级
# Authentication: # 以下是安全设置项目
#LoginGraceTime 2m
#PermitRootLogin yes #是否允许root登录。默认是允许的,建议设置成no
#StrictModes yes #是否让SSDH去检查用户主目录或相关文件的权限数据;
#MaxAuthTries 6
#MaxSessions 10
#RSAAuthentication yes
#PubkeyAuthentication yes #是否允许用户自行使用成对的密钥系统进行登录;
# The default is to check both .ssh/authorized_keys and .ssh/authorized_keys2
# but this is overridden so installations will only check .ssh/authorized_keys
AuthorizedKeysFile .ssh/authorized_keys #自定义的公钥数据放置于用户主目录下 .ssh/authorized_keys内
#AuthorizedPrincipalsFile none
#AuthorizedKeysCommand none
#AuthorizedKeysCommandUser nobody
# For this to work you will also need host keys in /etc/ssh/ssh_known_hosts
#RhostsRSAAuthentication no
# similar for protocol version 2
#HostbasedAuthentication no
# Change to yes if you don't trust ~/.ssh/known_hosts for
# RhostsRSAAuthentication and HostbasedAuthentication
#IgnoreUserKnownHosts no
# Don't read the user's ~/.rhosts and ~/.shosts files
#IgnoreRhosts yes
# To disable tunneled clear text passwords, change to no here!
#PasswordAuthentication yes
#PermitEmptyPasswords no
PasswordAuthentication yes
# Change to no to disable s/key passwords
#ChallengeResponseAuthentication yes
ChallengeResponseAuthentication no
# Kerberos options
#KerberosAuthentication no
#KerberosOrLocalPasswd yes
#KerberosTicketCleanup yes
#KerberosGetAFSToken no
#KerberosUseKuserok yes
# GSSAPI options
GSSAPIAuthentication yes
GSSAPICleanupCredentials no
#GSSAPIStrictAcceptorCheck yes
#GSSAPIKeyExchange no
#GSSAPIEnablek5users no
# Set this to 'yes' to enable PAM authentication, account processing,
# and session processing. If this is enabled, PAM authentication will
# be allowed through the ChallengeResponseAuthentication and
# PasswordAuthentication. Depending on your PAM configuration,
# PAM authentication via ChallengeResponseAuthentication may bypass
# the setting of "PermitRootLogin without-password".
# If you just want the PAM account and session checks to run without
# PAM authentication, then enable this but set PasswordAuthentication
# and ChallengeResponseAuthentication to 'no'.
# WARNING: 'UsePAM no' is not supported in Red Hat Enterprise Linux and may cause several
# problems.
UsePAM yes
#AllowAgentForwarding yes
#AllowTcpForwarding yes
#GatewayPorts no
X11Forwarding yes
#X11DisplayOffset 10
#X11UseLocalhost yes
#PermitTTY yes
#PrintMotd yes
#PrintLastLog yes
#TCPKeepAlive yes
#UseLogin no
UsePrivilegeSeparation sandbox # Default for new installations.
#PermitUserEnvironment no
#Compression delayed
#ClientAliveInterval 0
#ClientAliveCountMax 3
#ShowPatchLevel no
#UseDNS yes
#PidFile /var/run/sshd.pid
#MaxStartups 10:30:100
#PermitTunnel no
#ChrootDirectory none
#VersionAddendum none
# no default banner path
#Banner none
# Accept locale-related environment variables
AcceptEnv LANG LC_CTYPE LC_NUMERIC LC_TIME LC_COLLATE LC_MONETARY LC_MESSAGES
AcceptEnv LC_PAPER LC_NAME LC_ADDRESS LC_TELEPHONE LC_MEASUREMENT
AcceptEnv LC_IDENTIFICATION LC_ALL LANGUAGE
AcceptEnv XMODIFIERS
# override default of no subsystems
Subsystem sftp /usr/libexec/openssh/sftp-server
# Example of overriding settings on a per-user basis
#Match User anoncvs
# X11Forwarding no
# AllowTcpForwarding no
# PermitTTY no
# ForceCommand cvs server
4、SSH简易安全设置
4.1 服务器软件本身的设置强化
SSHD服务器配置文件/etc/ssh/sshd_config默认项目已经很完备了,出于安全考虑需要设置:禁止root这个账号使用sshd服务;
[root@db2017 ~]# vi /etc/ssh/sshd_config
# Authentication:
#LoginGraceTime 2m
#PermitRootLogin yes #去掉注释且修改成PermitRootLogin no
PermitRootLogin no
#StrictModes yes
#MaxAuthTries 6
#MaxSessions 10
4.2、TCP Wrapper使用:/etc/hosts.allow /etc/hosts.deny
假如只想让本机以及局域网192.168.1.0/24、192.168.0.0/24及192.168.100.0/24网段内的主机能够登录的话,可以这样设置:
[root@db2017 ~]# vi /etc/hosts.allow
#
# hosts.allow This file contains access rules which are used to
# allow or deny connections to network services that
# either use the tcp_wrappers library or that have been
# started through a tcp_wrappers-enabled xinetd.
#
# See 'man 5 hosts_options' and 'man 5 hosts_access'
# for information on rule syntax.
# See 'man tcpd' for information on tcp_wrappers
#
sshd:127.0.0.1 192.168.0.0/255.255.255.0 192.168.1.0/255.255.255.0 192.168.100.0/255.255.255.0 #新添加的SSHD规则!
[root@db2017 ~]# vi /etc/hosts.deny
# the tcp_wrappers library or that have been
# started through a tcp_wrappers-enabled xinetd.
#
# The rules in this file can also be set up in
# /etc/hosts.allow with a 'deny' option instead.
#
# See 'man 5 hosts_options' and 'man 5 hosts_access'
# for information on rule syntax.
# See 'man tcpd' for information on tcp_wrappers
sshd:ALL
4.3、iptables数据包过滤防火墙
[root@db2017 sysconfig]# vi /etc/sysconfig/iptables
增加规则:
iptables -A INPUT -i EXTIF -s 192.168.0.0/24 -p tcp --dport 22 -j ACCEPT
iptables -A INPUT -i EXTIF -s 192.168.1.0/24 -p tcp --dport 22 -j ACCEPT
CentOS7下SSH服务学习笔记的更多相关文章
- CentOS7环境下SSH端口修改笔记
CentOS7环境下SSH端口修改笔记 说明: CentOS7服务器环境,默认SSH端口为22,考虑到安全方面问题,欲修改端口为62231(机器内网IP为192.168.1.31) ssh配置文件和i ...
- SpringCloud微服务学习笔记
SpringCloud微服务学习笔记 项目地址: https://github.com/taoweidong/Micro-service-learning 单体架构(Monolithic架构) Mon ...
- 微服务学习笔记(1)——使用MagicOnion实现gRPC
原文:微服务学习笔记(1)--使用MagicOnion实现gRPC 1.什么是gRPC 官方文档:https://grpc.io/docs/guides/index.html 2.什么是MagicOn ...
- 微服务学习笔记(2)——使用Consul 实现 MagicOnion(GRpc) 服务注册和发现
原文:微服务学习笔记(2)--使用Consul 实现 MagicOnion(GRpc) 服务注册和发现 1.下载打开Consul 笔者是windows下面开发的(也可以使用Docker). 官网下载w ...
- Spring Cloud微服务学习笔记
Spring Cloud微服务学习笔记 SOA->Dubbo 微服务架构->Spring Cloud提供了一个一站式的微服务解决方案 第一部分 微服务架构 1 互联网应用架构发展 那些迫使 ...
- CentOS7下RabbitMQ服务安装配置
参考文档: CentOS7下RabbitMQ服务安装配置 http://www.linuxidc.com/Linux/2016-03/129557.htm 在linux下安装配置rabbitMQ详细教 ...
- CentOS7下NFS服务安装及配置固定端口
CentOS7下NFS服务安装及配置 系统环境:CentOS Linux release 7.4.1708 (Core) 3.10.0-693.el7.x86_64 软件版本:nfs-utils-1. ...
- CENTOS7开启SSH服务
CENTOS7开启SSH服务 CENTOS7开启SSH服务以后,XSHELL,WINSCP才能成功连接CENTOS7. 开启ssh服务需要root权限,先用root账户登陆. 安装SSH: yum i ...
- Ubuntu环境下SSH服务安装、SSH远程登录以及SSH数据传输
https://www.cnblogs.com/asyang1/p/9467646.html SSH 为 Secure Shell 的缩写,为建立在应用层基础上的安全通信协议. 一.检查SSH服务是否 ...
随机推荐
- [ZJOI2018]历史(LCT)
这篇还发了洛谷题解 [Luogu4338] [BZOJ5212] 题解 题意 给出一棵树,给定每一个点的 \(access\) 次数,计算轻重链切换次数的最大值,带修改. 先考虑不带修改怎么做 假设 ...
- xshell传输文件到linux
我们使用xshell来连接linux之后会发现方便了很多~然而使用xshell要怎么把本地文件传到linux上面呢? 1.yum安装一款工具.#yum install lrzsz -y 2检查是否安 ...
- Electron、Node.js、JavaScript、JQuery、Vue.js、Angular.js,layui,bootstrap
转载:https://blog.csdn.net/meplusplus/article/details/79033786 layui :是基于jquery库的封装开发. bootstrap:同样基于 ...
- java TopK算法
现有一亿个数据,要求从其中找出最小的一万个数,希望所需的时间和空间最小,也就是所谓的topK问题 TopK问题就是从海量的数据中取最大(或最小的)的K个数. TopK问题其实是有线性时间复杂度的解的, ...
- 安装eclipse for ee
去官网下载最新版本版本的linux版本的eclipse for ee,下载到Downloads文件夹. 解压文件夹 sudo tar -zxvf eclipse-jee-2018-09-linux-g ...
- java——并查集 UnionFind
时间复杂度: O(log*n),近乎是O(1)级别的 UnionFind 接口: public interface UF { int getSize(); boolean isConnected(in ...
- Select语句完整的执行顺序
Select语句完整的执行顺序:1.from子句组装来自不同数据源的数据:2.where子句基于指定的条件对记录行进行筛选:3.group by子句将数据划分为多个分组:4.使用聚集函数进行计算:5. ...
- JMeter 正则表达式提取器(二)
引用名: 引用此数据-别名 正则表达式: 取值 模板: 表示使用提取到的第几个值:$-1$:表示取所有值$0$:表示随机取值$1$:表示取第1个$2$:表示取第二个以此类推:$n$:表示取第n个 ...
- ztree 获取最下级的子节点内容
<!doctype html> <html lang="en"> <head> <meta charset="UTF-8&quo ...
- red5服务器基础之red5环境的安装配置
red5的官网地址http://red5.org/ 下载完成之后解压 在系统变量配置RED5_HOME 在浏览器里输入 http://localhost:5080/ 配置ip地址在安装目录D:\red ...