Tomcat8+Spring-Security 启用安全通道(https)的一步步实现
近日学习Spring Security框架,学习到利用安全框架完成系统的安全通道控制时,来来回回遇到了不少问题。spring教程上写的略简单,对于我等小白来讲不足以支撑看书编码,好在网络上有资料可以查询,在吸取了他人经验,再结合自身的调试,最终实现了想要的效果。接下来,我就一步一步还原这个实现的过程,请往下看。
一、关于Tomcat的证书安装,ssl监听端口的实现说明
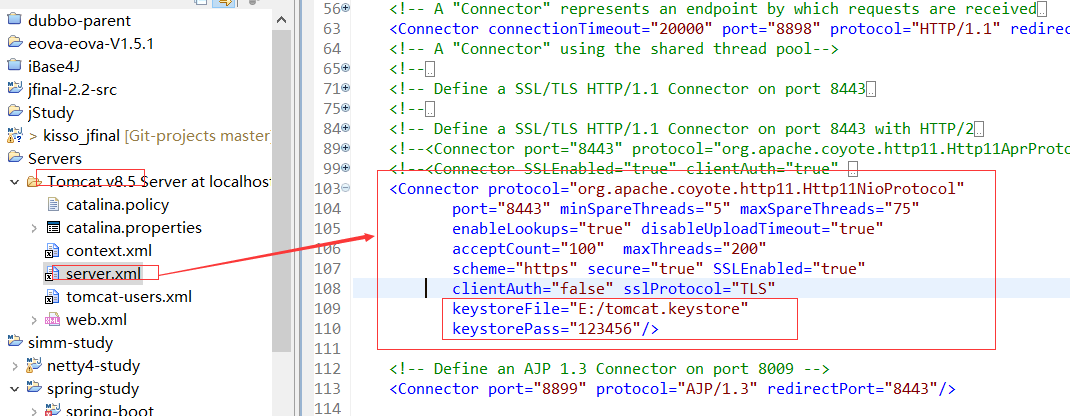
使用Tomcat启用ssl,需要在server.xml文件中 添加ssl请求的监听设置。方式有多种,这里提供一种,不是重点,不做赘述。
1.使用jdk的keytool工具,生成服务端证书
keytool -genkeypair -alias tomcat -keyalg RSA -keypass 123456 -storepass 123456 -keystore E:/tomcat.keystore

2.配置server.xml的ssl监听
    <Connector protocol="org.apache.coyote.http11.Http11NioProtocol"

           port="8443" minSpareThreads="5" maxSpareThreads="75"

           enableLookups="true" disableUploadTimeout="true"

           acceptCount="100"  maxThreads="200"

           scheme="https" secure="true" SSLEnabled="true"

           clientAuth="false" sslProtocol="TLS"

           keystoreFile="E:/tomcat.keystore"

           keystorePass="123456"/>
3.(可以选择)直接配置web.xml,完成安全通道的拦截开启。这种方式不需要spring security框架。
<login-config>

    <auth-method>CLIENT-CERT</auth-method>

    <realm-name>Client Cert Users-only Area</realm-name>

</login-config>

<security-constraint>

    <web-resource-collection>

        <web-resource-name >SSL</web-resource-name>

        <url-pattern>/*</url-pattern>

    </web-resource-collection>

    <user-data-constraint>

        <transport-guarantee>CONFIDENTIAL</transport-guarantee>

    </user-data-constraint>

</security-constraint>

</web-app>
二、验证Spring Security 安全通道设置的实现说明
1、参考spring教程说明,完成第一次的启用https的尝试。对 /free/** 的请求开启安全连接。

- 我的设置代码 ( .and().requiresChannel().antMatchers("/free/**").requiresSecure())
@Configuration

@EnableWebSecurity

public class SecurityConfig extends WebSecurityConfigurerAdapter {

    /**

     * HTTP请求处理

     */

    @Override

    protected void configure(HttpSecurity http) throws Exception {

        http

         .formLogin().loginPage("/user/login.do")

         .defaultSuccessUrl("/free/list.do")//启用FORM登录

        .and().authorizeRequests().antMatchers("/user/login.do").permitAll()//登录页允许所有人访问

        .and().authorizeRequests().antMatchers("/**/*.do").authenticated()

        .and().requiresChannel().antMatchers("/free/**").requiresSecure()

        //.channelProcessors(getChannelProcessors())

        .and().csrf().disable();  //暂时禁用CSRF

    }
- 测试一下。报出了一堆filter执行的错误,并且将请求的路径也改了,多了一级applicationContext。

- 跟踪源码,查看一下错误原因。堆栈调用过程这里就不细讲了,这里只说一下问题根源。
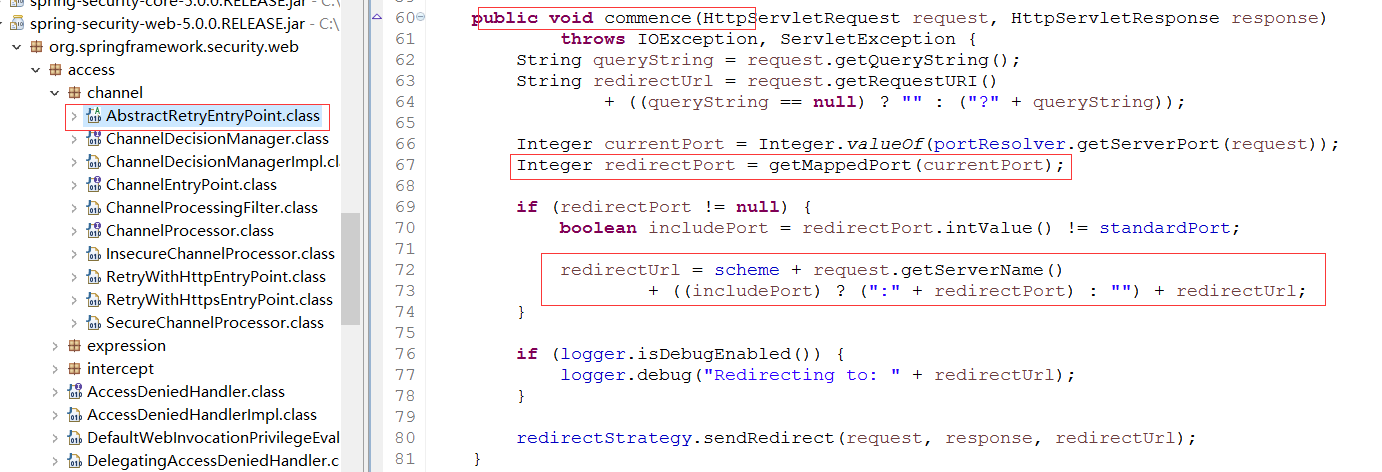
如图1,调试发现需要启动安全访问的请求都会进入这个方法,组装重定向地址。redirectPort 应该返回https请求监听端口,但是很遗憾的是这个值是null。
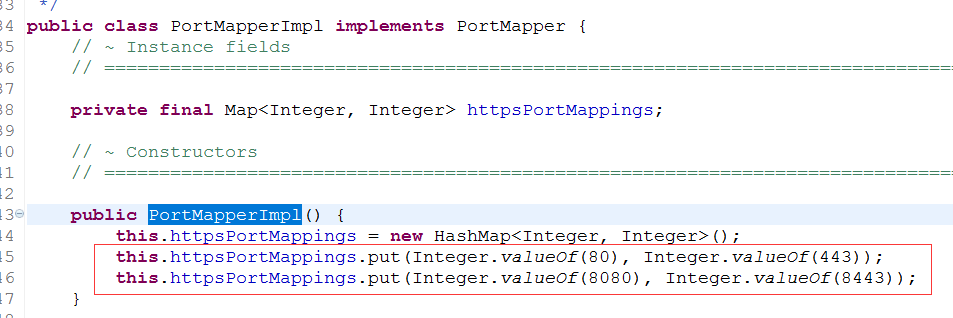
如图2,接下来我看了下 getMappedPort这个方法,发现Spring Security默认是内置个两组对应的映射端口(80->443,8080->8443)。到这里上面出错就好理解了,我测试用的tomcat,设置的http请求监听端口是8898,根本就找不到对应的https端口。知道了问题,接下来就开始整改吧。
2、个人源码分析,暴力指定自己的通道请求处理,设置channelProcessors。
- 我的整改代码
    /**

     * HTTP请求处理

     */

    @Override

    protected void configure(HttpSecurity http) throws Exception {

        http

         .formLogin().loginPage("/user/login.do")

         .defaultSuccessUrl("/free/list.do")//启用FORM登录

        .and().authorizeRequests().antMatchers("/user/login.do").permitAll()//登录页允许所有人访问

        .and().authorizeRequests().antMatchers("/**/*.do").authenticated()

        .and().requiresChannel().channelProcessors(getChannelProcessors())

        .antMatchers("/free/**").requiresSecure()

        .and().csrf().disable();  //暂时禁用CSRF

    }

    /**

     * 设置自己的通道处理器

     * @return

     */

    private List<ChannelProcessor> getChannelProcessors(){

       List<ChannelProcessor> list = new ArrayList<ChannelProcessor>();

       SecureChannelProcessor processor = new SecureChannelProcessor();

       RetryWithHttpsEntryPoint entryPoint = ((RetryWithHttpsEntryPoint)processor.getEntryPoint());

       //重新定义port映射

       PortMapperImpl portMapper = new PortMapperImpl();

       HashMap<String,String> maper = new HashMap<String,String>();

       maper.put("80","443");

       maper.put("8080","8443");

       maper.put("8898","8443");

       portMapper.setPortMappings(maper);

       entryPoint.setPortMapper(portMapper);

       list.add(processor);

       list.add(new InsecureChannelProcessor());

       return list;

    }
- 测试一下,看看结果。不出所料,已经可以了!

3.、回头想想,框架不会这么烂吧?不可能一个端口映射,还得自己分析一堆源码才知道怎么玩?会不会是我自己没找到门路?答案是肯定的,实际上框架真的已经提供了配置端口映射的方法。接下来就是优雅的第3版实现,请往下看。
- 我的整改代码
@Configuration

@EnableWebSecurity

public class SecurityConfig extends WebSecurityConfigurerAdapter {

    /**

     * HTTP请求处理

     */

    @Override

    protected void configure(HttpSecurity http) throws Exception {

        http

         .formLogin().loginPage("/user/login.do")

         .defaultSuccessUrl("/free/list.do")//启用FORM登录

        .and().authorizeRequests().antMatchers("/user/login.do").permitAll()//登录页允许所有人访问

        .and().portMapper().http(8898).mapsTo(8443)  //添加端口映射,做测试用

        .and().authorizeRequests().antMatchers("/**/*.do").authenticated()

        .and().requiresChannel().antMatchers("/free/**").requiresSecure()

        .and().requiresChannel().anyRequest().requiresInsecure()

        .and().httpBasic()

        .and().csrf().disable();  //暂时禁用CSRF

    }
- 测试一下,看看结果。非常不错,这才是正确的道路!
4、试了几把跳转,发现点击退出系统按钮,退回到登录页面也成了https请求,不符合我想要的设置效果啊。按这个测试结果来看,猜测整个过程应该是这样的。当我们成功进入一次https请求后,之后的请求因为都是指定的相对路径,所以全部指向了8443端口。需要有个显示的设置,让其他请求被http架构处理。接下来是我的第4版实现,请往下看。
- 我的整改代码
@Configuration

@EnableWebSecurity

public class SecurityConfig extends WebSecurityConfigurerAdapter {

    /**

     * HTTP请求处理

     */

    @Override

    protected void configure(HttpSecurity http) throws Exception {

        String doUrl = "/**/*.do";

        http

         .formLogin().loginPage("/user/login.do")

         .defaultSuccessUrl("/free/list.do")//启用FORM登录

        .and().authorizeRequests().antMatchers("/user/login.do").permitAll()//登录页允许所有人访问

        .and().portMapper().http(8898).mapsTo(8443)  //添加端口映射,做测试用

        .and().authorizeRequests().antMatchers(doUrl).authenticated()

        .and().requiresChannel().antMatchers("/free/**",doUrl).requiresSecure()

        .and().requiresChannel().antMatchers(doUrl).requiresInsecure()

        .and().httpBasic()

        .and().csrf().disable();  //启用CSRF

    }
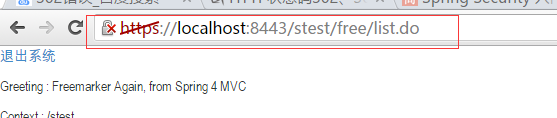
- 测试一下,看看结果。可以了,现在可以做到只对/free/路径下的请求开启https安全通道了!

至此开启安全访问通道的功能实现就完成了。希望对读到结尾的你有所帮助!如果有好的意见,欢迎评论交流。
Tomcat8+Spring-Security 启用安全通道(https)的一步步实现的更多相关文章
- Spring Security权限控制
Spring Security官网 : https://projects.spring.io/spring-security/ Spring Security简介: Spring Security是一 ...
- 使用Spring Security控制会话
1.概述 在本文中,我们将说明Spring Security如何允许我们控制HTTP会话.此控件的范围从会话超时到启用并发会话和其他高级安全配置. 2.会话何时创建? 我们可以准确控制会话何时创建以及 ...
- 结合Spring Security进行web应用会话安全管理
在本文中,将为大家说明如何结合Spring Security 和Spring Session管理web应用的会话. 一.Spring Security创建使用session的方法 Spring Sec ...
- spring security控制session
spring security控制session本文给你描述在spring security中如何控制http session.包括session超时.启用并发session以及其他高级安全配置. 创 ...
- SpringBoot 优雅配置跨域多种方式及Spring Security跨域访问配置的坑
前言 最近在做项目的时候,基于前后端分离的权限管理系统,后台使用 Spring Security 作为权限控制管理, 然后在前端接口访问时候涉及到跨域,但我怎么配置跨域也没有生效,这里有一个坑,在使用 ...
- Spring Security 源码分析(四):Spring Social实现微信社交登录
社交登录又称作社会化登录(Social Login),是指网站的用户可以使用腾讯QQ.人人网.开心网.新浪微博.搜狐微博.腾讯微博.淘宝.豆瓣.MSN.Google等社会化媒体账号登录该网站. 前言 ...
- spring security oauth2 client_credentials模
spring security oauth2 client_credentials模 https://www.jianshu.com/p/1c3eea71410e 序 本文主要简单介绍一下spring ...
- 关于 Spring Security OAuth2 中 CORS 跨域问题
CORS 是一个 W3C 标准,全称是”跨域资源共享”(Cross-origin resource sharing).它允许浏览器向跨源服务器,发出XMLHttpRequest请求,从而克服了 AJA ...
- spring security 学习文档
web service Prepared by: Sea ...
随机推荐
- mybatis_SQL映射(2)
文章摘录自:http://blog.csdn.net/y172158950/article/details/17258377 1. sql的重用:定义一个sql片段,可在任何SQL语句中重用该片段. ...
- LinkedList 源码分析(JDK 1.8)
1.概述 LinkedList 是 Java 集合框架中一个重要的实现,其底层采用的双向链表结构.和 ArrayList 一样,LinkedList 也支持空值和重复值.由于 LinkedList 基 ...
- linux下建ftp用户,并限制用户访问路径[转]
目的是:在linux系统上建立ftp用户,并限制其通过ftp访问时,只能访问用户主目录:其主目录显示路径也是“/”,看不到上级目录. 例如,我要建立用户usertest,密码为usertest ...
- CSS--开篇
1,什么是CSS? 层叠样式表(Cascading Style Sheet ),定义了如何显示HTML元素,用来控制网页的样式和布局. 引入CSS后:HTML标记专门用于定义网页的内容,而使用CSS来 ...
- MyEclipse安装插件
原文地址:http://www.cnblogs.com/pharen/archive/2012/02/08/2343342.html 本文讲解MyEclipse(MyEclipse10)的三种方法,以 ...
- android onSaveInstanceState应用实例
//activity销毁之前调用,把状态值存储上 @Override protected void onSaveInstanceState(Bundle outState) { outState.pu ...
- Docker for Web Developers目录
在OpenStack在私有云占主导定位之后,后起之秀Docker在PaaS平台.CI/CD.微服务领域展露锋芒.作为Web Developers,我们有必要学习和掌握这门技术. 1. 运行第一个Doc ...
- C# Linq基本常用用法
1.什么是Linq? Lanaguage Interated Query(语言集成查询),Linq 是集成C# 和VB这些语言中用于提供数据查询能力的一个新特性. 这里只介绍两种基本常用用法. 学习方 ...
- Nagios在selinux开启的情况下使用
# chcon -R -t httpd_sys_content_t /usr/local/nagios/sbin/ # chcon -R -t httpd_sys_content_t /usr/loc ...
- maps.reg
^/(.*\.miaopai.com/stream/.*\.mp4\?.*) http://$1 ^/([[:digit:]]{1,3}\.[[:digit:]]{1,3}\.[[:digit:]]{ ...