Python CRM项目二
一.准备工作
如果没有配置基本的项目,请参考 http://www.cnblogs.com/luhuajun/p/7771196.html
当我们配置完成后首先准备我们的app
创建2个app分别对应学生,重写的Admin模板
 python manager.py startapp student  #学生视图

 python manager.py startapp king_admin #king_admin视图
配置每个app的url映射
1.主app
 #将每个模块的urls.py引入

 urlpatterns = [

     url(r'^admin/', admin.site.urls),

     url(r'^crm/',include('crm.urls')),

     url(r'^student/',include('student.urls')),

     url(r'^king_admin/',include('king_admin.urls')),

 ]
2.crm
 urlpatterns = [

     url(r'^$',views.index,name='sales_index'),#销售首页

     url(r'customers/',views.customer_list,name='customer_list'),#客户库

 ]
3.student
 urlpatterns = [

     #学生首页

     url(r'^$',views.index,name='stu_index'),

 ]
4.king_admin
 urlpatterns = [

     #表首页

     url(r'^$',views.index,name='table_index'),

 ]
配置每个url的视图
1.crm
 def index(request):

     #返回销售首页

     return render(request,'index.html',name='sales_index')

 def customer_list(request):

     #返回客户库首页

     return render(request,'sales/customers.html')
2.student
 def index(request):

     #返回学生首页

     return render(request,'student/index.html')
3.king_admin
 def index(request):

     #返回表格管理页面

     return render(request, 'king_admin/table_index.html',{'table_list':king_admin.enabled_admins})
配置前端页面
模板使用:http://v3.bootcss.com/examples/dashboard/
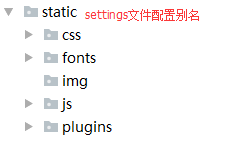
将上面的模板下载,将css,js,文件按一下的层级结构归类
下载的html文件进行分解,分解为base.html和index.html
base.html存放css文件和js文件
index.html继承base.html然后在此基础上进行定制
base.html
 <!DOCTYPE html>

 <html lang="zh-CN">

   <head>

     <meta charset="utf-8">

     <meta http-equiv="X-UA-Compatible" content="IE=edge">

     <meta name="viewport" content="width=device-width, initial-scale=1">

     <!-- 上述3个meta标签*必须*放在最前面,任何其他内容都*必须*跟随其后! -->

     <meta name="description" content="">

     <meta name="author" content="">

     <title>oldboy CRM</title>

     <!-- Bootstrap core CSS -->

     <link href="/static/css/bootstrap.min.css" rel="stylesheet">

     <!-- IE10 viewport hack for Surface/desktop Windows 8 bug -->

     <link href="/static/css/dashboard.css" rel="stylesheet">

     <!-- Custom styles for this template -->

     <link href="/static/css/ie10-viewport-bug-workaround.css" rel="stylesheet">

     <link href="/static/plugins/dropzone/dropzone.css" rel="stylesheet">

     {% block css %}{% endblock %}

   </head>

   {% block body %}{% endblock %}

     <script src="/static/js/jquery.min.js"></script>

     <script src="/static/js/bootstrap.min.js"></script>

     <script src="/static/js/holder.min.js"></script>

     <script src="/static/js/ie10-viewport-bug-workaround.js"></script>

     <script src="/static/plugins/dropzone/dropzone.js"></script>

   {% block bottom-js %}{% endblock %}

 </html>
index.html
 {% extends 'base.html' %}

 {% block body %}

 <body>

     <nav class="navbar navbar-inverse navbar-fixed-top">

       <div class="container-fluid">

         <div class="navbar-header">

           <button type="button" class="navbar-toggle collapsed" data-toggle="collapse" data-target="#navbar" aria-expanded="false" aria-controls="navbar">

             <span class="sr-only">Toggle navigation</span>

             <span class="icon-bar"></span>

             <span class="icon-bar"></span>

             <span class="icon-bar"></span>

           </button>

           <a class="navbar-brand" href="#">My CRM</a>

         </div>

         <div id="navbar" class="navbar-collapse collapse">

           <ul class="nav navbar-nav navbar-right">

             <li class="dropdown">

                 <a href="#" class="dropdown-toggle" data-toggle="dropdown" aria-expanded="false">{{ request.user }}</a>

                 <ul class="dropdown-menu" role="menu">

 {#                    <li><a href="{% url 'acc_logout' %}">注销</a></li>#}

                 </ul>

             </li>

           </ul>

         </div>

       </div>

     </nav>

     <div class="container-fluid">

       <div class="row">

         <div class="col-sm-3 col-md-2 sidebar">

           <ul class="nav nav-sidebar">

 {#            {% for role in request.user.roles.all %}#}

 {#                {% for menu in role.menus.all %}#}

 {#                    <li><a href="{% if menu.url_type == 0 %}{% url menu.url_name %}{% else %}{{   menu.url_name }}{% endif %}">{{ menu.name }}</a></li>#}

 {#                {% endfor %}#}

 {#            {% endfor %}#}

               {% for role in request.user.userprofile.roles.all %}

                 {% for menu in role.menus.all %}

                     <li><a href="{% url menu.url_name %}">{{ menu.name }}</a></li>

                 {% endfor %}

               {% endfor %}

           </ul>

         </div>

         <div class="col-sm-9 col-sm-offset-3 col-md-10 col-md-offset-2 main">

            {% block page-content %}

             <h1 class="page-header">Dashboard</h1>

             <div class="row placeholders">

             <div class="col-xs-6 col-sm-3 placeholder">

               <img src="data:image/gif;base64,R0lGODlhAQABAIAAAHd3dwAAACH5BAAAAAAALAAAAAABAAEAAAICRAEAOw==" width="200" height="200" class="img-responsive" alt="Generic placeholder thumbnail">

               <h4>Label</h4>

               <span class="text-muted">Something else</span>

             </div>

           </div>

             <h2 class="sub-header">Section title</h2>

             {% endblock %}

         </div>

       </div>

     </div>

   </body>

 {% endblock %}
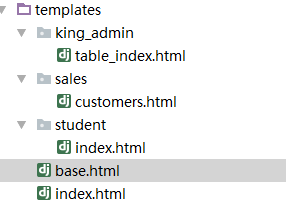
然后在template下创个各个app名称的文件夹来存放不同app的页面,目录结构如下
然后启动项目,看看每个url是否可以正常访问
准备数据
在插入数据之前,由于本项目要是用动态菜单,所以还要创建一张菜单表和角色表进行关联
 class Menu(models.Model):

     '''菜单表'''

     name = models.CharField(max_length=32)

     url_name = models.CharField(max_length=64,unique=True)

     def __str__(self):

         return self.name

     class Meta:

         verbose_name_plural = '菜单'

 class Role(models.Model):

     '''角色表'''

     name = models.CharField(max_length=64,unique=True)

     #新增菜单信息

     menus = models.ManyToManyField('Menu',blank=True)

     def __str__(self):

         return self.name

     class Meta:

         verbose_name_plural = '角色'
同步数据库,启动项目,进入admin后台管理
在一些表中插入数据
首先插入tag表
 INSERT INTO prefect_crm.crm_tag (name) VALUES ('土豪');

 INSERT INTO prefect_crm.crm_tag (name) VALUES ('屌丝');

 INSERT INTO prefect_crm.crm_tag (name) VALUES ('无基础');

 INSERT INTO prefect_crm.crm_tag (name) VALUES ('有基础');

 INSERT INTO prefect_crm.crm_tag (name) VALUES ('有工作经验');

 INSERT INTO prefect_crm.crm_tag (name) VALUES ('没文化');

 INSERT INTO prefect_crm.crm_tag (name) VALUES ('没有工作经验');

 INSERT INTO prefect_crm.crm_tag (name) VALUES ('转行');
菜单表
 INSERT INTO prefect_crm.crm_menu (name, url_name) VALUES ('销售首页', 'sales_index');

 INSERT INTO prefect_crm.crm_menu (name, url_name) VALUES ('学生首页', 'stu_index');

 INSERT INTO prefect_crm.crm_menu (name, url_name) VALUES ('客户库', 'customer_list');
角色表
 INSERT INTO prefect_crm.crm_role (name) VALUES ('学生');

 INSERT INTO prefect_crm.crm_role (name) VALUES ('销售');
角色和菜单的关联表
 INSERT INTO prefect_crm.crm_role_menus (role_id, menu_id) VALUES (1, 1);

 INSERT INTO prefect_crm.crm_role_menus (role_id, menu_id) VALUES (1, 3);

 INSERT INTO prefect_crm.crm_role_menus (role_id, menu_id) VALUES (2, 2);
用户表
 INSERT INTO prefect_crm.crm_userprofile (name, user_id) VALUES ('Alex Li', 1);

 INSERT INTO prefect_crm.crm_userprofile (name, user_id) VALUES ('Jack', 2);
用户角色关联表
 INSERT INTO prefect_crm.crm_userprofile_roles (userprofile_id, role_id) VALUES (1, 1);

 INSERT INTO prefect_crm.crm_userprofile_roles (userprofile_id, role_id) VALUES (2, 2);
课程表
 INSERT INTO prefect_crm.crm_course (name, price, period, outline) VALUES ('Python', 18900, 5, '1.python语法

 2.python基础

 3.前端

 4.项目');
客户表
 INSERT INTO prefect_crm.crm_customer (name, qq, qq_name, phone, source, referral_from, content, memo, status, date, consult_course_id, consultant_id) VALUES ('大锤', '', '大锤', '', 1, '', '上课时间

 上课地点

 价格', '没有报名', 'unregistered', '2017-10-17 01:48:53', 1, 1);

 INSERT INTO prefect_crm.crm_customer (name, qq, qq_name, phone, source, referral_from, content, memo, status, date, consult_course_id, consultant_id) VALUES ('小锤', '', '小锤', '', 2, '', '价格

 地点

 学习周期', '有点低能', 'unregistered', '2017-10-17 01:49:49', 1, 1);

 INSERT INTO prefect_crm.crm_customer (name, qq, qq_name, phone, source, referral_from, content, memo, status, date, consult_course_id, consultant_id) VALUES ('小悦悦', '', '小悦悦', '', 4, '', '价格

 授课方式

 是否有美女', '有强烈的学习意向', 'signed', '2017-10-17 01:52:12', 1, 2);
客户和标签的关系表
 INSERT INTO prefect_crm.crm_customer_tags (customer_id, tag_id) VALUES (1, 4);

 INSERT INTO prefect_crm.crm_customer_tags (customer_id, tag_id) VALUES (1, 7);

 INSERT INTO prefect_crm.crm_customer_tags (customer_id, tag_id) VALUES (2, 2);

 INSERT INTO prefect_crm.crm_customer_tags (customer_id, tag_id) VALUES (2, 5);

 INSERT INTO prefect_crm.crm_customer_tags (customer_id, tag_id) VALUES (3, 2);

 INSERT INTO prefect_crm.crm_customer_tags (customer_id, tag_id) VALUES (3, 8);
在此列出这些数据表,但是我们在Django admin自带的后台管理中,不需要插入中间表,系统会自动在中间表中关联,此处只是说明表关系
二.动态菜单的展示
在配置完数据之后,首先在页面的右上角展示登录的用户名,在左侧菜单根据不同的用户展示不同的明细

因为userprofile中关联了Django自带的User,所以展示用户名只需要一行代码
在index.html中找到相应的行,替换即可
<a href="#" class="dropdown-toggle" data-toggle="dropdown" aria-expanded="false">{{ request.user }}</a>
因为在userprofile中已经关联了role,而role关联了菜单所以在前端可以直接循环userprofile来获取菜单
在index.html中找到相应的行,替换即可
 {% for role in request.user.userprofile.roles.all %}

                 {% for menu in role.menus.all %}

                     <li><a href="{% url menu.url_name %}">{{ menu.name }}</a></li>

                 {% endfor %}

               {% endfor %}
这样动态菜单就设置完成
三.king_admin动态绑定models
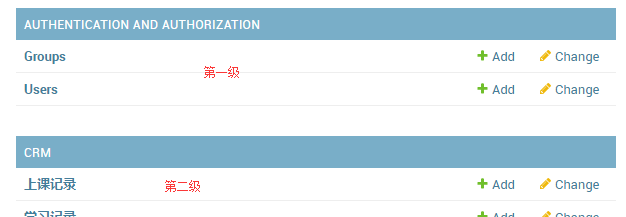
因为我们要重写Django Admin的功能,所以首先分析Admin展示的数据结构
第一级是App
第二级是models
第三级是字段
所以数据结构是
{app_name:{model_name:model_object,model_name1:model_object1,model_name2:model_object2....},}
这样的分层结构来封装数据,并返回给前端展示
根据类自动获取关联的表名和app名称
过程
 #1.进入python交互环境

 python manage.py shell

 #2.找到app名称

 from crm import models

 models.UserProfile._meta.app_config

 #3.找到表名

 models.UserProfile._meta.app_label
核心代码:
 def register(model_class,admin_class=None):

     #如果不存再app,就新建一个字典,并且绑定admin_class和mode_class

     if model_class._meta.app_label not in enabled_admins:

         enabled_admins[model_class._meta.app_label] = {}

     #绑定model对象和admin类,类似于admin的register方法

     admin_class.model = model_class

     #将字典的格式写成{app:{'model_name':model_obj}}这种格式

     enabled_admins[model_class._meta.app_label][model_class._meta.model_name] = admin_class
总体代码:
 from crm import models

 enabled_admins = {} #全局字典

 class BaseAdmin(object):

     #基类

     list_display = []

     list_filter = []

 #定制类

 class CustomerFollowUpAdmin(BaseAdmin):

     list_display = ['customer', 'consultant','date']

 class CustomerAdmin(BaseAdmin):

     list_display = ['qq','name']

     #model = model.Customer

 #绑定model和定制类的方法

 def register(model_class,admin_class=None):

     if model_class._meta.app_label not in enabled_admins:

         enabled_admins[model_class._meta.app_label] = {}

     admin_class.model = model_class#绑定model对象和admin类

     enabled_admins[model_class._meta.app_label][model_class._meta.model_name] = admin_class

 #注册

 register(models.Customer,CustomerAdmin)
 from crm import models

 enabled_admins = {} #全局字典

 class BaseAdmin(object):

     #基类定义一些展示方法

     list_display = []

     list_filter = []

 class CustomerFollowUpAdmin(BaseAdmin):

     #自定义展示

     list_display = ['customer', 'consultant','date']

 class CustomerAdmin(BaseAdmin):

     list_display = ['qq','name']

     #model = model.Customer

 def register(model_class,admin_class=None):

     if model_class._meta.app_label not in enabled_admins:

         enabled_admins[model_class._meta.app_label] = {}

     #绑定model对象和admin类

     admin_class.model = model_class

     enabled_admins[model_class._meta.app_label][model_class._meta.model_name] = admin_class

 #注册

 register(models.Customer,CustomerAdmin)

 register(models.CustomerFollowUp,CustomerFollowUp
视图映射
 from django.shortcuts import render

 from king_admin import king_admin

 # Create your views here.

 def index(request):

     return render(request, 'king_admin/table_index.html',{'table_list':king_admin.enabled_admins})
页面
 {% extends 'base.html' %}

 {% block body %}

 <body>

     <nav class="navbar navbar-inverse navbar-fixed-top">

       <div class="container-fluid">

         <div class="navbar-header">

           <button type="button" class="navbar-toggle collapsed" data-toggle="collapse" data-target="#navbar" aria-expanded="false" aria-controls="navbar">

             <span class="sr-only">Toggle navigation</span>

             <span class="icon-bar"></span>

             <span class="icon-bar"></span>

             <span class="icon-bar"></span>

           </button>

           <a class="navbar-brand" href="#">My CRM</a>

         </div>

         <div id="navbar" class="navbar-collapse collapse">

           <ul class="nav navbar-nav navbar-right">

             <li class="dropdown">

                 <a href="#" class="dropdown-toggle" data-toggle="dropdown" aria-expanded="false">{{ request.user }}</a>

                 <ul class="dropdown-menu" role="menu">

 {#                    <li><a href="{% url 'acc_logout' %}">注销</a></li>#}

                 </ul>

             </li>

           </ul>

         </div>

       </div>

     </nav>

     <div class="container" style="margin-top:50px;">

         <div class="row">

             <div class="panel panel-info">

               <div class="panel-heading">

                 <h3 class="panel-title">Panel title</h3>

               </div>

               <div class="panel-body">

                 {% for app_name,app_tables in table_list.items %}

                 <table class="table table-hover">

                    <thead>

                     <tr>

                        <th>{{ app_name }}</th>

                     </tr>

                    </thead>

                    <tbody>

                    {% for table_name,admin in app_tables.items %}

                     <tr>

                         <td>{{ table_name }}</td>

                         <td>add</td>

                         <td>change</td>

                     </tr>

                     {% endfor %}

                    </tbody>

                 </table>

                {% endfor %}

               </div>

             </div>

         </div>

     </div>

 </body>

 {% endblock %}
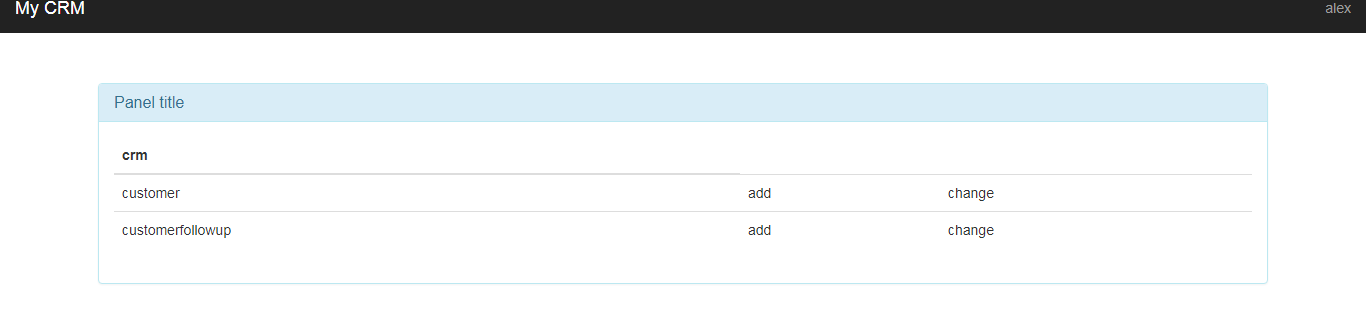
以上步骤的展示效果
Python CRM项目二的更多相关文章
- Python CRM项目八
自定义用户认证 目的:实现Django自定义的认证系统,在生产环境都是根据此代码进行定制的 步骤: 1.在settings文件中配置要使用的类 #命名规则 app名称.类名 AUTH_USER_MOD ...
- python实践项目二:列表转字符串
将列表各元素转换为字符串并以规定形式返回. 假定有下面这样的列表:spam = ['apples', 'bananas', 'tofu', 'cats'],将其转换成字符串:'apples, bana ...
- Python CRM项目一
开发环境: 语言Python3.X以上 MTV WEB框架 Django 前端框架 jQuery+bootstrap 数据库 MySQL 运行环境 安装Python3.x 安装Django 除IE8以 ...
- Python CRM项目七
仿照Django Admin实现对readonly的字段进行设置 功能点: 1.页面不可进行更改 2.如果改变html代码中的值,则需要进行后端的数据库数据校验 3.可以对某些字段进行自定制校验规则 ...
- Python CRM项目三
1.分页: 分页使用Django内置的分页模块来实现 官方的分页案例 from django.core.paginator import Paginator, EmptyPage, PageNotAn ...
- Python CRM项目六
自定义Django Admin的action 在Django Admin中,可以通过action来自定义一些操作,其中默认的action的功能是选中多条数据来进行删除操作 我们在king_admin中 ...
- Python CRM项目四
实现Django Admin的多对多的复选框效果 效果:左边显示的是未选中的字段,右边显示的是已选中的字段,两边点击的标签可以互相更换 首先在king_admin.py中增加filter_horizo ...
- crm 系统项目(二) admin 后台操作表格
crm 系统项目(二) admin 后台操作表格 1. app下创建 templates 运行的时候 先找全局的templates——> 按照app的注册顺序找templates中的文件 2. ...
- CRM项目总结
CRM项目总结 一:开发背景 在公司日益扩大的过程中,不可避免的会伴随着更多问题出现. 对外 : 如何更好的管理客户与公司的关系?如何更及时的了解客户日益发展的需求变 ...
随机推荐
- SIT 和 UAT
在企业级软件的测试过程中,经常会划分为三个阶段--单元测试,SIT和UAT,如果开发人员足够,通常还会在SIT之前引入代码审查机制(Code Review)来保证软件符合客户需求且流程正确.下面简单介 ...
- Axios源码阅读笔记#1 默认配置项
Promise based HTTP client for the browser and node.js 这是 Axios 的定义,Axios 是基于 Promise,用于HTTP客户端--浏览器和 ...
- 用reduce实现阶乘计算
def fact(a,b): return a*b from functools import reduce print(reduce(fact,range(1,6))) from functools ...
- Pagination(分页) 从前台到后端总结
一:效果图 下面我先上网页前台和管理端的部分分页效果图,他们用的是一套代码. 回到顶部(go to top) 二:上代码前的一些知识 ...
- oracle 例外
一.例外分类oracle将例外分为预定义例外.非预定义例外和自定义例外三种.1).预定义例外用于处理常见的oracle错误.2).非预定义例外用于处理预定义例外不能处理的例外.3).自定义例外用于处理 ...
- C++ Primer Plus 6 第二章
// myfirst.cpp--displays a message #include <iostream> // a PREPROCESSOR directive int main() ...
- Java并发/多线程系列——初识篇
回到过去,电脑有一个CPU,一次只能执行一个程序.后来多任务处理意味着计算机可以同时执行多个程序(AKA任务或进程).这不是真的"同时".单个CPU在程序之间共享.操作系统将在运行 ...
- .NET十年回顾
一. 引子 从我还是编程菜鸟时起,.NET就从来没让我失望过.总是惊喜不断. 当年我第一个项目是做个进销存.用的Winform.当时我是机电工程师.编程只是业余心血来潮而已. .NET的低门槛.V ...
- Elixir游戏服设计五
在<Elixir游戏服设计一>里提到,按照系统功能划分成app要保证原子性很难, 现在想想也没那么难.保证原子性,无非就是需要某个单点去完成操作.那么选择玩家进程去做原子性工作就可以了. ...
- Redis缓存项目应用架构设计二
一.概述 由于架构设计一里面如果多平台公用相同Key的缓存更改配置后需要多平台上传最新的缓存配置文件来更新,比较麻烦,更新了架构设计二实现了缓存配置的集中管理,不过这样有有了过于中心化的问题,后续在看 ...