[js高手之路]封装运动框架实战左右与上下滑动的焦点轮播图
在这篇文章[js高手之路]打造通用的匀速运动框架中,封装了一个匀速运动框架,我们在这个框架的基础之上,加上缓冲运动效果,然后用运动框架来做幻灯片(上下,左右),效果如下:【选择器用的是html5的,你的浏览器需要支持html5新选择器,才能看见效果额】


- 1
- 2
- 3
- 4
- 5
缓冲运动通常有两种常见的表现:比如让一个div从0运动到500,一种是事件触发的时候,速度很快, 一种是事件触发的时候慢,然后慢慢加快.我们来实现先块后慢的,常见的就是开车,比如刚从高速路上下来的车,就是120km/小时,然后进入匝道,变成40km/时. 或者40km/小时进入小区,最后停车,变成0km/小时. 从120km/小时->40km/小时, 或者40km->0km/小时,都是速度先块后慢,这种运动怎么用程序来表示呢?
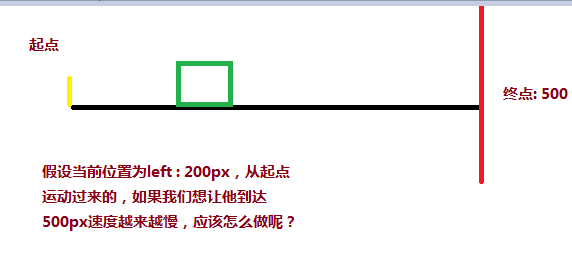
可以用目标距离( 500 ) - 当前距离( 200 ) / 一个系数( 比如12 ),就能达到速度由块而慢的变化,当前距离在起点,分子(500 - 0 )最大,所以速度最大,如果当前距离快要接近500,分子最小,除完之后的速度也是最小。
     <style>

         div{

             width: 200px;

             height: 200px;

             background:red;

             position: absolute;

             left: 0px;

         }

     </style>

     <script>

         window.onload = function(){

             var oBtn = document.querySelector( "input" ),

                 oBox = document.querySelector( '#box' ),

                 speed = 0, timer = null;

             oBtn.onclick = function(){

                 timer = setInterval( function(){

                     speed = ( 500 - oBox.offsetLeft ) / 8;

                     oBox.style.left = oBox.offsetLeft + speed + 'px';

                 }, 30 );

             }

         }

     </script>

 </head>

 <body>

     <input type="button" value="动起来">

     <div id="box"></div>

 </body>
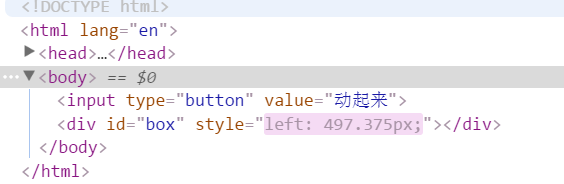

你会发现,速度永远都在0.375这里停着,获取到的当前的距离停在497px? 这里有个问题,我们的div不是停在497.375px吗,怎么获取到的没有了后面的小数0.375呢?计算机在处理浮点数会有精度损失。我们可以单独做一个小测试:
 <div id="box" style="position:absolute;left:30.2px;width:200px;height:300px;background:red;"></div>

     <script>

         var oBox = document.querySelector( '#box' );

         alert( oBox.offsetLeft );

     </script>
你会发现这段代码获取到左偏移是30px而不是行间样式中写的30.2px。因为在获取当前位置的时候,会舍去小数,所以速度永远停在0.375px, 位置也是永远停在497,所以,为了到达目标,我们就得把速度变成1,对速度向上取整( Math.ceil ),我们就能把速度变成1,div也能到达500
 oBtn.onclick = function(){

     timer = setInterval( function(){

         speed = ( 500 - oBox.offsetLeft ) / 8;

         if( speed > 0 ) {

             speed = Math.ceil( speed );

         }

         console.log( speed, oBox.offsetLeft );

         oBox.style.left = oBox.offsetLeft + speed + 'px';

     }, 30 );

 }
第二个问题,如果div的位置是在900,也就是说从900运动到500,有没有这样的需求呢? 肯定有啊,轮播图,从右到左就是这样的啊。
     <style>

         #box{

             width: 200px;

             height: 200px;

             background:red;

             position: absolute;

             left: 900px;

         }

     </style>

     <script>// <![CDATA[

         window.onload = function(){

             var oBtn = document.querySelector( "input" ),

                 oBox = document.querySelector( '#box' ),

                 speed = 0, timer = null;

             oBtn.onclick = function(){

                 timer = setInterval( function(){

                     speed = ( 500 - oBox.offsetLeft ) / 8;

                     if( speed > 0 ) {

                         speed = Math.ceil( speed );

                     }

                     oBox.style.left = oBox.offsetLeft + speed + 'px';

                 }, 30 );

             }

         }

     // ]]></script>

 </head>

 <body>

     <input type="button" value="动起来">

     <div id="box"></div>

 </body>

 oBtn.onclick = function(){

     timer = setInterval( function(){

         speed = ( 500 - oBox.offsetLeft ) / 8;

         if( speed > 0 ) {

             speed = Math.ceil( speed );

         }else {

             speed = Math.floor( speed );

         }

         console.log( speed, oBox.offsetLeft );

         oBox.style.left = oBox.offsetLeft + speed + 'px';

     }, 30 );

 }
然后我们把这个缓冲运动整合到匀速运动框架,就变成:
 function css(obj, attr, value) {

     if (arguments.length == 3) {

         obj.style[attr] = value;

     } else {

         if (obj.currentStyle) {

             return obj.currentStyle[attr];

         } else {

             return getComputedStyle(obj, false)[attr];

         }

     }

 }

 function animate(obj, attr, fn) {

     clearInterval(obj.timer);

     var cur = 0;

     var target = 0;

     var speed = 0;

     obj.timer = setInterval(function () {

         var bFlag = true;

         for (var key in attr) {

             if (key == 'opacity ') {

                 cur = css(obj, 'opacity') * 100;

             } else {

                 cur = parseInt(css(obj, key));

             }

             target = attr[key];

             speed = ( target - cur ) / 8;

             speed = speed > 0 ? Math.ceil(speed) : Math.floor(speed);

             if (cur != target) {

                 bFlag = false;

                 if (key == 'opacity') {

                     obj.style.opacity = ( cur + speed ) / 100;

                     obj.style.filter = "alpha(opacity:" + ( cur + speed ) + ")";

                 } else {

                     obj.style[key] = cur + speed + "px";

                 }

             }

         }

         if (bFlag) {

             clearInterval(obj.timer);

             fn && fn.call(obj);

         }

     }, 30 );

 }
有了这匀速运动框架,我们就来做幻灯片:
上下幻灯片的html样式文件:
 <!DOCTYPE html>

 <html lang="en">

 <head>

     <meta charset="UTF-8">

     <title>slide - by ghostwu</title>

     <link rel="stylesheet" href="css/slide3.css">

     <script src="js/animate.js"></script>

     <script src="js/slide.js"></script>

 </head>

 <body>

 <div id="slide">

     <div id="slide-img">

         <div id="img-container">

             <img src="./img/1.jpg" alt="" style="opacity:1;">

             <img src="./img/2.jpg" alt="">

             <img src="./img/3.jpg" alt="">

             <img src="./img/4.jpg" alt="">

             <img src="./img/5.jpg" alt="">

         </div>

     </div>

     <div id="slide-nums">

         <ul>

             <li class="active"></li>

             <li></li>

             <li></li>

             <li></li>

             <li></li>

         </ul>

     </div>

 </div>

 </body>

 </html>
slide3.css文件:
 * {

     margin:;

     padding:;

 }

 li {

     list-style-type: none;

 }

 #slide {

     width: 800px;

     height: 450px;

     position: relative;

     margin:20px auto;

 }

 #slide-img {

     position: relative;

     width: 800px;

     height: 450px;

     overflow: hidden;

 }

 #img-container {

     position: absolute;

     left: 0px;

     top: 0px;

     height: 2250px;

     /*font-size:0px;*/

 }

 #img-container img {

     display: block;

     float: left;

 }

 #slide-nums {

     position: absolute;

     right:10px;

     bottom:10px;

 }

 #slide-nums li {

     float: left;

     margin:0px 10px;

     background: white;

     width: 20px;

     height: 20px;

     text-align: center;

     line-height: 20px;

     border-radius:10px;

     text-indent:-999px;

     opacity:0.6;

     filter:alpha(opacity:60);

     cursor:pointer;

 }

 #slide-nums li.active {

     background: red;

 }
animate.js文件:
 function css(obj, attr, value) {

     if (arguments.length == 3) {

         obj.style[attr] = value;

     } else {

         if (obj.currentStyle) {

             return obj.currentStyle[attr];

         } else {

             return getComputedStyle(obj, false)[attr];

         }

     }

 }

 function animate(obj, attr, fn) {

     clearInterval(obj.timer);

     var cur = 0;

     var target = 0;

     var speed = 0;

     obj.timer = setInterval(function () {

         var bFlag = true;

         for (var key in attr) {

             if (key == 'opacity ') {

                 cur = css(obj, 'opacity') * 100;

             } else {

                 cur = parseInt(css(obj, key));

             }

             target = attr[key];

             speed = ( target - cur ) / 8;

             speed = speed > 0 ? Math.ceil(speed) : Math.floor(speed);

             if (cur != target) {

                 bFlag = false;

                 if (key == 'opacity') {

                     obj.style.opacity = ( cur + speed ) / 100;

                     obj.style.filter = "alpha(opacity:" + ( cur + speed ) + ")";

                 } else {

                     obj.style[key] = cur + speed + "px";

                 }

             }

         }

         if (bFlag) {

             clearInterval(obj.timer);

             fn && fn.call(obj);

         }

     }, 30 );

 }
slide.js文件:
 window.onload = function () {

     function Slide() {

         this.oImgContainer = document.getElementById("img-container");

         this.aLi = document.getElementsByTagName("li");

         this.index = 0;

     }

     Slide.prototype.bind = function () {

         var that = this;

         for (var i = 0; i < this.aLi.length; i++) {

             this.aLi[i].index = i;

             this.aLi[i].onmouseover = function () {

                 that.moveTop( this.index );

             }

         }

     }

     Slide.prototype.moveTop = function (i) {

         this.index = i;

         for( var j = 0; j < this.aLi.length; j++ ){

            this.aLi[j].className = '';

         }

         this.aLi[this.index].className = 'active';

         animate( this.oImgContainer, {

             "top" : -this.index * 450,

             "left" : 0

         });

     }

     var oSlide = new Slide();

     oSlide.bind();

 }
 * {

     margin:;

     padding:;

 }

 li {

     list-style-type: none;

 }

 #slide {

     width: 800px;

     height: 450px;

     position: relative;

     margin:20px auto;

 }

 #slide-img {

     position: relative;

     width: 800px;

     height: 450px;

     overflow: hidden;

 }

 #img-container {

     position: absolute;

     left: 0px;

     top: 0px;

     width: 4000px;

 }

 #img-container img {

     display: block;

     float: left;

 }

 #slide-nums {

     position: absolute;

     right:10px;

     bottom:10px;

 }

 #slide-nums li {

     float: left;

     margin:0px 10px;

     background: white;

     width: 20px;

     height: 20px;

     text-align: center;

     line-height: 20px;

     border-radius:10px;

     text-indent:-999px;

     opacity:0.6;

     filter:alpha(opacity:60);

     cursor:pointer;

 }

 #slide-nums li.active {

     background: red;

 }
js调用文件:
 window.onload = function () {

     function Slide() {

         this.oImgContainer = document.getElementById("img-container");

         this.aLi = document.getElementsByTagName("li");

         this.index = 0;

     }

     Slide.prototype.bind = function () {

         var that = this;

         for (var i = 0; i < this.aLi.length; i++) {

             this.aLi[i].index = i;

             this.aLi[i].onmouseover = function () {

                 that.moveLeft( this.index );

             }

         }

     }

     Slide.prototype.moveLeft = function (i) {

         this.index = i;

         for( var j = 0; j < this.aLi.length; j++ ){

            this.aLi[j].className = '';

         }

         this.aLi[this.index].className = 'active';

         animate( this.oImgContainer, {

             "left" : -this.index * 800

         });

     }

     var oSlide = new Slide();

     oSlide.bind();

 }
[js高手之路]封装运动框架实战左右与上下滑动的焦点轮播图的更多相关文章
- 原生js焦点轮播图
原生js焦点轮播图主要注意这几点: 1.前后按钮实现切换,同时注意辅助图2.中间的button随着前后按钮对应切换,同时按button也能跳转到相应的index3.间隔调用与无限轮播.4.注意在动画时 ...
- js焦点轮播图
汇集网上焦点轮播图的实现方式,自己试了下,不过鼠标悬浮停止动画和鼠标离开动画播放好像没生效,不太明白,最后两行代码中,为什么可以直接写stop和play.不用加括号调用函数么?求懂的大神指点! 所用知 ...
- 封装一个简单的原生js焦点轮播图插件
轮播图实现的效果为,鼠标移入左右箭头会出现,可以点击切换图片,下面的小圆点会跟随,可以循环播放(为了方便理解,没有补2张图做无缝轮播).本篇文章的主要目的是分享封装插件的思路. 轮播图我一开始是写成非 ...
- Flask实战第54天:cms删除轮播图功能完成
后台逻辑 编辑cms.views.py @bp.route('/dbanner/',methods=['POST']) @login_required def dbanner(): banner_id ...
- Flask实战第53天:cms编辑轮播图功能完成
后端逻辑 表单验证, 这里编辑就是和添加的内容一样,所以可以直接继承添加轮播图的表单验证,然后多加一个轮播图的id即可 编辑cmd.forms.py class UpdateBannerForm(Ad ...
- Flask实战第52天:cms添加轮播图前端代码逻辑完成
首页我们在模态框中的保存按钮加一个id,这样方便我们选取这个按钮 <button type="button" class="btn btn-primary" ...
- JS+css3焦点轮播图PC端
<!DOCTYPE html> <html lang="en"> <head> <meta charset="UTF-8&quo ...
- 原生js焦点轮播图的实现
继续学习打卡,武汉加油,逆战必胜!今日咱们主要探讨一下原生js写轮播图的问题, 简单解析一下思路: 1,首先写好css样式问题 2,考虑全局变量:自动播放的定时器,以及记录图片位置的角标Index 2 ...
- [js高手之路]匀速运动与实例实战(侧边栏,淡入淡出)
javascript中,如何让一个元素(比如div)运动起来呢? 设置基本的样式,一定要让div有定位( 当然用margin的变化也可以让元素产生运动效果 ); <style> div { ...
随机推荐
- linux模拟实现主机跨路由通信
p.MsoNormal,li.MsoNormal,div.MsoNormal { margin: 0cm; margin-bottom: .0001pt; text-align: justify; f ...
- SwaggerUI笔记
关于 Swagger Swagger能成为最受欢迎的REST APIs文档生成工具之一,有以下几个原因: Swagger 可以生成一个具有互动性的API控制台,开发者可以用来快速学习和尝试API. S ...
- 201521123039 《java程序设计》第八周学习总结
1. 本周学习总结 1.1 以你喜欢的方式(思维导图或其他)归纳总结集合与泛型相关内容. 总结: 1.集合可以动态修改大小,但是不可以存放基本数据类型: 2.java中任何对象都是is-a Objec ...
- MarkDown换行
现象:1,MarkDown编辑两行显示,但是实际显示为一行: 2,编辑状态中空一行,此时显示为也空了一行,界面显示不友好: 解决:在第一行中最后输入至少2个空格+回车即可显示正常:
- 火狐html5拖拽 弹出新页面解决办法
今天做项目时,需要实现一个拖拽排序的功能,遂想到了html5的拖拽,便开始查资料,写代码.功夫不复有心人,通过网上资料作参考,排序功能成功实现.谷歌浏览器测试,拖拽平滑,无问题.火狐浏览器测试时,却无 ...
- java类成员变量与代码块初始化
首先根据下面的这个一段代码:引入关于java初始化顺序的问题public class InitationTest extends Person { public InitationTest() { S ...
- 工作中对数组的一些处理,整理(结合underscore.js)
1.数组里边相同元素提取成map,并以'',''分隔 例如:var arr = [{a:"xx",b:''xxx''},{a:"xxx",b:''xxxxx'' ...
- 一个JavaScript触发器插件,可通过指定频次、指定时间内触发指定的处理函数
js-trigger是一个JavaScript触发器插件,可通过指定频次.指定时间内触发指定的处理函数 Tango<tanwei_yx@126.com> 特性 支持AMD/CMD/Comm ...
- oc __weak和__strong的区别
1.先上代码 1 2 3 4 5 6 7 8 9 10 11 12 13 14 15 id __weak obj=[[NSObject alloc]init]; NSLog(@"弱引 ...
- 每天学点SpringMVC-拦截器
1. 先写个Hello World 1.1 写一个Interceptor class并实现HandlerInterceptor接口 public class FirstInterceptor impl ...