【Canal源码分析】Canal Server的启动和停止过程
本文主要解析下canal server的启动过程,希望能有所收获。
一、序列图
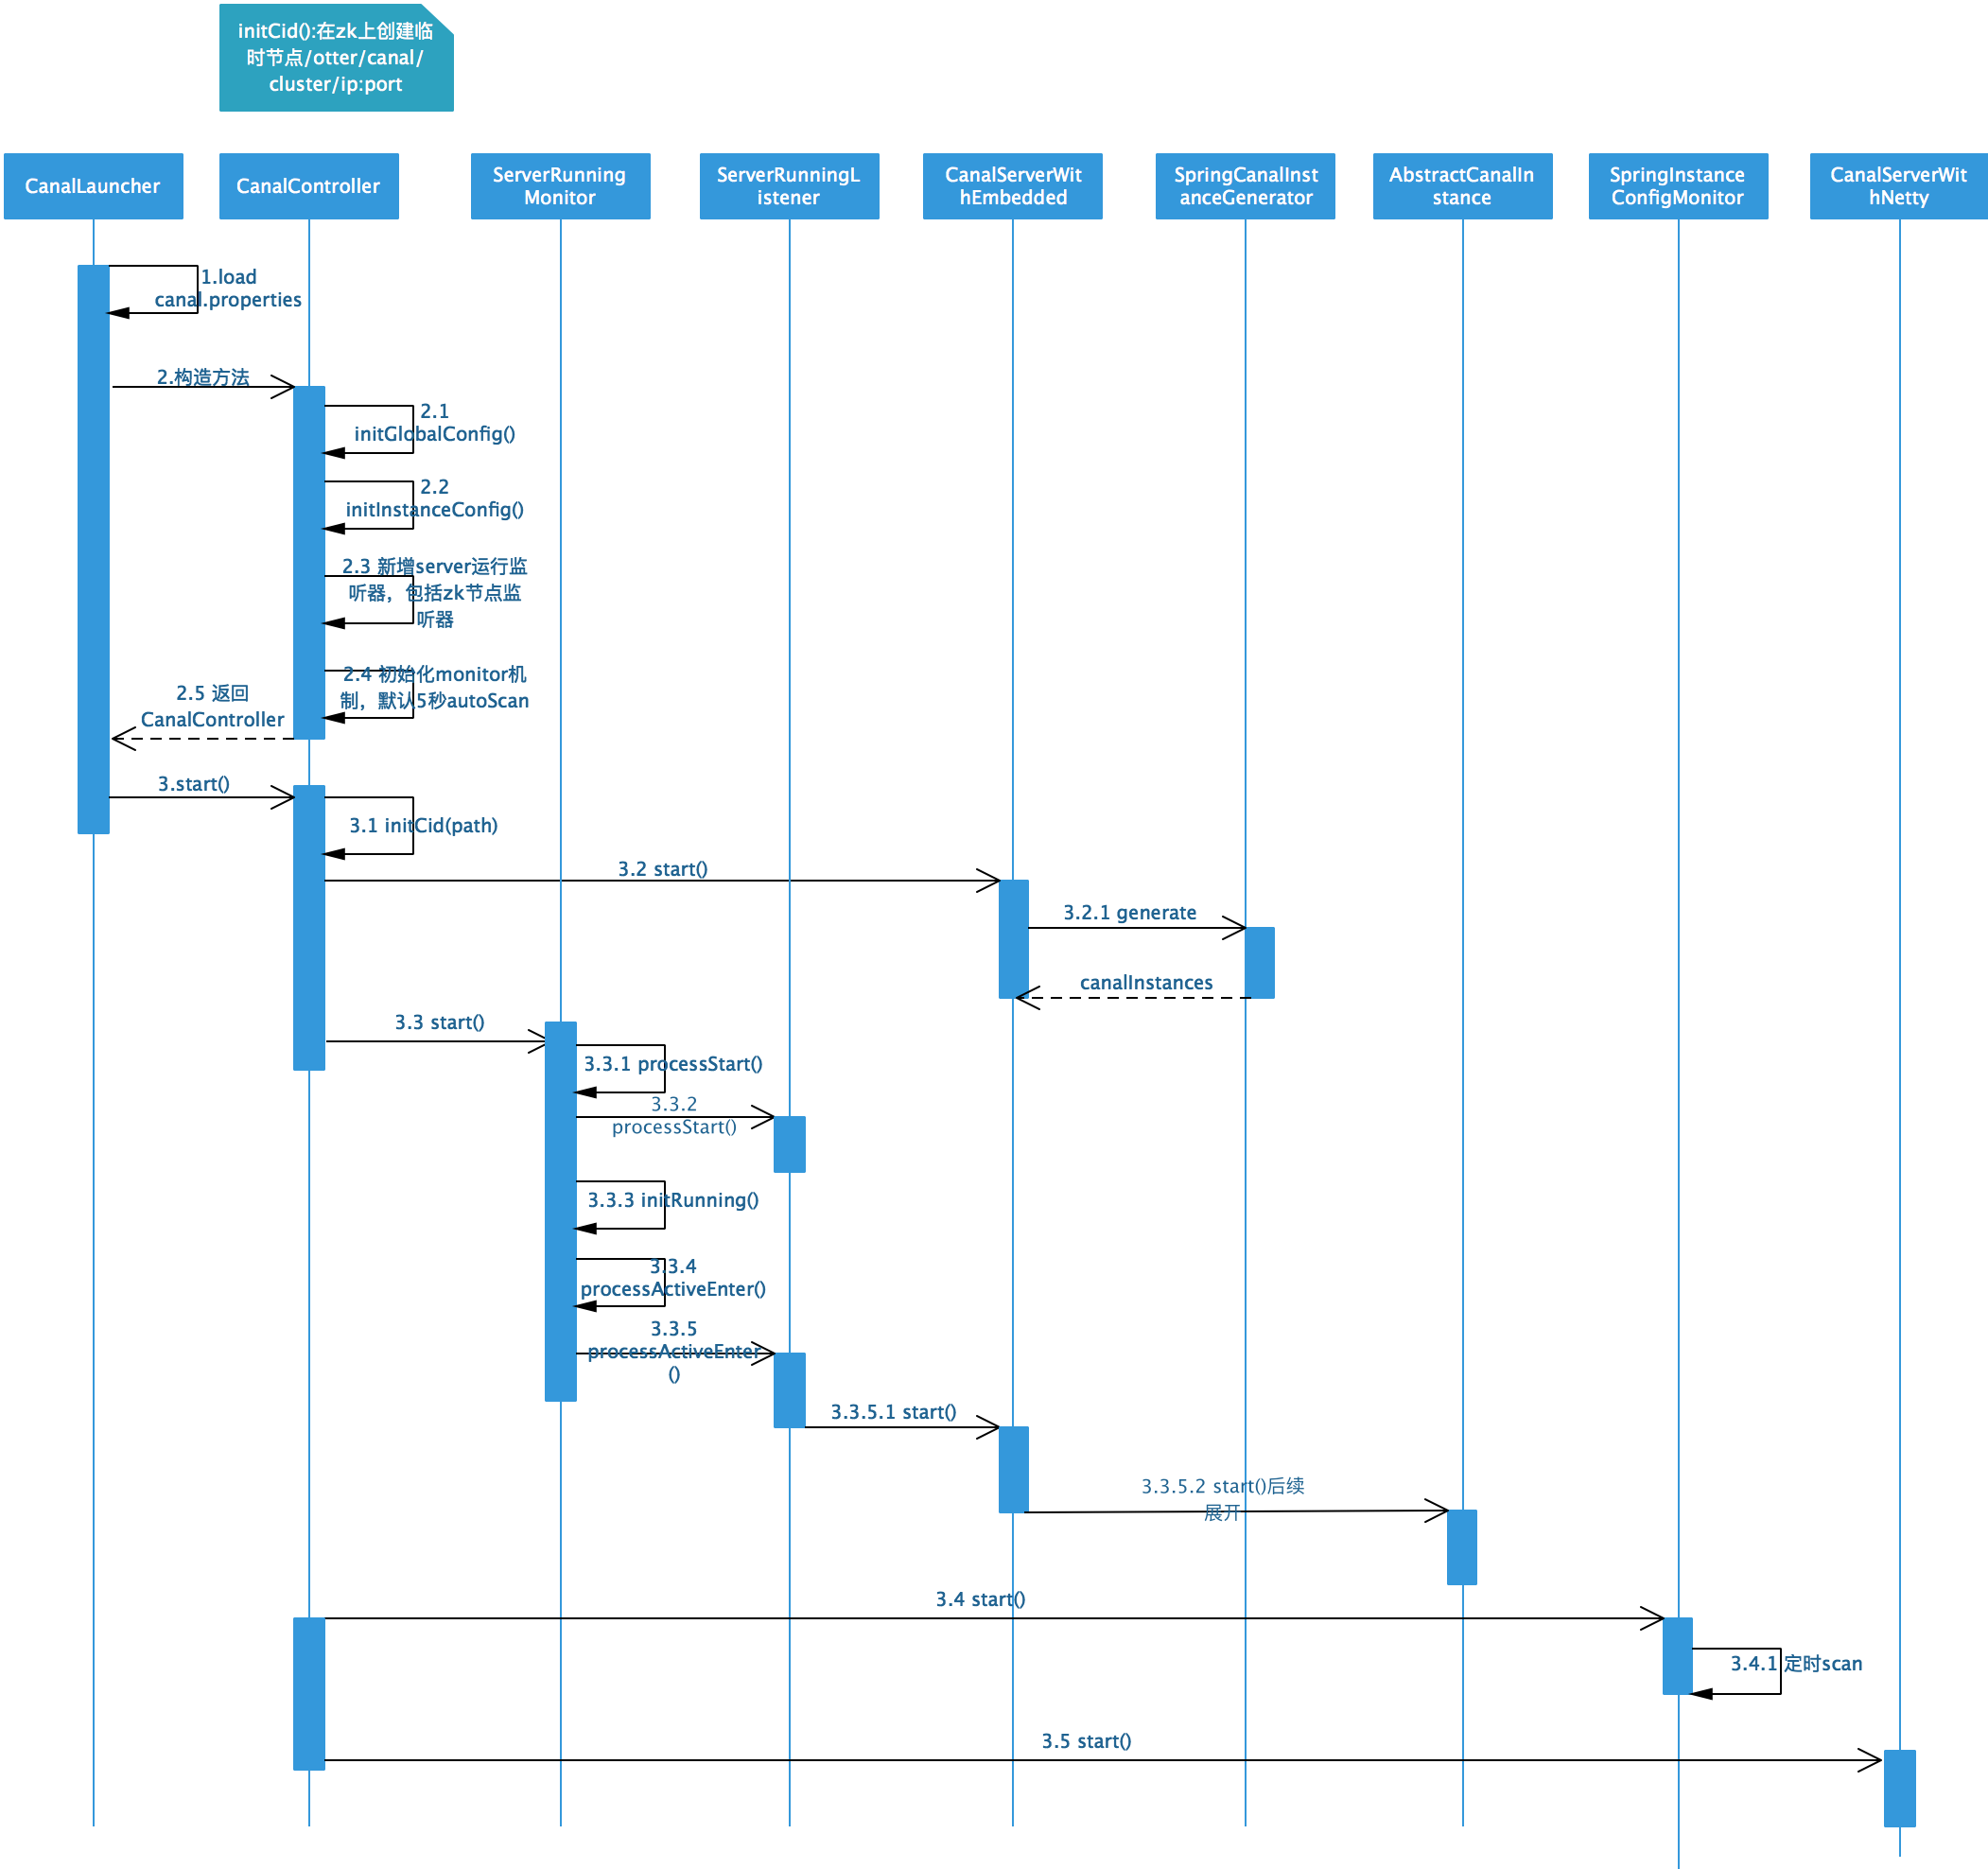
1.1 启动
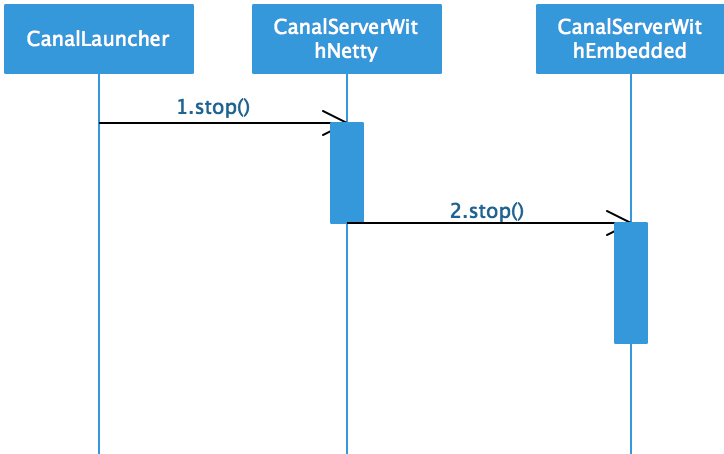
1.2 停止
二、源码分析
整个server启动的过程比较复杂,看图难以理解,需要辅以文字说明。
首先程序的入口在CanalLauncher的main方法中。
2.1 加载配置文件
String conf = System.getProperty("canal.conf", "classpath:canal.properties");

Properties properties = new Properties();

if (conf.startsWith(CLASSPATH_URL_PREFIX)) {

    conf = StringUtils.substringAfter(conf, CLASSPATH_URL_PREFIX);

    properties.load(CanalLauncher.class.getClassLoader().getResourceAsStream(conf));

} else {

    properties.load(new FileInputStream(conf));

}
从canal.properties文件中load所有的配置信息,加载到上下文中。不再赘述。
2.2 构造CanalController
根据配置文件来构造CanalController,这块的代码比较多,主要分为七个步骤,具体如下。
2.2.1 初始化全局参数配置
调用initGlobalConfig方法,过程如下:
- 判断运行模式,是从spring加载还是manager加载,目前开源版本建议使用spring
- 获取是否懒加载
- 如果是manager模式启动,获取manager的ip地址;如果是spring模式启动,获取spring xml的文件地址,加载到全部配置中
- 构造一个实例构造器CanalInstanceGenerator,我们用到的就是在spring的beanFactory中加上destination的bean,这个destination就是canal instance的名称
这块逻辑在CanalController的initGlobalConfig方法中。
2.2.2 初始化实例配置
这块的逻辑是从instance.properties里面初始化实例。
private void initInstanceConfig(Properties properties) {

    String destinationStr = getProperty(properties, CanalConstants.CANAL_DESTINATIONS);

    String[] destinations = StringUtils.split(destinationStr, CanalConstants.CANAL_DESTINATION_SPLIT);

    for (String destination : destinations) {

        InstanceConfig config = parseInstanceConfig(properties, destination);

        InstanceConfig oldConfig = instanceConfigs.put(destination, config);

        if (oldConfig != null) {

            logger.warn("destination:{} old config:{} has replace by new config:{}", new Object[] { destination,

                    oldConfig, config });

        }

    }

}
从这段代码中可以看出,我们在一个canal.properties文件中,可以配置多个destination,也就是可以配置多个instance,不同的instance以逗号隔开。这里主要看的是parseInstanceConfig()方法,里面的逻辑如下:
- 获取启动模式,是manager还是spring,我们这边默认都是spring。
- 获取懒加载字段
- 获取spring xml配置文件地址
2.2.3 初始SocketChannel
从配置文件中获取canal.socketChannel字段,放到全局变量中。
2.2.4 准备canal server
从配置文件中分别获取canal.id、ip、port(对外提供socket服务的端口),获取一个内存级的server单例,同时也获取一个对外提供Netty服务的单例。
cid = Long.valueOf(getProperty(properties, CanalConstants.CANAL_ID));

ip = getProperty(properties, CanalConstants.CANAL_IP);

port = Integer.valueOf(getProperty(properties, CanalConstants.CANAL_PORT));

embededCanalServer = CanalServerWithEmbedded.instance();

embededCanalServer.setCanalInstanceGenerator(instanceGenerator);// 设置自定义的instanceGenerator

canalServer = CanalServerWithNetty.instance();

canalServer.setIp(ip);

canalServer.setPort(port);
2.2.5 初始化系统目录
从配置文件中获取zk地址(canal.zkServers),启动一个zk客户端,然后初始化两个系统目录,分别是:
- /otter/canal/destinations
- /otter/canal/cluster
2.2.6 初始化系统监控
根据destination构造运行时监控,其实就是根据instance名来构造ServerRunningMonitor。其实就是实现了ServerRunningListener中的一些方法。
public interface ServerRunningListener {

    /**

     * 启动时回调做点事情

     */

    public void processStart();

    /**

     * 关闭时回调做点事情

     */

    public void processStop();

    /**

     * 触发现在轮到自己做为active,需要载入上一个active的上下文数据

     */

    public void processActiveEnter();

    /**

     * 触发一下当前active模式失败

     */

    public void processActiveExit();

}
然后初始化一下ServerRunningMonitor。
runningMonitor.init();
这个init方法跟踪的结果,其实就是执行了ServerRunningListener中的processStart方法。
public void processStart() {

    try {

        if (zkclientx != null) {

            final String path = ZookeeperPathUtils.getDestinationClusterNode(destination, ip + ":" + port);

            initCid(path);

            zkclientx.subscribeStateChanges(new IZkStateListener() {

                public void handleStateChanged(KeeperState state) throws Exception {

                }

                public void handleNewSession() throws Exception {

                    initCid(path);

                }

                @Override

                public void handleSessionEstablishmentError(Throwable error) throws Exception {

                    logger.error("failed to connect to zookeeper", error);

                }

            });

        }

    } finally {

        MDC.remove(CanalConstants.MDC_DESTINATION);

    }

}
首先获取了/otter/canal/destinations/{destination}/cluster/ip:port的内容,其实就是server的地址,最后一个ip:port是个zk的临时节点。然后订阅一下节点事件,当节点有事件推送过来后,做一些动作。
2.2.7 初始化配置文件监控
如果canal.auto.scan配置为true(默认为true),首先定义一个InstanceAction,包含了启动、停止、重启instance的动作。
定义一个SpringInstanceConfigMonitor,配置定时扫描的事件为canal.auto.scan.interval,默认5s,扫描canal.conf.dir目录下的文件,与上面定义的InstanceAction结合起来。
2.3 启动CanalController
上面的构造方法其实就是定义一些必要的内容,真正的启动在这个方法中。
2.3.1 创建工作节点
创建临时节点/otter/canal/cluster/ip:port,同时启动监听器.
2.3.2 启动embeded服务
embededCanalServer.start();
这个start里面,一个是将当前server的running状态置为true,同时根据destination构建CanalInstance。
2.3.3 HA启动
遍历Map<String, InstanceConfig>中的InstanceConfig,如果CanalInsance还没启动,如果不是懒加载的话,直接HA启动ServerRunningMonitor。
ServerRunningMonitor runningMonitor = ServerRunningMonitors.getRunningMonitor(destination);

if (!config.getLazy() && !runningMonitor.isStart()) {

    runningMonitor.start();

}

public synchronized void start() {

    super.start();

    try {

        processStart();

        if (zkClient != null) {

            // 如果需要尽可能释放instance资源,不需要监听running节点,不然即使stop了这台机器,另一台机器立马会start

            String path = ZookeeperPathUtils.getDestinationServerRunning(destination);

            zkClient.subscribeDataChanges(path, dataListener);

            initRunning();

        } else {

            processActiveEnter();// 没有zk,直接启动

        }

    } catch (Exception e) {

        logger.error("start failed", e);

        // 没有正常启动,重置一下状态,避免干扰下一次start

        stop();

    }

}
这里面启动的内容我们来看看。
- 首先调用super.start()把当前的running状态置为true。
- 然后启动zk节点的监听(这边的processStart是否多余了?)。
- 监听路径/otter/canal/destinations/{destination}/running节点的变化
zkClient.subscribeDataChanges(path, dataListener);
- 这里的dataListener是ServerRunningMonitor构造函数中定义的,就是定义一些zk节点监听的动作。
- 如果有数据变化,如果running节点中的内容ServerRunningData发生了变化,字段active变为了false,而且address就是本机,说明本机出现了主动释放,需要释放运行时状态。此时需要调用到processActiveExit方法,其实就是停止了本机的server中destination对应的instance。
- 如果节点发生了删除动作,如果上一次active的状态就是本机,则即时触发一下active抢占,调用initRunning()方法,当然,如果启动失败,也不是立即切换,而是会等待5s,再尝试启动。这个启动方法中,主要调用的是processActiveEnter()方法,来启动了embededCanalServer.start(destination)。其实就是启动canalInstance,这块后续再分析。
- 其实除了监听器,在本身的ServerRunningMonitor的start方法中,也有initRunning方法。这块启动canalInstance的方法,我们下一篇文章分析。
2.3.4 instance文件扫描启动
在扫描之前,把destination和InstanceAction绑定到缓存中。
instanceConfigMonitors.get(config.getMode()).register(destination, defaultAction);
首先启动一个全局扫描,然后再对应的destination配置文件的扫描。
if (autoScan) {

    instanceConfigMonitors.get(globalInstanceConfig.getMode()).start();

    for (InstanceConfigMonitor monitor : instanceConfigMonitors.values()) {

        if (!monitor.isStart()) {

            monitor.start();

        }

    }

}
这个start方法启动了一个定时器,默认5s扫描一次。扫描的内容就是配置文件路径下的内容,针对文件的新增、删除、修改,对应InstanceAction中的start,stop和reload方法。也就是说,我们在canal运行的过程中,通过动态修改配置文件,来实现动态调整运行时参数,主要可以用来进行重复消费,位点的迁移等等。
2.3.5 网络接口启动
CanalServerWithNetty的启动,首先需要启动CanalServerWithEmbedded,主要的业务逻辑在SessionHandler中。这块其实是暴露外部服务,给canal client进行调用。
2.4 增加关闭hook
Runtime.getRuntime().addShutdownHook(new Thread() {

    public void run() {

        try {

            logger.info("## stop the canal server");

            controller.stop();

        } catch (Throwable e) {

            logger.warn("##something goes wrong when stopping canal Server:", e);

        } finally {

            logger.info("## canal server is down.");

        }

    }

});
在server停止时,调用controller.stop()方法。
public void stop() throws Throwable {

    canalServer.stop();

    if (autoScan) {

        for (InstanceConfigMonitor monitor : instanceConfigMonitors.values()) {

            if (monitor.isStart()) {

                monitor.stop();

            }

        }

    }

    for (ServerRunningMonitor runningMonitor : ServerRunningMonitors.getRunningMonitors().values()) {

        if (runningMonitor.isStart()) {

            runningMonitor.stop();

        }

    }

    // 释放canal的工作节点

    releaseCid(ZookeeperPathUtils.getCanalClusterNode(ip + ":" + port));

    logger.info("## stop the canal server[{}:{}]", ip, port);

    if (zkclientx != null) {

        zkclientx.close();

    }

}
主要是停止controller,server相关的monitor,instance相关的monitor,然后释放zk节点,关闭zk连接。
【Canal源码分析】Canal Server的启动和停止过程的更多相关文章
- Envoy 源码分析--程序启动过程
目录 Envoy 源码分析--程序启动过程 初始化 main 入口 MainCommon 初始化 服务 InstanceImpl 初始化 启动 main 启动入口 服务启动流程 LDS 服务启动流程 ...
- neo4j源码分析1-编译打包启动
date: 2018-03-22 title: "neo4j源码分析1-编译打包启动" author: "邓子明" tags: - 源码 - neo4j - 大 ...
- SpringBoot源码分析之SpringBoot的启动过程
SpringBoot源码分析之SpringBoot的启动过程 发表于 2017-04-30 | 分类于 springboot | 0 Comments | 阅读次数 SpringB ...
- Spring源码分析专题 —— IOC容器启动过程(上篇)
声明 1.建议先阅读<Spring源码分析专题 -- 阅读指引> 2.强烈建议阅读过程中要参照调用过程图,每篇都有其对应的调用过程图 3.写文不易,转载请标明出处 前言 关于 IOC 容器 ...
- k8s client-go源码分析 informer源码分析(2)-初始化与启动分析
k8s client-go源码分析 informer源码分析(2)-初始化与启动分析 前面一篇文章对k8s informer做了概要分析,本篇文章将对informer的初始化与启动进行分析. info ...
- 【Canal源码分析】Canal Instance启动和停止
一.序列图 1.1 启动 1.2 停止 二.源码分析 2.1 启动 这部分代码其实在ServerRunningMonitor的start()方法中.针对不同的destination,启动不同的Cana ...
- 「从零单排canal 03」 canal源码分析大纲
在前面两篇中,我们从基本概念理解了canal是一个什么项目,能应用于什么场景,然后通过一个demo体验,有了基本的体感和认识. 从这一篇开始,我们将从源码入手,深入学习canal的实现方式.了解can ...
- 【Canal源码分析】parser工作过程
本文主要分析的部分是instance启动时,parser的一个启动和工作过程.主要关注的是AbstractEventParser的start()方法中的parseThread. 一.序列图 二.源码分 ...
- 【Canal源码分析】Sink及Store工作过程
一.序列图 二.源码分析 2.1 Sink Sink阶段所做的事情,就是根据一定的规则,对binlog数据进行一定的过滤.我们之前跟踪过parser过程的代码,发现在parser完成后,会把数据放到一 ...
随机推荐
- csdn获得积分
常规方式获取可用分 1.每天只要回复就可以获得10个可用分.注:回复后的第2天发放. 2.每周回复量大于10个帖子,将获得30可用分.注:下一周的周二发放. 3.本周获得技术专家分30分以上,将获得4 ...
- 获取手机的唯一标示uuid
NSString *idfv = [[[UIDevice currentDevice] identifierForVendor] UUIDString];
- MFC中不同对话框间使用SendMessage发送自定义消息的具体实现
1. 基本知识 SendMessage的基本结构如下: SendMessage( HWND hWnd, //消息传递的目标窗口或线程的句柄. UINT Msg, //消息类别(这里可 ...
- MFC 怎样获得某个窗口的句柄?
GetSafeHandle();this-> hWnd;GetDlgItem(hwnd,ID);//获取窗口ID所对应的HWND的子窗口句柄 在主窗口中,如果要用到父窗口的句柄,可以用 HWND ...
- hdu 1266 Reverse Number
题目 一道水题,但是超时了几次(Time Limit Exceeded) 题中说:then n 32-bit integers follow.私以为可以用int来做,结果就一直超时,博客之,发现全是用 ...
- hdu1089 Ignatius's puzzle
题目 其实这道题不是很难,但是我刚开始拿到这道题的时候不知道怎么做, 因为这个式子我就不知道是干什么的: 65|f(x) 百度解释(若a/b=x...0 称a能被b整除,b能整除a,即b|a,读作& ...
- muduo网络库学习之MutexLock类、MutexLockGuard类、Condition类、CountDownLatch类封装中的知识点
一.MutexLock 类 class MutexLock : boost::noncopyable 二.MutexLockGuard类 class MutexLockGuard : bo ...
- [mobile]移动端页面没有重新请求时,刷新页面代码
<input type="hidden" value="yes" id="id_if_reload" /> <script ...
- Android Studio 集成 TFS,实现安卓移动开发的持续集成和交付(DevOps)
目录 1 集成TFS系统.... 1.1 概述.... 1.2 安装TFS插件.... 1.2.1 在线安装方式.... 1.2.2 离线安装方案.... 1.3 常见操作.... 1.3.1 新建G ...
- vim基本命令速查表
来源:https://github.com/skywind3000/awesome-cheatsheets/blob/master/editors/vim.txt ################## ...