
asp.net core 使用identityServer4的密码模式来进行身份认证(一)
IdentityServer4是ASP.NET Core的一个包含OpenID和OAuth 2.0协议的框架。具体Oauth 2.0和openId请百度。
前言本博文适用于前后端分离或者为移动产品来后端api的身份认证功能。
一 首先第一步使用Nuge包管理器下载IdentityServer4的包。
第二部,添加一个名叫Config的类。
这个类的作用是对一些api和client进行配置的。
  public static IEnumerable<IdentityResource> GetIdentityResource()

        {

            return new List<IdentityResource>

             {

                 new IdentityResources.OpenId(),

                 new IdentityResources.Profile(),

                 new IdentityResources.Email()

             };

        }

        public static IEnumerable<ApiResource> GetApiResource()

        {

            return new List<ApiResource>

            {

                new ApiResource("gateway_api","gateway service"),

                new ApiResource("user_api","user_api service"),

                //并且要把contactapi加入到apiResource,并加入到 client的allowedScopes中

               // new ApiResource("contact_api","contact_api service")

            };

        }

        public static IEnumerable<Client> GetClients()

        {

            return new List<Client>()

          {

              new Client

              {

                    ClientId="pc",

                    AllowedGrantTypes = GrantTypes.ResourceOwnerPassword, //这里是指定授权的模式,选择密码模式,

                    ClientSecrets = { new Secret("yemobai".Sha256()) },

                     RefreshTokenUsage=TokenUsage.ReUse,

                     AlwaysIncludeUserClaimsInIdToken = true,

                     AllowOfflineAccess = true,

                    AllowedScopes=new List<string>

                    {

                        "user_api",

                    IdentityServerConstants.StandardScopes.Profile,

                    IdentityServerConstants.StandardScopes.OpenId,

                    IdentityServerConstants.StandardScopes.OfflineAccess

                    }

              }

          };

        }
第三步 添加start up的配置
  services.AddIdentityServer()

                 .AddDeveloperSigningCredential()

                .AddInMemoryApiResources(Config.GetApiResource())

                .AddInMemoryIdentityResources(Config.GetIdentityResource())

                .AddInMemoryClients(Config.GetClients())

                .AddResourceOwnerValidator<ResourceOwnerPasswordValidator>()

                .AddProfileService<ProfileService>()

                .AddCorsPolicyService<CorsPolicyService>() //这是IdentityServer跨域的,我尝试开启asp.net core 的跨域,但是identityServer不接受请求。

                ;
 public void Configure(IApplicationBuilder app, IHostingEnvironment env,ILoggerFactory loggerFactory)

        {

            if (env.IsDevelopment())

            {

                app.UseDeveloperExceptionPage();

            }

            loggerFactory.AddConsole(Configuration.GetSection("Logging"));

            loggerFactory.AddDebug();

            app.UseIdentityServer(); //启用identityServer中间件

            app.UseCors(buider =>

            {

                buider.WithOrigins("http://localhost:8080")

                .AllowAnyHeader();

            });

            app.UseMvc();

        }
第四步 用户验证
其实identityServier4也提供了一些测试用户来进行身份认证的实验,这些东西都在identityServer4的官网上都有介绍。
新建一个类ResourceOwnerPasswordValidator继承与IResourceOwnerPasswordValidator接口(IResourceOwnerPasswordValidator是Identityserver4提供的一个接口其主要工作就是验证我们的用户名和密码)。
这个接口只有一个方法
public async Task ValidateAsync(ResourceOwnerPasswordValidationContext context)
怎么获取我们传过来的用户名和密码呢?
答:在方法的参数context中,按F12进入到ResourceOwnerPasswordValidationContext这个类的定义中,具体定义的属性如下
    //

    // 摘要:

    //     Class describing the resource owner password validation context

    public class ResourceOwnerPasswordValidationContext

    {

        public ResourceOwnerPasswordValidationContext();

        //

        // 摘要:

        //     Gets or sets the name of the user.

        public string UserName { get; set; }

        //

        // 摘要:

        //     Gets or sets the password.

        public string Password { get; set; }

        //

        // 摘要:

        //     Gets or sets the request.

        public ValidatedTokenRequest Request { get; set; }

        //

        // 摘要:

        //     Gets or sets the result.

        public GrantValidationResult Result { get; set; }

    }
可以看到 userName和passWord都已经定义好了,我们只管用就行了。
context.UserName, context.Password
就算用户名和密码和我的数据库的数据对上了,该怎么返回我对用户名和密码的认证结果呢?
答:
如果你是一个细心的人,你会发现上面 ValidateAsync这个方法返回一个Task,可以基本上认为无返回值了。不要着急,看看ResourceOwnerPasswordValidationContext这个类的定义。
GrantValidationResult Result { get; set; }
里面有这么一个属性。看名字都知道是验证结果了。不出意外,我们对用户名和密码的验证接口应该放在这个里面。
那下面就很简单了。
 if (accountResult.Status=="登陆成功")

            {

                context.Result= new GrantValidationResult(accountResult.User.Id.ToString(), "admin", GetUserClaim(accountResult.User));

            }

            else

            {

                //验证失败

                context.Result = new GrantValidationResult(TokenRequestErrors.InvalidGrant, "密码错误");

            }
具体的构造函数重载,请自己看。如果有需求的不要忘了,把claim给加上。怎么 加claim呢,
最简单的方式你数据库验证用户名和密码完后,把一些claim给带上。
向我这样
 public Claim[] GetUserClaim(UserInfo userInfo)

        {

            var claims = new Claim[] { new Claim("USERID", userInfo.UserId), new Claim("USERNAME", userInfo.UserName) };

            return claims;

        }
完整代码
 public class ResourceOwnerPasswordValidator: IResourceOwnerPasswordValidator

    {

         private readonly IAccountService accountService;

         public ResourceOwnerPasswordValidator(IAccountService _accountService)

        {

            accountService = _accountService;

        }

        public async Task ValidateAsync(ResourceOwnerPasswordValidationContext context)

        {

            var accountResult = await accountService.SignInAsync(context.UserName, context.Password);

            if (accountResult.Status=="登陆成功")

            {

                context.Result= new GrantValidationResult(accountResult.User.Id.ToString(), "admin", GetUserClaim(accountResult.User));

            }

            else

            {

                //验证失败

                context.Result = new GrantValidationResult(TokenRequestErrors.InvalidGrant, "密码错误");

            }

        }

        public Claim[] GetUserClaim(UserInfo userInfo)

        {

            var claims = new Claim[] { new Claim("USERID", userInfo.UserId), new Claim("USERNAME", userInfo.UserName) };

            return claims;

        }
测试结果。
是用postmen来进行测试。没有的话请自行下载。
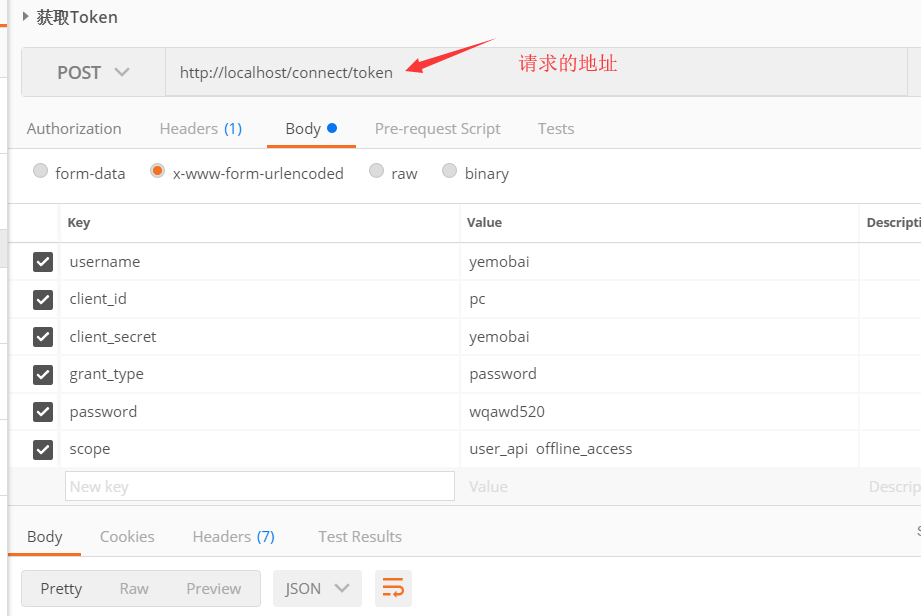
忘了说了,把IdentityServer4的包下载下来后 ,运行项目浏览器输入http://localhost:5000/.well-known/openid-configuration
看看identiyServer4一些接口地址。
然后在在postMen中输入一下Key和value(不要把我的给抄了上去)
scope写不写无所谓,如果你写的了话必须在config类中
   public static IEnumerable<ApiResource> GetApiResource()

        {

            return new List<ApiResource>

            {

                new ApiResource("gateway_api","gateway service"),

                new ApiResource("user_api","user_api service"),

                //并且要把contactapi加入到apiResource,并加入到 client的allowedScopes中

               // new ApiResource("contact_api","contact_api service")

            };

        }
在这个方法中添加上。而且也要在
  public static IEnumerable<Client> GetClients()

        {

            return new List<Client>()

          {

              new Client

              {

                    ClientId="pc",

                    AllowedGrantTypes = GrantTypes.ResourceOwnerPassword,

                    ClientSecrets = { new Secret("yemobai".Sha256()) },

                     RefreshTokenUsage=TokenUsage.ReUse,

                     AlwaysIncludeUserClaimsInIdToken = true,

                     AllowOfflineAccess = true,

                    AllowedScopes=new List<string>

                    {

                        "user_api",

                    IdentityServerConstants.StandardScopes.Profile,

                    IdentityServerConstants.StandardScopes.OpenId,

                    IdentityServerConstants.StandardScopes.OfflineAccess

                    }

              }

          };
而且也要在 AllowedScopes里面给加上。
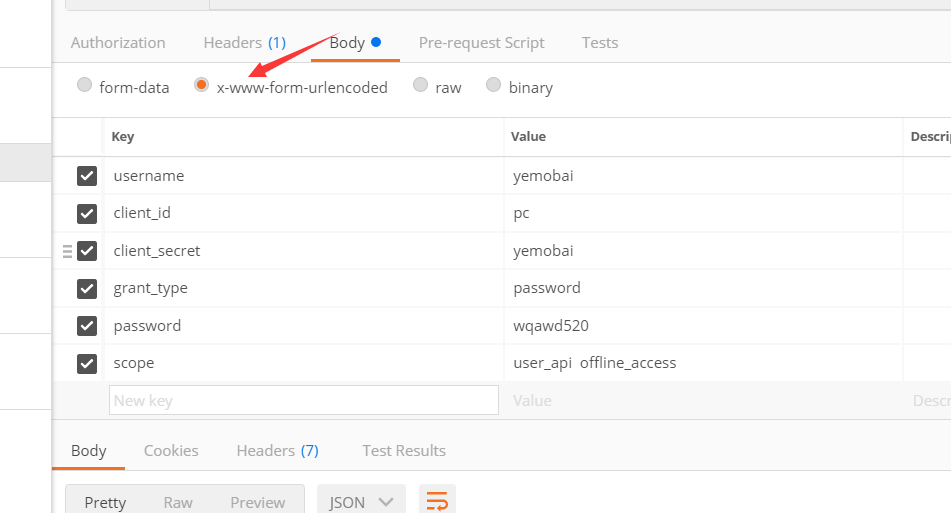
结果

这个时候我们就拿到了access_token和过期时间和refresh_token,
就用了IdentityServer4搞了一个access_token出来。算什么身份认证?
答:下一节解释。
asp.net core 使用identityServer4的密码模式来进行身份认证(一)的更多相关文章
- asp.net core 使用identityServer4的密码模式来进行身份认证(2) 认证授权原理
前言:本文将会结合asp.net core 认证源码来分析起认证的原理与流程.asp.net core版本2.2 对于大部分使用asp.net core开发的人来说. 下面这几行代码应该很熟悉了. s ...
- Asp.Net Core 中IdentityServer4 授权中心之自定义授权模式
一.前言 上一篇我分享了一篇关于 Asp.Net Core 中IdentityServer4 授权中心之应用实战 的文章,其中有不少博友给我提了问题,其中有一个博友问我的一个场景,我给他解答的还不够完 ...
- Asp.Net Core 中IdentityServer4 授权中心之应用实战
一.前言 查阅了大多数相关资料,查阅到的IdentityServer4 的相关文章大多是比较简单并且多是翻译官网的文档编写的,我这里在 Asp.Net Core 中IdentityServer4 的应 ...
- Asp.Net Core 中IdentityServer4 授权原理及刷新Token的应用
一.前言 上面分享了IdentityServer4 两篇系列文章,核心主题主要是密码授权模式及自定义授权模式,但是仅仅是分享了这两种模式的使用,这篇文章进一步来分享IdentityServer4的授权 ...
- Asp.Net Core 中IdentityServer4 实战之 Claim详解
一.前言 由于疫情原因,让我开始了以博客的方式来学习和分享技术(持续分享的过程也是自己学习成长的过程),同时也让更多的初学者学习到相关知识,如果我的文章中有分析不到位的地方,还请大家多多指教:以后我会 ...
- Asp.Net Core 中IdentityServer4 实战之角色授权详解
一.前言 前几篇文章分享了IdentityServer4密码模式的基本授权及自定义授权等方式,最近由于改造一个网关服务,用到了IdentityServer4的授权,改造过程中发现比较适合基于Role角 ...
- ASP.NET Core路由中间件[2]: 路由模式
一个Web应用本质上体现为一组终结点的集合.终结点则体现为一个暴露在网络中可供外界采用HTTP协议调用的服务,路由的作用就是建立一个请求URL模式与对应终结点之间的映射关系.借助这个映射关系,客户端可 ...
- 【.NET Core】ASP.NET Core之IdentityServer4(1):快速入门
[.NET Core]ASP.NET Core之IdentityServer4 本文中的IdentityServer4基于上节的jenkins 进行docker自动化部署. 使用了MariaDB,EF ...
- 避免在ASP.NET Core中使用服务定位器模式
(此文章同时发表在本人微信公众号"dotNET每日精华文章",欢迎右边二维码来关注.) 题记:服务定位器(Service Locator)作为一种反模式,一般情况下应该避免使用,在 ...
随机推荐
- 兼容谷歌、火狐、IE7.0以上浏览器div+css实现的带有蒙版的半透明弹窗效果[xyytit]
整个页面变暗的蒙版效果,带有半透明边框的弹窗,用在网站里一定很酷. 最初见与奢饰品购物网站YMALL,后边研究了下,自己做了这个实例. 技术要点:css中几种透明样式的使用.不同的样式在不同的浏览器中 ...
- Selenium原理初步--Android自动化测试学习历程
章节:自动化基础篇——Selenium原理初步(第五讲) 注:其实所有的东西都是应该先去用,但是工具基本都一样,底层都是用的最基础的内容实现的,测试应该做的是: (1)熟练使用工具,了解各个工具的利弊 ...
- ftp使用(图文详解)
41,准备: FileZilla_Server-v0.9.41.rar 2.安装,可以全部默认下一步 这里装在了E盘 3安装成功添加用户 添加用户名yanan 选择share folders选择要共享 ...
- [leetcode]117. Populating Next Right Pointers in Each NodeII用next填充同层相邻节点
Given a binary tree struct TreeLinkNode { TreeLinkNode *left; TreeLinkNode *right; TreeLinkNode *nex ...
- 轮播图jQuery
<!DOCTYPE html> <html lang="en"> <head> <meta charset="UTF-8&quo ...
- Santa Claus and a Place in a Class
/* Santa Claus is the first who came to the Christmas Olympiad, and he is going to be the first to t ...
- ILSpy 反编译.NET
ILSpy 是一个开源的.NET反编译工具,简洁强大易用是它的特征.在绝大多数情况下,它都能很好的完成你对未知程序集内部代码的探索.
- 通过ANT实现jmeter批量执行脚本、生成报告、发送邮件全套build.xml文件
在开始通过ANT运行build.xml之前,有一步必须要做,那就是将JMeter所在目录下extras子目录里的ant-JMeter-1.1.1.jar复制到Ant所在目录lib子目录之下,这样Ant ...
- part1:12-sudo用户管理和Linux密码故障排除
sudo用户管理 权力下放! 1.Root密码破解步骤 a.在系统启动时,迅速按下任意键或回车键.进入grub选项菜单 b.在grub选项菜单按e进入编辑模式,上下选择kernel行.然后按e进入编辑 ...
- shell的一些简单用法
一 BASH的属性 BASH中会存储一些自身属性的参数,启用或关闭某一项功能 例如控制* .字符是否为通配 查看参数 set -o 关闭noglob参数 set -o noglob ls * ls: ...