IntelliJ IDEA 2017版 spring-boot加载jsp配置详解(详细图文实例)
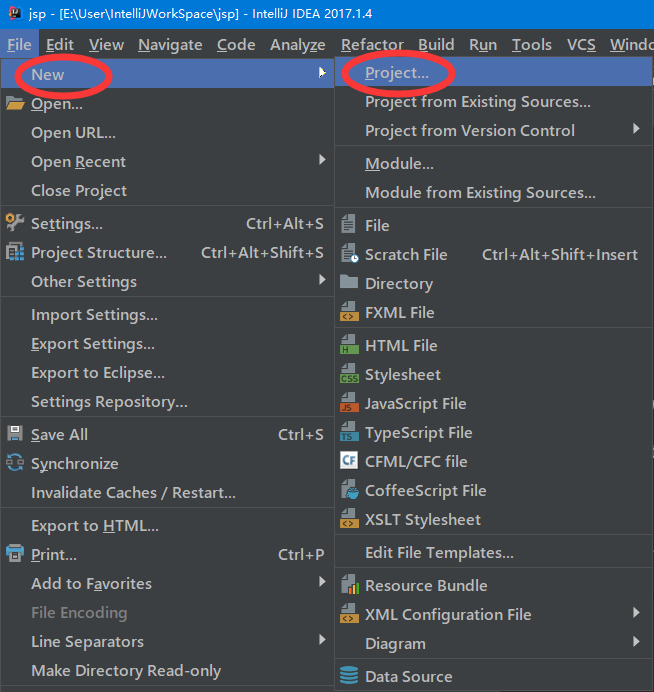
一、创建项目
(File--->New-->Project)
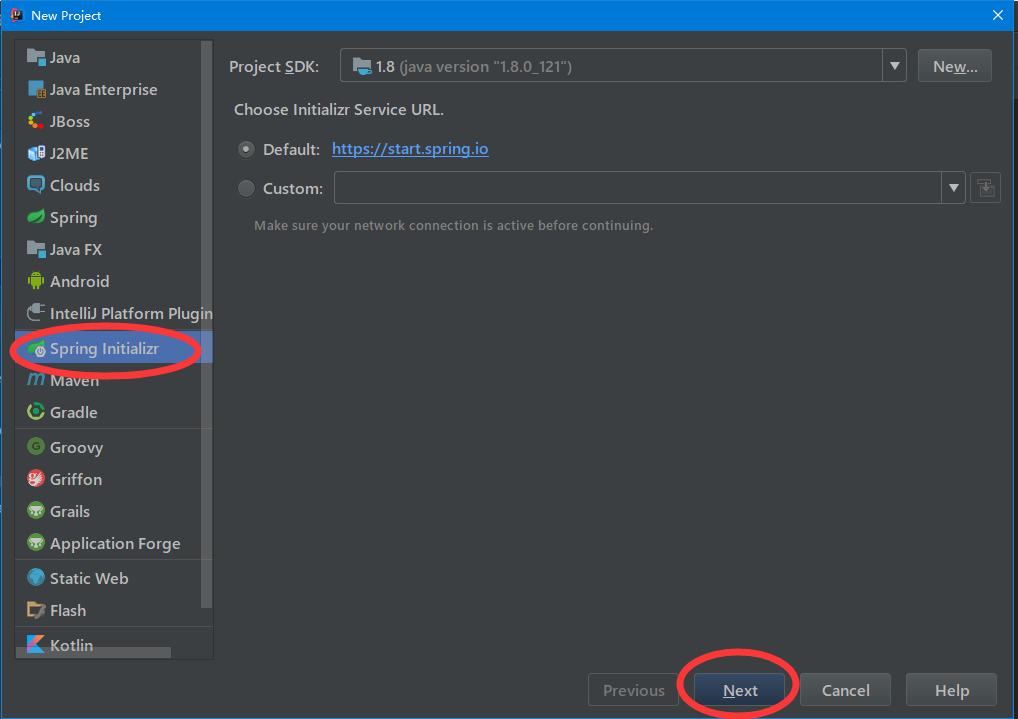
2、项目配置内容
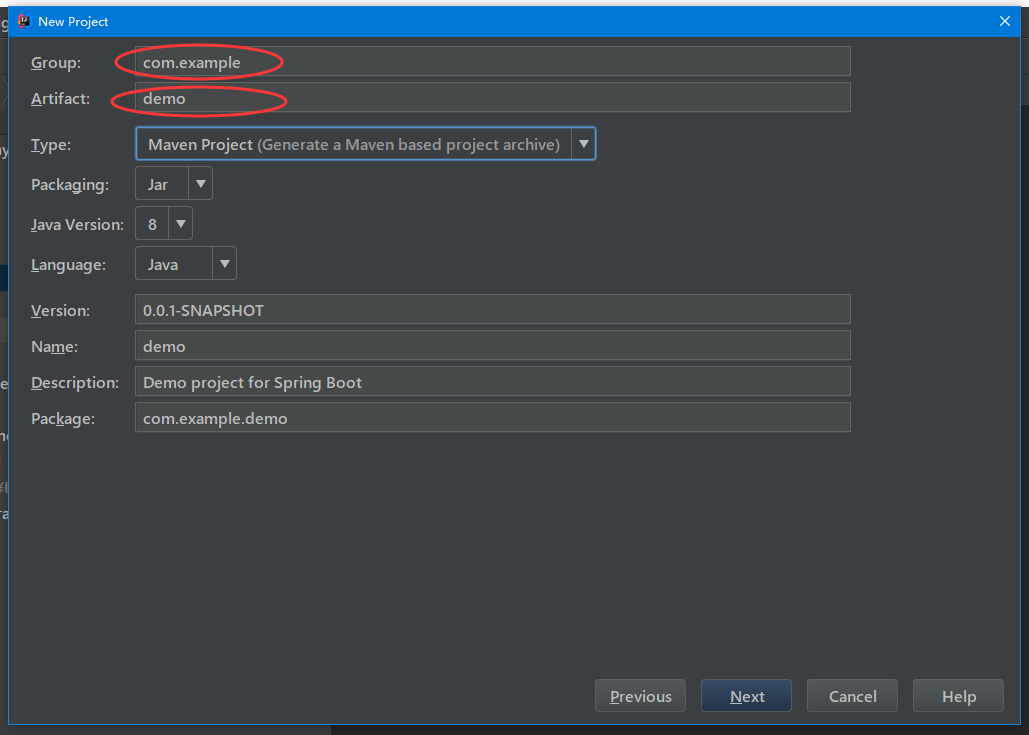
3、选择配置项目的Group包名,Artifact项目名称
4、选择项目类型为web类型

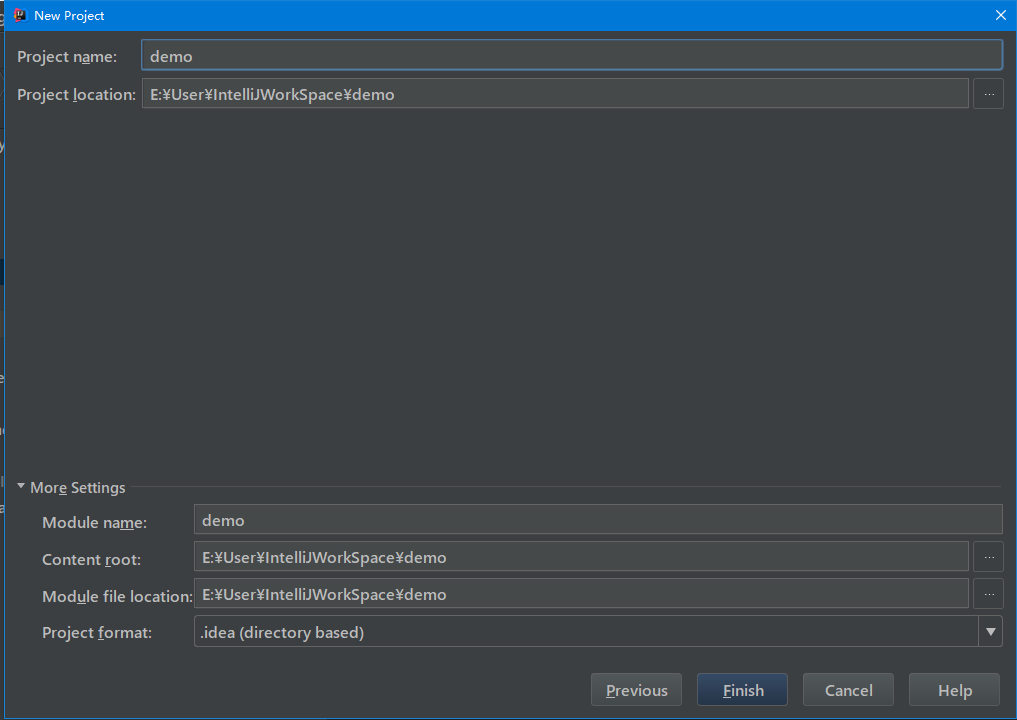
5、创建成功,点击最后一步finish
二、代码编写
1、搭建pom.xml文件
 <?xml version="1.0" encoding="UTF-8"?>

 <project xmlns="http://maven.apache.org/POM/4.0.0" xmlns:xsi="http://www.w3.org/2001/XMLSchema-instance"

          xsi:schemaLocation="http://maven.apache.org/POM/4.0.0 http://maven.apache.org/xsd/maven-4.0.0.xsd">

     <modelVersion>4.0.0</modelVersion>

     <groupId>com.springboot</groupId>

     <artifactId>jsp</artifactId>

     <version>0.0.1-SNAPSHOT</version>

     <packaging>jar</packaging>

     <name>jsp</name>

     <url>http://maven.apache.org</url>

     <description>Demo project for Spring Boot</description>

     <parent>

         <groupId>org.springframework.boot</groupId>

         <artifactId>spring-boot-starter-parent</artifactId>

         <version>1.5.9.RELEASE</version>

         <relativePath/> <!-- lookup parent from repository -->

     </parent>

     <properties>

         <project.build.sourceEncoding>UTF-8</project.build.sourceEncoding>

         <project.reporting.outputEncoding>UTF-8</project.reporting.outputEncoding>

         <java.version>1.8</java.version>

     </properties>

     <dependencies>

         <dependency>

             <groupId>org.springframework.boot</groupId>

             <artifactId>spring-boot-starter-web</artifactId>

         </dependency>

         <dependency>

             <groupId>org.springframework.boot</groupId>

             <artifactId>spring-boot-starter-test</artifactId>

             <scope>test</scope>

         </dependency>

         <!-- servlet 依赖. -->

         <dependency>

             <groupId>javax.servlet</groupId>

             <artifactId>javax.servlet-api</artifactId>

             <scope>provided</scope>

         </dependency>

         <!--

                 JSTL(JSP Standard Tag Library,JSP标准标签库)是一个不断完善的开放源代码的JSP标签库,是由apache的jakarta小组来维护的。

          -->

         <dependency>

             <groupId>javax.servlet</groupId>

             <artifactId>jstl</artifactId>

         </dependency>

         <!-- tomcat 的支持.-->

         <dependency>

             <groupId>org.springframework.boot</groupId>

             <artifactId>spring-boot-starter-tomcat</artifactId>

             <scope>provided</scope>

         </dependency>

         <dependency>

             <groupId>org.apache.tomcat.embed</groupId>

             <artifactId>tomcat-embed-jasper</artifactId>

             <!--<scope>provided</scope>-->

         </dependency>

         <dependency>

             <groupId>org.eclipse.jdt.core.compiler</groupId>

             <artifactId>ecj</artifactId>

             <version>4.6.1</version>

             <scope>provided</scope>

         </dependency>

     </dependencies>

     <build>

         <plugins>

             <plugin>

                 <groupId>org.springframework.boot</groupId>

                 <artifactId>spring-boot-maven-plugin</artifactId>

             </plugin>

         </plugins>

     </build>

 </project>
2、application配置
 #页面默认前缀目录

 spring.mvc.view.prefix=/WEB-INF/jsp/

 # 响应默认后缀

 spring.mvc.view.suffix=.jsp
3、Application类编辑
 package com.springboot;

 import org.springframework.boot.SpringApplication;

 import org.springframework.boot.autoconfigure.SpringBootApplication;

 @SpringBootApplication

 public class JspApplication {

     public static void main(String[] args) {

         SpringApplication.run(JspApplication.class, args);

     }

 }
4、Controller测试类编辑
 package com.springboot.controller;

 import org.springframework.stereotype.Controller;

 import org.springframework.web.bind.annotation.RequestMapping;

 import java.util.Map;

 /**

  * Created by liuya on 2018-01-28.

  */

 @Controller

 public class JSPController {

     @RequestMapping("/index")

     public String index(Map<String, Object> map) {

         map.put("name","Andy");

         return "mytest";

     }

 }
三、界面配置
由于IntellJ下的项目不自带webapp,所以需要手动自行添加
方法如图
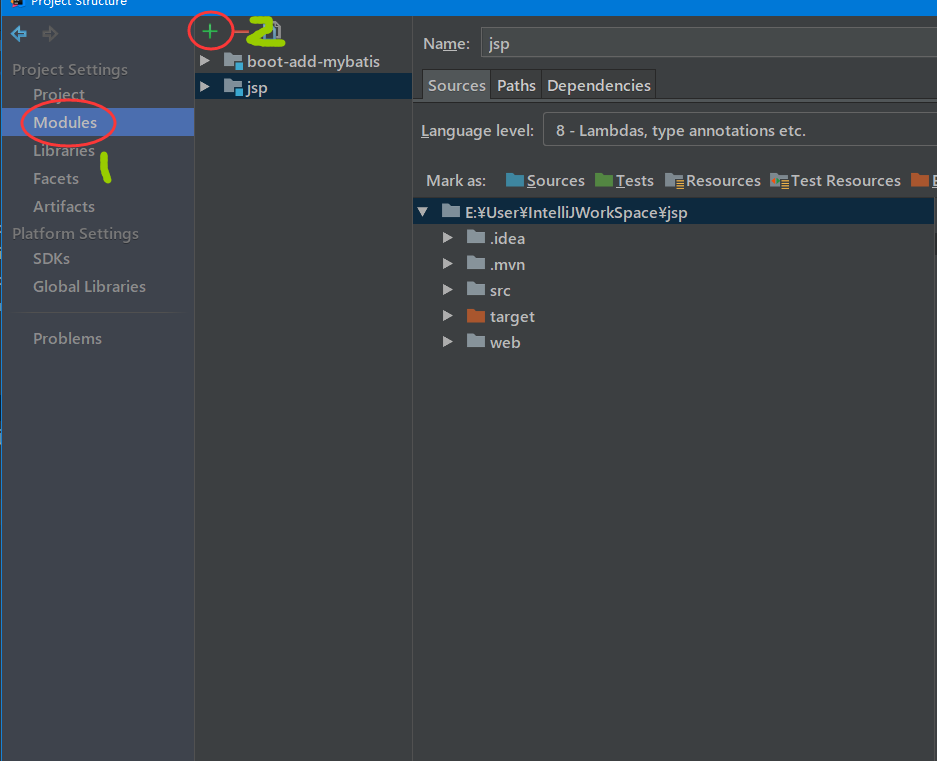
1、选中项目--->file-->Project Structure

2、如图选中module ,选中jsp,然后选择2的加号
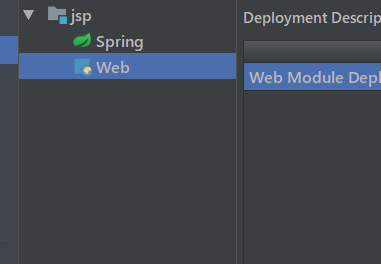
3、加号弹出框中选择web

4、就会在目录下生成一个web,然后我们对web进行配置
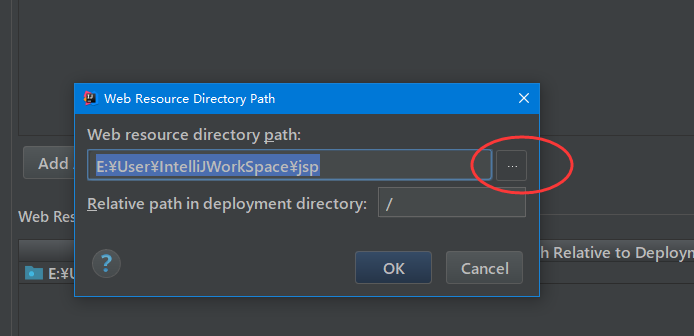
5、web配置到项目中,选中web然后找到右边的小加号

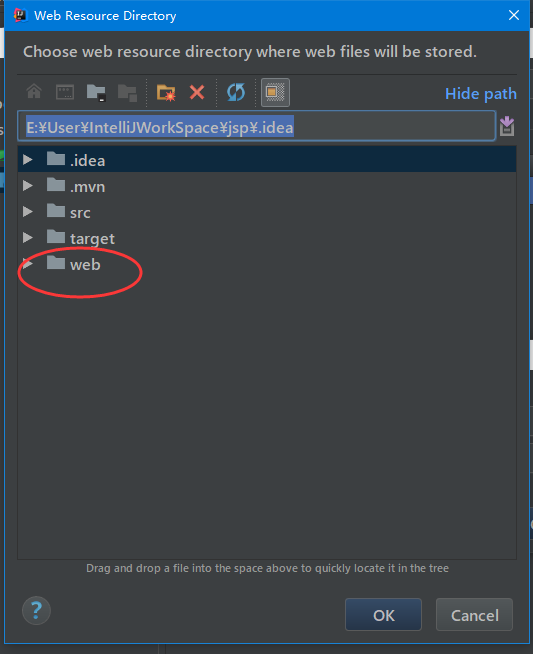
6、找到自己的项目,然后选择你自己建立的web文件夹(一般有个默认路径,但是我们不用,选择后边的省略号)
7、点击后弹出如图,然后选择自己的web,如图
8、点击ok,然后就发现文件夹变为了带点的文件夹,然后在文件夹下建立jsp子文件夹,然后在其中加入测试代码
 <%--

   Created by IntelliJ IDEA.

   User: liuya

   Date: 2018-01-28

   Time: 下午 06:12

   To change this template use File | Settings | File Templates.

 --%>

 <%@ page contentType="text/html;charset=UTF-8" language="java" %>

 <html>

 <head>

     <title>mytestdemo</title>

 </head>

 <body>

 <center>

     <h2>Hello ${name} </h2>

 </center>

 </body>

 </html>
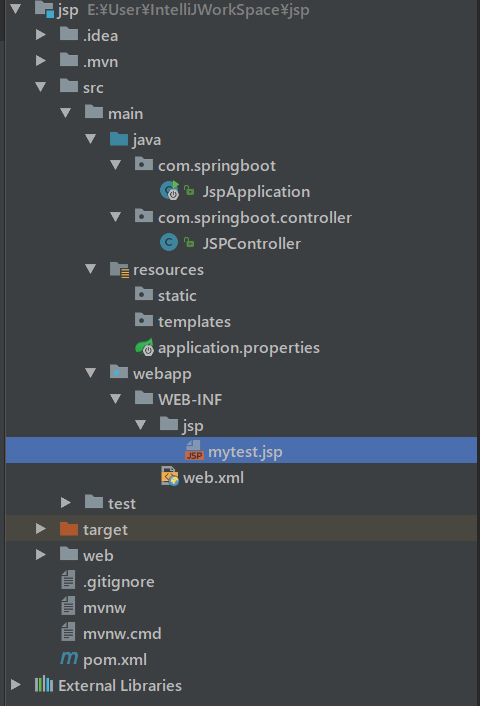
9、项目的各个目录层级
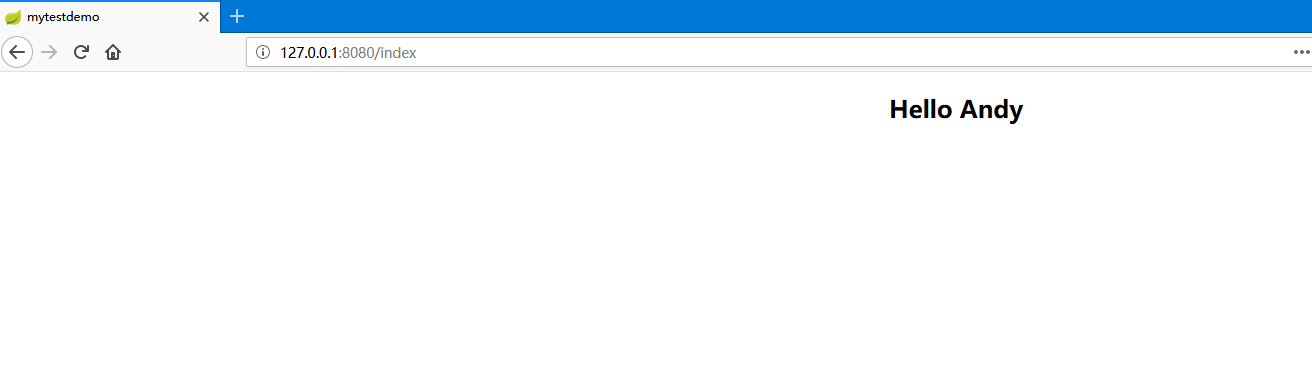
10、访问地址:http://127.0.0.1:8080/index,测试如图返回为测试成功
IntelliJ IDEA 2017版 spring-boot加载jsp配置详解(详细图文实例)的更多相关文章
- spring boot加载自定义配置
1.通过@Value 配置文件中 wechat: ssh: host: 192.0.1.1 port: 22 加载类 @Component @Data public class SftpConfig ...
- spring boot 加载jsp
1.spring boot启动类继承SpringBootServletInitializer ,并且重写configure方法 package com.springapp.mvc;import jav ...
- Spring Boot 2.0 教程 - 配置详解
Spring Boot 可以通过properties文件,YAML文件,环境变量和命令行参数进行配置.属性值可以通过,@Value注解,Environment或者ConfigurationProper ...
- web.xml的加载过程配置详解
一:web.xml加载过程 简单说一下,web.xml的加载过程.当我们启动一个WEB项目容器时,容器包括(JBoss,Tomcat等).首先会去读取web.xml配置文件里的配置,当这一步骤没有 ...
- spring boot slf4j日记记录配置详解
https://blog.csdn.net/liuweixiao520/article/details/78900779
- Spring Boot加载配置文件
问题1:Spring如何加载配置,配置文件位置? 1.默认位置: Spring Boot默认的配置文件名称为application.properties,SpringApplication将从以下位置 ...
- Spring Boot加载application.properties配置文件顺序规则
SpringApplication会从以下路径加载所有的application.properties文件: 1.file:./config/(当前目录下的config文件夹) 2.file:./(当前 ...
- spring boot 加载web容器tomcat流程源码分析
spring boot 加载web容器tomcat流程源码分析 我本地的springboot版本是2.5.1,后面的分析都是基于这个版本 <parent> <groupId>o ...
- Spring Boot源码中模块详解
Spring Boot源码中模块详解 一.源码 spring boot2.1版本源码地址:https://github.com/spring-projects/spring-boot/tree/2.1 ...
随机推荐
- centor os 安装nginx
安装nginx和health check wget http://nginx.org/download/nginx-1.4.5.tar.gz git clone https://github.com/ ...
- Java HashMap两种遍历方式
第一种: Map map = new HashMap(); Iterator iter = map.entrySet().iterator(); while (iter.hasNext()) { Ma ...
- Haskell语言学习笔记(55)Data.Vector
Data.Vector Construction Prelude V> import Data.Vector as V Prelude V> V.empty [] Prelude V> ...
- centos7 升级python2.7 到python3.6(Centos7 安装Anaconda)
Anaconda 下载 https://www.anaconda.com/download/#linux 下载文件 Anaconda3-5.2.0-Linux-x86_64.sh bash Anaco ...
- Spring Boot AOP
AOP为Aspect Oriented Programming的缩写,意为:面向切面编程,通过预编译方式和运行期动态代理实现程序功能的统一维护的一种技术.AOP是Spring框架中的一个重要内容,它通 ...
- 用NBU无法还原数据库到ASM磁盘
描述:用NBU无法还原数据库到ASM磁盘,却可以还原到数据库本地磁盘 错误提示: ORA-15025: could not open disk "/dev/mapper/DATA1" ...
- 57. Insert Interval (Array; Sort)
Given a set of non-overlapping intervals, insert a new interval into the intervals (merge if necessa ...
- [leetcode]299. Bulls and Cows公牛和母牛
You are playing the following Bulls and Cows game with your friend: You write down a number and ask ...
- IIS6.0创建新网站后,浏览显示需输入用户名和密码
1.首先我们需要创建一个用于匿名访问的账号. 我的电脑右键,电脑管理->本地用户和组->用户->新用户 注意勾选(用户不能更改密码和密码永不过期这两项) 2.右键新创建的用户-& ...
- discuz的css处理机制
common/common.css 是一个通用的css文件. common/module.css 是某个功能模块使用的css文件. module.css中,利用特殊语法: /** 标识 **/ c ...