【原】使用Xfermode正确的绘制出遮罩效果
以前写as3的时候,遮罩效果一个mask属性就搞定了,真是方便。
转到android上以后,发现要实现类似的效果,可以使用Xfermode,android一共提供了三种:
AvoidXfermode;

PixelXorXfermode;

PorterDuffXfermode;
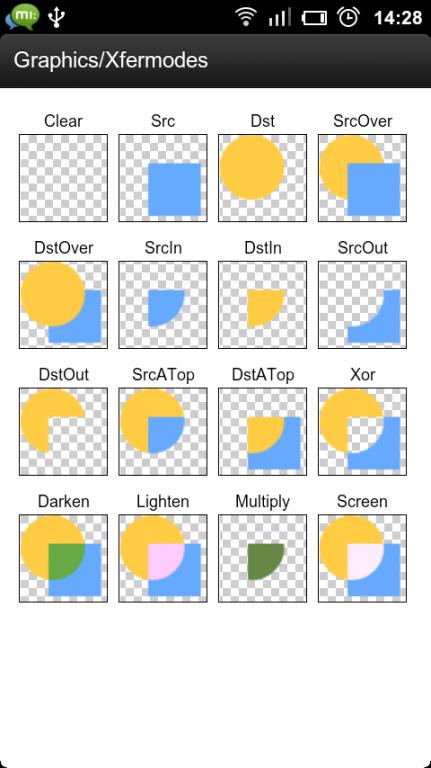
前两种已经不被推荐使用了(据说是因为不支持硬件加速,要生效得强制关闭硬件加速),就不细说了,主要说说第三种,一共提供了十六种效果(as3里也提供了类似,但是更加复杂的方法,所以对我而言还是比较熟悉的),如图所示:
但是要正确的在canvas上实现这些效果,还真是没那么容易,我也是研究了半天,终于实现了自己想要的效果,下面用一个例子说明下我的操作流程。
想要实现的效果是这样的:
简单分析一下,绘制一个圆形和一个矩形,计算好相应的坐标位置,然后使用SRC_IN进行混合就可以了,类似这样:
下面说一下我的操作流程:
1. 绘制border
2. 保存为单独层(canvas.saveLayer),特别注意这一步必须要有,否则无论如何出不来正常效果,起码我试了很久没有成功
3. 绘制填充的圆形,同时也是遮罩
4. 设置笔触的Xfermode为new PorterDuffXfermode(PorterDuff.Mode.SRC_IN)
5. 使用该笔触绘制矩形,进行混合
6. 恢复到canvas上
上代码,大家可以对照看一下各个步骤的具体代码
    @Override

    protected void onDraw(Canvas canvas) {

        float strokeWidth = getResources().getDimension(R.dimen.stroke_width);

        int borderColor = getResources().getColor(R.color.carnation);

        int fillColor = getResources().getColor(R.color.carnation_lighter);

        int percentColor = getResources().getColor(R.color.carnation_light);

        int width = getWidth();

        int height = getHeight();

        //border

        Paint stroke = new Paint(Paint.ANTI_ALIAS_FLAG);

        stroke.setStrokeWidth(strokeWidth);

        stroke.setStyle(Paint.Style.STROKE);

        stroke.setColor(borderColor);

        canvas.drawOval(new RectF(strokeWidth/2,strokeWidth/2,width-strokeWidth/2,height-strokeWidth/2),stroke);

        //save as new layer

        int save = canvas.saveLayer(0,0,width,height,null,Canvas.ALL_SAVE_FLAG);

        //fill background

        Paint fill = new Paint(Paint.ANTI_ALIAS_FLAG);

        fill.setStyle(Paint.Style.FILL);

        fill.setColor(fillColor);

        canvas.drawOval(new RectF(strokeWidth - 1, strokeWidth - 1, width - strokeWidth + 1, height - strokeWidth + 1), fill);

        //mix rect

        fill.setColor(percentColor);

        fill.setXfermode(new PorterDuffXfermode(PorterDuff.Mode.SRC_IN));

        canvas.drawRect(0,(1-mPercent)*height,width,height,fill);

        //restore to canvas

        canvas.restoreToCount(save);

        super.onDraw(canvas);

    }
之前也查了不少文章,貌似没有看到多少着重说saveLayer的,还是我对照官方apidemos源码试出来的,希望对遇到同样疑问的朋友有所帮助!
2015/7/9 更新:
1. 要实现混合的两个图形,必须位于同一个layer上,经测试位于不同layer上是无法混合的,即使最后都绘制到了canvas上。
2. 不同的绘制顺序,可能有不同的效果,注意一下逻辑即可。
更新一段复杂点的例子
使用了两种混合方式SRC_IN和CLEAR,主要代码如下:
     @Override

     protected void onDraw(Canvas canvas) {

         int width = getWidth();

         int height = getHeight();

         float strokeWidth = DimenUtils.dp2px(4);

         float pointRadius = DimenUtils.dp2px(4);

         float gap = DimenUtils.dp2px(4);

         float monthRadius = height * 0.2f;

         float textSize = DimenUtils.dp2px(14);

         int color = getResources().getColor(R.color.carnation);

         int lightColor = getResources().getColor(R.color.carnation_light);

         int lighterColor = getResources().getColor(R.color.carnation_lighter);

         float degree = 360*mRate;

         Paint paint = new Paint(Paint.ANTI_ALIAS_FLAG);

         //new layer

         int save = canvas.saveLayer(0, 0, width, height, null, Canvas.ALL_SAVE_FLAG);

         //draw percent

         canvas.save();

         float fillDistance = pointRadius+gap+strokeWidth/2;

         canvas.translate(fillDistance,fillDistance);

         RectF fillRect = new RectF(0,0,width-2*fillDistance,height-2*fillDistance);

         paint.setColor(lightColor);

         paint.setStyle(Paint.Style.FILL);

         canvas.drawOval(fillRect,paint);

         //mix rect

         paint.setColor(color);

         paint.setXfermode(new PorterDuffXfermode(PorterDuff.Mode.SRC_IN));

         canvas.drawRect(0, (1 - mPercent) * (height-2*fillDistance), width-2*fillDistance, height-2*fillDistance, paint);

         canvas.restore();

         //border

         paint.setXfermode(null);

         paint.setStrokeWidth(strokeWidth);

         paint.setStyle(Paint.Style.STROKE);

         paint.setColor(lighterColor);

         RectF borderRect = new RectF(pointRadius,pointRadius,width-pointRadius,height-pointRadius);

         canvas.drawOval(borderRect, paint);

         paint.setColor(color);

         canvas.drawArc(borderRect,270,degree,false,paint);

         //draw point

         canvas.save();

         paint.setStyle(Paint.Style.FILL);

         canvas.translate(width/2,height/2);

         canvas.rotate(degree);

         canvas.drawCircle(0,pointRadius-height/2,pointRadius,paint);

         canvas.restore();

         //draw month

         canvas.save();

         canvas.translate(width*0.7f,height*0.8f);

         paint.setColor(Color.BLACK);

         paint.setStyle(Paint.Style.STROKE);

         paint.setStrokeWidth(gap);

         paint.setXfermode(new PorterDuffXfermode(PorterDuff.Mode.CLEAR));

         canvas.drawCircle(0,0,monthRadius+gap/2,paint);

         paint.setXfermode(null);

         paint.setStyle(Paint.Style.FILL);

         paint.setColor(getResources().getColor(R.color.orange));

         canvas.drawCircle(0,0,monthRadius,paint);

         canvas.restoreToCount(save);

     }

【原】使用Xfermode正确的绘制出遮罩效果的更多相关文章
- iOS: 如何正确的绘制1像素的线
iOS 绘制1像素的线 一.Point Vs Pixel iOS中当我们使用Quartz,UIKit,CoreAnimation等框架时,所有的坐标系统采用Point来衡量.系统在实际渲染到设置时会帮 ...
- 移动端和PC端弹出遮罩层后,页面禁止滚动的解决方法及探究
PC端解决方案 pc端的解决思路就是在弹出遮罩层的时候取消已经存在的滚动条,达到无法滚动的效果. 也就是说给body添加overflow:hidden属性即可,IE6.7下不会生效,需要给html增加 ...
- jquery特效(7)—弹出遮罩层且内容居中
上周写了几个小特效,其中有个点击按钮弹出遮罩层的特效,下面来看最终实现的效果: 由于是测试的程序,所以我未加关闭的按钮. 一.主体程序 <!DOCTYPE html> <html&g ...
- Css动画形式弹出遮罩层,内容区上下左右居中于不定宽高的容器中
<!DOCTYPE html> <html> <head> </head> <body id="body"> <! ...
- jquery制作弹出层带遮罩效果,点击阴影部分层消失
jquery制作弹出层带遮罩效果,点击阴影部分层消失. 整体还是比较简单的. HTML代码很简单 <a href="#" class="big-link" ...
- 使用 HTML5 Canvas 绘制出惊艳的水滴效果
HTML5 在不久前正式成为推荐标准,标志着全新的 Web 时代已经来临.在众多 HTML5 特性中,Canvas 元素用于在网页上绘制图形,该元素标签强大之处在于可以直接在 HTML 上进行图形操作 ...
- 基于jQuery向下弹出遮罩图片相册
今天给大家分享一款基于jQuery向下弹出遮罩图片相册.单击相册图片时,一个遮罩层从上到下动画出现.然后弹出显示图片.这款插件适用浏览器:IE8.360.FireFox.Chrome.Safari.O ...
- Cocos2d-x--Box2D绘制出两个矩形框的解决方案
一个简单的Demo,只是在程序窗口绘制出一个矩形 找到以下代码,注释掉其中一句 效果:
- js弹出对话框,遮罩效果,
刚刚来到实习单位,我跟着廖哥做项目.然后他分配给我一个小小的任务,实现起来总的效果如下: 然后,但我们单击显示数目这个链接的时候,就会弹出一个又遮罩效果的对话框,如下图: 当我们在对话框中再点击里面的 ...
随机推荐
- LeetCode之104. Maximum Depth of Binary Tree
-------------------------------- 递归遍历即可 AC代码: /** * Definition for a binary tree node. * public clas ...
- 最小生成树的Kruskal算法实现
最近在复习数据结构,所以想起了之前做的一个最小生成树算法.用Kruskal算法实现的,结合堆排序可以复习回顾数据结构.现在写出来与大家分享. 最小生成树算法思想:书上说的是在一给定的无向图G = (V ...
- Python中使用递归输出嵌套列表并转化为大写
- Client病毒已感染超7万人 暗扣费并频弹广告
恶意木马病毒横行,您的钱包还hold得住吗?猎豹移动安全实验室与安天AVL移动安全团队于2015年下半年,共同截获一款名为Client的木马病毒,并且对该病毒进行持续监测.通过进一步关注,我们发现该病 ...
- sqlserver表分区小结
为什么要表分区? 当一个表的数据量太大的时候,我们最想做的一件事是什么?将这个表一分为二或者更多分,但是表还是这个表,只是将其内容存储分开,这样读取就快了N倍了 原理:表数据是无法放在文件中的,但是 ...
- MXNet设计和实现简介
原文:https://github.com/dmlc/mxnet/issues/797 神经网络本质上是一种语言,我们通过它来表达对应用问题的理解.例如我们用卷积层来表达空间相关性,RNN来表达时间连 ...
- [BI项目记]-对项目文件进行规划
BI项目中会有很多不同种类的项目,此篇会对这些项目进行一个总结,并且在TFS中进行分类. 根据笔者对BI项目的经验和理解,主要将BI项目中的项目类型进行如下分类: DB脚本 DB脚本是BI项目中重要的 ...
- UITableView在设置contentOffset的同时也reload,造成tableView的contentOffset偏差
最近在写一个聊天的框架,遇到一个奇葩的问题,就是发送聊天记录的时候(需要tableView上移,显示出最新的记录),增加一条记录无疑需要reload一下(大家都明白的),这是就会出现头疼的问题,页面显 ...
- 前台处理json字符串的几种方法(转)
原文地址http://www.css88.com/archives/3919 比如我有两个变量,我要将a转换成字符串,将b转换成JSON对象: var a={"name":&quo ...
- hdu分类 Math Theory(还有三题!)
这个分类怎么觉得这么水呢.. 这个分类做到尾的模板集: //gcd int gcd(int a,int b){return b? gcd(b, a % b) : a;} //埃氏筛法 O(nlogn) ...