
Identity Server 4 从入门到落地(三)—— 创建Web客户端
书接上回,我们已经搭建好了基于Identity Server 4的认证服务和管理应用(如果还没有搭建,参看本系列前两部分,相关代码可以从github下载:https://github.com/zhenl/IDS4Admin )。
现在我们来创建Web客户端。基本上可以按照Identity Server官网教程来: https://identityserver4.readthedocs.io/en/latest/quickstarts/2_interactive_aspnetcore.html 。只不过我使用的是.Net 6,代码上有少许出入。
首先创建一个Asp.Net Core Web项目,使用MVC项目模板,在创建时选择不需要身份认证。然后引入程序包 Microsoft.AspNetCore.Authentication.OpenIdConnect。
接下来修改Program.cs,.Net 6引入了简洁模式,代码看上去有些不同。
using System.IdentityModel.Tokens.Jwt;

var builder = WebApplication.CreateBuilder(args);

//增加的代码

JwtSecurityTokenHandler.DefaultMapInboundClaims = false;

builder.Services.AddAuthentication(options =>

{

    options.DefaultScheme = "Cookies";

    options.DefaultChallengeScheme = "oidc";

})

    .AddCookie("Cookies")

    .AddOpenIdConnect("oidc", options =>

    {

        options.Authority = "http://localhost:4010";

        options.RequireHttpsMetadata = false;

        options.ClientId = "myclient";

        options.ClientSecret = "secret";

        options.ResponseType = "code";

        options.Scope.Add("openid");

        options.Scope.Add("profile");

        options.GetClaimsFromUserInfoEndpoint = true;

        options.SaveTokens = true;

    });

//增加结束

// Add services to the container.

builder.Services.AddControllersWithViews();

var app = builder.Build();

// Configure the HTTP request pipeline.

if (!app.Environment.IsDevelopment())

{

    app.UseExceptionHandler("/Home/Error");

    // The default HSTS value is 30 days. You may want to change this for production scenarios, see https://aka.ms/aspnetcore-hsts.

    app.UseHsts();

}

app.UseHttpsRedirection();

app.UseStaticFiles();

app.UseRouting();

app.UseAuthentication(); //增加的代码

app.UseAuthorization();

app.MapControllerRoute(

    name: "default",

    pattern: "{controller=Home}/{action=Index}/{id?}")

    .RequireAuthorization(); //增加的代码

app.Run();
增加的代码进行了注释。需要注意的是,由于我们的测试认证服务器运行在http://localhost:4010,没有使用HTTPS协议,所以增加了options.RequireHttpsMetadata = false。
还需要修改lanuch.json中的代码,将项目改变为自启动项目,不依赖IIS Express:
{

  "profiles": {

    "IDS4Client": {

      "commandName": "Project",

      "dotnetRunMessages": true,

      "launchBrowser": true,

      "applicationUrl": "https://localhost:7002;http://localhost:5002",

      "environmentVariables": {

        "ASPNETCORE_ENVIRONMENT": "Development"

      }

    }

  }

}
最后,修改Index.cshtml,显示用户信息:
@{

    ViewData["Title"] = "Home Page";

}

@using Microsoft.AspNetCore.Authentication

<h2>Claims</h2>

<dl>

    @foreach (var claim in User.Claims)

    {

        <dt>@claim.Type</dt>

        <dd>@claim.Value</dd>

    }

</dl>

<h2>Properties</h2>

<dl>

    @foreach (var prop in (await Context.AuthenticateAsync()).Properties.Items)

    {

        <dt>@prop.Key</dt>

        <dd>@prop.Value</dd>

    }

</dl>
客户端就编写完成了,然后使用管理应用(我这里是http://localhost:4003)向认证服务的数据库中增加这个客户端的定义。设置项很多,可以参考现有的管理客户端进行设置,也可以克隆现有的客户端进行修改。主要的设置是基本信息和认证注销部分,特别注意别忘了设置客户端密钥,并且密钥需要与客户端代码中的相同,还有就是允许作用域也要和代码中的相同。这两部分的截图如下:
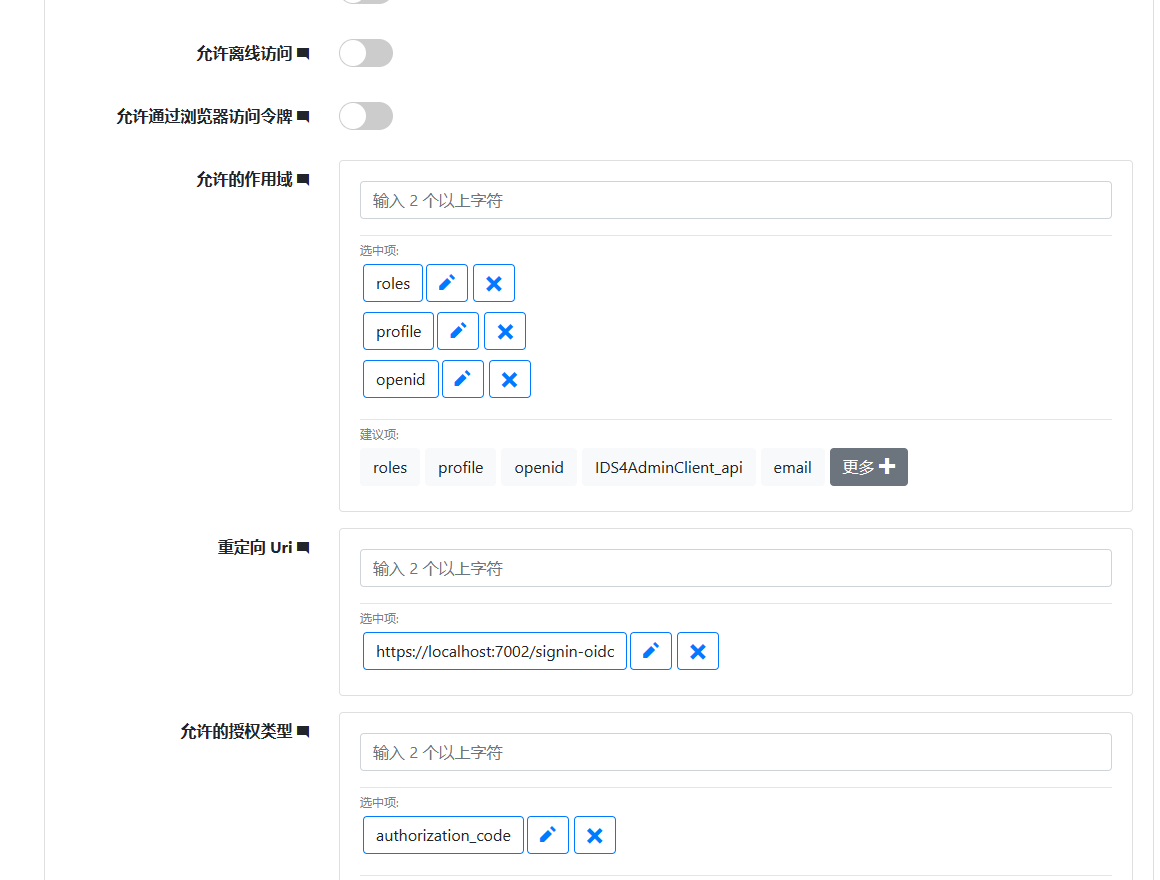
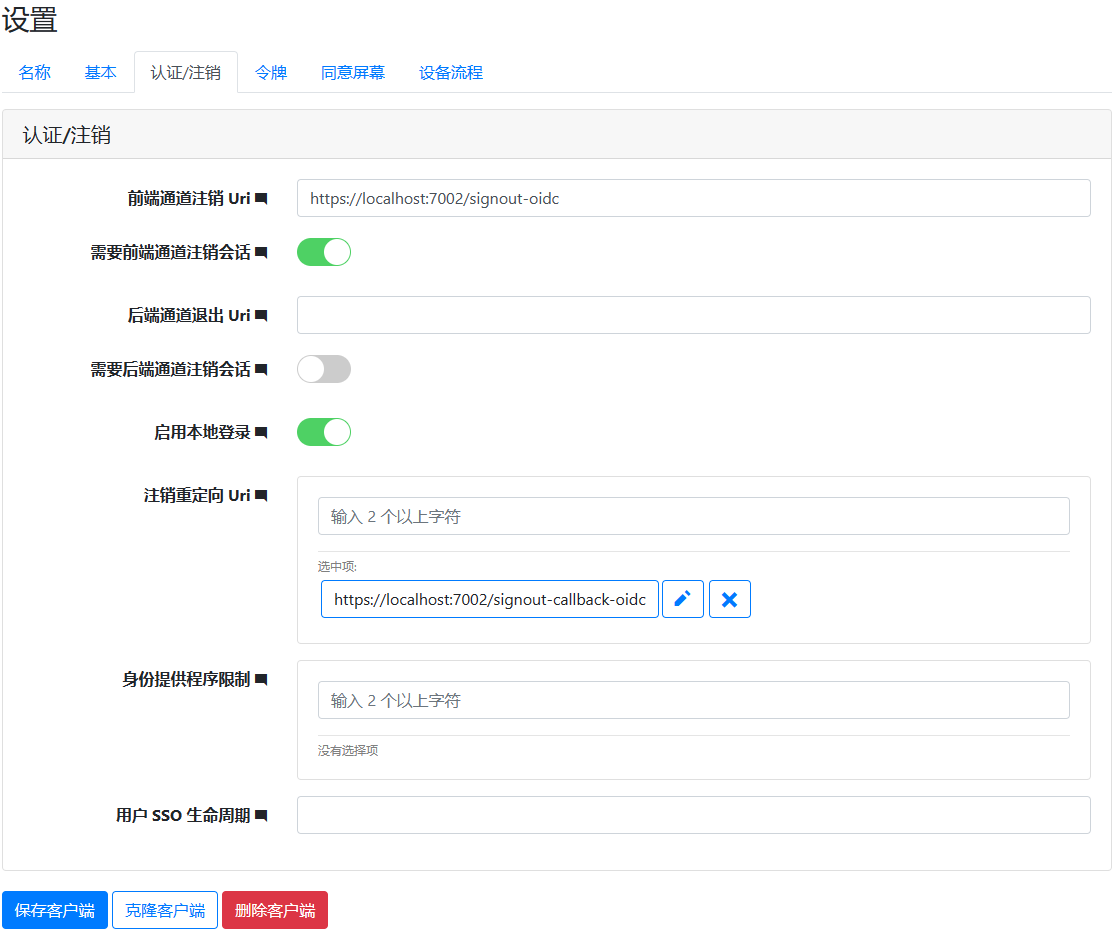
设置完成后,访问这个客户端http://localhost:7002,会重定位到认证服务器提示登录,登录后,会出现下面的界面:
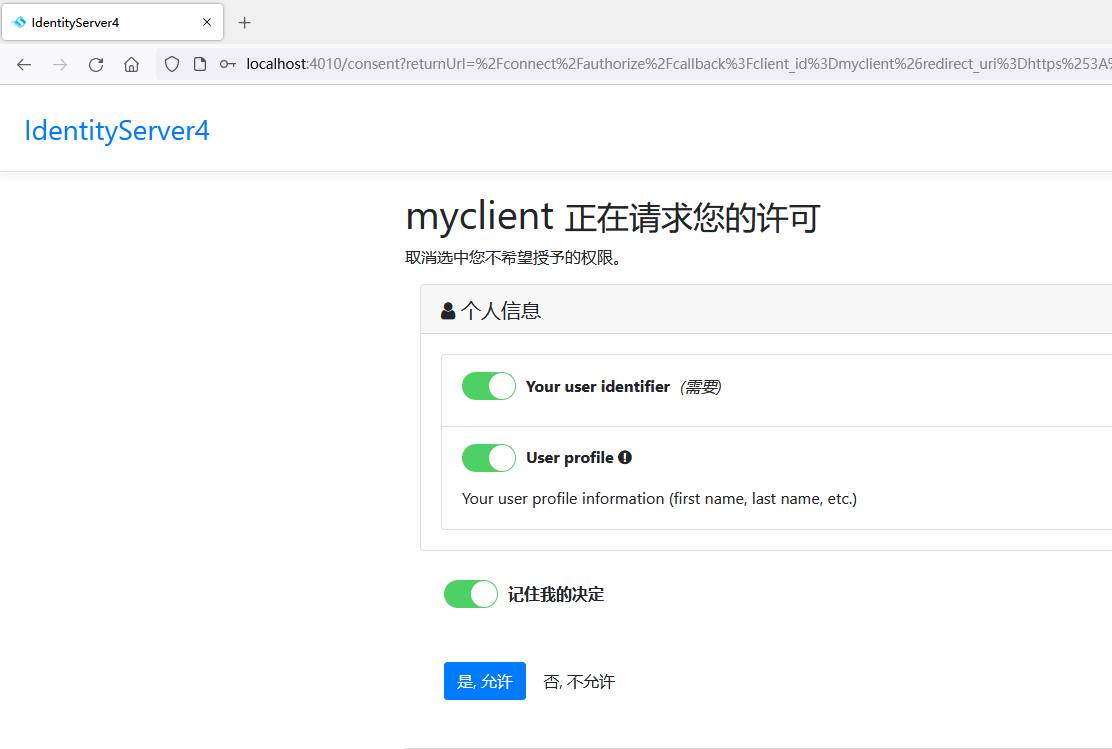
同意确认后,回到我们需要访问的界面:
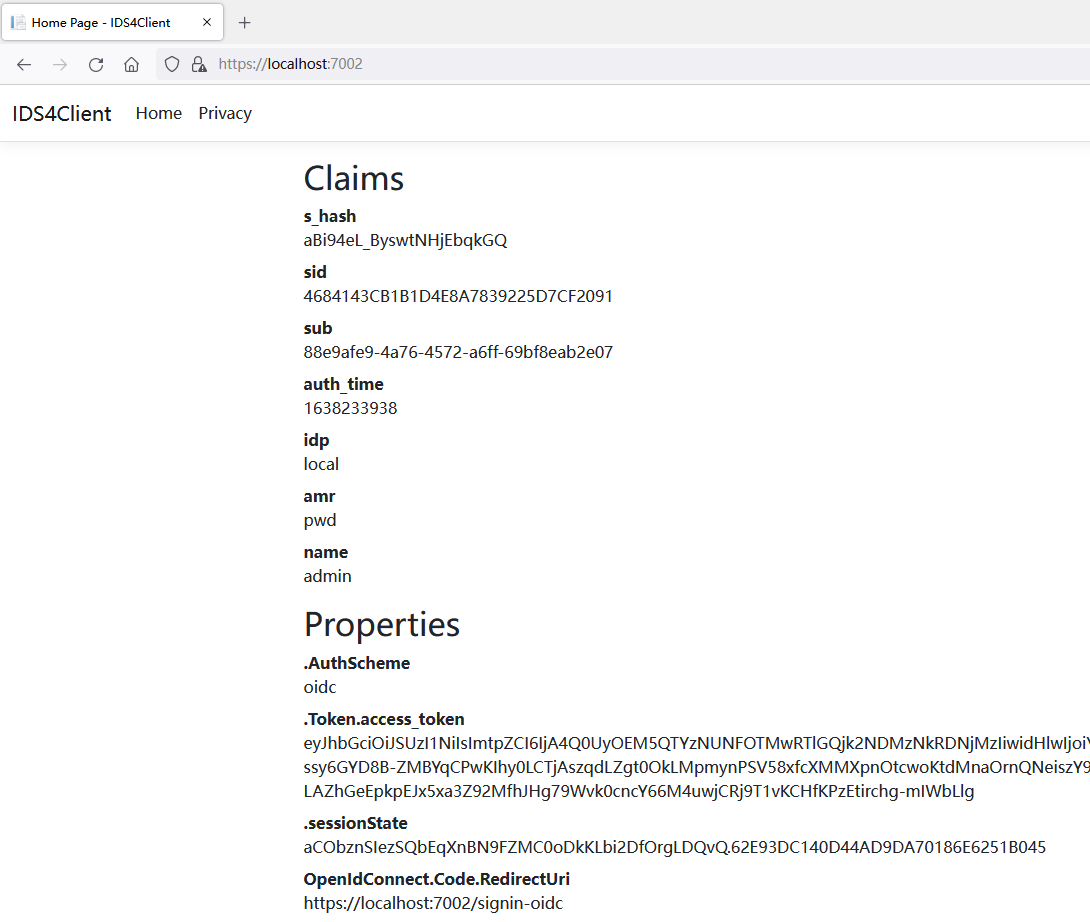
最后,增加登出链接,将这个链接增加到_Layout.chstml中,在菜单代码下面增加这个链接:
                    <ul class="navbar-nav">

                        <a class="nav-link text-dark" asp-area="" asp-controller="Home" asp-action="Logout">Logout</a>

                    </ul>
简化起见,我们在HomeController中增加登出代码,很简单:
       public IActionResult Logout()

        {

            return SignOut("Cookies", "oidc");

        }
到此,采用Identity Server 4进行认证管理的Web客户端就初步搭建完成了。下一步,我们需要搭建一个受Identity Server 4 保护的Web Api。
上述代码可以github下载: https://github.com/zhenl/IDS4ClientDemo,喜欢的话给个star。
Identity Server 4 从入门到落地(三)—— 创建Web客户端的更多相关文章
- Identity Server 4 从入门到落地(九)—— 客户端User和Role的解析
前面的部分: Identity Server 4 从入门到落地(一)-- 从IdentityServer4.Admin开始 Identity Server 4 从入门到落地(二)-- 理解授权码模式 ...
- Identity Server 4 从入门到落地(十)—— 编写可配置的客户端和Web Api
前面的部分: Identity Server 4 从入门到落地(一)-- 从IdentityServer4.Admin开始 Identity Server 4 从入门到落地(二)-- 理解授权码模式 ...
- Identity Server 4 从入门到落地(十一)—— Docker部署
前面的部分: Identity Server 4 从入门到落地(一)-- 从IdentityServer4.Admin开始 Identity Server 4 从入门到落地(二)-- 理解授权码模式 ...
- Identity Server 4 从入门到落地(十二)—— 使用Nginx集成认证服务
前面的部分: Identity Server 4 从入门到落地(一)-- 从IdentityServer4.Admin开始 Identity Server 4 从入门到落地(二)-- 理解授权码模式 ...
- Identity Server 4 从入门到落地(五)—— 使用Ajax访问Web Api
前面的部分: Identity Server 4 从入门到落地(一)-- 从IdentityServer4.Admin开始 Identity Server 4 从入门到落地(二)-- 理解授权码模式 ...
- Identity Server 4 从入门到落地(四)—— 创建Web Api
前面的部分: Identity Server 4 从入门到落地(一)-- 从IdentityServer4.Admin开始 Identity Server 4 从入门到落地(二)-- 理解授权码模式 ...
- Identity Server 4 从入门到落地(六)—— 简单的单页面客户端
前面的部分: Identity Server 4 从入门到落地(一)-- 从IdentityServer4.Admin开始 Identity Server 4 从入门到落地(二)-- 理解授权码模式 ...
- Identity Server 4 从入门到落地(七)—— 控制台客户端
前面的部分: Identity Server 4 从入门到落地(一)-- 从IdentityServer4.Admin开始 Identity Server 4 从入门到落地(二)-- 理解授权码模式 ...
- Identity Server 4 从入门到落地(八)—— .Net Framework 客户端
前面的部分: Identity Server 4 从入门到落地(一)-- 从IdentityServer4.Admin开始 Identity Server 4 从入门到落地(二)-- 理解授权码模式 ...
随机推荐
- Noip模拟78 2021.10.16
这次时间分配还是非常合理的,但可惜的是$T4$没开$\textit{long long}$挂了$20$ 但是$Arbiter$上赏了蒟蒻$20$分,就非常不错~~~ T1 F 直接拿暴力水就可以过,数 ...
- Manacher(马拉车)
Able was I ere I saw Elba. ----Napoléon Bonaparte(拿破仑) 一.回文串&回文子串 这个很好理解. 如果一个字符串正着读和反着读是一 ...
- Spring Cloud Gateway夺命连环10问?
大家好,我是不才陈某~ 最近有很多小伙伴私信我催更 <Spring Cloud 进阶>,陈某也总结了一下,最终原因就是陈某之前力求一篇文章将一个组件重要知识点讲透,这样导致了文章篇幅很长, ...
- Windows7下面手把手教你安装Django - Hongten
我所使用的操作系统是Windows7,内存是2G 在搜索了一些资料发现,对于Django的安装,详细的真的很少,都说的很简化,然而,这篇blog可以手把手教你成功安装Django 对于Django的详 ...
- eclipse javaEE版下载过程中选择镜像(Select Another Mirror)无反应解决办法,附带eclipse javaEE版下载教程。
1.eclipse javaEE版下载过程中选择镜像(Select Another Mirror)无反应 (复制该网址下载即可 https://mirrors.neusoft.edu.cn/eclip ...
- 极速上手 VUE 3—v-model 的使用变化
本篇文章主要介绍 v-model 在 Vue2 和 Vue3 中使用变化. 一.Vue2 中 v-model 的使用 v-model 是语法糖,本质还是父子组件间的通信.父子组件通信时有两种方式: 父 ...
- 我的笔记本电脑瞬间扩大一个T的容量!
前言 不知道有多少人在家里搭建中央存储设备的,也就是NAS.这个东西在我日常生活中,存储了大量的个人资料,家人们的照片,技术的资料,还有各种高清影视剧.搭配公网的IP,可以真正做到,任何时候任何地点的 ...
- DeWeb进阶 :控件开发 --- 1 完成一个纯html的demo
最近随着DeWeb(以下简称DW)的完善,和群友的应用的深入,已经有网友开始尝试做DeWeb支持控件的开发了! 这太令人兴奋了! 作为DeWeb的开发者,感觉DeWeb的优势之一就是简洁的第三方控件扩 ...
- OpenAPITools 实践
OpenAPITools 可以依据 REST API 描述文件,自动生成服务端桩(Stub)代码.客户端 SDK 代码,及文档等.其是社区版的 Swagger ,差异可见:OpenAPI Genera ...
- linux网络编程 IO多路复用 select epoll
本文以我的小型聊天室为例,对于服务器端的代码,做了三次改进,我将分别介绍阻塞式IO,select,epoll . 一:阻塞式IO 对于聊天室这种程序,我们最容易想到的是在服务器端accept之后,然后 ...