Activiti7 与 Spring Boot 及 Spring Security 整合 踩坑记录
1. 前言
实话实说,网上关于Activiti的教程千篇一律,有参考价值的不多。很多都是老早以前写的,基本都是直接照搬官方提供的示例,要么就是用单元测试跑一下,要么排除Spring Security,很少有看到一个完整的项目。太难了,笔者在实操的时候,遇到很多坑,在此做一个记录。
其实,选择用Activiti7没别的原因,就是因为穷。但凡是有钱,谁还用开源版的啊,当然是用商业版啦。国外的工作流引擎没有考虑中国的实际情况,很多像回退、委派、撤销等等功能都没有,所以最省事的还是中国特色的BPM。
Activiti7的文档比较少,但是教程多。Flowable的文档比较齐全,但是网上教程少。
2. Maven依赖
<?xml version="1.0" encoding="UTF-8"?>

<project xmlns="http://maven.apache.org/POM/4.0.0" xmlns:xsi="http://www.w3.org/2001/XMLSchema-instance"

         xsi:schemaLocation="http://maven.apache.org/POM/4.0.0 https://maven.apache.org/xsd/maven-4.0.0.xsd">

    <modelVersion>4.0.0</modelVersion>

    <parent>

        <groupId>org.springframework.boot</groupId>

        <artifactId>spring-boot-starter-parent</artifactId>

        <version>2.5.2</version>

        <relativePath/> <!-- lookup parent from repository -->

    </parent>

    <groupId>com.cjs.example</groupId>

    <artifactId>demo-activiti7</artifactId>

    <version>0.0.1-SNAPSHOT</version>

    <name>demo-activiti7</name>

    <properties>

        <java.version>1.8</java.version>

    </properties>

    <dependencies>

        <dependency>

            <groupId>org.springframework.boot</groupId>

            <artifactId>spring-boot-starter-data-jpa</artifactId>

        </dependency>

        <dependency>

            <groupId>org.springframework.boot</groupId>

            <artifactId>spring-boot-starter-data-redis</artifactId>

        </dependency>

        <dependency>

            <groupId>org.springframework.boot</groupId>

            <artifactId>spring-boot-starter-security</artifactId>

        </dependency>

        <dependency>

            <groupId>org.springframework.boot</groupId>

            <artifactId>spring-boot-starter-web</artifactId>

        </dependency>

        <dependency>

            <groupId>org.activiti</groupId>

            <artifactId>activiti-spring-boot-starter</artifactId>

            <version>7.1.0.M6</version>

        </dependency>

        <dependency>

            <groupId>mysql</groupId>

            <artifactId>mysql-connector-java</artifactId>

            <scope>runtime</scope>

        </dependency>

        <dependency>

            <groupId>org.projectlombok</groupId>

            <artifactId>lombok</artifactId>

            <optional>true</optional>

        </dependency>

        <dependency>

            <groupId>org.apache.commons</groupId>

            <artifactId>commons-lang3</artifactId>

            <version>3.12.0</version>

        </dependency>

        <dependency>

            <groupId>org.apache.commons</groupId>

            <artifactId>commons-collections4</artifactId>

            <version>4.4</version>

        </dependency>

        <dependency>

            <groupId>commons-io</groupId>

            <artifactId>commons-io</artifactId>

            <version>2.10.0</version>

        </dependency>

        <dependency>

            <groupId>io.jsonwebtoken</groupId>

            <artifactId>jjwt</artifactId>

            <version>0.9.1</version>

        </dependency>

        <dependency>

            <groupId>com.alibaba</groupId>

            <artifactId>fastjson</artifactId>

            <version>1.2.76</version>

        </dependency>

    </dependencies>

    <build>

        <plugins>

            <plugin>

                <groupId>org.springframework.boot</groupId>

                <artifactId>spring-boot-maven-plugin</artifactId>

                <configuration>

                    <excludes>

                        <exclude>

                            <groupId>org.projectlombok</groupId>

                            <artifactId>lombok</artifactId>

                        </exclude>

                    </excludes>

                </configuration>

            </plugin>

        </plugins>

    </build>

</project>
配置 application.properties
server.port=8080
server.servlet.context-path=/activiti7
spring.datasource.driver-class-name=com.mysql.jdbc.Driver
spring.datasource.url=jdbc:mysql://localhost:3306/demo?useUnicode=true&characterEncoding=utf8&nullCatalogMeansCurrent=true
spring.datasource.username=root
spring.datasource.password=123456
spring.jpa.database=mysql
spring.jpa.open-in-view=true
spring.jpa.properties.hibernate.enable_lazy_load_no_trans=true
spring.jpa.show-sql=true
spring.redis.host=192.168.28.31
spring.redis.port=6379
spring.redis.password=123456
spring.redis.database=1
spring.activiti.database-schema-update=true
spring.activiti.db-history-used=true
spring.activiti.history-level=full
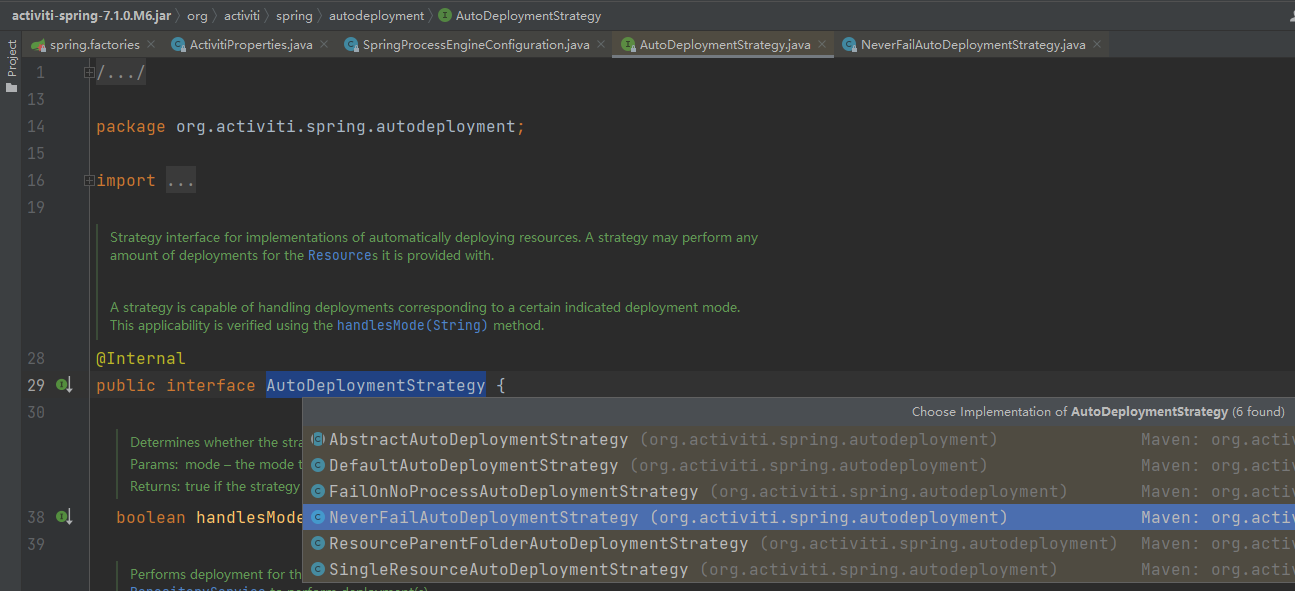
spring.activiti.check-process-definitions=false
spring.activiti.deployment-mode=never-fail代码是最好的老师,查看代码所有配置项都一目了然
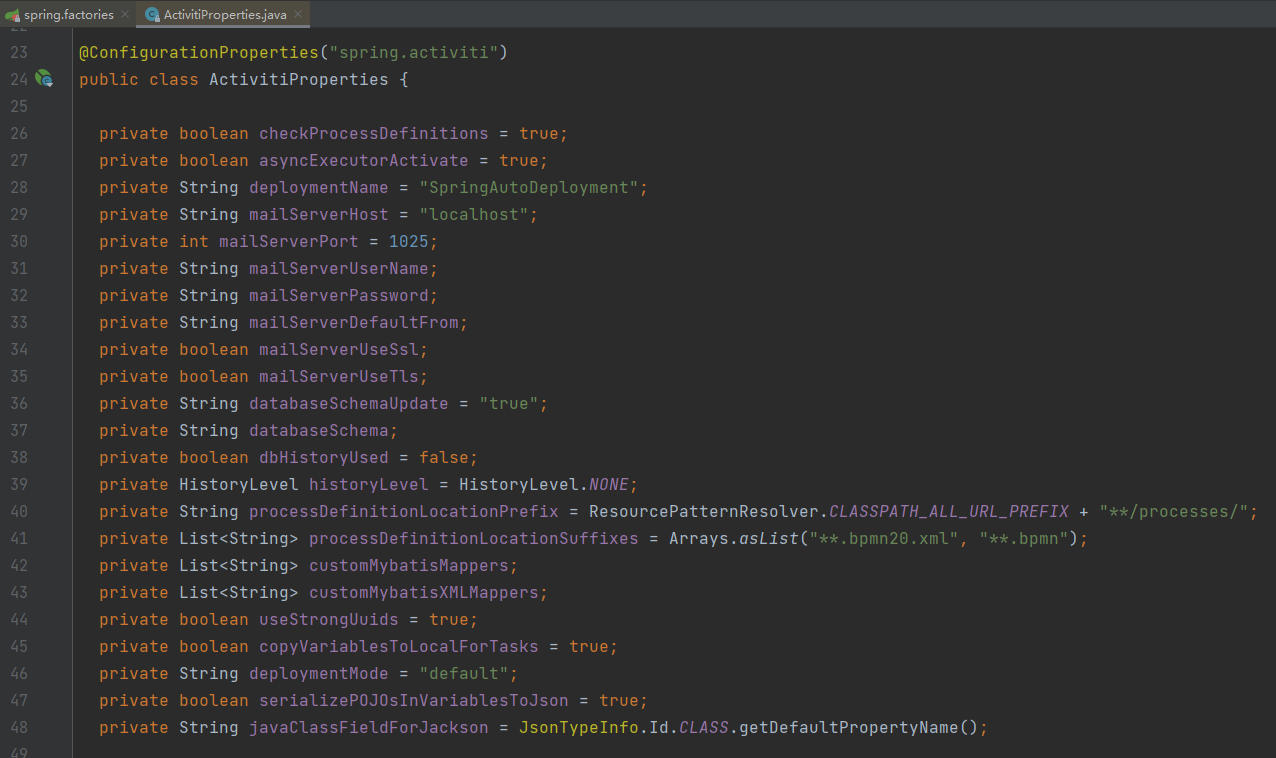
这里最好关闭自动部署,不然每次项目启动的时候就会自动部署一次
3. 集成 Spring Security
详见我另一篇 《基于 Spring Security 的前后端分离的权限控制系统》
3.1. 实体类
权限
package com.cjs.example.entity;

import lombok.Getter;

import lombok.Setter;

import javax.persistence.*;

import java.io.Serializable;

import java.util.Set;

/**

 * 菜单表

 * @Author ChengJianSheng

 * @Date 2021/6/12

 */

@Setter

@Getter

@Entity

@Table(name = "sys_menu")

public class SysMenuEntity implements Serializable {

    @Id

    @GeneratedValue(strategy = GenerationType.AUTO)

    @Column(name = "id")

    private Integer id;

    /**

     * 资源编码

     */

    @Column(name = "code")

    private String code;

    /**

     * 资源名称

     */

    @Column(name = "name")

    private String name;

    /**

     * 菜单/按钮URL

     */

    @Column(name = "url")

    private String url;

    /**

     * 资源类型(1:菜单,2:按钮)

     */

    @Column(name = "type")

    private Integer type;

    /**

     * 父级菜单ID

     */

    @Column(name = "pid")

    private Integer pid;

    /**

     * 排序号

     */

    @Column(name = "sort")

    private Integer sort;

    @ManyToMany(mappedBy = "menus")

    private Set<SysRoleEntity> roles;

}
角色
package com.cjs.example.entity;

import lombok.Getter;

import lombok.Setter;

import javax.persistence.*;

import java.io.Serializable;

import java.util.Set;

/**

 * 角色表

 * @Author ChengJianSheng

 * @Date 2021/6/12

 */

@Setter

@Getter

@Entity

@Table(name = "sys_role")

public class SysRoleEntity implements Serializable {

    @Id

    @GeneratedValue(strategy = GenerationType.AUTO)

    @Column(name = "id")

    private Integer id;

    /**

     * 角色名称

     */

    @Column(name = "name")

    private String name;

    @ManyToMany(mappedBy = "roles")

    private Set<SysUserEntity> users;

    @ManyToMany

    @JoinTable(name = "sys_role_menu",

            joinColumns = {@JoinColumn(name = "role_id", referencedColumnName = "id")},

            inverseJoinColumns = {@JoinColumn(name = "menu_id", referencedColumnName = "id")})

    private Set<SysMenuEntity> menus;

    @ManyToMany

    @JoinTable(name = "sys_dept_role",

            joinColumns = {@JoinColumn(name = "role_id", referencedColumnName = "id")},

            inverseJoinColumns = {@JoinColumn(name = "dept_id", referencedColumnName = "id")})

    private Set<SysDeptEntity> depts;

}
部门
package com.cjs.example.entity;

import lombok.Getter;

import lombok.Setter;

import javax.persistence.*;

import java.io.Serializable;

import java.util.Set;

/**

 * 部门表

 * @Author ChengJianSheng

 * @Date 2021/6/12

 */

@Setter

@Getter

@Entity

@Table(name = "sys_dept")

public class SysDeptEntity implements Serializable {

    @Id

    @GeneratedValue(strategy = GenerationType.AUTO)

    @Column(name = "id")

    private Integer id;

    /**

     * 部门名称

     */

    @Column(name = "name")

    private String name;

    /**

     * 父级部门ID

     */

    @Column(name = "pid")

    private Integer pid;

    /**

     * 组对应的角色

     */

    @ManyToMany(mappedBy = "depts")

    private Set<SysRoleEntity> roles;

}
用户
package com.cjs.example.entity;

import lombok.Getter;

import lombok.Setter;

import javax.persistence.*;

import java.io.Serializable;

import java.time.LocalDate;

import java.util.Set;

/**

 * 用户表

 * @Author ChengJianSheng

 * @Date 2021/6/12

 */

@Setter

@Getter

@Entity

@Table(name = "sys_user")

public class SysUserEntity implements Serializable {

    @Id

    @GeneratedValue(strategy = GenerationType.AUTO)

    @Column(name = "id")

    private Integer id;

    @Column(name = "username")

    private String username;

    @Column(name = "password")

    private String password;

    @Column(name = "mobile")

    private String mobile;

    @Column(name = "enabled")

    private Integer enabled;

    @Column(name = "create_time")

    private LocalDate createTime;

    @Column(name = "update_time")

    private LocalDate updateTime;

    @OneToOne

    @JoinColumn(name = "dept_id")

    private SysDeptEntity dept;

    @ManyToMany

    @JoinTable(name = "sys_user_role",

            joinColumns = {@JoinColumn(name = "user_id", referencedColumnName = "id")},

            inverseJoinColumns = {@JoinColumn(name = "role_id", referencedColumnName = "id")})

    private Set<SysRoleEntity> roles;

}
3.2. 自定义 UserDetailsService
package com.cjs.example.domain;

import lombok.Setter;

import org.springframework.security.core.GrantedAuthority;

import org.springframework.security.core.authority.SimpleGrantedAuthority;

import org.springframework.security.core.userdetails.User;

import org.springframework.security.core.userdetails.UserDetails;

import java.util.Collection;

import java.util.Set;

/**

 * @Author ChengJianSheng

 * @Date 2021/6/12

 * @see User

 * @see User

 */

@Setter

public class MyUserDetails implements UserDetails {

    private String username;

    private String password;

    private boolean enabled;

    private Set<SimpleGrantedAuthority> authorities;

    public MyUserDetails(String username, String password, boolean enabled, Set<SimpleGrantedAuthority> authorities) {

        this.username = username;

        this.password = password;

        this.enabled = enabled;

        this.authorities = authorities;

    }

    @Override

    public Collection<? extends GrantedAuthority> getAuthorities() {

        return authorities;

    }

    @Override

    public String getPassword() {

        return password;

    }

    @Override

    public String getUsername() {

        return username;

    }

    @Override

    public boolean isAccountNonExpired() {

        return true;

    }

    @Override

    public boolean isAccountNonLocked() {

        return true;

    }

    @Override

    public boolean isCredentialsNonExpired() {

        return true;

    }

    @Override

    public boolean isEnabled() {

        return enabled;

    }

}
MyUserDetailsService
package com.cjs.example.service;

import com.cjs.example.domain.MyUserDetails;

import com.cjs.example.entity.SysMenuEntity;

import com.cjs.example.entity.SysRoleEntity;

import com.cjs.example.entity.SysUserEntity;

import com.cjs.example.repository.SysUserRepository;

import org.apache.commons.lang3.StringUtils;

import org.springframework.security.core.authority.SimpleGrantedAuthority;

import org.springframework.security.core.userdetails.UserDetails;

import org.springframework.security.core.userdetails.UserDetailsService;

import org.springframework.security.core.userdetails.UsernameNotFoundException;

import org.springframework.stereotype.Service;

import javax.annotation.Resource;

import java.util.HashSet;

import java.util.Set;

import java.util.stream.Collectors;

/**

 * @Author ChengJianSheng

 * @Date 2021/6/12

 */

@Service

public class MyUserDetailsService implements UserDetailsService {

    @Resource

    private SysUserRepository sysUserRepository;

    @Override

    public UserDetails loadUserByUsername(String username) throws UsernameNotFoundException {

        SysUserEntity sysUserEntity = sysUserRepository.findByUsername(username);

        Set<SysRoleEntity> userRoles = sysUserEntity.getRoles();

        Set<SysRoleEntity> deptRoles = sysUserEntity.getDept().getRoles();

        Set<SysRoleEntity> roleSet = new HashSet<>();

        roleSet.addAll(userRoles);

        roleSet.addAll(deptRoles);

        Set<SimpleGrantedAuthority> authorities = roleSet.stream().flatMap(role->role.getMenus().stream())

                .filter(menu-> StringUtils.isNotBlank(menu.getCode()))

                .map(SysMenuEntity::getCode)

//                .map(e -> "ROLE_" + e.getCode())

                .map(SimpleGrantedAuthority::new)

                .collect(Collectors.toSet());

        return new MyUserDetails(sysUserEntity.getUsername(), sysUserEntity.getPassword(), 1==sysUserEntity.getEnabled(), authorities);

    }

}
如果加了“ROLE_”前缀,那么比较的时候应该用 SimpleGrantedAuthority 进行比较
这里姑且不加这个前缀了,因为后面集成 Activiti 的时候用户组有一个前缀 GROUP_
package com.cjs.example.service;

import org.springframework.security.core.Authentication;

import org.springframework.security.core.GrantedAuthority;

import org.springframework.security.core.authority.AuthorityUtils;

import org.springframework.security.core.authority.SimpleGrantedAuthority;

import org.springframework.security.core.context.SecurityContextHolder;

import org.springframework.security.core.userdetails.UserDetails;

import org.springframework.stereotype.Component;

import java.util.Set;

import java.util.stream.Collectors;

@Component("myAccessDecisionService")

public class MyAccessDecisionService {

    public boolean hasPermission(String permission) {

        Authentication authentication = SecurityContextHolder.getContext().getAuthentication();

        Object principal = authentication.getPrincipal();

        if (principal instanceof UserDetails) {

            UserDetails userDetails = (UserDetails) principal;

            Set<String> set = userDetails.getAuthorities().stream().map(GrantedAuthority::getAuthority).collect(Collectors.toSet());

            return set.contains(permission);

//            //  AuthorityUtils.createAuthorityList(permission);

//            SimpleGrantedAuthority simpleGrantedAuthority = new SimpleGrantedAuthority(permission);

//            return userDetails.getAuthorities().contains(simpleGrantedAuthority);

        }

        return false;

    }

}
3.3. 自定义Token过滤器
package com.cjs.example.filter;

import com.alibaba.fastjson.JSON;

import com.cjs.example.domain.MyUserDetails;

import org.apache.commons.lang3.StringUtils;

import org.springframework.beans.factory.annotation.Autowired;

import org.springframework.data.redis.core.StringRedisTemplate;

import org.springframework.security.authentication.UsernamePasswordAuthenticationToken;

import org.springframework.security.core.context.SecurityContextHolder;

import org.springframework.stereotype.Component;

import org.springframework.web.filter.OncePerRequestFilter;

import javax.servlet.FilterChain;

import javax.servlet.ServletException;

import javax.servlet.http.HttpServletRequest;

import javax.servlet.http.HttpServletResponse;

import java.io.IOException;

import java.util.concurrent.TimeUnit;

/**

 * @Author ChengJianSheng

 * @Date 2021/6/17

 */

@Component

public class TokenFilter extends OncePerRequestFilter {

    @Autowired

    private StringRedisTemplate stringRedisTemplate;

    @Override

    protected void doFilterInternal(HttpServletRequest request, HttpServletResponse response, FilterChain chain) throws ServletException, IOException {

        String token = request.getHeader("token");

        String key = "TOKEN:" + token;

        if (StringUtils.isNotBlank(token)) {

            String value = stringRedisTemplate.opsForValue().get(key);

            if (StringUtils.isNotBlank(value)) {

                MyUserDetails user = JSON.parseObject(value, MyUserDetails.class);

                if (null != user && null == SecurityContextHolder.getContext().getAuthentication()) {

                    UsernamePasswordAuthenticationToken authenticationToken = new UsernamePasswordAuthenticationToken(user, null, user.getAuthorities());

                    SecurityContextHolder.getContext().setAuthentication(authenticationToken);

                    //  刷新token

                    //  如果生存时间小于10分钟,则再续1小时

                    long time = stringRedisTemplate.getExpire(key);

                    if (time < 600) {

                        stringRedisTemplate.expire(key, (time + 3600), TimeUnit.SECONDS);

                    }

                }

            }

        }

        chain.doFilter(request, response);

    }

}
3.3. WebSecurityConfig
package com.cjs.example.config;

import com.cjs.example.filter.TokenFilter;

import com.cjs.example.handler.*;

import com.cjs.example.service.MyUserDetailsService;

import org.springframework.beans.factory.annotation.Autowired;

import org.springframework.security.config.annotation.authentication.builders.AuthenticationManagerBuilder;

import org.springframework.security.config.annotation.method.configuration.EnableGlobalMethodSecurity;

import org.springframework.security.config.annotation.web.builders.HttpSecurity;

import org.springframework.security.config.annotation.web.configuration.EnableWebSecurity;

import org.springframework.security.config.annotation.web.configuration.WebSecurityConfigurerAdapter;

import org.springframework.security.config.http.SessionCreationPolicy;

import org.springframework.security.crypto.bcrypt.BCryptPasswordEncoder;

import org.springframework.security.crypto.password.PasswordEncoder;

import org.springframework.security.web.authentication.UsernamePasswordAuthenticationFilter;

/**

 * @Author ChengJianSheng

 * @Date 2021/6/12

 */

@EnableGlobalMethodSecurity(prePostEnabled = true)

@EnableWebSecurity

public class WebSecurityConfig extends WebSecurityConfigurerAdapter {

    @Autowired

    private MyUserDetailsService myUserDetailsService;

    @Autowired

    private MyAuthenticationSuccessHandler myAuthenticationSuccessHandler;

    @Autowired

    private MyAuthenticationFailureHandler myAuthenticationFailureHandler;

    @Autowired

    private MyLogoutSuccessHandler myLogoutSuccessHandler;

    @Autowired

    private TokenFilter tokenFilter;

    @Override

    protected void configure(AuthenticationManagerBuilder auth) throws Exception {

        auth.userDetailsService(myUserDetailsService).passwordEncoder(passwordEncoder());

    }

    @Override

    protected void configure(HttpSecurity http) throws Exception {

        http.formLogin()

                .successHandler(myAuthenticationSuccessHandler)

                .failureHandler(myAuthenticationFailureHandler)

                .and()

                .logout().logoutSuccessHandler(myLogoutSuccessHandler)

                .and()

                .authorizeRequests()

                .antMatchers("/activiti7/login").permitAll()

                .anyRequest().authenticated()

                .and()

                .exceptionHandling()

                .accessDeniedHandler(new MyAccessDeniedHandler())

                .authenticationEntryPoint(new MyAuthenticationEntryPoint())

                .and()

                .sessionManagement().sessionCreationPolicy(SessionCreationPolicy.STATELESS)

                .maximumSessions(1)

                .maxSessionsPreventsLogin(false)

                .expiredSessionStrategy(new MyExpiredSessionStrategy());

        http.addFilterBefore(tokenFilter, UsernamePasswordAuthenticationFilter.class);

        http.csrf().disable();

    }

    public PasswordEncoder passwordEncoder() {

        return new BCryptPasswordEncoder();

    }

}
至此一切都很顺利,毕竟之前也写过很多遍。
package com.cjs.example.controller;

import org.springframework.security.access.prepost.PreAuthorize;

import org.springframework.web.bind.annotation.GetMapping;

import org.springframework.web.bind.annotation.RequestMapping;

import org.springframework.web.bind.annotation.RestController;

/**

 * @Author ChengJianSheng

 * @Date 2021/6/12

 */

@RestController

@RequestMapping("/hello")

public class HelloController {

    @PreAuthorize("@myAccessDecisionService.hasPermission('hello:sayHello')")

    @GetMapping("/sayHello")

    public String sayHello() {

        return "hello";

    }

    @PreAuthorize("@myAccessDecisionService.hasPermission('hello:sayHi')")

    @GetMapping("/sayHi")

    public String sayHi() {

        return "hi";

    }

}
4. 集成 Activiti7
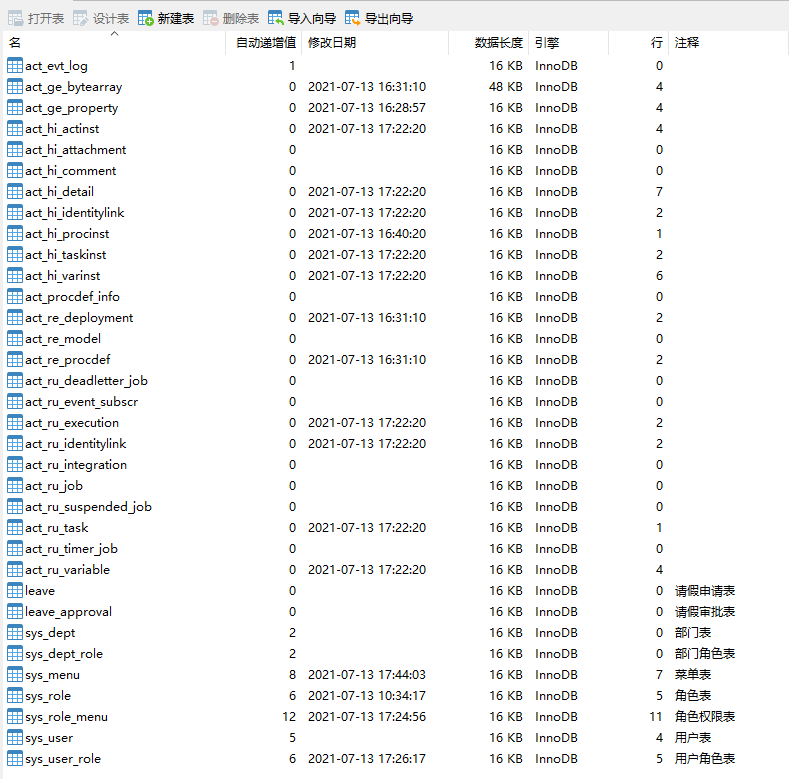
启动项目以后,activiti相关表已经创建好了
接下来,以简单的请假为例来演示
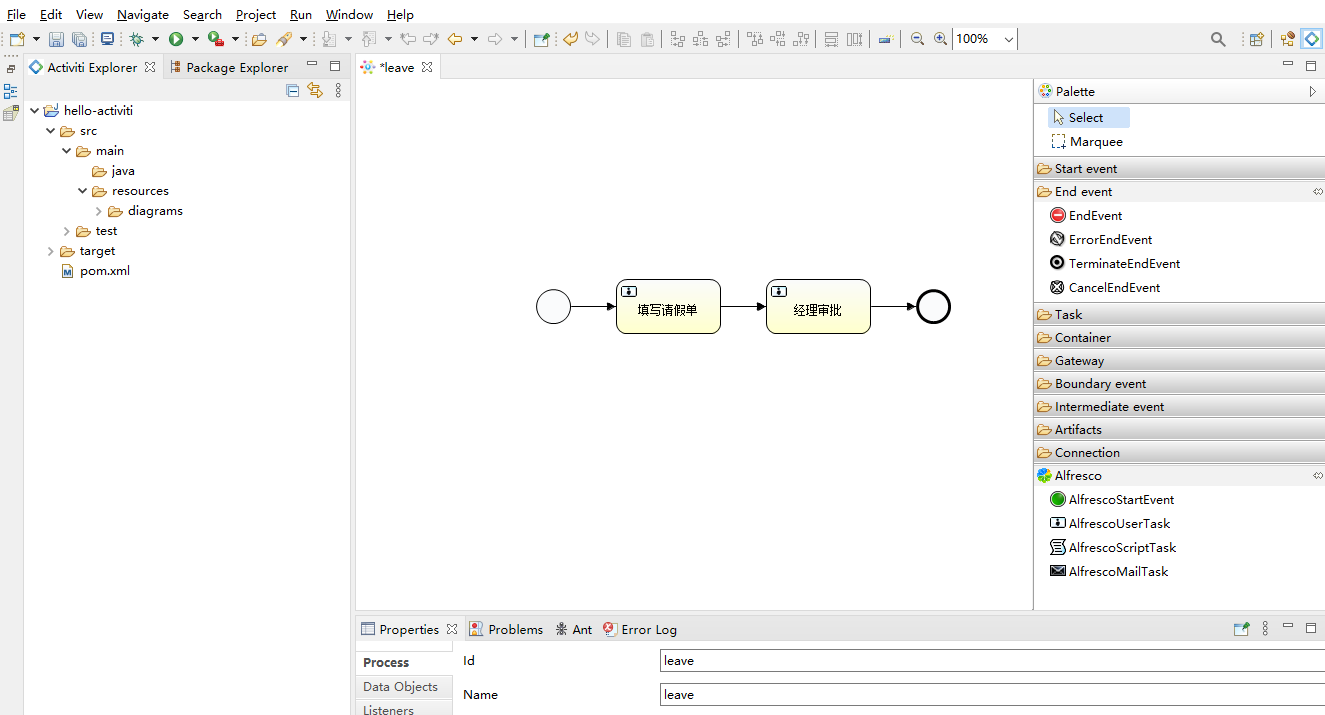
<process id="leave" name="leave" isExecutable="true">

    <startEvent id="startevent1" name="Start"></startEvent>

    <userTask id="usertask1" name="填写请假单" activiti:assignee="${sponsor}"></userTask>

    <sequenceFlow id="flow1" sourceRef="startevent1" targetRef="usertask1"></sequenceFlow>

    <endEvent id="endevent1" name="End"></endEvent>

    <sequenceFlow id="flow2" sourceRef="usertask1" targetRef="endevent1"></sequenceFlow>

    <userTask id="usertask2" name="经理审批" activiti:candidateGroups="${manager}"></userTask>

    <sequenceFlow id="flow3" sourceRef="usertask1" targetRef="usertask2"></sequenceFlow>

    <endEvent id="endevent2" name="End"></endEvent>

    <sequenceFlow id="flow4" sourceRef="usertask2" targetRef="endevent2"></sequenceFlow>

</process>
4.1. 部署流程定义
package com.cjs.example.controller;
import com.cjs.example.domain.RespResult;
import com.cjs.example.util.ResultUtils;
import lombok.extern.slf4j.Slf4j;
import org.activiti.engine.RepositoryService;
import org.activiti.engine.repository.Deployment;
import org.activiti.engine.repository.ProcessDefinition;
import org.apache.commons.io.IOUtils;
import org.springframework.beans.factory.annotation.Autowired;
import org.springframework.web.bind.annotation.*;
import org.springframework.web.multipart.MultipartFile;
import javax.servlet.http.HttpServletResponse;
import java.io.IOException;
import java.io.InputStream;
import java.util.zip.ZipInputStream;
/**
* @Author ChengJianSheng
* @Date 2021/7/12
*/
@Slf4j
@RestController
@RequestMapping("/deploy")
public class DeploymentController {
@Autowired
private RepositoryService repositoryService;
/**
* 部署
* @param file ZIP压缩包文件
* @param processName 流程名称
* @return
*/
@PostMapping("/upload")
public RespResult<String> upload(@RequestParam("zipFile") MultipartFile file, @RequestParam("processName") String processName) {
String originalFilename = file.getOriginalFilename();
if (!originalFilename.endsWith("zip")) {
return ResultUtils.error("文件格式错误");
}
ProcessDefinition processDefinition = null;
try {
ZipInputStream zipInputStream = new ZipInputStream(file.getInputStream());
Deployment deployment = repositoryService.createDeployment().addZipInputStream(zipInputStream).name(processName).deploy();
processDefinition = repositoryService.createProcessDefinitionQuery().deploymentId(deployment.getId()).singleResult();
} catch (IOException e) {
log.error("流程部署失败!原因: {}", e.getMessage(), e);
}
return ResultUtils.success(processDefinition.getId());
}
/**
* 查看流程图
* @param deploymentId 部署ID
* @param resourceName 图片名称
* @param response
* @return
*/
@GetMapping("/getDiagram")
public void getDiagram(@RequestParam("deploymentId") String deploymentId, @RequestParam("resourceName") String resourceName, HttpServletResponse response) {
InputStream inputStream = repositoryService.getResourceAsStream(deploymentId, resourceName);
// response.setContentType(MediaType.IMAGE_PNG_VALUE);
try {
IOUtils.copy(inputStream, response.getOutputStream());
} catch (IOException e) {
e.printStackTrace();
} finally {
IOUtils.closeQuietly(inputStream);
}
}
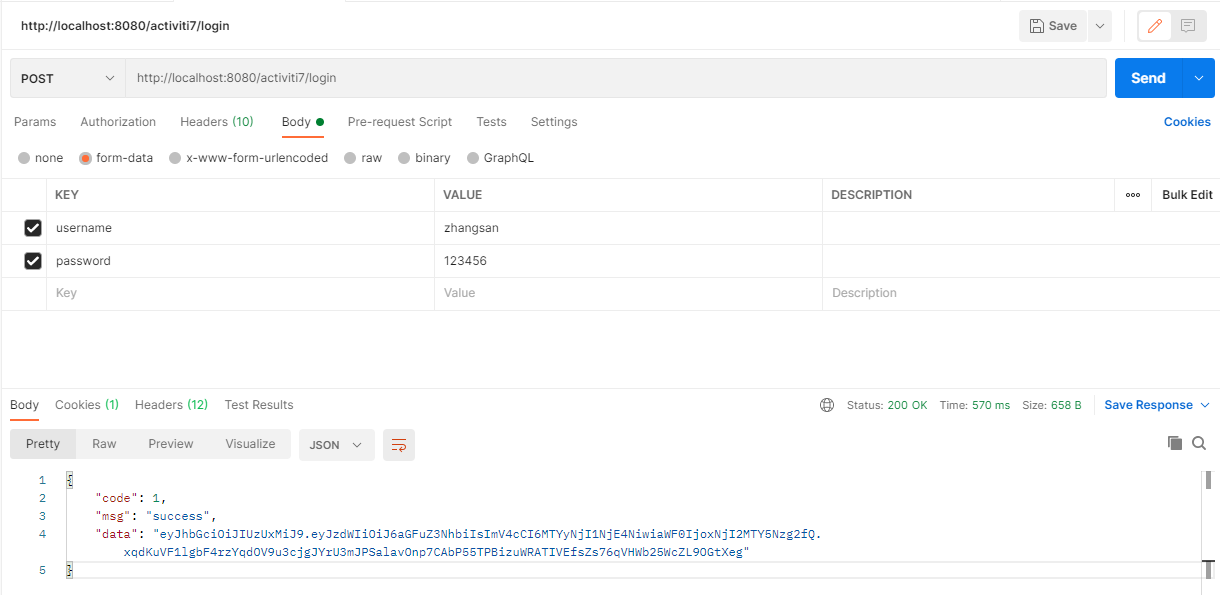
}首先登录一下
然后,将流程图文件打成zip压缩包

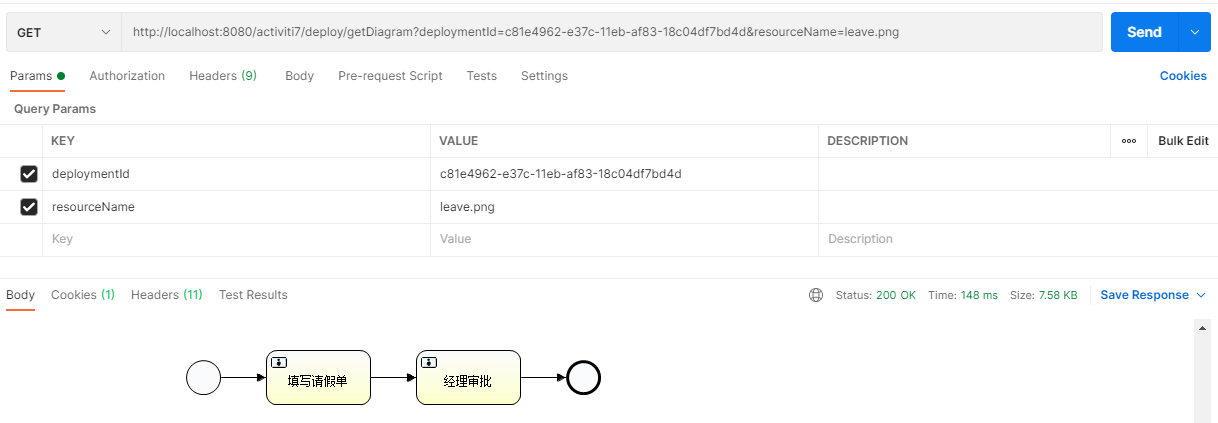
查看流程图
4.2. 启动流程实例
最开始,我是这样写的
ProcessInstance processInstance = processRuntime.start(ProcessPayloadBuilder

                    .start()

                    .withProcessDefinitionId(processDefinitionId)

                    .withVariable("sponsor", authentication.getName())

                    .build());
当我这样写了以后,第一个问题出现了,没有权限访问
查看代码之后,我发现调用ProcessRuntime的方法需要当前登录用户有“ACTIVITI_USER” 权限


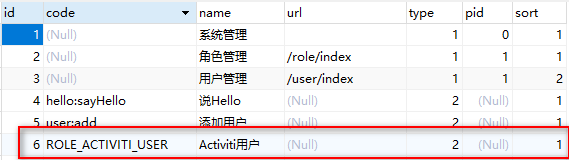
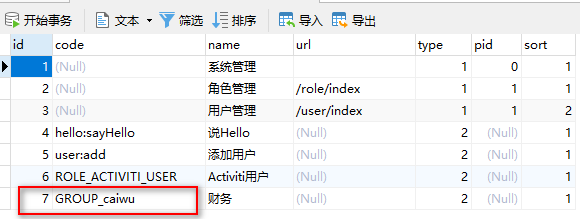
于是,我在数据库sys_menu表里加了一条数据
重新登录后,zhangsan可以调用ProcessRuntime里面的方法了
很快,第二个问题出现了, 当我用 ProcessRuntime#start() 启动流程实例的时候报错了
org.activiti.engine.ActivitiException: Query return 2 results instead of max 1

	at org.activiti.engine.impl.DeploymentQueryImpl.executeSingleResult(DeploymentQueryImpl.java:213) ~[activiti-engine-7.1.0.M6.jar:na]

	at org.activiti.engine.impl.DeploymentQueryImpl.executeSingleResult(DeploymentQueryImpl.java:30) ~[activiti-engine-7.1.0.M6.jar:na]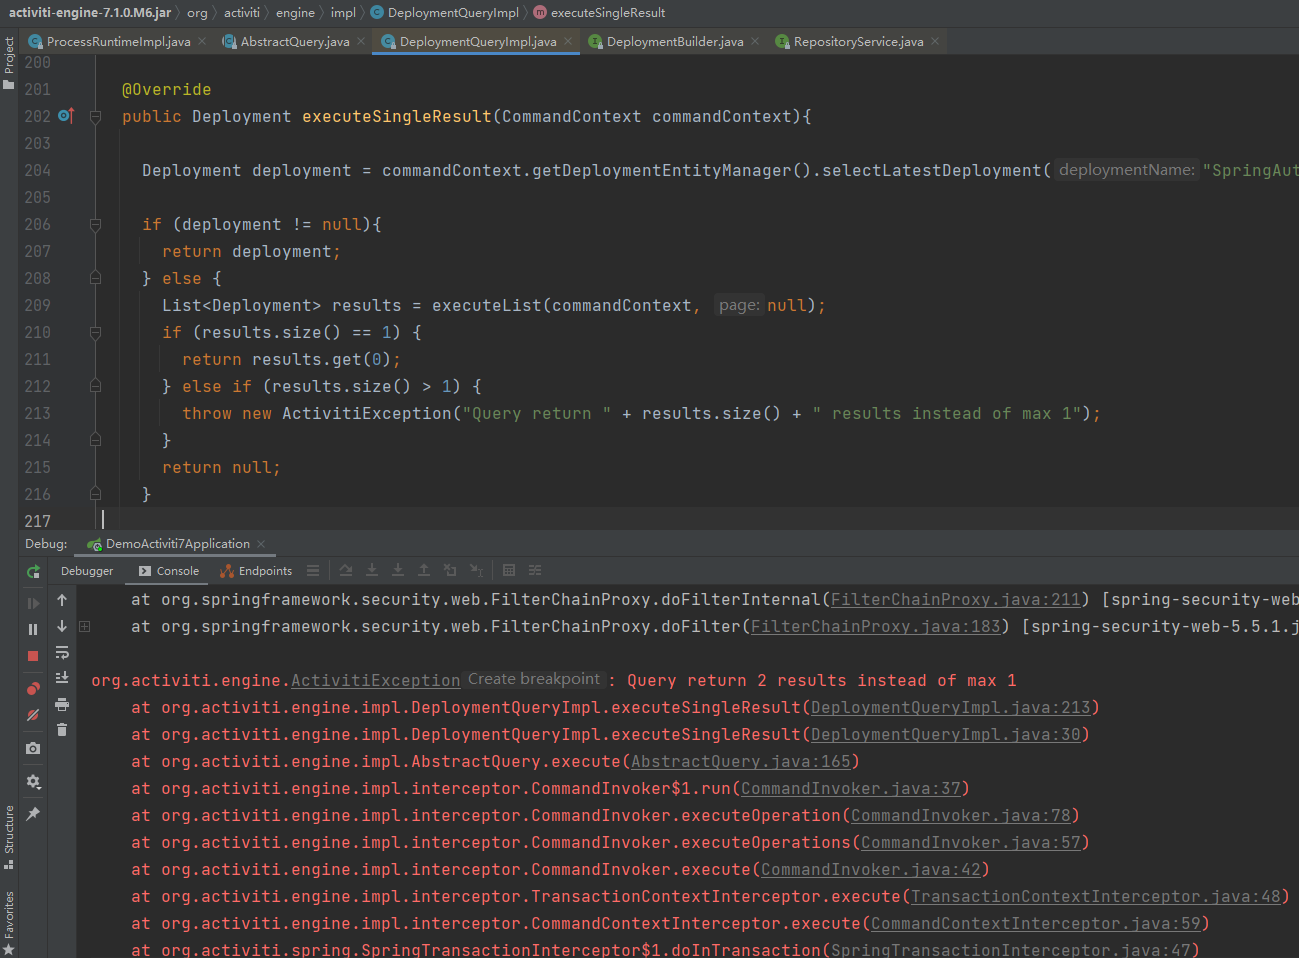
查看代码,终于找到问题所在了
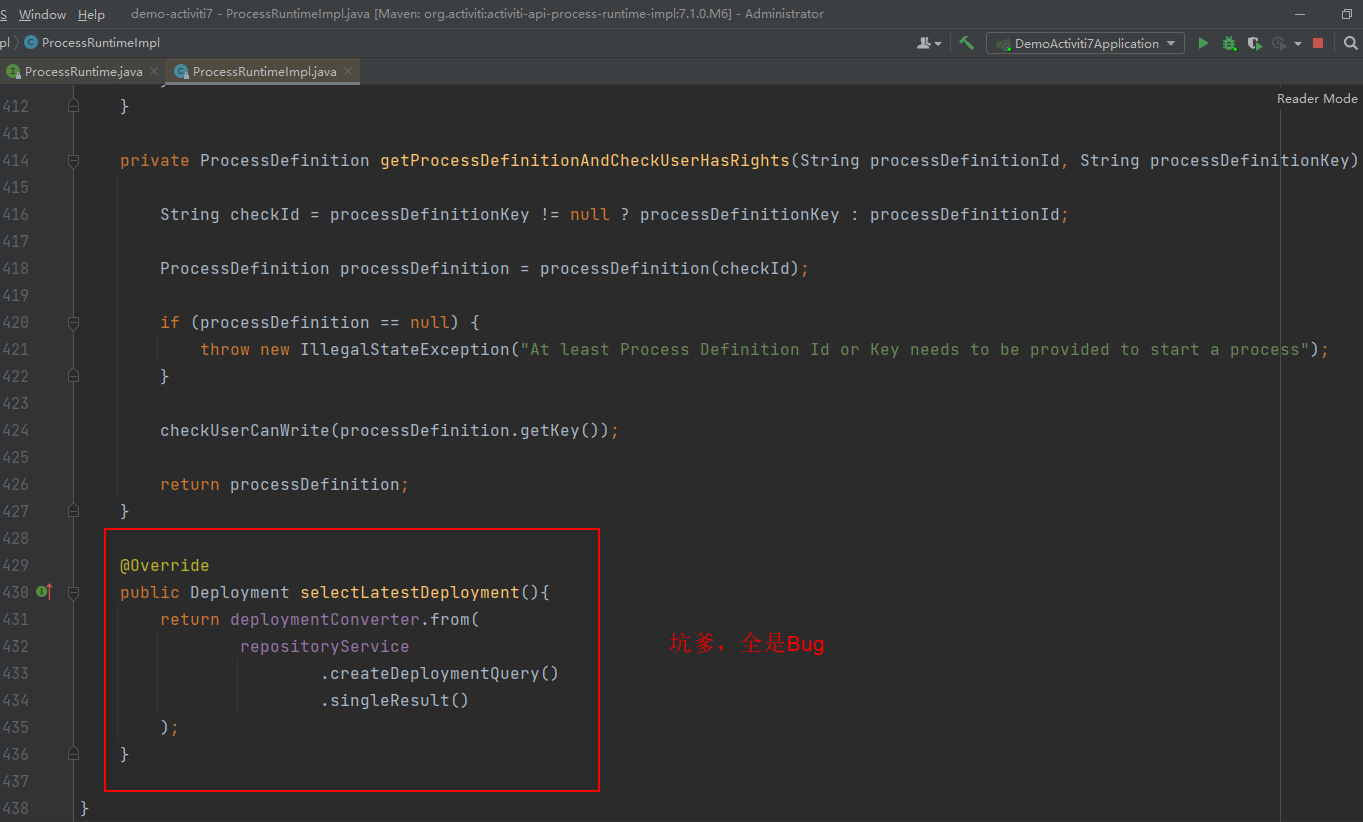
这明显就是 Activiti 的Bug,查询所有部署的流程没有加任何查询条件,吐了
于是,百度了一下,网上有人建议换一个版本,于是我将activiti-spring-boot-starter的版本从“7.1.0.M6”换成了“7.1.0.M5”,呵呵,又一个错,缺少字段
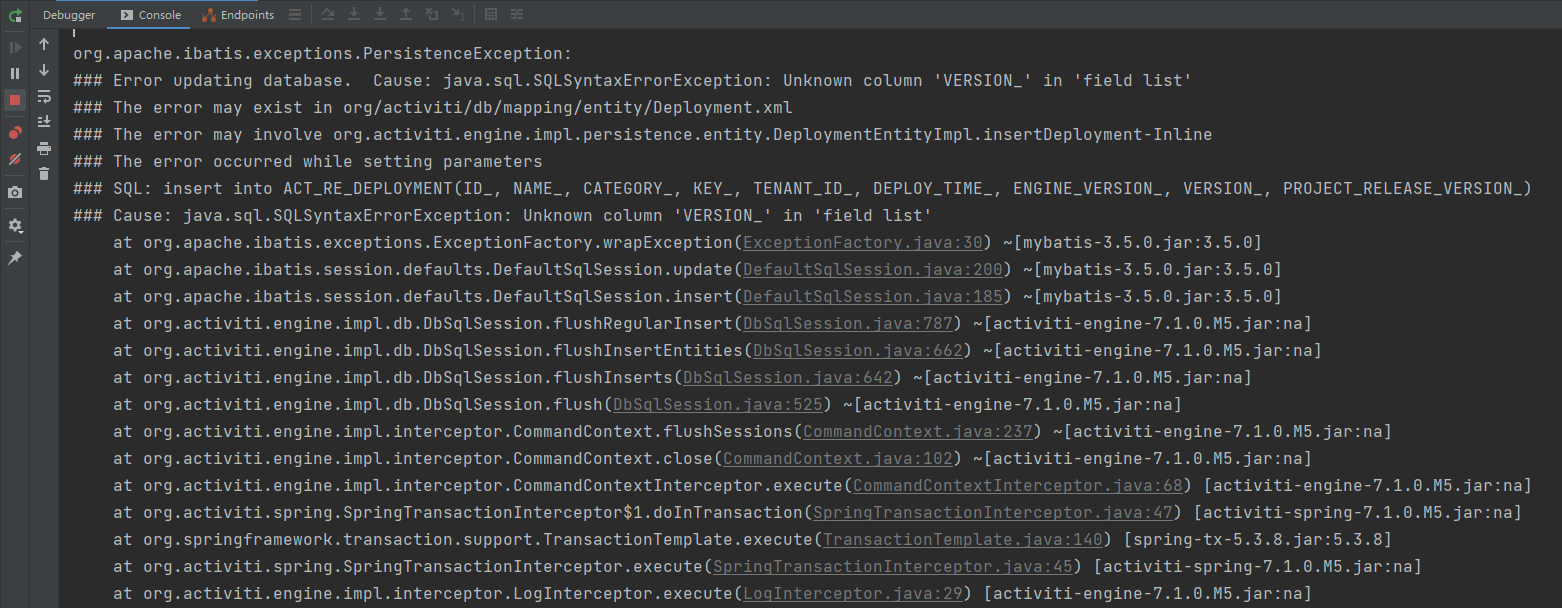
原来M6和M5的表结构不一样。我又将版本将至“7.1.0.M4”,这次直接起不来了

没办法,版本改回7.1.0.M6,不用ProcessRuntime,改用原来的RuntimeService
package com.cjs.example.controller;

import com.cjs.example.domain.RespResult;

import com.cjs.example.util.ResultUtils;

import org.activiti.api.process.model.ProcessInstance;

import org.activiti.api.process.model.builders.ProcessPayloadBuilder;

import org.activiti.api.process.runtime.ProcessRuntime;

import org.activiti.engine.RuntimeService;

import org.springframework.beans.factory.annotation.Autowired;

import org.springframework.security.core.Authentication;

import org.springframework.security.core.annotation.AuthenticationPrincipal;

import org.springframework.security.core.context.SecurityContextHolder;

import org.springframework.web.bind.annotation.GetMapping;

import org.springframework.web.bind.annotation.RequestMapping;

import org.springframework.web.bind.annotation.RequestParam;

import org.springframework.web.bind.annotation.RestController;

import java.util.HashMap;

import java.util.Map;

/**

 * @Author ChengJianSheng

 * @Date 2021/7/12

 */

@RestController

@RequestMapping("/processInstance")

public class ProcessInstanceController {

    @Autowired

    private ProcessRuntime processRuntime;

    @Autowired

    private RuntimeService runtimeService;

    @GetMapping("/start")

    public RespResult start(@RequestParam("processDefinitionId") String processDefinitionId) {

        Authentication authentication = SecurityContextHolder.getContext().getAuthentication();

        org.activiti.engine.runtime.ProcessInstance processInstance = null;

        try {

//            ProcessInstance processInstance = processRuntime.start(ProcessPayloadBuilder

//                    .start()

//                    .withProcessDefinitionId(processDefinitionId)

//                    .withVariable("sponsor", authentication.getName())

//                    .build());

            Map<String, Object> variables = new HashMap<>();

            variables.put("sponsor", authentication.getName());

            processInstance = runtimeService.startProcessInstanceById(processDefinitionId, variables);

        } catch (Exception ex) {

            ex.printStackTrace();

        }

        return ResultUtils.success(processInstance);

    }

}
这里注意 org.activiti.engine.runtime.ProcessInstance 和 org.activiti.api.process.model.ProcessInstance 别搞混了
查看流程定义
package com.cjs.example.controller;

import com.cjs.example.domain.RespResult;

import com.cjs.example.util.ResultUtils;

import org.activiti.api.process.model.ProcessDefinition;

import org.activiti.api.process.runtime.ProcessAdminRuntime;

import org.activiti.api.process.runtime.ProcessRuntime;

import org.activiti.api.runtime.shared.query.Page;

import org.activiti.api.runtime.shared.query.Pageable;

import org.springframework.beans.factory.annotation.Autowired;

import org.springframework.web.bind.annotation.GetMapping;

import org.springframework.web.bind.annotation.RequestMapping;

import org.springframework.web.bind.annotation.RestController;

/**

 * @Author ChengJianSheng

 * @Date 2021/7/12

 */

@RestController

@RequestMapping("/processDefinition")

public class ProcessDefinitionController {

    @Autowired

    private ProcessAdminRuntime processAdminRuntime;

//    private ProcessRuntime processRuntime;

    @GetMapping("/list")

    public RespResult<Page<ProcessDefinition>> getProcessDefinition(){

        Page<ProcessDefinition> processDefinitionPage = processAdminRuntime.processDefinitions(Pageable.of(0, 10));

        return ResultUtils.success(processDefinitionPage);

    }

}
4.3. 查询待办任务并完成
按照我们的流程定义,zhangsan提交了请假申请,所以第一个任务是zhangsan的,先让zhangsan登录
Page<Task> page = taskRuntime.tasks(Pageable.of(0, 10));

if (null != page && page.getTotalItems() > 0) {

    for (Task task : page.getContent()) {

        taskRuntime.complete(TaskPayloadBuilder.complete().withTaskId(task.getId()).build());

    }

}由于第一个任务是一个个人任务,所以不需要先认领任务,直接去完成即可

第二个任务是一个组任务,而且我还用了流程变量,因此要么在启动流程实例的时候就给这个流程变量赋值,要么在上一个任务完成时给变量赋值。
这里,我用的是候选组(Candidate Groups),而不是候选者(Candidate Users)。二者差不多,都是组任务,区别在于如果用候选者的话需要列出所有候选用户并用逗号分隔,如果用候选组的话就只需要写组名即可,多个组之间用逗号分隔。
本例中,我也不用流程变量,例如直接写 activiti:candidateGroups="caiwu"
taskRuntime.complete(TaskPayloadBuilder.complete().withTaskId(task.getId()).withVariable("manager", "caiwu").build());有没有发现,这里查询任务的时候没有指定要查谁的任务,完成任务的时候也没有指定是谁完成的,这都是Spring Security的功劳

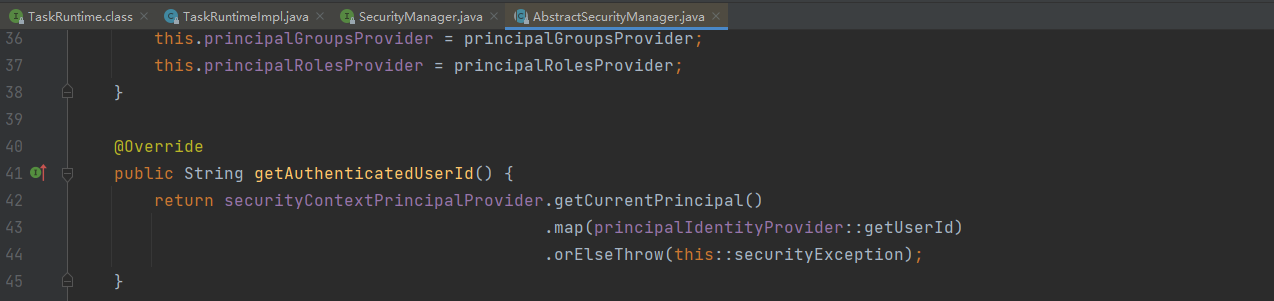
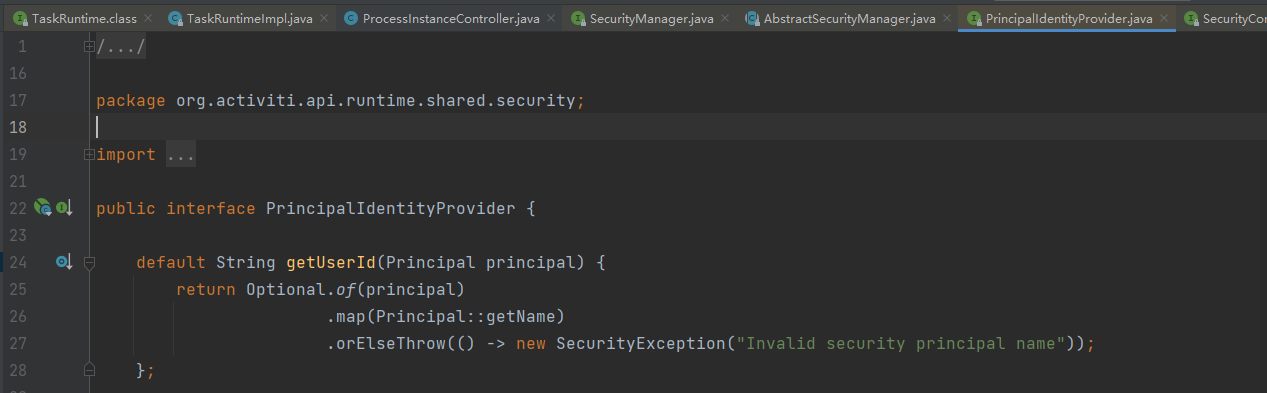
到这里可以看出,取的是当前登录用户,即 SecurityContextHolder.getContext().getAuthentication().getName()
SecurityContextHolder.getContext().getAuthentication().getName()同理,完成任务
接下来的是一个组任务,任务必须由“canwu”这个组的人去完成,为了让 lisi 能看到这个任务,需要在sys_menu表中加一条记录
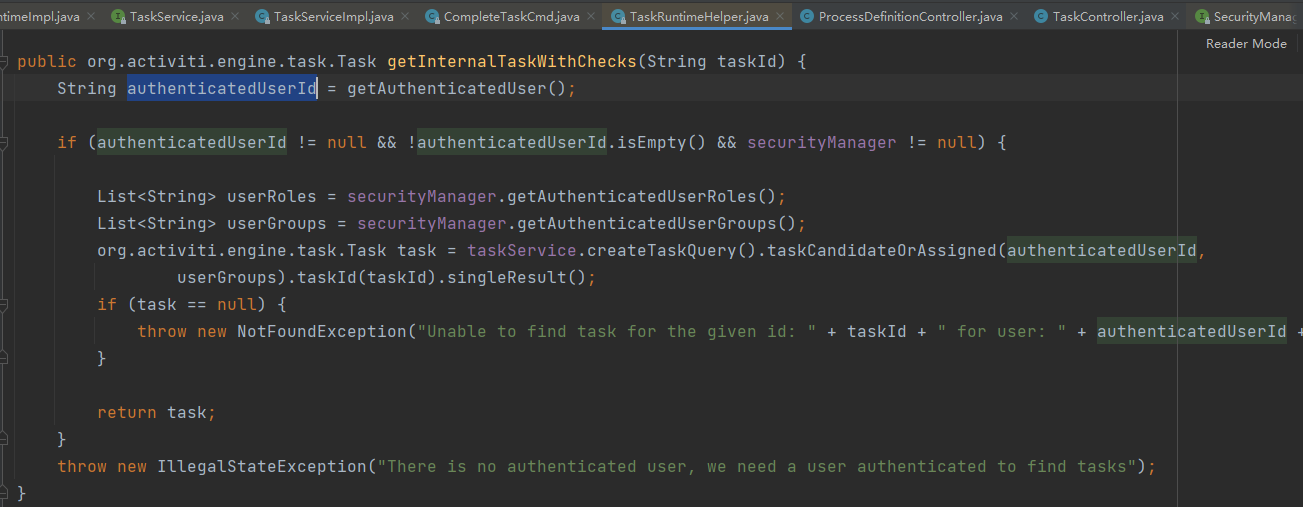
当lisi登录进来以后,调用 taskRuntime.tasks(Pageable.of(0, 10)) 查询自己的任务时
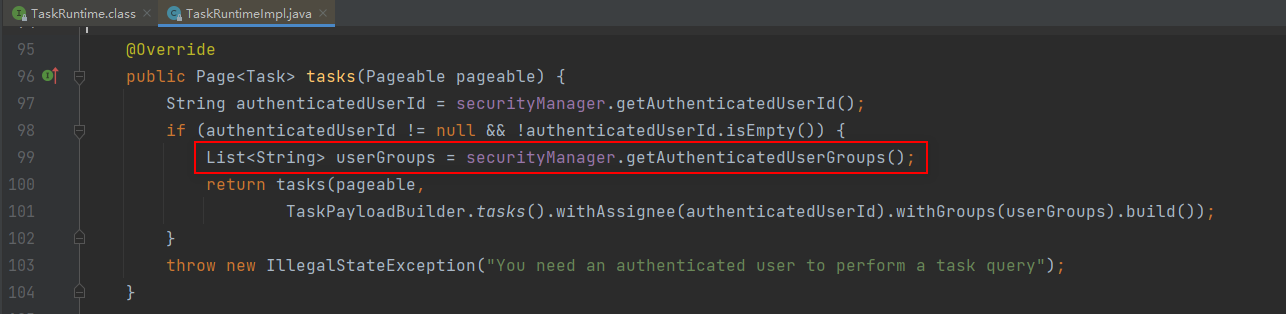

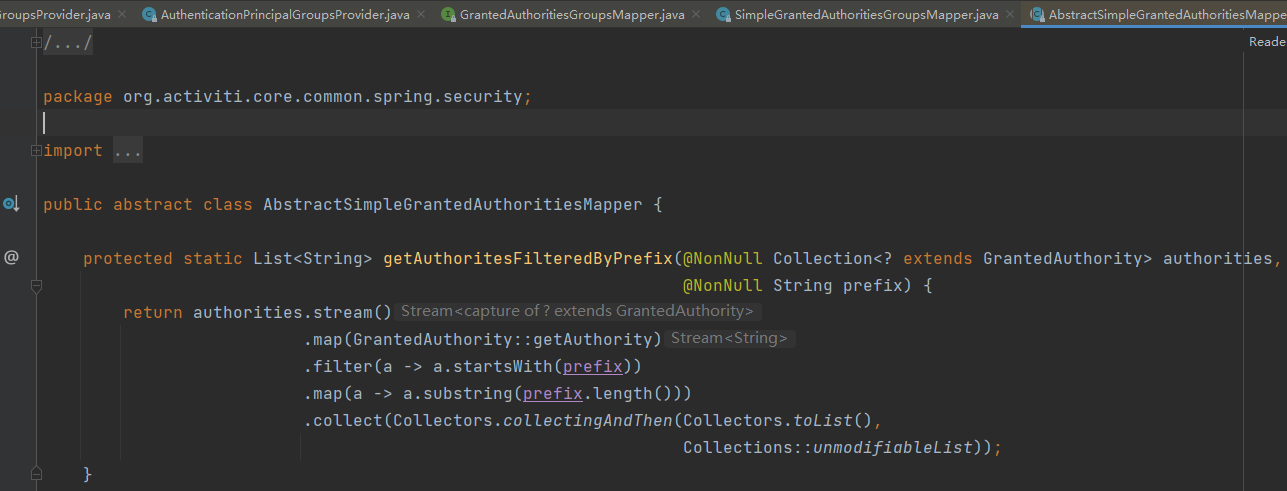
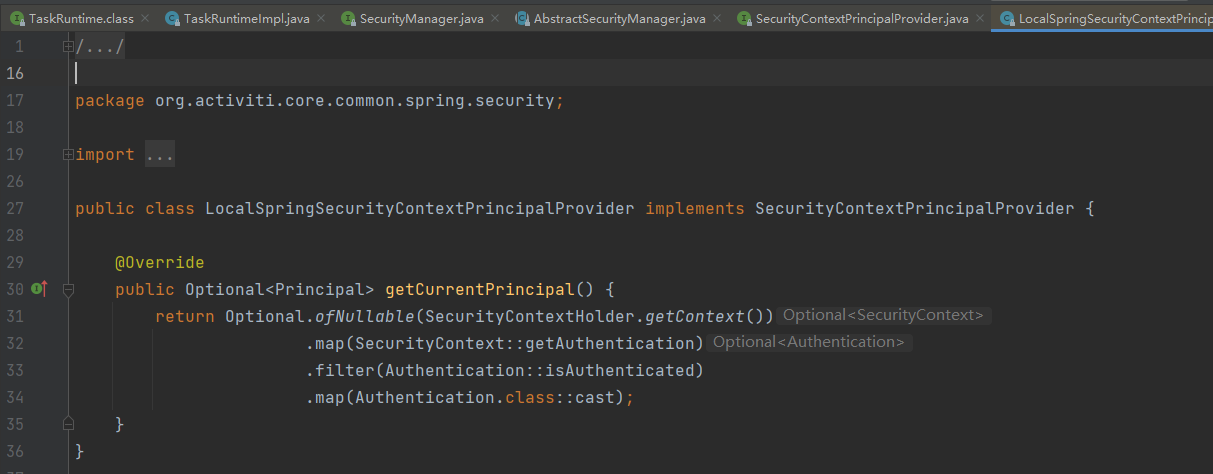
通过跟代码,我们知道,查询任务其实是这样的,等价于下面这段代码
Authentication authentication = SecurityContextHolder.getContext().getAuthentication();

String authenticatedUserId = authentication.getName();

List<String> userGroups = authentication.getAuthorities()

        .stream()

        .map(GrantedAuthority::getAuthority)

        .filter(a -> a.startsWith("GROUP_"))

        .map(a -> a.substring("GROUP_".length()))

        .collect(Collectors.collectingAndThen(Collectors.toList(), Collections::unmodifiableList));

List<Task> taskList = taskService.createTaskQuery()

        .taskCandidateOrAssigned(authenticatedUserId, userGroups)

        .processInstanceId("xxx")

        .listPage(0,10);
查询当前登录用户的个人任务和组任务
接下来,让 zhaoliu 登录进来

package com.cjs.example.controller;

import org.activiti.api.runtime.shared.query.Page;

import org.activiti.api.runtime.shared.query.Pageable;

import org.activiti.api.task.model.Task;

import org.activiti.api.task.model.builders.TaskPayloadBuilder;

import org.activiti.api.task.runtime.TaskRuntime;

import org.springframework.beans.factory.annotation.Autowired;

import org.springframework.web.bind.annotation.GetMapping;

import org.springframework.web.bind.annotation.RequestMapping;

import org.springframework.web.bind.annotation.RestController;

/**

 * @Author ChengJianSheng

 * @Date 2021/7/12

 */

@RestController

@RequestMapping("/task")

public class TaskController {

    @Autowired

    private TaskRuntime taskRuntime;

    @GetMapping("/pageList")

    public void pageList() {

        //  查询待办任务(个人任务 + 组任务)

        Page<Task> page = taskRuntime.tasks(Pageable.of(0, 10));

        if (null != page && page.getTotalItems() > 0) {

            for (Task task : page.getContent()) {

                //  认领任务

                taskRuntime.claim(TaskPayloadBuilder.claim().withTaskId(task.getId()).build());

                //  完成任务

                taskRuntime.complete(TaskPayloadBuilder.complete().withTaskId(task.getId()).build());

            }

        }

    }

}
zhaoliu完成任务后,整个流程就结束了

Activiti7 与 Spring Boot 及 Spring Security 整合 踩坑记录的更多相关文章
- Spring boot配置MongoDB以及Morphia踩坑记录
pom 因为项目中采用Morphia(MongoDB的ODM框架,对象-文档映射(object-document mapper)),因此需要在pom文件中引入相应依赖: <dependency& ...
- Spring Boot 开发系列一 开发踩坑
这是学习spring boot 的第二周,公司号称这玩意是啥都不会的新手就可以填空开发,于是决定上手一把,怎么说我也是搞了快七八年的.NET和.NETcore,没想到无情打脸,快被这个能填空开的IDE ...
- mondrian4 kylin saiku 整合踩坑记录
1 先说了版本: Mondrian 4 .kylin2.2 .saiku 3.15 2 saiku 3.15 使用的xml是基于 mondrian4 的schema的xml.判断是不是mondrian ...
- spring boot与jdbcTemplate的整合案例2
简单入门了spring boot后,接下来写写跟数据库打交道的案例.博文采用spring的jdbcTemplate工具类与数据库打交道. 下面是搭建的springbootJDBC的项目的总体架构图: ...
- Spring Boot(Spring的自动整合框架)
Spring Boot 是一套基于Spring框架的微服务框架,由于Spring是一个轻量级的企业开发框架,主要功能就是用于整合和管理其他框架,想法是将平时主流使用到的框架的整合配置预先写好,然后通过 ...
- spring boot+freemarker+spring security标签权限判断
spring boot+freemarker+spring security标签权限判断 SpringBoot+SpringSecurity+Freemarker项目中在页面上使用security标签 ...
- Spring Boot 中使用 MyBatis 整合 Druid 多数据源
2017 年 10 月 20 日 Spring Boot 中使用 MyBatis 整合 Druid 多数据源 本文将讲述 spring boot + mybatis + druid 多数据源配置方 ...
- Spring Boot 学习笔记(六) 整合 RESTful 参数传递
Spring Boot 学习笔记 源码地址 Spring Boot 学习笔记(一) hello world Spring Boot 学习笔记(二) 整合 log4j2 Spring Boot 学习笔记 ...
- Spring Boot数据访问之整合Mybatis
在Mybatis整合Spring - 池塘里洗澡的鸭子 - 博客园 (cnblogs.com)中谈到了Spring和Mybatis整合需要整合的点在哪些方面,需要将Mybatis中数据库连接池等相关对 ...
随机推荐
- Java并发之AQS原理剖析
概述: AbstractQueuedSynchronizer,可以称为抽象队列同步器. AQS有独占模式和共享模式两种: 独占模式: 公平锁: 非公平锁: 共享模式: 数据结构: 基本属性: /** ...
- NGINX缓存使用官方指南
我们都知道,应用程序和网站一样,其性能关乎生存.但如何使你的应用程序或者网站性能更好,并没有一个明确的答案.代码质量和架构是其中的一个原因,但是在很多例子中我们看到,你可以通过关注一些十分基础的应用内 ...
- 改进遗传算法之CHC算法简要介绍
简要介绍: CHC算法是Eshelman于1991年提出的一种改进的遗传算法的缩称,第一个C代表跨世代精英选择(Cross generational elitist selection)策略, H代表 ...
- 使用ubuntu charmed kubernetes 部署一套生产环境的集群
官方文档: https://ubuntu.com/kubernetes/docs 搭建一个基本的集群 集群ip规划 hostname ip ubuntu-1 10.0.0.10 juju-contro ...
- 机器学习PAL数据可视化
机器学习PAL数据可视化 本文以统计全表信息为例,介绍如何进行数据可视化. 前提条件 完成数据预处理,详情请参见数据预处理. 操作步骤 登录PAI控制台. 在左侧导航栏,选择模型开发和训练 > ...
- 《精通 ASP.NET Core MVC (第七版)》开始发售
学习 Web 开发技术很难吗?没有适合的学习资料,确实很枯燥,很难.如果有一本如同良师益友的优秀图书辅助,就很轻松,一点也不难! 对于优秀的技术图书来说,必须从读者的角度来编写,而不是从作者的角度来编 ...
- 《python网络数据采集》笔记2
1.网页表单与登陆窗口 Requests 库擅长处理那些复杂的 HTTP 请求.cookie.header(响应头和请求头)等内容. 1)表单提交 import requests #字段 params ...
- 汉枫Wi-Fi串口服务器HF2211S应用案例
实现的功能 该模块上电后主动以mobusRTU协议,通过本模块的串口将气体检测仪的4路传感器数据读取 模块上电后连接指定WiFi,通过MQTT协议将读取到的数据以JSON格式推送到指定服务器. 具体细 ...
- Qt中的多线程与线程池浅析+实例
1. Qt中的多线程与线程池 今天学习了Qt中的多线程和线程池,特写这篇博客来记录一下 2. 多线程 2.1 线程类 QThread Qt 中提供了一个线程类,通过这个类就可以创建子线程了,Qt 中一 ...
- centos 7 查看磁盘使用情况
1.查询系统整体磁盘使用情况 df -h [root@hadoop100 aubunt]# df -h 文件系统 容量 已用 可用 已用% 挂载点 /dev/mapper/centos-root 17 ...