nginx服务跳转
1.什么是页面跳转
- 将URL信息做改变
- 将URI信息做改变
- 完成伪静态配置
2.实现页面跳转的方法
http://nginx.org/en/docs/http/ngx_http_rewrite_module.html#rewrite
2.1rewrite跳转
Syntax:	rewrite     regex              replacement           [flag];

                 匹配需要跳转的信息     跳转成什么地址       标记

Default:	—

Context:	server, location, if
标记:
- last:
- break:
- redirect: 临时跳转,状态码为302
- permanent:永久跳转,状态码为301
2.2return跳转
Syntax:    return code [text];

return code URL;

return URL;

Default:    —

Context:    server, location, if
2.3页面跳转实践操作
01.跳转配置中last与break区别对比
[root@web01-172.16.1.7 /html]# vim /etc/nginx/conf.d/rewrite.conf

server{

  listen 80;

  server_name rewrite.shuai.com;

  root    /html;

  location ~ ^/break/ {

     rewrite  ^/break/  /test/  break;

}

  location ~ ^/last/ {

     rewrite  ^/last/  /test/  last;

}

  location ~ /test/ {

     default_type  application/json;

     return 200 'ok';

}

}

~
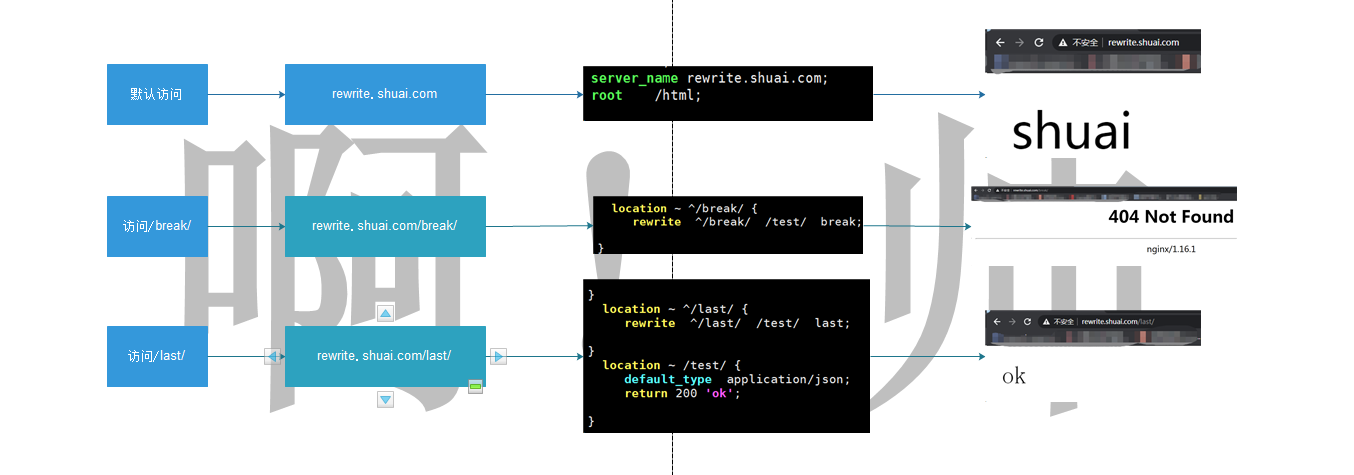
02.break和last区别
break:一旦跳转完毕,就会停止后续操作过程,不会在显示跳转页面地址,没有跳转目录
last:一旦跳转完毕,会继续访问后端页面
2.4常见跳转示例情况测试说明
例一:用户访问/abc/1.html实际上真实访问的是/ccc/bbb/2.html
#http://rewrite.shuai.com/abc/1.html>>http://rewrite.shuai.com/ccc/bbb/2.html
01.准备路径
[root@web01-172.16.1.7 ~]# mkdir /html/ccc/bbb -p

[root@web01-172.16.1.7 ~]# echo "ccc_bbb_2" > /html/ccc/bbb/2.html
02.配置nginx跳转
[root@web01-172.16.1.7 ~]# cat /etc/nginx/conf.d/ccbb.conf

server {

  listen 80;

  server_name rewrite.shuai.com;

  location / {

   root /html;

   index index.html;

  }

  location /abc {

  rewrite (.*) /ccc/bbb/2.html redirect;

  #return 302 /ccc/bbb/2.html;

  }

}

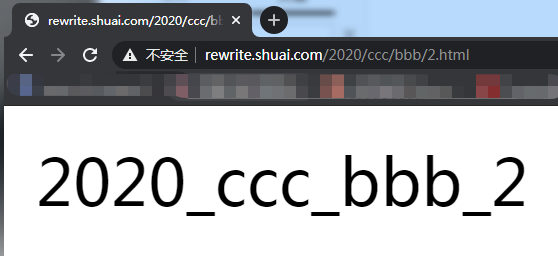
例二:用户访问/2019/ccc/bbb/2.html实际上访问的是/2020/ccc/bbb/2.html
http://rewrite.shuai.com/2019/ccc/bbb/2.html>>http://rewrite.shuai.com/2020/ccc/bbb/2.html
01.准备路径
[root@web01-172.16.1.7 ~]# mkdir /html/2020/ccc/bbb -p

[root@web01-172.16.1.7 ~]# echo "2020_ccc_bbb_2" > /html/2020/ccc/bbb/2.html
02.配置nginx跳转
[root@web01-172.16.1.7 ~]# vim /etc/nginx/conf.d/ccbb.conf

server {

  listen 80;

  server_name rewrite.shuai.com;

  location / {

   root /html;

   index index.html;

  }

  location /2019 {

  rewrite ^/2019/(.*)$ /2020/$1 redirect;

  return 302 /2020/ccc/bbb/2.html;

  }

}
例三:用户访问/test目录下的任何内容,实际上是访问http://rewrite.shuai.com
01.准备路径
[root@web01-172.16.1.7 ~]# mkdir /html/test/1.jpg
02.配置nginx跳转
[root@web01-172.16.1.7 /html]# cat /etc/nginx/conf.d/caca.conf

server {

  listen 80;

  server_name rewrite.shuai.com;

  location / {

   root /html;

   index  1.jpg  index.html;

  }

  location /test {

   rewrite (.*) http://rewrite.shuai.com  redirect;

  }

}

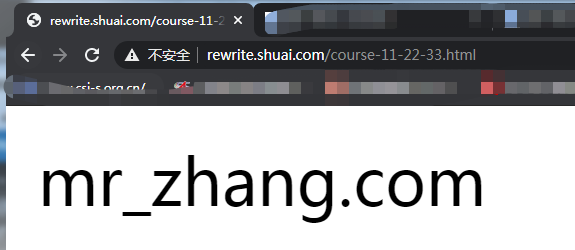
例四:用户访问course-11-22-33.html实际上真实访问是/course/11/22/33/course_33.html
http://rewrite.shuai.com/course-11-22-33.html>>http://rewrite.shuai.com/html/11/22/33/course_33.html
01.准备路径
[root@web01-172.16.1.7 ~]# mkdir /html/coures/11/22/33 -p

[root@web01-172.16.1.7 /html/coures]# echo "mr_zhang.com">/html/coures/11/22/33/course_33.html
02.配置nginx跳转
[root@web01-172.16.1.7 /html/coures]# vim  /etc/nginx/conf.d/ccbb.conf

server {

  listen 80;

  server_name rewrite.shuai.com;

  location / {

   root /html;

   index index.html;

   rewrite ^/course-(.*)-(.*)-(.*).html$ /coures/$1/$2/$3/course_$3.html break; #动态

   rewrite ^/course-(.*)  /coures/11/22/33/course_33.html redirect; #静态

  }

}
说明:last/break做跳转不会显示跳转的地址信息
3.基于URL跳转
rewrite.shuai.com>>www.ashuai.com
3.1修改dns解析
10.0.0.7 rewrite.shuai.com www.ashuai.com
3.2配置nginx跳转
[root@web01-172.16.1.7 /etc/nginx/conf.d]# cat ccbb.conf

server {

  listen 80;

  server_name rewrite.shuai.com;

  rewrite ^/(.*) http://www.jd.com/$1  permanent;

}

server {

  listen 80;

  server_name www.jd.com;

  location / {

   root /html;

   index index.html;

  }

}

##################################################或

server {

  listen 80;

  server_name    rewrite.shuai.com   www.jd.com;

  location / {

   root /html;

   index index.html;

   if ($http_host ~*  ^rewrite.shuai.com){

       rewrite ^/(.*) http://www.jd.com/$1  permanent;

     }

  }

}

4.将http请求,跳转至https
4.1创建https访问
4.1.1nginx安装ssl模块
4.1.2安装证书,黑户证书,实际环境不可用
openssl genrsa -idea -out server.key 2048

openssl req -days 36500 -x509 -sha256 -nodes -newkey rsa:2048 -keyout server.key -out server.crt
4.1.3修改nginx配置文件
[root@web01-172.16.1.7 /etc/nginx/conf.d]# cat blog.conf

server{

    listen        443  ssl;

    server_name   blog.ashuai.com;

    fastcgi_buffers  512  64k;

    ssl_certificate     /etc/nginx/server.crt;

    ssl_certificate_key /etc/nginx/server.key;

    location / {

        root  /blog/wordpress;

        index  index.php;

    }

     location ~ \.php$ {

        root /blog/wordpress;

        fastcgi_index index.php;

        fastcgi_param SCRIPT_FILENAME $document_root$fastcgi_script_name;

        fastcgi_pass  127.0.0.1:9000;

        include fastcgi_params;

   }

}
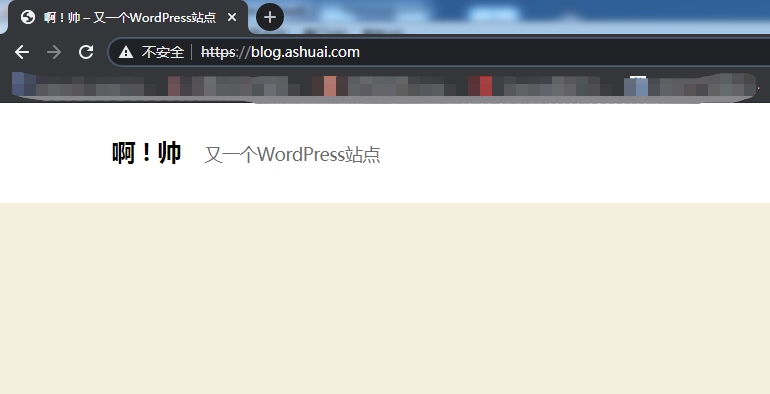
4.2实现http跳转为https
[root@web01-172.16.1.7 /etc/nginx/conf.d]# cat blog.conf

server{

   listen     80;

   server_name blog.ashuai.com;

   rewrite (.*) https://$server_name$1 redirect;

}

server{

    listen    443 ssl;

    server_name   blog.ashuai.com;

    fastcgi_buffers  512  64k;

    ssl_certificate     /etc/nginx/server.crt;

    ssl_certificate_key /etc/nginx/server.key;

    location / {

        root  /blog/wordpress;

        index  index.php;

    }

     location ~ \.php$ {

        root /blog/wordpress;

        fastcgi_index index.php;

        fastcgi_param SCRIPT_FILENAME $document_root$fastcgi_script_name;

        fastcgi_pass  127.0.0.1:9000;

        include fastcgi_params;

   }

}
nginx服务跳转的更多相关文章
- 9. nginx服务实验笔记
LNMP安装与配置 Nginx与apache.lighttp性能综合对比,如下图: 一.系统需求: CentOS/RHEL/Fedora/Debian/Ubuntu系统 需要3GB以上硬盘 ...
- nginx服务部署 说明
第1章 常用的软件 1.1 常用来提供静态服务的软件 Apache :这是中小型Web服务的主流,Web服务器中的老大哥, Nginx :大型网站Web服务的主流,曾经Web服务器中的初生牛犊 ...
- 【实战分享】又拍云 OpenResty / Nginx 服务优化实践
2018 年 11 月 17 日,由 OpenResty 主办的 OpenResty Con 2018 在杭州举行.本次 OpenResty Con 的主题涉及 OpenResty 的新开源特性.业界 ...
- nginx服务企业应用
1.1 常用来提供静态服务的软件 Apache :这是中小型Web服务的主流,Web服务器中的老大哥, Nginx :大型网站Web服务的主流,曾经Web服务器中的初生牛犊,现已长大. Nginx 的 ...
- Nginx服务优化
1.1Nginx.conf配置文件基本参数优化 1.1.1 隐藏nginx header内版本号信息 一些特定的系统及服务漏洞一般都和特定的软件及版本号有关,我们应尽量隐藏服务器的敏感信息(软件名称 ...
- 企业级Nginx服务基础到架构优化详解
1.隐藏nginx header版本号 2.更改源码隐藏软件名称 3.更改nginx默认用户及用户组 4.配置nginx worker进程个数 5.根据CPU核数进行nginx进程优化 6.nginx ...
- Nginx服务的地址重写
调整Nginx服务器配置,实现: 1.所有访问a.html的请求,重定向到b.html; 2.所有访问Nginx服务器(192.168.4.1)的请求重定向至www.baidu.com: 3.所有访问 ...
- Nginx服务部署
1 企业常用网站服务 处理静态资源:nginx.apache.Lighttpd处理动态资源:tomcat(java语言编写).php(php语言编写).python(python语言编写)nginx网 ...
- 【Linux】nginx服务配置
一. 部署LNMP环境 准备工作 Linux系统准备 设置IP 关闭防火墙 yum源配置 安装: 传输软件包 1. tar -zxvf lnmp1.2-full.tar.gz cd lnmp1.2-f ...
随机推荐
- Elastic Stack(ElasticSearch 、 Kibana 和 Logstash) 实现日志的自动采集、搜索和分析
Elastic Stack 包括 Elasticsearch.Kibana.Beats 和 Logstash(也称为 ELK Stack).能够安全可靠地获取任何来源.任何格式的数据,然后实时地对数据 ...
- CENTOS7network config文件不能直接bak 必须建立bak目录再bak
CENTOS7network config文件不能直接bak 必须建立bak目录再bak
- Msf--控制 Android手机
|>>>中华人民共和国网络安全法<<<|警告:请勿用于非法用途,后果自负! 0.环境 虚拟机 KaliLinux 手机 Redmi 6A 同一局域网下 1.查看控制 ...
- ELK日志收集分析平台部署使用
一.ELK介绍 开源实时日志分析ELK平台能够完美的解决我们上述的问题,ELK由ElasticSearch.Logstash和Kiabana三个开源工具组成: 1.ElasticSearch是一个基于 ...
- ssh判断免密登陆
ssh判断免密登陆 [root@jenkins ~]# vi /opt/release_code.sh #!/bin/bash . /etc/init.d/functions #echo $WORKS ...
- Servlet中的过滤器和监听器
1.什么是过滤器? Servlet规范中定义的一种特殊的组件,用来拦截容器的调用过程.容器收到请求之后,首先调用过滤器,然后再调用Servlet 2.生命周期: 1.servlet:servlet的生 ...
- 书列荐书 |《至关重要的关系》 【美】里德·霍夫曼
本书的内容不算多,堪称精辟,有些东西甚至可以作为指导思想.括号内为书列君书评. 经典语录: 每个人都是企业家!(否则你无法最大化努力!) 创业和做人是相通的.我们要有计划,要执着,但是也要有弹性,懂得 ...
- sql server 操作(不定期更新)
要求:基本的语法要清楚. sql server疑难点: 1.Partition by可以理解为 对多行数据分组后排序取每个产品的第一行数据 先处理内查询,由内向外处理,外层查询利用内层查询的结果嵌套查 ...
- win系统下如何安装xgboost,开发环境是anaconda,以及这中间需要注意的问题
最近学到了xgboost,但是anaconda并没有这个环境只好自己安装了... 注: (1)并没有测试anaconda在2.x的版本下是如何安装的, 基本上应该是大同小类的,我的anaconda版本 ...
- 2020年Yann Lecun深度学习笔记(下)
2020年Yann Lecun深度学习笔记(下)