【鸡年大吉】,不知道写点啥,放个demo(小球碰撞)吧,有兴趣的看看
最初的想法是仿写win7的泡泡屏保效果,但是对于小球的斜碰问题一直没搞明白(如果你会这个,欢迎留言或者做个demo),所以只是简单处理了碰撞后的速度,有时候会看起来很搞笑~~~funny guy
话不多说,先上demo
https://win7killer.github.io/demo_set/html_demo/canvas/can_ps/ball.html
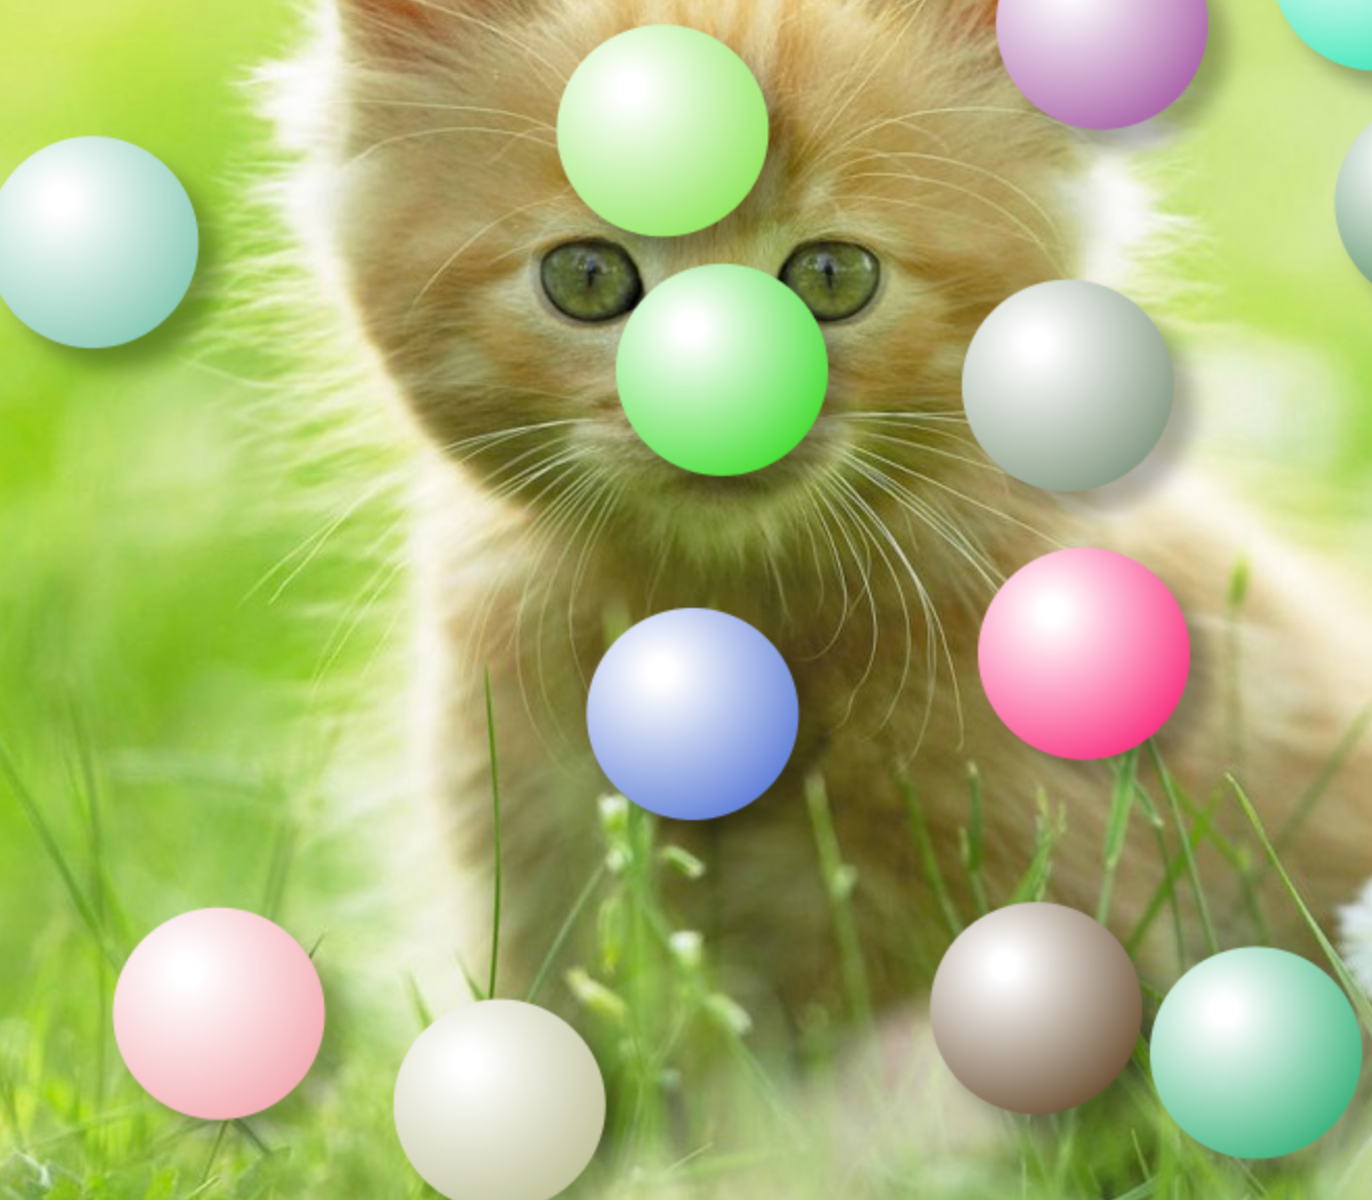
效果如下:
code:
 <!DOCTYPE html>

 <html lang="zh">

 <head>

     <meta charset="UTF-8">

     <meta name="viewport" content="width=device-width, initial-scale=1.0">

     <meta http-equiv="X-UA-Compatible" content="ie=edge">

     <title>Document</title>

     <style>

         * {

             margin: 0;

             padding: 0;

         }

         html {

             height: 100%;

         }

         body {

             width: 100%;

             height: 100%;

             background: #333;

             background: url(./img/6.jpg) no-repeat 0 0;

             background-size: cover;

         }

         canvas {

             display: block;

         }

     </style>

 </head>

 <body>

     <canvas id="can" width=0 height=0></canvas>

     <script>

         var ballsNum = 20;

         window.onload = function() {

             var can = document.getElementById('can');

             can.width = document.body.offsetWidth;

             can.height = document.body.offsetHeight;

             var ctx = can.getContext('2d');

             var ballR = Math.floor(can.height / 15);

             ctx.shadowColor = 'rgba(0,0,0,.3)';

             ctx.shadowOffsetX = ballR / 5;

             ctx.shadowOffsetY = ballR / 5;

             // ctx.shadowBlur = ballR / 10 > 5 ? ballR / 10 : 5;

             ctx.shadowBlur = 16;

             var aObj = randomBall(ballsNum);

             var raf = window.requestAnimationFrame(loop);

             function loop() {

                 ctx.clearRect(0, 0, can.width, can.height);

                 for (var i = 0, l = aObj.length; i < l; i++) {

                     fnChange(aObj[i]);

                     checkPeng(aObj, i);

                 }

                 if (raf) {

                     raf = window.requestAnimationFrame(loop);

                 }

             }

             //  改变圆心坐标

             function fnChange(obj) {

                 drawArc(obj);

                 obj.x += obj.sx * 10 / 4;

                 obj.y += obj.sy * 5 / 4;

                 if (obj.x >= can.width - ballR) {

                     obj.x = can.width - ballR;

                     obj.sx = -1 * obj.sx;

                 } else if (obj.x <= ballR) {

                     obj.x = ballR;

                     obj.sx = -1 * obj.sx;

                 }

                 if (obj.y >= can.height - ballR) {

                     obj.y = can.height - ballR;

                     obj.sy = -1 * obj.sy;

                 } else if (obj.y <= ballR) {

                     obj.y = ballR;

                     obj.sy = -1 * obj.sy;

                 }

             }

             //画圆

             function drawArc(obj) {

                 ctx.save();

                 ctx.beginPath();

                 ctx.arc(obj.x % can.width, obj.y % can.height, ballR, 0, 2 * Math.PI);

                 ctx.closePath();

                 var grd = ctx.createRadialGradient(obj.x - ballR * 3 / 10, obj.y - ballR * 4 / 10, ballR / 8, obj.x - ballR * 4 / 10, obj.y - ballR * 4 / 10, ballR * 16 / 10);

                 grd.addColorStop(0, "rgba(255,255,255,1)");

                 grd.addColorStop(1, obj.scolor);

                 ctx.fillStyle = grd;

                 ctx.fill();

                 ctx.restore();

             }

             function randomBall(num) {

                 var barr = [];

                 var ball;

                 for (var i = 0; i < num || 0; i++) {

                     ball = {};

                     ball.x = Math.random() * (can.width - ballR * 2) + ballR;

                     ball.y = Math.random() * (can.height - ballR * 2) + ballR;

                     ball.sx = Math.random() * 6 - 6 / 2;

                     ball.sy = Math.random() * 6 - 6 / 2;

                     var scr = Math.round(Math.random() * 200 + 50);

                     var scg;

                     var scb;

                     if (scr > 200) {

                         if (Math.random() > 1) {

                             scg = Math.round(Math.random() * 150 + 50);

                             scb = Math.round(Math.random() * 200 + 50);

                         } else {

                             scb = Math.round(Math.random() * 150 + 50);

                             scg = Math.round(Math.random() * 200 + 50);

                         }

                     } else {

                         scg = Math.round(Math.random() * 200 + 50);

                         scb = Math.round(Math.random() * 200 + 50);

                     }

                     ball.scolor = 'rgba(' + [scr, scg, scb, 1].join(',') + ')';

                     barr.push(ball);

                 }

                 return barr;

             }

             //碰撞检测

             function checkPeng(arr, i) {

                 var j, len;

                 for (j = 0, len = arr.length; j < len; j++) {

                     if (i === j) {

                         continue;

                     }

                     var ca = {

                         x: arr[i].x - arr[j].x,

                         y: arr[i].y - arr[j].y

                     }

                     var z = Math.sqrt(Math.pow(ca.x, 2) + Math.pow(ca.y, 2));

                     var cha = z - ballR * 2;

                     if (cha <= 0) {

                         if (arr[i].x < arr[j].x) {

                             arr[i].x += cha;

                         } else {

                             arr[i].x += -cha;

                         }

                         if (arr[i].y < arr[j].y) {

                             arr[i].y += cha;

                         } else {

                             arr[i].y += -cha;

                         }

                         //arr[i].sy = -1*arr[i].sy;

                         var iTY = arr[i].sy;

                         arr[i].sy = 1 * arr[j].sy;

                         arr[j].sy = iTY;

                         //arr[i].sx = -1*arr[i].sx;

                         var iTX = arr[i].sx;

                         arr[i].sx = 1 * arr[j].sx;

                         arr[j].sx = iTX;

                     }

                 }

             }

         }

     </script>

 </body>

 </html>
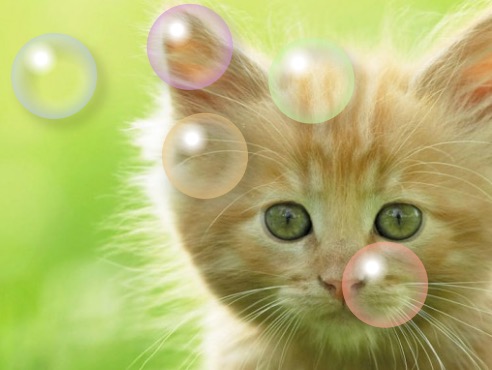
然后是加强版的透明泡泡
https://win7killer.github.io/demo_set/html_demo/canvas/can_ps/ball_1.html
效果如下:
code:
 <!DOCTYPE html>

 <html lang="zh">

 <head>

     <meta charset="UTF-8">

     <meta name="viewport" content="width=device-width, initial-scale=1.0">

     <meta http-equiv="X-UA-Compatible" content="ie=edge">

     <title>Document</title>

     <style>

         * {

             margin: 0;

             padding: 0;

         }

         html {

             height: 100%;

         }

         body {

             width: 100%;

             height: 100%;

             background: #333;

             background: url(./img/6.jpg) no-repeat 0 0;

             background-size: cover;

         }

         canvas {

             display: block;

         }

     </style>

 </head>

 <body>

     <canvas id="can" width=0 height=0></canvas>

     <script>

         var ballsNum = 20;

         window.onload = function() {

             var can = document.getElementById('can');

             can.width = document.body.offsetWidth;

             can.height = document.body.offsetHeight;

             var ctx = can.getContext('2d');

             var ballR = Math.floor(can.height / 15);

             ctx.shadowColor = 'rgba(0,0,0,.3)';

             ctx.shadowOffsetX = ballR / 5;

             ctx.shadowOffsetY = ballR / 5;

             // ctx.shadowBlur = ballR / 10 > 5 ? ballR / 10 : 5;

             ctx.shadowBlur = 16;

             var aObj = randomBall(ballsNum);

             var raf = window.requestAnimationFrame(loop);

             function loop() {

                 ctx.clearRect(0, 0, can.width, can.height);

                 for (var i = 0, l = aObj.length; i < l; i++) {

                     fnChange(aObj[i]);

                     checkPeng(aObj, i);

                 }

                 if (raf) {

                     raf = window.requestAnimationFrame(loop);

                 }

             }

             //  改变圆心坐标

             function fnChange(obj) {

                 drawArc(obj);

                 obj.x += obj.sx * 10 / 4;

                 obj.y += obj.sy * 5 / 4;

                 if (obj.x >= can.width - ballR) {

                     obj.x = can.width - ballR;

                     obj.sx = -1 * obj.sx;

                 } else if (obj.x <= ballR) {

                     obj.x = ballR;

                     obj.sx = -1 * obj.sx;

                 }

                 if (obj.y >= can.height - ballR) {

                     obj.y = can.height - ballR;

                     obj.sy = -1 * obj.sy;

                 } else if (obj.y <= ballR) {

                     obj.y = ballR;

                     obj.sy = -1 * obj.sy;

                 }

             }

             //画圆

             function drawArc(obj) {

                 ctx.save();

                 ctx.beginPath();

                 ctx.arc(obj.x % can.width, obj.y % can.height, ballR, 0, 2 * Math.PI);

                 ctx.closePath();

                 var grd1 = ctx.createRadialGradient(

                     obj.x,

                     obj.y,

                     ballR / 2,

                     obj.x,

                     obj.y,

                     ballR * 13 / 10

                 );

                 // grd1.addColorStop(0, "rgba(255,255,255,1)");

                 grd1.addColorStop(0, "rgba(255,255,255,0)");

                 grd1.addColorStop(1, obj.scolor);

                 ctx.fillStyle = grd1;

                 ctx.fill();

                 ctx.restore();

                 var grd = ctx.createRadialGradient(obj.x - ballR * 3 / 10, obj.y - ballR * 4 / 10, ballR / 8, obj.x - ballR * 4 / 10, obj.y - ballR * 4 / 10, ballR * 16 / 10);

                 grd.addColorStop(0, "rgba(255,255,255,1)");

                 grd.addColorStop(0.2, "rgba(255,255,255,0)");

                 grd.addColorStop(1, "rgba(255,255,255,0)");

                 // grd.addColorStop(1, obj.scolor);

                 ctx.fillStyle = grd;

                 ctx.save();

                 ctx.shadowColor = 'rgba(0,0,0,.0)';

                 ctx.fill();

                 ctx.restore();

             }

             function randomBall(num) {

                 var barr = [];

                 var ball;

                 for (var i = 0; i < num || 0; i++) {

                     ball = {};

                     ball.x = Math.random() * (can.width - ballR * 2) + ballR;

                     ball.y = Math.random() * (can.height - ballR * 2) + ballR;

                     ball.sx = Math.random() * 6 - 6 / 2;

                     ball.sy = Math.random() * 6 - 6 / 2;

                     var scr = Math.round(Math.random() * 200 + 50);

                     var scg;

                     var scb;

                     if (scr > 200) {

                         if (Math.random() > 1) {

                             scg = Math.round(Math.random() * 150 + 50);

                             scb = Math.round(Math.random() * 200 + 50);

                         } else {

                             scb = Math.round(Math.random() * 150 + 50);

                             scg = Math.round(Math.random() * 200 + 50);

                         }

                     } else {

                         scg = Math.round(Math.random() * 200 + 50);

                         scb = Math.round(Math.random() * 200 + 50);

                     }

                     ball.scolor = 'rgba(' + [scr, scg, scb, 1].join(',') + ')';

                     barr.push(ball);

                 }

                 return barr;

             }

             //碰撞检测

             function checkPeng(arr, i) {

                 var j, len;

                 for (j = 0, len = arr.length; j < len; j++) {

                     if (i === j) {

                         continue;

                     }

                     var ca = {

                         x: arr[i].x - arr[j].x,

                         y: arr[i].y - arr[j].y

                     }

                     var z = Math.sqrt(Math.pow(ca.x, 2) + Math.pow(ca.y, 2));

                     var cha = z - ballR * 2;

                     if (cha <= 0) {

                         if (arr[i].x < arr[j].x) {

                             arr[i].x += cha;

                         } else {

                             arr[i].x += -cha;

                         }

                         if (arr[i].y < arr[j].y) {

                             arr[i].y += cha;

                         } else {

                             arr[i].y += -cha;

                         }

                         //arr[i].sy = -1*arr[i].sy;

                         var iTY = arr[i].sy;

                         arr[i].sy = 1 * arr[j].sy;

                         arr[j].sy = iTY;

                         //arr[i].sx = -1*arr[i].sx;

                         var iTX = arr[i].sx;

                         arr[i].sx = 1 * arr[j].sx;

                         arr[j].sx = iTX;

                     }

                 }

             }

         }

     </script>

 </body>

 </html>
就这样吧,canvas写了一些有意思的demo,但是没有系统的可以写成博客的东西,之后会慢慢整理一下介绍给大家~
最后,祝大家鸡年大吉吧,升职涨薪。
【鸡年大吉】,不知道写点啥,放个demo(小球碰撞)吧,有兴趣的看看的更多相关文章
- 使用 Flask 框架写用户登录功能的Demo时碰到的各种坑(五)——实现注册功能
使用 Flask 框架写用户登录功能的Demo时碰到的各种坑(一)——创建应用 使用 Flask 框架写用户登录功能的Demo时碰到的各种坑(二)——使用蓝图功能进行模块化 使用 Flask 框架写用 ...
- 使用 Flask 框架写用户登录功能的Demo时碰到的各种坑(四)——对 run.py 的调整
使用 Flask 框架写用户登录功能的Demo时碰到的各种坑(一)——创建应用 使用 Flask 框架写用户登录功能的Demo时碰到的各种坑(二)——使用蓝图功能进行模块化 使用 Flask 框架写用 ...
- 使用 Flask 框架写用户登录功能的Demo时碰到的各种坑(一)——创建应用
使用 Flask 框架写用户登录功能的Demo时碰到的各种坑(一)——创建应用 使用 Flask 框架写用户登录功能的Demo时碰到的各种坑(二)——使用蓝图功能进行模块化 使用 Flask 框架写用 ...
- 使用 Flask 框架写用户登录功能的Demo时碰到的各种坑(二)——使用蓝图功能进行模块化
使用 Flask 框架写用户登录功能的Demo时碰到的各种坑(一)——创建应用 使用 Flask 框架写用户登录功能的Demo时碰到的各种坑(二)——使用蓝图功能进行模块化 使用 Flask 框架写用 ...
- 使用 Flask 框架写用户登录功能的Demo时碰到的各种坑(三)——使用Flask-Login库实现登录功能
使用 Flask 框架写用户登录功能的Demo时碰到的各种坑(一)——创建应用 使用 Flask 框架写用户登录功能的Demo时碰到的各种坑(二)——使用蓝图功能进行模块化 使用 Flask 框架写用 ...
- 记写 android 微信登录的demo历程
前言 首先看一条链接: https://github.com/Tencent/WeDemo 腾讯给了一个wedemo,微信第三方登录的例子.里面是php和ios,ios是object写的,php还是原 ...
- canvas写的一个小时钟demo
<!DOCTYPE html> <html> <head> <title>HTML5 Canvas Demo of clock</title> ...
- webpack学习(二):先写几个webpack基础demo
一.先写一个简单demo1 1-1安装好webpack后创建这样一个目录: 1-2:向src各文件和dist/index.html文件写入内容: <!DOCTYPE html> <h ...
- js 模仿jquery 写个简单的小demo
<div id="div" style="background:red;width:100px;height:300px"> 123123123 & ...
随机推荐
- C# 开发系列(三)
参考:http://stackoverflow.com/questions/11248935/passing-values-to-a-put-json-request-in-c-sharp 发送htt ...
- HDU 5616 Jam's balance
背包.dp[i]=1表示i这种差值能被组合出来,差值有负数,所以用sum表示0,0表示-sum,2*sum表示sum. 询问X的时候,只需看dp[sum+X]或者dp[sum-X]是否有一个为1,注意 ...
- [Colony]RHCS集群理论
什么是集群? 集群是一组(>2)相互独立的,通过高速网络互联的计算机组成的集合.群集一般可以分为科学集群,负载均衡集群,高可用性集群三大类. 科学集群是并行计算的基础.它对外就好 ...
- mysql管理----状态参数释义
下面是数据库MySQL优化的一些步骤 一.通过show status和应用特点了解各种SQL的执行频率 通过SHOW STATUS可以提供服务器状态信息,也可以使用mysqladmin extende ...
- HTML学习(四)样式
通过使用 HTML4.0,所有的格式化代码均可移出 HTML 文档,然后移入一个独立的样式表. 实例:例1:本例演示如何使用添加到 <head> 部分的样式信息对 HTML 进行格式化.& ...
- Oracle物化视图的用法与总结
物化视图(material view)是什么? 物化视图是包括一个查询结果的数据库对象,它是远程数据的的本地副本,或者用来生成基于数据表求和的汇总表. 物化视图存储基于远程表的数据,也可以称为快照(类 ...
- GCJ Round 1C 2009 Problem C. Bribe the Prisoners
区间DP.dp[i][j]表示第i到第j个全部释放最小费用. #include<cstdio> #include<cstring> #include<cmath> ...
- STM32-USB详细使用说明(转)
源:STM32-USB详细使用说明 附件HID的双向通信 亮点STM32开发板充实了USBHID数据发送和接收例程(STM32固件库3.5 USB库3.4)
- sqlserver 笔记:常用字符串函数
select tid,tid+ coalesce(tid0,'101') from article where id=1 ---如果tid为null 则 返回101 select LEN('你 ...
- RabbitMQ消息队列(二):”Hello, World“
本文将使用Python(pika 0.9.8)实现从Producer到Consumer传递数据”Hello, World“. 首先复习一下上篇所学:RabbitMQ实现了AMQP定义的消息队列.它实现 ...