
[转]Mac's and serial TTY's
Mac's are excellent tools for accessing serial device TTY ports (to console into PBX's, switches, and routers). You just need a serial to USB adapter, the right driver, and some Terminal software.
You can use screen, although ZTerm, goSerial, or Minicom offer more features and functionality.
Drivers
Most Serial-to-USB adapters will work on a Mac with one of the following OS X drivers:
Prolific PL2303:
PL2303_MacOSX_v1_5_1.zip FTDI_MacOSX_v2.2.18.zip
If your adapter doesn't work with either of these, try the following sources:
- Silicon Labs - CP210x USB to UART Bridge Virtual COM Port (VCP) drivers.
- Belkin - USB Serial Adapters: F5U257, F5U103, F5U003 (poor OS X support).
- Keyspan serial-USB adapter drivers can be found in their Support Section.
NOTE: It may be necessary to remove any previous driver before installing a newer one, eg:
$ sudo rm -rf /System/Library/Extensions/ProlificUsbSerial.kext
After installing the correct driver, plug in your USB-Serial adapter, and open a Terminal session (Applications/Utilities).
Enter the command ls /dev/cu.*, and look for something like usbserial (or similar):
$ ls /dev/cu.*

/dev/cu.Bluetooth-Modem		/dev/cu.iPhone-WirelessiAP

/dev/cu.Bluetooth-PDA-Sync	/dev/cu.usbserial
This indicates the USB-Serial driver is working. Select this port name in a terminal program.
Note: Check your adapter still works after a Mac OS Update, as you may have to re-install the driver.
You might notice that each serial device shows up twice in /dev, once as a tty.* and once as a cu.*. So, what's the difference? Well, TTY devices are for calling into UNIX systems, whereas CU (Call-Up) devices are for calling out from them (eg, modems). We want to call-out from our Mac, so /dev/cu.* is the correct device to use.
The technical difference is that /dev/tty.* devices will wait (or listen) for DCD (data-carrier-detect), eg, someone calling in, before responding. /dev/cu.* devices do not assert DCD, so they will always connect (respond or succeed) immediately.
Software
Having installed the right driver, our USB-Serial adapter will show up in /dev/cu.* (as shown above). We now need some terminal emulation software before we can connect to anything. Here are some Mac OS X terminal emulation programs:
GUI apps: Zterm

Terminal apps:
I use and (highly) recommend minicom, but there are several alternatives.
* screen is built-in to Mac OS X, the alternatives require downloading and installing.
ZTerm
ZTerm is a well known terminal emulation program thats been around for years, updated for Intel Macs. It supports VT100 emulation, which means it sorta kinda works with Meridian Mail (Function keys on a MacBook: fn + f-key). Shareware, but registration is $20.
To configure ZTerm, open Settings > Modem Preferences and select your USB-Serial device as the default modem (Serial Port). Then edit your connection in Settings > Connection. Remember to connect the USB-Serial cable before launching ZTerm. The following pictures explain the steps:
 |
 |
goSerial
goSerial can open multiple connections simultaneously, send and receive files, log sessions, and it supports scripting. There is no terminal emulation (VT100) support. goSerial is Donation ware.
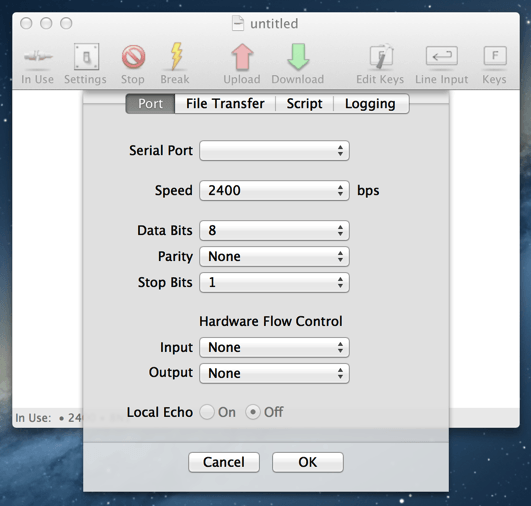
To configure goSerial, click the light switch in the Toolbar and select your USB-Serial device as the Serial Port. The communication settings are set in the same window. The serial ports dynamically updates if devices are added or removed. The following picture shows the settings window:
 |
screen
You can also use the Mac OS X built in Terminal program and screen, there's no extra software needed:
- Open an OS X terminal session (window)
- Find the right TTY device. Type:
ls /dev/cu.*With the USB-Serial adapter plugged in, you'll get a list, including something like this:
$ ls /dev/cu.*

/dev/cu.Bluetooth-Modem		/dev/cu.iPhone-WirelessiAP

/dev/cu.Bluetooth-PDA-Sync /dev/cu.usbserial - Then type:
screen /dev/cu.usbserial 9600
The 9600 at the end is the baud rate. You can use any standard rate, eg, 9600, or 19200 for a Sig Server! - To quit the screen app, type CTRL-A, then CTRL-\.
Type man screen in Terminal for further information on screen commands.
minicom
Alternatively, if you'd like a few more features, and a retro feel, you can install minicom 2.2  which is also my program of choice.
The linked version works under OS X 10.7 Lion, and 10.8 Mountain Lion. Minicom supports VT100 emulation, which means it sorta kinda works with Meridian Mail (Function keys on a MacBook: fn + f-key).
Download and run the minicom package installer, then manually edit your $PATH with sudo nano /private/etc/paths.
Add the following line to the bottom of the file: /opt/minicom/2.2/bin, save and exit - then relaunch the terminal.
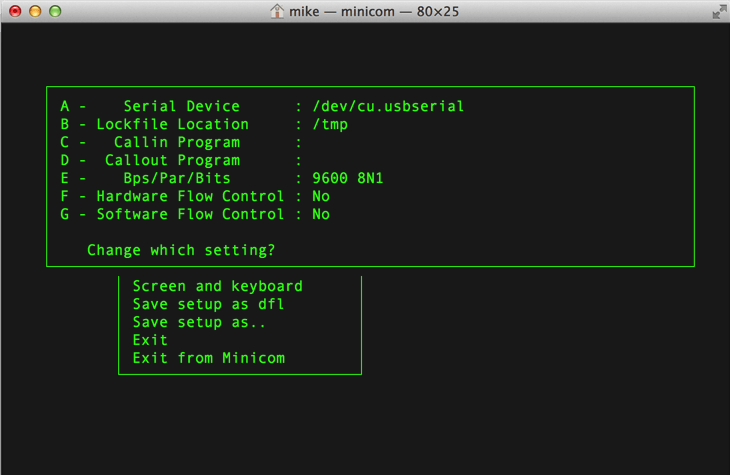
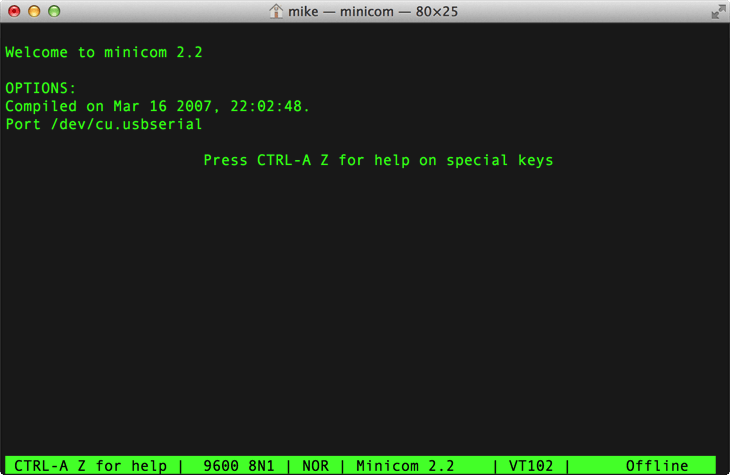
Run minicom -s first to configure your serial interface device name, and other options. Then, Save setup as dfl (default) and Exit. Your serial interface device name is found with ls /dev/cu.* (as shown above). Always launch minicom, with your selected serial adapter plugged in and available to avoid an error. In the example below, the serial device is configured as /dev/cu.KeySerial1:
 |
 |
|
| Click image to view, or right-click and Open Link in a new window/tab | ||
In minicom, commands can be called by CTRL-A <key>, for example, change your serial port settings with CTRL-A P
Press CTRL-A Z for a Command Summary, and help on special keys. Enter CTRL-A X to quit.
HINT: Change your OS X terminal window size to 80x25 (1 line more) so you can see the bottom Minicom status bar.
(Terminal Preferences -> Settings -> Window). Open a new window for this change to take effect.
 |
Note, the minicom installer creates /opt, and its not hidden in the OS X finder. Rectify this with: sudo chflags hidden /opt
[转]Mac's and serial TTY's的更多相关文章
- esp8266 免费wifi强推广告神器(4) 发现当前WIFI下的用户数目,IP,MAC请求http信息 在用户请求跳转后跳转
需求: 1 获取当前连接客户端的HTTP请求各种信息 方法 get http 请求路径 例如 /index.html / /pic.jpg 请求版本 HTTP/1.0 HT ...
- 获取与esp8266连接的客户端的Mac地址 IP 端口 控制停止等问题
两个关键的库 ESP8266WebServer.h WiFiClient.h ESP8266WiFiAP.cpp C:\Users\dongdong\Desktop\Arduino-master\li ...
- virsh console配置
If you're trying to get to the console, you can either use virt-viewer for the graphical console or ...
- pppd - 点对点协议守护进程
总览 SYNOPSIS pppd [ tty_name ] [ speed ] [ options ] 描述 点对点协议 (PPP) 提供一种在点对点串列线路上传输资料流 (datagrams)的方法 ...
- devices-list
转自:https://www.kernel.org/pub/linux/docs/lanana/device-list/devices-2.6.txt LINUX ALLOCATED DEVICES ...
- Linux procfs详解
1.0 proc文件系统总览在类Unix系统中体现了一种良好的抽象哲学,就是几乎所有的数据实体都被抽象成一个统一的接口--文件来看待,这样我们就可以用一些简单的基本工具完成大量复杂的操作.在Linux ...
- 微信客户端+微信公众平台+新浪云SAE+Arduino+WS100(控制LED)
第一步:准备 1.智能手机微信客户端或微信电脑版 2.注册微信公众平台 https://mp.weixin.qq.com 3.注册新浪账号 http://www.sinacloud.com 4.拥有一 ...
- 微信客户端+微信公众平台+新浪云SAE+Arduino+WS100(控制LED)
第一步:准备 1.智能手机微信客户端或微信电脑版 2.注册微信公众平台 https://mp.weixin.qq.com 3.注册新浪账号 http://www.sinacloud.com 4.拥有一 ...
- android获取设备唯一标示
概述 有时需要对用户设备进行标识,所以希望能够得到一个稳定可靠并且唯一的识别码.虽然Android系统中提供了这样设备识别码,但是由于Android系统版本.厂商定制系统中的Bug等限制,稳定性和唯一 ...
随机推荐
- WebAPI 和 WebService的区别
webapi用的是http协议,webservice用的是soap协议 webapi无状态,相对webservice更轻量级.webapi支持如get,post等http操作 http soap关系 ...
- mysql_【MySQL】常见的mysql 进程state
Analyzing 线程是对MyISAM 表的统计信息做分析(例如, ANALYZE TABLE ). checking permissions 线程是检查服务器是否具有所需的权限来执行该语句. Ch ...
- 无废话WCF入门教程四[WCF的配置文件]
一.概述 配置也是WCF编程中的主要组成部分.在以往的.net应用程序中,我们会把DBConn和一些动态加载类及变量写在配置文件里.但WCF有所不同.他指定向客户端公开的服务,包括服务的地址.服务用于 ...
- ArcGIS API for Silverlight 使用GP服务实现要素裁剪功能
原文:ArcGIS API for Silverlight 使用GP服务实现要素裁剪功能 昨天一QQ好友问了一个关于裁剪的问题,感觉自己也没有帮上什么忙,之后自己做了一个裁剪的例子,不过在做这个例子的 ...
- iOS # Charles拦截封包
Charles: 是在Mac下常用的截取网络封包的工具,在做iOS开发时,我们为了调试与服务器端的网络通讯协议,常常需要截取网络封包来分析.Charles通过将自己设置成系统的网络访问代理服务器,使得 ...
- utf8 和 UTF-8 在使用中的差别
在使用中经常遇到utf-8和utf8,如今最终弄明确他们的使用不同之处了,如今来和大家分享一下,以下我们看一下utf8 和 UTF-8 有什么差别 "UTF-8"是标准写法,ph ...
- DBUtils的使用
DButils是apache旗下Commons项目中的一个JDBC工具包,它可以为帮助我们简化对JDBC的操作,但它并不是一个ORM框架,只是可以为我们执行sql,并将返回的ResultSet转化成我 ...
- Web API 2:Action的返回类型
Web API 2:Action的返回类型 Web API控制器中的Action方法有如下几种返回类型: void HttpResponseMessage IHttpActionResult 其它类型 ...
- 如何使用Visual Studio 2013 开发PHP5.6项目
原文如何使用Visual Studio开发PHP项目 在windows下开发php除了记事本 DW 以及一帮Zend studio,Eclipse,NetBeans之流以外,个人感觉还是vsiual ...
- C语言库函数大全及应用实例十四
原文:C语言库函数大全及应用实例十四 [编程资料]C语言库函数大全及应用实例十四 函数名: strset 功 能: 将一个串 ...