iOS-Core-Animation-Advanced-Techniques(一)
视图(UIView)和图层(CALayer)的关系: 每一个UIview都有一个CALayer实例的图层属性,视图的职责就是创建并管理这个图层,以确保当子视图在层级关系中添加或者被移除的时候,他们关联的图层也同样对应在层级关系树当中有相同的操作。图层才是真正用来在屏幕上显示和做动画,UIView仅仅是对它的一个封装,提供了一些iOS类似于处理触摸的具体功能,以及Core Animation底层方法的高级接口。
使用图层关联的视图而不是CALayer的好处在于,你能在使用所有CALayer底层特性的同时,也可以使用UIView的高级API(比如自动排版,布局和事件处理)
使用图层,需添加QuartzCore框架到Build Phases,然后在vc的.m文件中引入<QuartzCore/QuartzCore.h>库
在layer中放一张背景图:
UIImage *image = [UIImage imageNamed:@"egg.jpg"];

    //add it directly to our view's layer
self.layerView.layer.contents = (__bridge id)image.CGImage;
self.layerView.layer.contentsScale = [UIScreen mainScreen].scale;
contents是一个id类型,若想让他显示图片,则需给它一个CGImageRef,而uiimage里面有条属性cgimage可以返回cgimageref,但是因为cgimageref不是一个cocoa对象,而是一个core foundation类型,所以需通过关键字bridge转换
self.layerView.layer.contentsGravity = kCAGravityResizeAspectFill;//决定内容在图层的边界中怎么对齐
    /**

     kCAGravityCenter

     kCAGravityTop

     kCAGravityBottom

     kCAGravityLeft

     kCAGravityRight

     kCAGravityTopLeft

     kCAGravityTopRight

     kCAGravityBottomLeft

     kCAGravityBottomRight

     kCAGravityResize

     kCAGravityResizeAspect //等比例拉伸以适应图层边界
     kCAGravityResizeAspectFill //充满整个图层
  **/
self.layerView.layer.contentsRect = CGRectMake(0.34, , 0.3, 0.5);
contentsRect: 通过这个属性裁剪图片,默认为{0,0,1,1),显示全部。
self.layerView.layer.contentsCenter = CGRectMake(, , , 0.5);
当图片太小进行拉伸时,只会拉伸contentsCenter里的范围,其它地方会压缩或者不变
CALayer可以通过CALayerDelegate来提供重绘的具体实现
- (void)drawLayer:(CALayer *)layer inContext:(CGContextRef)ctx; //重绘的内容
通过 [blueLayer display] 这个方法进行重绘
transform
/*

         以下三点结论基于未旋转的情况:

         1.当参数x>0 && x<=M_PI时,为顺时针

         2.当参数x>-M_PI && x<0时,为逆时针

         3.若参数x<M_PI || x>2.0*M_PI时,则旋转方向等同于x%2的旋转方向

         总结:旋转方向就是向最短路径方向旋转

*/

view.transform = CGAffineTransformMakeRotation(M_PI);// 顺时针旋转180度

but.transform = CGAffineTransformMakeScale(, );//宽高伸缩比例

 but.transform = CGAffineTransformMakeTranslation(, );//xy移动距离

but.transform = CGAffineTransformMake(, , , , , );//自定义形变,参数自拟,下边会详细描述
对layer的anchorPoint的理解与应用:
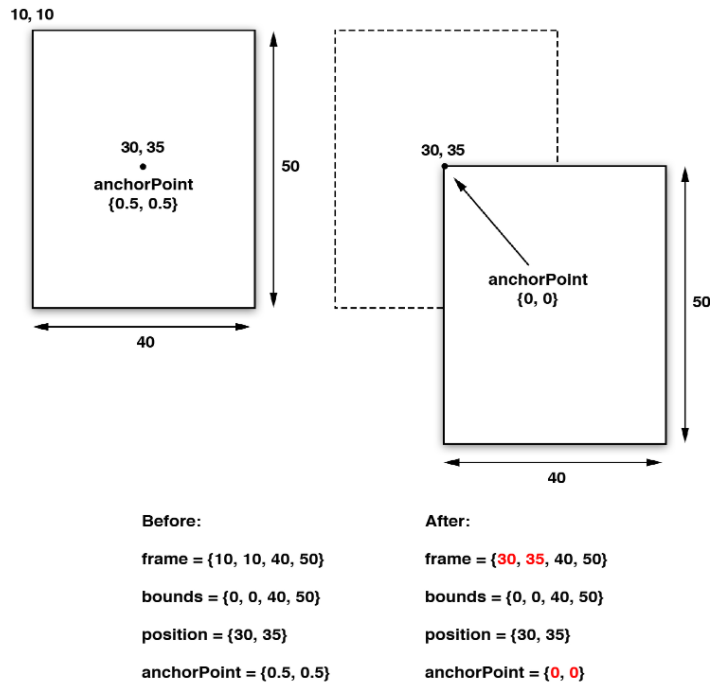
通过上面的数据可以发现,view的center和view.layer的position都不变,但是view.frame.origin和view.layer.frame.origin都向右下偏移
因为,position与frame与bounds的关系如下
position.x = frame.origin.x + anchorPoint.x *

bounds.size.width;

position.y = frame.origin.y + anchorPoint.y *

bounds.size.height;
frame.origin.x = position.x - anchorPoint.x *

bounds.size.width;

frame.origin.y = position.y - anchorPoint.y *

bounds.size.height;
而当使用transform旋转时,其实是围绕center或者position旋转,所以这时,view会绕左上角旋转,而不是view的中心处
注意的是,anchorPoint是一个坐标比例,默认为(0.5,0.5)处于layer的中心处。
这里有个transform旋转左上角的例子
[self setAnchorPoint:CGPointMake(, ) forView:self.layerView];   //通过anchorPoint将center相对于本图层置于左上角,视图向右下偏移,然后改变center将视图移到原来的origin处,保证了视图位置不变

    [UIView animateWithDuration: animations:^{

        self.layerView.transform = CGAffineTransformMakeRotation(M_PI/);   //视图绕center旋转,也就是图层的做上角

    } completion:^(BOOL finished) {

        [self setAnchorPoint:CGPointMake(0.5, 0.5) forView:self.layerView];  //通过anchorPoint将center相对于本图层置于中心,视图向左上偏移,然后改变center将视图移到原来的origin处,保证了视图位置不变

    }];

- (void)setAnchorPoint:(CGPoint)anchorPoint forView:(UIView *)view

{

    CGPoint oldOrigin = view.frame.origin;

    view.layer.anchorPoint = anchorPoint;

    CGPoint newOrigin = view.frame.origin;

    CGPoint transition;

    transition.x = newOrigin.x - oldOrigin.x;

    transition.y = newOrigin.y - oldOrigin.y;

    view.center = CGPointMake (view.center.x - transition.x, view.center.y - transition.y);

}
其实如果不是为了让anchorPoint也复原为(0.5,0.5),setAnchorPoint方法中,view.center可以直接等于oldOrigin。看项目需求选择。
zPosition:
图层是根据它们子图层的sublayers出现的顺序来类绘制的,后被绘制上的图层将会遮盖住之前的图层,但是通过增加图层的zPosition,就可以把图层向用户方向前置,于是它就在所有其他图层的前面了.
UIView *view1 = [[UIView alloc] initWithFrame:CGRectMake((screen_width - )/, (screen_height - )/, , )];

    view1.backgroundColor = [UIColor redColor];

    view1.layer.zPosition = 1.0f;

    [self.view addSubview:view1];

    UIView *view2 = [[UIView alloc] initWithFrame:CGRectMake((screen_width - )/, (screen_height - )/, , )];

    view2.backgroundColor = [UIColor greenColor];

    [self.view addSubview:view2];
原本view2会遮住view1,因为它们相对于父视图处于同一位置,但view1设置了zPosition,因此view1遮住了view2,有点像视图展示的优先级。
介绍一个方法用来实现:一个点在两个视图中的坐标的相互转换
  //self.layerView.layer在self.view.layer上。
    //get touch position relative to main view

    CGPoint point = [[touches anyObject] locationInView:self.view]; //point相对于self.view的位置

    //convert point to the white layer's coordinates

    point = [self.layerView.layer convertPoint:point fromLayer:self.view.layer]; //point相对于self.layerview的位置
-containsPoint:接受一个在本图层坐标系下的CGPoint,如果这个点在图层frame范围内就返回YES
#import "ViewController.h"

#import <QuartzCore/QuartzCore.h>

@interface ViewController ()<CALayerDelegate>

@property (nonatomic, strong) UIView *layerView;

@property (nonatomic, strong) CALayer *blueLayer;

@end

@implementation ViewController

- (void)viewDidLoad {

    [super viewDidLoad];

    self.view.backgroundColor = [UIColor grayColor];

    CGFloat screen_width = [UIScreen mainScreen].bounds.size.width;

    CGFloat screen_height = [UIScreen mainScreen].bounds.size.height;

    self.layerView = [[UIView alloc] initWithFrame:CGRectMake((screen_width - )/, (screen_height - )/, , )];

    self.layerView.backgroundColor = [UIColor redColor];

    //[self.view addSubview:self.layerView];

    [self.view.layer addSublayer:self.layerView.layer];

    self.blueLayer = [CALayer layer];

    self.blueLayer.frame = CGRectMake(50.0f, 50.0f, 100.0f, 100.0f);

    self.blueLayer.backgroundColor = [UIColor blueColor].CGColor;

    //add it to our view

    [self.layerView.layer addSublayer:self.blueLayer];

    //[self.layerView.layer addSublayer:view.layer];

}

- (void)touchesBegan:(NSSet *)touches withEvent:(UIEvent *)event

{

    //get touch position relative to main view

    CGPoint point = [[touches anyObject] locationInView:self.view];  //得到触摸点

    NSLog(@"%lf %lf",point.x, point.y);

    //convert point to the white layer's coordinates

    point = [self.layerView.layer convertPoint:point fromLayer:self.view.layer]; //获得触摸点相对于self.layerView的位置

    //get layer using containsPoint:

    if ([self.layerView.layer containsPoint:point]) {  //判断self.layerView是否含有这个点,也就是判断是否触碰了self.layerView

        //convert point to blueLayer’s coordinates

        point = [self.blueLayer convertPoint:point fromLayer:self.layerView.layer];

        if ([self.blueLayer containsPoint:point]) {

            [[[UIAlertView alloc] initWithTitle:@"Inside Blue Layer"

                                        message:nil

                                       delegate:nil

                              cancelButtonTitle:@"OK"

                              otherButtonTitles:nil] show];

        } else {

            [[[UIAlertView alloc] initWithTitle:@"Inside White Layer"

                                        message:nil

                                       delegate:nil

                              cancelButtonTitle:@"OK"

                              otherButtonTitles:nil] show];

        }

    }

}
-hitTest方法 :接受一个CGPoint类型参数,它返回图层本身,或者包含这个坐标点的叶子节点图层。这意味着不再需要像使用-containsPoint:那样,人工地在每个子图层变换或者测试点击的坐标。如果这个点在最外面图层的范围之外,则返回nil
- (void)touchesBegan:(NSSet *)touches withEvent:(UIEvent *)event

{

    //get touch position

    CGPoint point = [[touches anyObject] locationInView:self.view];

    //get touched layer

    CALayer *layer = [self.layerView.layer hitTest:point];

    //get layer using hitTest

    if (layer == self.blueLayer) {

        [[[UIAlertView alloc] initWithTitle:@"Inside Blue Layer"

                                    message:nil

                                   delegate:nil

                          cancelButtonTitle:@"OK"

                          otherButtonTitles:nil] show];

    } else if (layer == self.layerView.layer) {

        [[[UIAlertView alloc] initWithTitle:@"Inside White Layer"

                                    message:nil

                                   delegate:nil

                          cancelButtonTitle:@"OK"

                          otherButtonTitles:nil] show];

    }

}
自动布局:
UIView的布局,autoresizingMask和constraints属性能做到自适应屏幕旋转
CALayer的布局,就需要手工操作,使用CALayerDelegate协议,实现- (void)layoutSublayersOfLayer:(CALayer *)layer方法
当图层的bounds发生改变,或者图层的-setNeedsLayout方法被调用的时候,这个函数将会被执行。这使得你可以手动地重新摆放或者重新调整子图层的大小
iOS-Core-Animation-Advanced-Techniques(一)的更多相关文章
- IOS Core Animation Advanced Techniques的学习笔记(五)
第六章:Specialized Layers 类别 用途 CAEmitterLayer 用于实现基于Core Animation粒子发射系统.发射器层对象控制粒子的生成和起源 CAGradient ...
- IOS Core Animation Advanced Techniques的学习笔记(四)
第五章:Transforms Affine Transforms CGAffineTransform是二维的 Creating a CGAffineTransform 主要有三种变 ...
- IOS Core Animation Advanced Techniques的学习笔记(一)
转载. Book Description Publication Date: August 12, 2013 Core Animation is the technology underlying A ...
- iOS Core Animation Advanced Techniques
Book Descripter Core Animation is the technology underlying Apple's iOS user interface. By unleashin ...
- IOS Core Animation Advanced Techniques的学习笔记(二)
- (void)drawLayer:(CALayer *)layer inContext:(CGContextRef)ctx { CGFloat width = 10.0f; //draw a thi ...
- IOS Core Animation Advanced Techniques的学习笔记(三)
第四章:Visual Effects Rounded Corners 例子4.1 cornerRadius 源码在这里下载:http://www.informit.com/title/978013 ...
- 转 iOS Core Animation 动画 入门学习(一)基础
iOS Core Animation 动画 入门学习(一)基础 reference:https://developer.apple.com/library/ios/documentation/Coco ...
- iOS - Core Animation 核心动画
1.UIView 动画 具体讲解见 iOS - UIView 动画 2.UIImageView 动画 具体讲解见 iOS - UIImageView 动画 3.CADisplayLink 定时器 具体 ...
- iOS Core Animation 简明系列教程
iOS Core Animation 简明系列教程 看到无数的CA教程,都非常的难懂,各种事务各种图层关系看的人头大.自己就想用通俗的语言翻译给大家听,尽可能准确表达,如果哪里有问题,请您指出我会尽 ...
- iOS Core Animation之CALayer心得
使用CALayer的mask实现注水动画效果 Core Animation一直是iOS比较有意思的一个主题,使用Core Animation可以实现非常平滑的炫酷动画.Core animtion的AP ...
随机推荐
- Spring Boot 学习笔记
参考资料 http://docs.spring.io/spring-boot/docs/current/reference/htmlsingle/ Spring Boot简介 Spring Boot使 ...
- python3 selenium 登录操作
使用场景: 测试过程中,有的时候需要登录才可以进行其他操作 举例说明: # coding=utf-8 """ :author: 花花测试 :time: 2017.05.0 ...
- MarkDown本地图片上传工具制作总结
引言:开始尝试使用MarkDown语法写文档,发现图片必须用外链的形式才能插入到文章中,而自己平时最常用的插入图片方式就是QQ截屏,觉得很不方便所以制作的小工具辅助上传,因为时间和水平有限,其实代码写 ...
- 使用java API操作hdfs--拷贝部分文件到hdfs
要求如下: 自行在本地文件系统生成一个大约一百多字节的文本文件,写一段程序(可以利用Java API或C API),读入这个文件,并将其第101-120字节的内容写入HDFS成为一个新文件. impo ...
- ios模拟器bug
Error: xcode-select: error: tool 'xcodebuild' requires Xcode, but active developer directory '/Libra ...
- 《快学Scala》——数组、映射和元组
数组 定长数组:在Scala中可以用Array,初始化一个定长数组.例如: val nums = new Array[Int](10) //10个整数的数组,所有元素初始化为0 val a = new ...
- Hive的分区操作~~~~~~
一.Hive分区(一).分区概念:为什么要创建分区:单个表数据量越来越大的时候,在Hive Select查询中一般会扫描整个表内容,会消耗很多时间做没必要的工作.有时候只需要扫描表中关心的一部分数据, ...
- motor和servo
程序简单易读,不再做注释 motor.py from gpiozero import Motor from gpiozero import LED led = LED(2) motor = Motor ...
- MySQL高可用方案MHA自动Failover与手动Failover的实践及原理
集群信息 角色 IP地址 ServerID 类型 Master ...
- web工作过程
了解浏览器与服务器进行通信和访问的过程 打开浏览器-输入URL地址 当我们访问一个网页时,如http://www.baidu.com,这个网址包含四个部分的内容: 1.第一部分:协议类型:这里是htt ...