eclipse maven新建springMVC项目(原创)
1、配置eclipse maven

2、新建maven项目

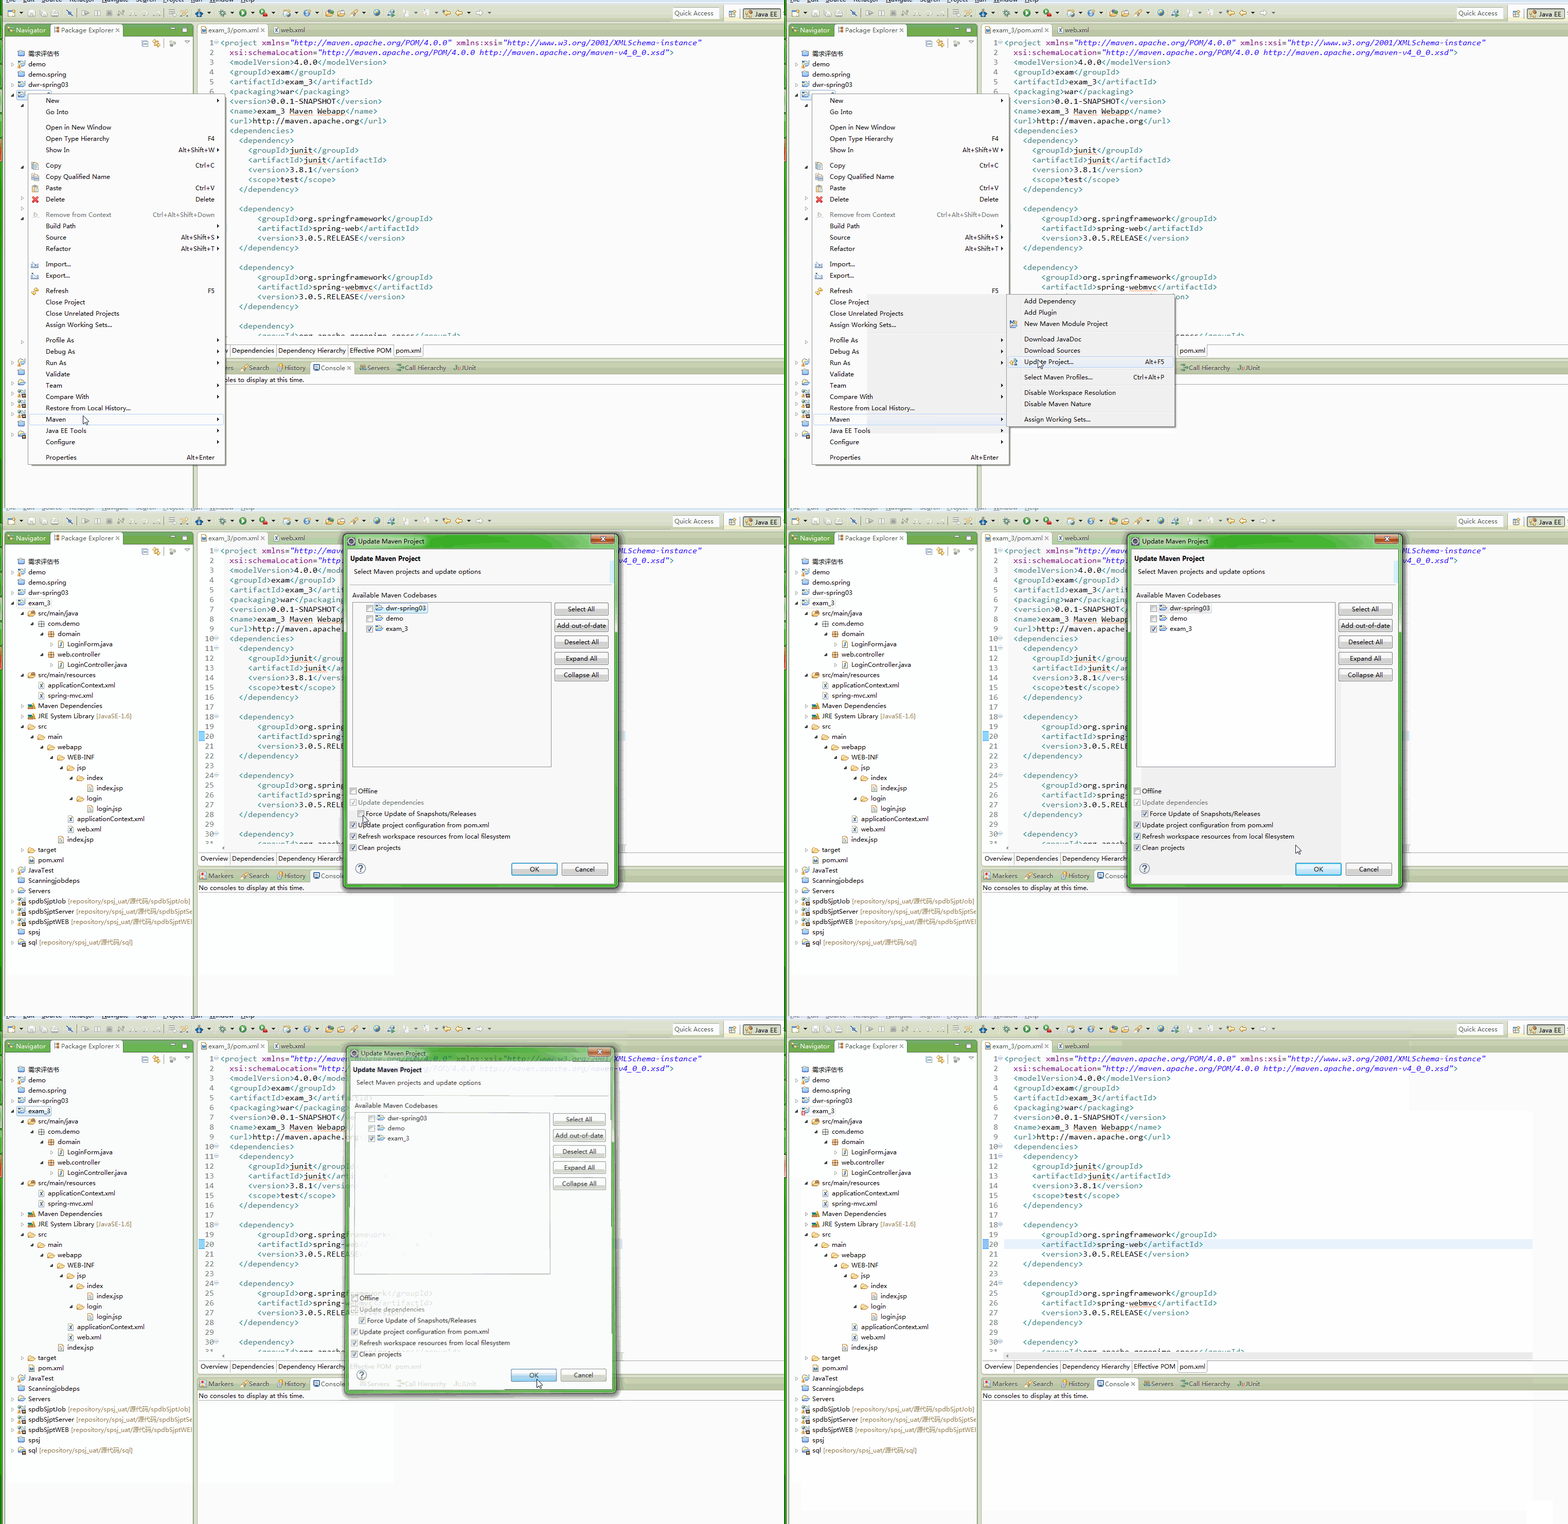
3、新建src/main/java,更新pom
<project xmlns="http://maven.apache.org/POM/4.0.0" xmlns:xsi="http://www.w3.org/2001/XMLSchema-instance"

  xsi:schemaLocation="http://maven.apache.org/POM/4.0.0 http://maven.apache.org/maven-v4_0_0.xsd">

  <modelVersion>4.0.0</modelVersion>

  <groupId>exam</groupId>

  <artifactId>exam_3</artifactId>

  <packaging>war</packaging>

  <version>0.0.1-SNAPSHOT</version>

  <name>exam_3 Maven Webapp</name>

  <url>http://maven.apache.org</url>

  <dependencies>

    <dependency>

      <groupId>junit</groupId>

      <artifactId>junit</artifactId>

      <version>3.8.1</version>

      <scope>test</scope>

    </dependency>

    <dependency>

        <groupId>org.springframework</groupId>

        <artifactId>spring-web</artifactId>

        <version>3.0.5.RELEASE</version>

    </dependency>

    <dependency>

        <groupId>org.springframework</groupId>

        <artifactId>spring-webmvc</artifactId>

        <version>3.0.5.RELEASE</version>

    </dependency>

    <dependency>

        <groupId>org.apache.geronimo.specs</groupId>

        <artifactId>geronimo-servlet_2.5_spec</artifactId>

        <version>1.2</version>

    </dependency>

  </dependencies>

  <build>

    <finalName>exam_3</finalName>

    <plugins>

            <plugin>

                <!-- 编译插件 -->

                <groupId>org.apache.maven.plugins</groupId>

                <artifactId>maven-compiler-plugin</artifactId>

                <version>2.3.2</version>

                <configuration>

                    <source>1.6</source>

                    <target>1.6</target>

                </configuration>

            </plugin>

            <plugin>

                <!-- 源码插件 -->

                <groupId>org.apache.maven.plugins</groupId>

                <artifactId>maven-source-plugin</artifactId>

                <version>2.1</version>

                <!-- 发布时自动将源码同时发布的配置 -->

                <executions>

                    <execution>

                        <id>attach-sources</id>

                        <goals>

                            <goal>jar</goal>

                        </goals>

                    </execution>

                </executions>

            </plugin>

                <plugin>

                <groupId>org.mortbay.jetty</groupId>

                <artifactId>maven-jetty-plugin</artifactId>

                <version>6.1.26</version>

                <configuration>

                    <webAppSourceDirectory>src/main/webapp</webAppSourceDirectory>

                    <contextPath>/exam_3</contextPath>

                    <scanIntervalSeconds>10</scanIntervalSeconds>

                    <connectors>

                        <connector implementation="org.mortbay.jetty.nio.SelectChannelConnector">

                            <port>5555</port>

                            <maxIdleTime>100</maxIdleTime>

                        </connector>

                    </connectors>

                </configuration>

            </plugin>

        </plugins>

  </build>

</project>
4、更新项目maven依赖

5、写web.xml
<?xml version="1.0" encoding="UTF-8"?>

<web-app version="2.4" xmlns="http://java.sun.com/xml/ns/j2ee"

    xmlns:xsi="http://www.w3.org/2001/XMLSchema-instance"

    xsi:schemaLocation="http://java.sun.com/xml/ns/j2ee http://java.sun.com/xml/ns/j2ee/web-app_2_4.xsd">

    <context-param>

        <param-name>contextConfigLocation</param-name>

        <param-value>classpath:applicationContext.xml</param-value>

    </context-param>

    <listener>

        <listener-class>org.springframework.web.context.ContextLoaderListener</listener-class>

    </listener>

    <filter>

        <filter-name>CharacterEncodingFilter</filter-name>

        <filter-class>org.springframework.web.filter.CharacterEncodingFilter</filter-class>

        <init-param>

            <param-name>encoding</param-name>

            <param-value>utf-8</param-value>

        </init-param>

    </filter>

    <filter-mapping>

        <filter-name>CharacterEncodingFilter</filter-name>

        <url-pattern>/*</url-pattern>

    </filter-mapping>

    <servlet>

        <servlet-name>exam</servlet-name>

        <servlet-class>org.springframework.web.servlet.DispatcherServlet</servlet-class>

        <init-param>

            <param-name>contextConfigLocation</param-name>

            <param-value>classpath:spring-mvc.xml</param-value>

        </init-param>

    </servlet>

    <servlet-mapping>

        <servlet-name>exam</servlet-name>

        <url-pattern>/</url-pattern>

    </servlet-mapping>

    <welcome-file-list>

        <welcome-file>index.jsp</welcome-file>

    </welcome-file-list>

</web-app>
6、写src/main/resources目录下applicationContext.xml和spring-mvc.xml
<?xml version="1.0" encoding="UTF-8"?>

<!DOCTYPE beans PUBLIC "-//SPRING//DTD BEAN//EN" "http://www.springframework.org/dtd/spring-beans.dtd">

<beans>

</beans>
<?xml version="1.0" encoding="UTF-8"?>

<!-- Bean头部 -->

<beans xmlns="http://www.springframework.org/schema/beans"

    xmlns:xsi="http://www.w3.org/2001/XMLSchema-instance" xmlns:p="http://www.springframework.org/schema/p"

    xmlns:mvc="http://www.springframework.org/schema/mvc" xmlns:context="http://www.springframework.org/schema/context"

    xmlns:util="http://www.springframework.org/schema/util"

    xsi:schemaLocation="http://www.springframework.org/schema/beans http://www.springframework.org/schema/beans/spring-beans-3.0.xsd

            http://www.springframework.org/schema/context http://www.springframework.org/schema/context/spring-context-3.0.xsd

            http://www.springframework.org/schema/mvc http://www.springframework.org/schema/mvc/spring-mvc-3.0.xsd

            http://www.springframework.org/schema/util http://www.springframework.org/schema/util/spring-util-3.0.xsd">

    <!-- 激活@Controller模式 -->

    <mvc:annotation-driven />

    <!-- 对包中的所有类进行扫描,以完成Bean创建和自动依赖注入的功能 需要更改 -->

    <context:component-scan base-package="com.demo.web.controller" />

    <bean class="org.springframework.web.servlet.mvc.annotation.AnnotationMethodHandlerAdapter" />

    <bean id="viewResolver" class="org.springframework.web.servlet.view.InternalResourceViewResolver">

        <property name="prefix">

            <value>/WEB-INF/jsp/</value>

        </property>

        <property name="suffix">

            <value>.jsp</value>

        </property>

    </bean>

</beans>
7、新增部分代码
public class LoginForm {

    private String username;

    private String password;

    public String getUsername() {

        return username;

    }

    public void setUsername(String username) {

        this.username = username;

    }

    public String getPassword() {

        return password;

    }

    public void setPassword(String password) {

        this.password = password;

    }

}
@Controller

 public class LoginController {

     @RequestMapping(value="logind")

     public ModelAndView login(HttpServletRequest request,HttpServletResponse response,LoginForm command ){

         String username = command.getUsername();

         ModelAndView mv = new ModelAndView("/index/index","command","LOGIN SUCCESS, " + username);

         return mv;

     }

 }
index.jsp login.jsp
<%@ page language="java" contentType="text/html; charset=utf-8"

     pageEncoding="utf-8"%>

 <!DOCTYPE html PUBLIC "-//W3C//DTD HTML 4.01 Transitional//EN" "http://www.w3.org/TR/html4/loose.dtd">

 <html>

 <head>

 <meta http-equiv="Content-Type" content="text/html; charset=utf-8">

 <title>Insert title here</title>

 </head>

 <body>

     ${command}

 </body>

 </html>
<%@ page language="java" contentType="text/html; charset=utf-8"

    pageEncoding="utf-8"%>

<!DOCTYPE html PUBLIC "-//W3C//DTD HTML 4.01 Transitional//EN" "http://www.w3.org/TR/html4/loose.dtd">

<html>

<head>

<meta http-equiv="Content-Type" content="text/html; charset=utf-8">

<title>Insert title here</title>

</head>

<body>

    <div>

        <form action="logind" methed="get">

            <input type="text" name="username">

            <input type="submit" value="SUBMIT">

        </form>

    </div>

</body>

</html>
根目录index.jsp
<%

     request.getRequestDispatcher("/WEB-INF/jsp/login/login.jsp").forward(request,response); %>

<html>

<body>

<h2>Hello World!</h2>

</body>

</html>
8、目录结构

9、运行项目

ok..........................(转载请注明出处,谢谢^_- )
eclipse maven新建springMVC项目(原创)的更多相关文章
- 使用Eclipse maven构建springmvc项目
Eclipse maven构建springmvc项目 Listener 监听器 架构 使用Log4J监控系统日志邮件警报 2014-12-16 13:09:16 控制器在完成逻辑处理后,通常会产生一些 ...
- Eclipse maven构建springmvc项目
原文地址: http://www.cnblogs.com/fangjins/archive/2012/05/06/2485459.html 一.背景介绍 对于初学者,用maven构建项目并不是一件容易 ...
- eclipse Maven新建一个项目并使用
安装参考这篇博文eclipse配置maven + 创建maven项目(三) 打开pom.xml 试着添加MySQL的JDBC驱动 添加如下配置, <dependency> <g ...
- Eclipse运行Maven的SpringMVC项目Run on Server时出现错误:Error configuring application listener of class org.springframework.web.context.ContextLoaderListener的问题解决
错误: 严重: Error configuring application listener of class org.springframework.web.context.ContextLoade ...
- Eclipse下Maven新建Web项目index.jsp报错完美解决(war包)
Eclipse下Maven新建Web项目步骤 1. 2. 3. 4. 5. 问题描述 最近用eclipse新建了一个maven项目,结果刚新建完成index.jsp页面就报错了,先把错误信息贴出来看看 ...
- 用Eclipse 搭建一个Maven Spring SpringMVC 项目
1: 先创建一个maven web 项目: 可以参照之前的文章: 用Maven 创建一个 简单的 JavaWeb 项目 创建好之后的目录是这样的; 2: 先配置maven 修改pom.xml & ...
- Intellij IDEA创建git,maven的SpringMVC项目
Intellij IDEA创建git,maven的SpringMVC项目 原文链接:http://www.cnblogs.com/blog5277/p/8906120.html 原文作者:博客园--曲 ...
- Eclipse+Maven创建webapp项目<一>(转)
还在为jar下载而烦恼吗?还在为jar依赖关系而烦恼吗?还在为jar冲突而烦恼吗?强大的maven项目管理工具来拯救你们呢?自动下载jar,自动下载jar依赖包.你什么都不用做,只需要在中央仓库中co ...
- 使用maven搭建SpringMVC项目环境
Window环境下用maven新建一个项目: mvn archetype:generate -DarchetypeCatalog=internal -DgroupId=cn-cisol -Dartif ...
随机推荐
- java 1.7
http://superuser.com/questions/740064/how-to-install-java-1-7-runtime-on-macos-10-9-mavericks sudo r ...
- MongoDB的索引(三)
MongoDB的索引: 1. _id索引 该索引是大多数集合默认创建的索引,也就是说用户每插入一个数据,MongoDB会自动生成一条唯一的_id字段. 2. 单键索引 单键索引是最普通的索引,它不会自 ...
- iOS开发——UI基础-提示框
提示框的种类有很多,废话不多说,直接上代码 一.文本提示框 运行结果如下: 代码实现如下: @interface ViewController () // 添加方法 - (IBAction)add; ...
- jbuilder的set!方法重构接口
https://github.com/rails/jbuilder 的set!方法重构接口, 因为grape没法使用 jBuilder 的缓存,所以直接用 Rails 写 API (1)多个图片 i ...
- git 教程(10)--添加远程库
现在的情景是,你已经在本地创建了一个Git仓库后,又想在GitHub创建一个Git仓库,并且让这两个仓库进行远程同步,这样,GitHub上的仓库既可以作为备份,又可以让其他人通过该仓库来协作,真是一举 ...
- Qt5 程序启动画面动图效果
2333终于实现动图,先弄了一个窗口去掉标题栏假装就是启动画面了,还是那只萌萌的猫这次会动了! 基类用的是QWidget 类名称MainView #ifndef MAINVIEW_H #define ...
- NOI2009 诗人小G
Sol 决策单调性+二分 传说中的四边形不等式...其实做了这道题还是不会... 证明简直吃屎//// 贴个传送门这里有部分分做法还有决策单调性的证明 byvoid ISA tell me that ...
- nginx泛域名解析实现二级域名多域名
利用nginx泛域名解析配置二级域名和多域名 网站的目录结构为html├── bbs└── www html为nginx的安装目录下默认的存放源代码的路径. bbs为论坛程序源代码路径www为主页程序 ...
- git cherry-pick简介
本文编辑整理自: http://sg552.iteye.com/blog/1300713 http://web.mit.edu/bitbucket/git-doc/git-cherry-pick.tx ...
- Minimum Adjustment Cost
Given an integer array, adjust each integers so that the difference of every adjacent integers are n ...
