
Pyqt QTabWidget 简单的计算器集合
今天我们简单介绍下QTabWidget,然后在加入Demo计算器
首先我先讲下文件的结构:
文件分四部分, 一部分是Ui设计文件, 一部分是由Ui生成的py文件, 一部分是 计算器的逻辑文件, 最后一部分是通过QTabWidget 将逻辑部分整合在一起的文件
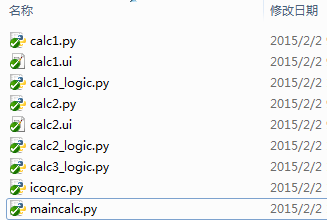
第一部分Ui:
我们总共有三个demo计算器,有两个需要Ui,另外一个直接把设计和逻辑写在了一个页面上
calc1.ui:
 <?xml version="1.0" encoding="UTF-8"?>

 <ui version="4.0">

  <class>calcF</class>

  <widget class="QWidget" name="calcF">

   <property name="geometry">

    <rect>

     <x>0</x>

     <y>0</y>

     <width>514</width>

     <height>300</height>

    </rect>

   </property>

   <property name="windowTitle">

    <string>Form</string>

   </property>

   <widget class="QPushButton" name="pushButtonResult">

    <property name="geometry">

     <rect>

      <x>100</x>

      <y>130</y>

      <width>271</width>

      <height>23</height>

     </rect>

    </property>

    <property name="text">

     <string>计算</string>

    </property>

   </widget>

   <widget class="QWidget" name="horizontalLayoutWidget">

    <property name="geometry">

     <rect>

      <x>20</x>

      <y>40</y>

      <width>461</width>

      <height>71</height>

     </rect>

    </property>

    <layout class="QHBoxLayout" name="horizontalLayout">

     <item>

      <widget class="QLabel" name="label">

       <property name="text">

        <string>参数一:</string>

       </property>

      </widget>

     </item>

     <item>

      <widget class="QLineEdit" name="lineEditParam1"/>

     </item>

     <item>

      <widget class="QComboBox" name="comboBox">

       <property name="cursor">

        <cursorShape>PointingHandCursor</cursorShape>

       </property>

      </widget>

     </item>

     <item>

      <widget class="QLabel" name="label_2">

       <property name="text">

        <string>参数二:</string>

       </property>

      </widget>

     </item>

     <item>

      <widget class="QLineEdit" name="lineEditParam2"/>

     </item>

    </layout>

   </widget>

   <widget class="QWidget" name="horizontalLayoutWidget_2">

    <property name="geometry">

     <rect>

      <x>20</x>

      <y>180</y>

      <width>461</width>

      <height>81</height>

     </rect>

    </property>

    <layout class="QHBoxLayout" name="horizontalLayout_2">

     <item>

      <widget class="QLabel" name="label_3">

       <property name="text">

        <string>显示结果:</string>

       </property>

      </widget>

     </item>

     <item>

      <widget class="QLineEdit" name="lineEdit_Result"/>

     </item>

    </layout>

   </widget>

  </widget>

  <resources/>

  <connections/>

 </ui>
calc2.ui
 <?xml version="1.0" encoding="UTF-8"?>

 <ui version="4.0">

  <class>calcSecond</class>

  <widget class="QWidget" name="calcSecond">

   <property name="geometry">

    <rect>

     <x>0</x>

     <y>0</y>

     <width>521</width>

     <height>264</height>

    </rect>

   </property>

   <property name="windowTitle">

    <string>Form</string>

   </property>

   <widget class="QWidget" name="verticalLayoutWidget">

    <property name="geometry">

     <rect>

      <x>20</x>

      <y>10</y>

      <width>471</width>

      <height>221</height>

     </rect>

    </property>

    <layout class="QVBoxLayout" name="verticalLayout">

     <item>

      <layout class="QHBoxLayout" name="horizontalLayout_3">

       <item>

        <widget class="QLabel" name="label_2s">

         <property name="text">

          <string>计算:</string>

         </property>

        </widget>

       </item>

       <item>

        <widget class="QLineEdit" name="lineEdit_2input"/>

       </item>

       <item>

        <widget class="QPushButton" name="pushButtoEnter">

         <property name="text">

          <string>回车确定★</string>

         </property>

        </widget>

       </item>

      </layout>

     </item>

     <item>

      <layout class="QHBoxLayout" name="horizontalLayout_2">

       <item>

        <widget class="QLabel" name="labelR">

         <property name="text">

          <string>结果:</string>

         </property>

        </widget>

       </item>

       <item>

        <widget class="QLineEdit" name="lineEdit_2Result"/>

       </item>

      </layout>

     </item>

    </layout>

   </widget>

  </widget>

  <resources/>

  <connections/>

 </ui>
第二部分转换为py:
这部分就是将Ui文件转换为py文件,这个就不多讲了,IDE集成,一键生成: C:\Python27\python.exe C:\Python27\Lib\site-packages\PyQT4\uic\pyuic.py -x calc1.ui -o calc1.py
第三部分逻辑的实现:
首先我们新建逻辑页面,对应不同的设计页面, 对应如下:
calc1.ui ===> calc1.py ====> calc1_logic.py
calc2.ui ===> calc2.py ====> calc2_logic.py
calc3_logic.py
上面我们已经讲过,第三个计算器的设计和逻辑在一个页面(来自网上)。
然后我们分别编写逻辑页面:
calc1_logic.py:
Pyqt 的正则验证:
pyqt提供 Validator 对输出的文本进行正则验证
 intValidator = QIntValidator(0, 99, self)   # Validator 验证器 可正则验证   限制输入的内容必须为 0-99之间的值

 validator = QRegExpValidator(QRegExp("\d{11}"), self)   #  正则, 必须输入为整数的值

 self.Uitab.lineEditParam1.setValidator(validator)
表达式:
|
正则字符 |
释义 |
举例 |
|
+ |
前面元素至少出现一次 |
ab+:ab、abbbb 等 |
|
* |
前面元素出现0次或多次 |
ab*:a、ab、abb 等 |
|
? |
匹配前面的一次或0次 |
Ab?: A、Ab 等 |
|
^ |
作为开始标记 |
^a:abc、aaaaaa等 |
|
$ |
作为结束标记 |
c$:abc、cccc 等 |
|
\d |
数字 |
3、4、9 等 |
|
\D |
非数字 |
A、a、- 等 |
|
[a-z] |
A到z之间的任意字母 |
a、p、m 等 |
|
[0-9] |
0到9之间的任意数字 |
0、2、9 等 |
 # -*- coding: utf-8 -*-

 from PyQt4.QtGui import *

 from PyQt4.QtCore import *

 from calc1 import Ui_calcF

 import sys

 class calc1_logic(QWidget):

     def __init__(self, parent=None):

         super(calc1_logic, self).__init__(parent)

         self.Uitab = Ui_calcF()

         self.Uitab.setupUi(self)

         self.Uitab.comboBox.addItem(u'请选择运算符', QVariant(''))

         self.Uitab.comboBox.addItem(u'+', QVariant('+'))

         self.Uitab.comboBox.addItem(u'-', QVariant('-'))

         self.Uitab.comboBox.addItem(u'*', QVariant('*'))

         self.Uitab.comboBox.addItem(u'/', QVariant('/'))

         self.Uitab.comboBox.addItem(u'dcb3688', QVariant('TEST'))

         self.Uitab.lineEdit_Result.setReadOnly(True)

         self.Uitab.lineEditParam1.setText('');

         intValidator = QIntValidator(0, 99, self);   # Validator 验证器 可正则验证   限制输入的内容必须为 0-99之间的值

         validator = QRegExpValidator(QRegExp("\d{11}"), self);   #  正则, 必须输入为整数的值,长度为11位

         self.Uitab.lineEditParam1.setValidator(validator)

         self.Uitab.lineEditParam1.setFont(QFont("SimSun", 18, QFont.Bold))

         self.Uitab.lineEditParam2.setFont(QFont("SimSun", 18, QFont.Bold))

         self.Uitab.lineEdit_Result.setFont(QFont("SimSun", 18, QFont.Bold))

         self.connect(self.Uitab.pushButtonResult, SIGNAL('clicked()'), self.count)

     def count(self):

         reload(sys)

         sys.setdefaultencoding("utf-8")

         text1 = self.Uitab.lineEditParam1

         text2 = self.Uitab.lineEditParam2

         # 判断参数

         if text1.text() == '' or text2.text() == '':

             QMessageBox.question(self, (u'提示'),(u'请先填写参数\n 参数不完整!'),QMessageBox.Yes )

             return False

         # 判断运算符

         operator = self.Uitab.comboBox.currentIndex()

         if operator == 0:

             QMessageBox.question(self, (u'提示'),(u'请选择运算符'),QMessageBox.Yes )

             return False

         QVariantData = self.Uitab.comboBox.itemData(operator)

         # 测试的combox 不支持运算符

         if QVariantData == 'TEST':

             QMessageBox.question(self, (u'提示'),(u'哈哈!这个值不支持运算'),QMessageBox.Yes)

             return False

         try:

             typeunicode = unicode(str(str(text1.text()))+QVariantData.toPyObject()+str((text2.text())))

             result = str(eval(typeunicode))  # eval 接收unicode 不接收str类型

         except:

             result = u'输入的值未验证通过!'

         self.Uitab.lineEdit_Result.setText(result)

 if __name__ == '__main__':

     app=QApplication(sys.argv)

     appcalc=calc1_logic()

     appcalc.show()

     app.exec_()
calc2_logic.py:
 # -*- coding: utf-8 -*-

 from PyQt4.QtGui import *

 from PyQt4.QtCore import *

 from calc2 import Ui_calcSecond

 import sys

 class calc2_logic(QWidget):

     def __init__(self, parent=None):

         super(calc2_logic,self).__init__(parent)

         self.Uitab= Ui_calcSecond()

         self.Uitab.setupUi(self)

         self.Uitab.lineEdit_2input.setFont(QFont("SimSun", 18, QFont.Bold))

         self.Uitab.lineEdit_2Result.setFont(QFont("SimSun", 18, QFont.Bold))

         self.connect(self.Uitab.lineEdit_2input,SIGNAL('returnPressed()'),self.count)

         self.connect(self.Uitab.pushButtoEnter,SIGNAL('clicked()'),self.count)

     def count(self):

         try:

             text = unicode(self.Uitab.lineEdit_2input.text())

             print(type(self.Uitab.lineEdit_2input.text()))

             self.Uitab.lineEdit_2Result.setText("%s = %s" % (text, eval(text)))

             self.Uitab.lineEdit_2input.selectAll()

         except:

             self.Uitab.lineEdit_2Result.setText("%s is invalid!" % text)

 if __name__ == '__main__':

     app=QApplication(sys.argv)

     appcalc=calc2_logic()

     appcalc.show()

     app.exec_()
calc3_logic.py:
 #!/usr/bin/python

 # coding=utf8

 import sys

 from PyQt4 import QtGui,QtCore

 class GridLayout(QtGui.QWidget):

     def __init__(self):

         QtGui.QWidget.__init__(self)

         names=['Cls','Bck','','Close','','','','/','','','','*','','','','-','','.','=','+']

         grid=QtGui.QGridLayout()

         j=0

         pos=[(0,0),(0,1),(0,2),(0,3),

              (1,0),(1,1),(1,2),(1,3),

              (2,0),(2,1),(2,2),(2,3),

              (3,0),(3,1),(3,2),(3,3),

              (4,0),(4,1),(4,2),(4,3)]

         button={}

         for i in names:

             button[i]=QtGui.QPushButton(i)

             if j==2:

                 grid.addWidget(QtGui.QLabel(' '),0,2)

             else:

                 grid.addWidget(button[i],pos[j][0],pos[j][1])

             j=j+1

         vbox=QtGui.QVBoxLayout()

         self.lcd=QtGui.QLineEdit()

         self.lcd.setFont(QtGui.QFont("SimSun", 18, QtGui.QFont.Bold))

         vbox.addWidget(self.lcd)

         vbox.addLayout(grid)

         self.setLayout(vbox)

         self.setFocus()

         for i in names:

             button[i].clicked.connect(self.shownum)

             self.connect(button["Close"], QtCore.SIGNAL("clicked()"),QtGui.qApp,QtCore.SLOT('quit()'))

     def shownum(self):

             senderc=self.sender()

             if senderc.text()=='Cls':

                 self.lcd.setText('')

             elif senderc.text()=='Bck':

                 self.lcd.setText(self.lcd.text()[:-1])

             elif senderc.text()=='=':

                 c=self.lcd.text()

                 d=["+","-","*","/"]

                 for i in d:

                     h=str(c).find(i)

                     if h>0: break

                 a=str(c).split(i)

                 if i=="+":

                     b=int(a[0])+int(a[1])

                 if i=="-":

                     b=int(a[0])-int(a[1])

                 if i=="*":

                     b=int(a[0])*int(a[1])

                 if i=="/":

                     b=int(a[0])/int(a[1])

                 self.lcd.setText(c+senderc.text()+str(b))

             else:

                 self.lcd.setText(self.lcd.text()+senderc.text())

 if __name__ == '__main__':

     app=QtGui.QApplication(sys.argv)

     appcalc3=GridLayout()

     appcalc3.show()

     app.exec_()
我们分别运行:

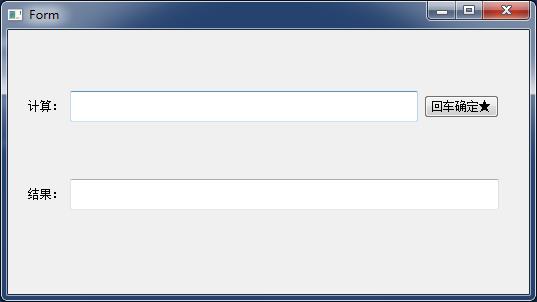
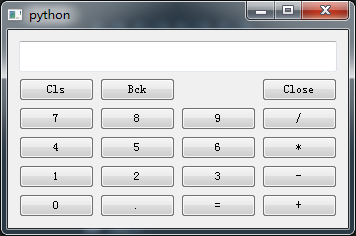
第四部分 QTabWidget效果的集成:
官网介绍QtabWidget:
|
The QTabWidget class provides a stack of tabbed widgets. A tab widget provides a tab bar (see QTabBar) and a "page area" that is used to display pages related to each tab. By default, the tab bar is shown above the page area, but different configurations are available (see TabPosition). Each tab is associated with a different widget (called a page). Only the current page is shown in the page area; all the other pages are hidden. The user can show a different page by clicking on its tab or by pressing its Alt+letter shortcut if it has one. The normal way to use QTabWidget is to do the following: Create a QTabWidget. The signal currentChanged() is emitted when the user selects a page. The current page index is available as currentIndex(), the current page widget with currentWidget(). You can retrieve a pointer to a page widget with a given index using widget(), and can find the index position of a widget with indexOf(). Use setCurrentWidget() or setCurrentIndex() to show a particular page. You can change a tab's text and icon using setTabText() or setTabIcon(). A tab and its associated page can be removed with removeTab(). Each tab is either enabled or disabled at any given time (see setTabEnabled()). If a tab is enabled, the tab text is drawn normally and the user can select that tab. If it is disabled, the tab is drawn in a different way and the user cannot select that tab. Note that even if a tab is disabled, the page can still be visible, for example if all of the tabs happen to be disabled. Tab widgets can be a very good way to split up a complex dialog. An alternative is to use a QStackedWidget for which you provide some means of navigating between pages, for example, a QToolBar or a QListWidget. Most of the functionality in QTabWidget is provided by a QTabBar (at the top, providing the tabs) and a QStackedWidget (most of the area, organizing the individual pages). |
很简单:
首先实例声明QtabWidget
 self.tabWidget = QTabWidget(self)

 self.tabWidget.setGeometry(QRect(50, 20, 511, 270))  # tab 的位置
添加 Tab
 self.calc1 = calc1_logic(self)  # 实例化 calc1_logic

 self.tabWidget.addTab(self.calc1, u"计算器一类")  # 在QTabWidget对象中插入QWidget对象sel.calc1页面。
最后连接事件
self.connect(self.tabWidget, SIGNAL('currentChanged(int)'), self.changes)
更多关于QtabWidget 的信息请查看官网
言归正传,第四部分页面我们命名为: maincalc.py
我们在main页面写两个Class类,一个是Qbasic类,继承QWidget, 一个maincalc类,继承自Qbasic类
其实Qbasic我当时是想写以些基础功能,比如 初始化的title 、Icon、 最大化、最小化事件、Esc按键事件等,但一直时间搞
Qbasic类:
 # Qbsic 基类

 class Qbasic(QWidget):

     def __init__(self):

         super(Qbasic, self).__init__()

         self.setWindowTitle('calc')

         self.setWindowFlags(QtCore.Qt.WindowMinimizeButtonHint)

         self.setWindowIcon(QIcon(':chrome.ico'))

     def keyPressEvent(self, event):

          if event.key() == QtCore.Qt.Key_Escape:

              self.close()
在maincalc类中,我们加入了动画效果animation,关于这个动画效果可以参考http://www.cnblogs.com/dcb3688/p/4264183.html
我们要把之前做好的计算器逻辑部分引入到这个页面
from calc1_logic import calc1_logic
from calc2_logic import calc2_logic
from calc3_logic import GridLayout
maincalc.py 完整代码:
 # -*- coding: utf-8 -*-

 from PyQt4.QtGui import *

 from PyQt4.QtCore import *

 from calc1_logic import calc1_logic

 from calc2_logic import calc2_logic

 from calc3_logic import GridLayout

 import icoqrc

 import sys

 from PyQt4 import QtCore, QtGui

 # Qbsic 基类

 class Qbasic(QWidget):

     def __init__(self):

         super(Qbasic, self).__init__()

         self.setWindowTitle('calc')

         self.setWindowFlags(QtCore.Qt.WindowMinimizeButtonHint)

         self.setWindowIcon(QIcon(':chrome.ico'))

     def keyPressEvent(self, event):

          if event.key() == QtCore.Qt.Key_Escape:

              self.close()

 class maincalc(Qbasic):

     def __init__(self):

         super(maincalc, self).__init__()

         self.setGeometry(QRect(300, 200, 600, 310))  # 在X=500, Y=400 , Length=150 ,   Height=50

         self.tabWidget = QTabWidget(self)

         self.tabWidget.setGeometry(QRect(50, 20, 511, 270))  # tab 的位置

         self.calc1 = calc1_logic(self)  # 实例化 calc1_logic

         self.tabWidget.addTab(self.calc1, u"计算器一类")  # 在QTabWidget对象中插入QWidget对象sel.calc1页面。

         self.tab2 = calc2_logic(self)

         self.tabWidget.addTab(self.tab2,  u"计算器二类"  )

         self.tab3 = GridLayout()

         self.tabWidget.addTab(self.tab3, u'计算器三类')

         self.tabWidget.setCurrentIndex(0)  # 设置当前在第 1 个tab选项中

         self.connect(self.tabWidget, SIGNAL('currentChanged(int)'), self.changes)

     def changes(self):

         indexs = self.tabWidget.currentIndex()

         if indexs == 0:  # tab1 计算器一

             MianCurrentHeight = self.height()  # 获取窗体高度

             TabCurrentHeight = self.tabWidget.height()

             self.Fanimation(1, MianCurrentHeight, 310)  # appcalc

             self.Fanimation(2, TabCurrentHeight, 270)  # tabWidget

         elif indexs == 1:  # tab2 计算器二

             MianCurrentHeight = self.height()  # 获取窗体高度

             TabCurrentHeight = self.tabWidget.height()

             self.Fanimation(1, MianCurrentHeight, 280)  # appcalc    高度由MianCurrentHeight渐变到300

             self.Fanimation(2, TabCurrentHeight, 240)  # tabWidget

         elif indexs == 2:  # tab3 计算器三

             MianCurrentHeight = self.height()  # 获取窗体高度

             TabCurrentHeight = self.tabWidget.height()

             self.Fanimation(1, MianCurrentHeight, 315)  # appcalc    高度由MianCurrentHeight渐变到300

             self.Fanimation(2, TabCurrentHeight, 280)  # tabWidget

     # type: 类型,1=appcalc,   2=tabWidget

     def Fanimation(self,type,StartHeight, EndHeight):

         if type == 1:

             width = 600

             self.animation = QPropertyAnimation(appcalc, 'geometry')

             self.animation.setDuration(1000)

             self.animation.setStartValue(QRect(300, 200, width, StartHeight))

             self.animation.setEndValue(QRect(300, 200, width, EndHeight))

             self.animation.start()

         elif type == 2:

             width = 500

             self.animation2 = QPropertyAnimation(self.tabWidget, 'geometry')

             self.animation2.setDuration(1000)

             self.animation2.setStartValue(QRect(50, 20, width, StartHeight))

             self.animation2.setEndValue(QRect(50, 20, width, EndHeight))

             self.animation2.start()

 app=QApplication(sys.argv)

 appcalc=maincalc()

 appcalc.show()

 app.exec_()
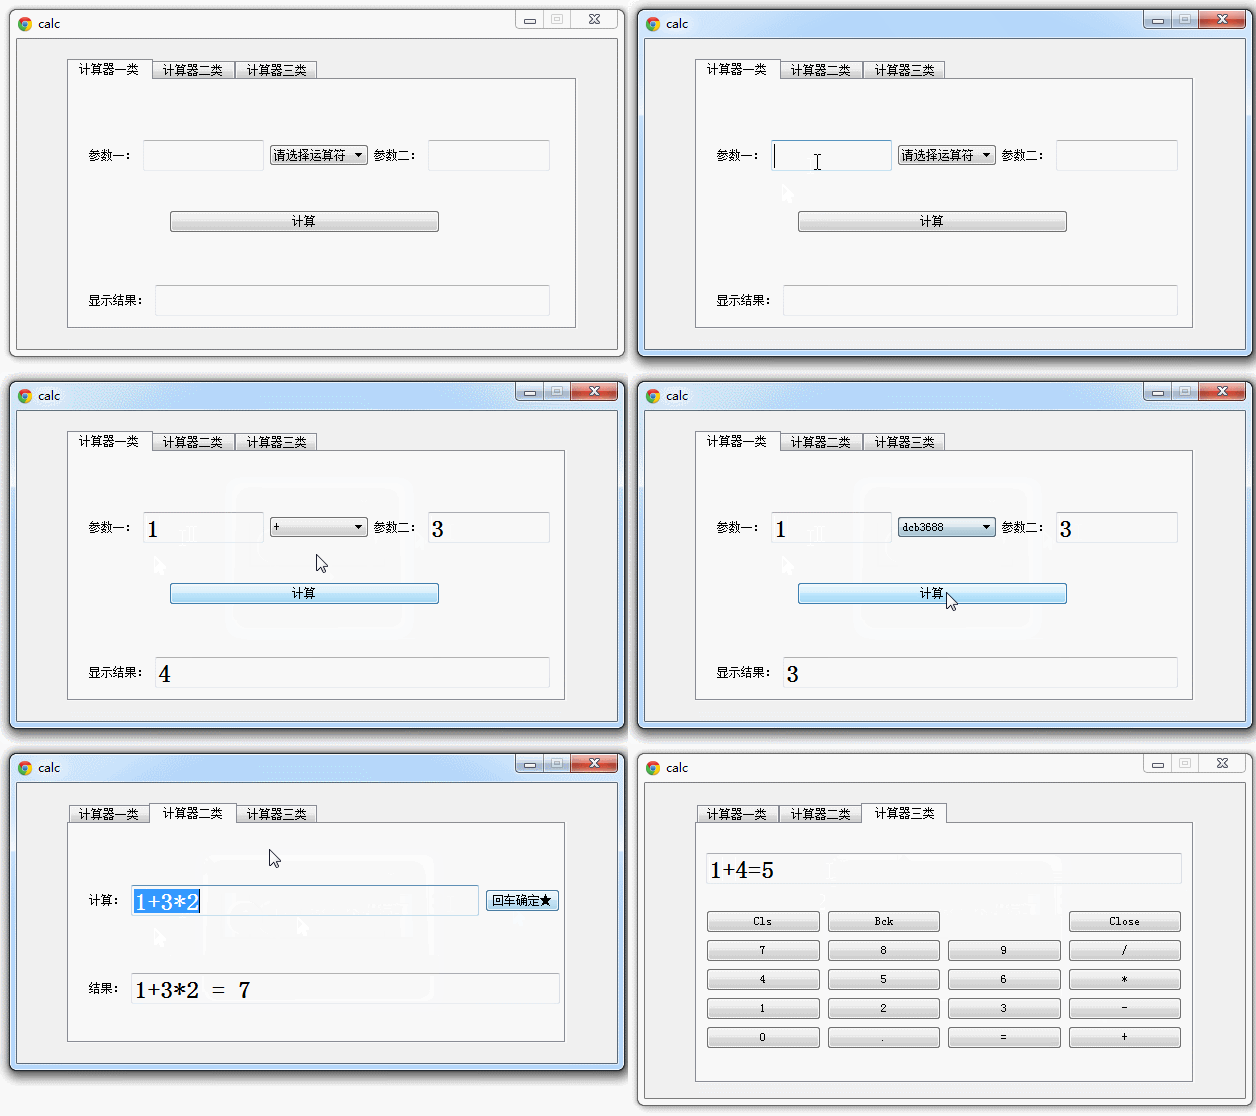
好,现在运行maincalc.py 查看效果:
Pyqt QTabWidget 简单的计算器集合的更多相关文章
- js制作简单的计算器
学着做了一个简单的计算器!记录记录!哈哈 <!DOCTYPE html> <html> <head> <title>简单的计算器</title&g ...
- 留念 C语言第一课简单的计算器制作
留念 C语言第一课简单的计算器制作 学C语言这么久了. /* 留念 C语言第一课简单的计算器制作 */ #include<stdio.h> #include<stdlib.h ...
- jsp学习---使用jsp和JavaBean实现超简单网页计算器
一.需求 如题,用jsp实现一个超简单的网页计算器. 二.实现 1.效果图 1)初始界面: 2)随便输入两个数进行相乘: 3)当除数为零时提示报错: 2.代码 Calculator.java pack ...
- JS实现一个简单的计算器
使用JS完成一个简单的计算器功能.实现2个输入框中输入整数后,点击第三个输入框能给出2个整数的加减乘除.效果如上: 第一步: 创建构建运算函数count(). 第二步: 获取两个输入框中的值和获取选择 ...
- javascript 简单的计算器
<%@ Page Language="C#" AutoEventWireup="true" CodeBehind="WebForm1.aspx. ...
- 教学项目之-通过Python实现简单的计算器
教学项目之-通过Python实现简单的计算器 计算器开发需求 实现加减乘除及拓号优先级解析 用户输入 1 - 2 * ( (60-30 +(-40/5) * (9-2*5/3 + 7 /3*99/ ...
- HDU1237 简单的计算器 【堆】+【逆波兰式】
简单的计算器 Time Limit: 2000/1000 MS (Java/Others) Memory Limit: 65536/32768 K (Java/Others) Total Sub ...
- 使用qt制作一个简单的计算器
前言:今天使用qt制作了一个很简单的计算器,觉得挺有意思的,所以在这里跟大家分享一下. 这里先跟大家说说使用到的函数: 一.槽连接函数 connect(信号发送者,发送的信号,信号接收者,信号接收者的 ...
- 从0到1:使用Caliburn.Micro(WPF和MVVM)开发简单的计算器
从0到1:使用Caliburn.Micro(WPF和MVVM)开发简单的计算器 之前时间一直在使用Caliburn.Micro这种应用了MVVM模式的WPF框架做开发,是时候总结一下了. Calibu ...
随机推荐
- MS DOS 命令大全
刚好看到留下来以备用: 一)MD——建立子目录命令 1.功能:创建新的子目录 2.类型:内部命令 3.格式:MD[盘符:][路径名]〈子目录名〉 4.使用说明: (1)“盘符”:指定要建立子目录的磁盘 ...
- django操作数据库之查询F,Q操作 和 seach搜索功能
# F 使用查询条件的值 # # from django.db.models import F # models.Tb1.objects.update(num=F('num')+1) # Q 构建搜索 ...
- phpmyadmin上传大sql文件办法
进入php5文件夹下: cd /etc/php5/apache2 #根据你当时的配置选择,比如之前配置是apache2就进入apache2,如果是cli就进入cli文件夹下 打开php.ini文件 s ...
- 【leetcode】Fraction to Recurring Decimal
Fraction to Recurring Decimal Given two integers representing the numerator and denominator of a fra ...
- 如何限制一个类只在堆上分配和栈上分配(StackOnly HeapOnly)
[本文链接] http://www.cnblogs.com/hellogiser/p/stackonly-heaponly.html [题目] 如何限制一个类只在堆上分配和栈上分配? [代码] C+ ...
- 和我一起学python,初识python (life is short ,we need python)
作者:tobecrazy 出处:http://www.cnblogs.com/tobecrazy 欢迎转载,转载请注明出处.thank you! 由于项目需要(并非因为life is short), ...
- SQL中关于字符串的处理
DECLARE @STR VARCHAR(MAX),@PRAM VARCHAR(20)SET @STR='中华人民共和国万岁'--字符串连接SET @STR=@STR+'an'+@STR --字符串拆 ...
- java基础学习05(面向对象基础01)
面向对象基础01 1.理解面向对象的概念 2.掌握类与对象的概念3.掌握类的封装性4.掌握类构造方法的使用 实现的目标 1.类与对象的关系.定义.使用 2.对象的创建格式,可以创建多个对象3.对象的内 ...
- ORACLE、MYSQL的JDBC配置
info.jdbc.driverClassName=oracle.jdbc.driver.OracleDriver info.jdbc.url=jdbc:oracle:thin:@192.168.18 ...
- CSS3 -web-box-shadow实现阴影效果
-webkit-box-shadow:2px -2px 10px #06c; 给元素添加阴影效果 text-shadow 是给文本添加阴影效果属性同上 形成的阴影跟阴影本体大小一致,四个属性分别代表 ...