
Android Studio 单刷《第一行代码》系列 05 —— Fragment 基础
前情提要(Previously)
本系列将使用 Android Studio 将《第一行代码》(书中讲解案例使用Eclipse)刷一遍,旨在为想入坑 Android 开发,并选择 Android Studio 作为开发 IDE 的同学开路。
PS:其实我就是现学现卖,希望我能坚持刷完。
在前面已经学习了 Android 四大组件中的 Activity,这次来学习一下Activity 中的 Fragment。
系列目录在此:
摘要(Abstract)
Fragment 的简介、简单使用、动态加载。
Fragment 是什么
先来看看 API Guides 里是怎么说的。
*
A Fragment represents a behavior or a portion of user interface in an Activity. You can combine multiple fragments in a single activity to build a multi-pane UI and reuse a fragment in multiple activities. You can think of a fragment as a modular section of an activity, which has its own lifecycle, receives its own input events, and which you can add or remove while the activity is running (sort of like a "sub activity" that you can reuse in different activities).
A fragment must always be embedded in an activity and the fragment's lifecycle is directly affected by the host activity's lifecycle.
*
- Fragment 必须嵌入在 Activity 中使用。
- Fragment 的生命周期 是受 Activity 影响的。
- 可以在一个 Activity 中使用多个 Fragment。
- Fragment 可以在多个 Activity 中重用。
说了这么多,也没说 Fragment 到底是什么,只好继续往下看。
Design Philosophy(设计理念)
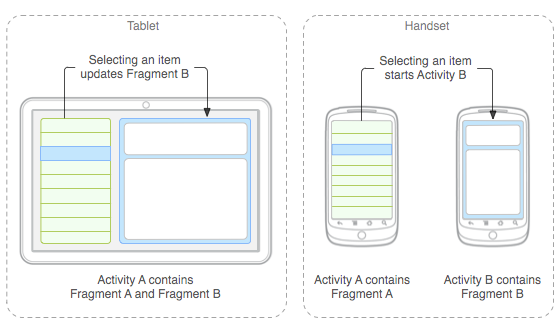
Android introduced fragments in Android 3.0 (API level 11), primarily to support more dynamic and flexible UI designs on large screens, such as tablets. Because a tablet's screen is much larger than that of a handset, there's more room to combine and interchange UI components. Fragments allow such designs without the need for you to manage complex changes to the view hierarchy. By dividing the layout of an activity into fragments, you become able to modify the activity's appearance at runtime and preserve those changes in a back stack that's managed by the activity.
- Android3.0 里出现的。
- 为了更加合理和充分地利用大屏幕的空间。
其实就是为了更好的同时支持手机和平板(我是这么认为的)。看下面这个来自 Android API Guides 中的图就明白了。
Fragment 简单使用
练习开始,新建一个 FragmentTest 的项目,在一个 Activity 中添加两个 Fragment,并列显示。
- 新建一个左侧布局 left_fragment.xml,放一个 Button 在里面,代码如下:
  <Button

      android:id="@+id/button"

      android:layout_width="wrap_content"

      android:layout_height="wrap_content"

      android:layout_gravity="center_horizontal"

      android:text="Button" />
同样的新建一个右侧布局 right_fragment.xml,放一个 TextView 在里面,代码省略。
新建 LeftFragment 类,继承自 Fragment,重写 onCreateView() 方法,在这个方法中通过 LayoutInflater 将布局动态加载进来,代码如下:
public class LeftFragment extends Fragment {
@Override
public View onCreateView(LayoutInflater inflater, ViewGroup container, Bundle savedInstanceState){
View view = inflater.inflate(R.layout.left_fragment,container,false);
return view;
}
}
同样新建 RightFragment 类,代码省略。
修改 activity_main.xml,删掉默认的 TextView 添加 Fragment,代码如下:
<fragment

    android:id="@+id/left_fragment"

    android:name="com.addict.fragmenttest.LeftFragment"

    android:layout_width="0dp"

    android:layout_height="match_parent"

    android:layout_weight="1"></fragment>

<fragment

    android:id="@+id/right_fragment"

    android:name="com.addict.fragmenttest.RightFragment"

    android:layout_width="0dp"

    android:layout_height="match_parent"

    android:layout_weight="1"></fragment>
这样最简单的 Fragment 示例就写好了,运行一下程序看看吧。
动态添加 Fragment
- 新建一个 another_right_fragment.xml,放一个 TextView 在里面,设定布局的颜色、TextView 的内容,代码如下:
  <TextView

      android:layout_width="wrap_content"

      android:layout_height="wrap_content"

      android:layout_gravity="center_horizontal"

      android:text="this is another right fragment."

      android:textSize="20sp" />
同样新建一个 AnotherRightFragment 类,代码省略。
修改 activity_main.xml 的代码,将右侧的 Fragment 放在 FrameLayout 中,代码如下:
<fragment

    android:id="@+id/left_fragment"

    android:name="com.addict.fragmenttest.LeftFragment"

    android:layout_width="0dp"

    android:layout_height="match_parent"

    android:layout_weight="1"></fragment>

<FrameLayout

    android:id="@+id/right_layout"

    android:layout_width="0dp"

    android:layout_height="match_parent"

    android:layout_weight="1">

    <fragment

        android:id="@+id/right_fragment"

        android:name="com.addict.fragmenttest.RightFragment"

        android:layout_width="match_parent"

        android:layout_height="match_parent"></fragment>

</FrameLayout>
- 修改 MainActivity 中的代码,在点击 Button 是动态添加 Fragment,代码如下:
@Override

protected void onCreate(Bundle savedInstanceState) {

    super.onCreate(savedInstanceState);

    setContentView(R.layout.activity_main);

    Button button = (Button) findViewById(R.id.button);

    button.setOnClickListener(new View.OnClickListener() {

        @Override

        public void onClick(View v) {

            AnotherRightFragment fragment = new AnotherRightFragment();

            FragmentManager fragmentManager = getFragmentManager();

            FragmentTransaction transaction = fragmentManager.beginTransaction();

            transaction.replace(R.id.right_layout, fragment);

            transaction.commit();

        }

    });

}
这样就完成了,运行一下看看吧。小结一下动态添加 Fragment:
- 创建待添加的 Fragment 的实例。
- 获取 FragmentManager,通过 getFragmentManager() 方法。
- 开启事务。
- 向容器内加入 Fragment,使用 replace() 方法,参数为需要传入的容器 id、待添加的 Fragment 实例。
- 提交事务。
利用返回栈管理 Fragment
运行之前的程序,点击 Button 动态添加 Fragment 后,按下 Back 键我们发现程序直接退出了。那么能不能做到按 Back 键回到上一个 Fragment 呢?
超简单,在这句代码 transaction.commit(); 前再加一句代码 transaction.addToBackStack(null); 就可以了,试试看吧。
2015-03-21 更正
按照上面写的加上这句代码 transaction.addToBackStack(null); 之后,我发现按下 Back 仍然没有返回上一个 Fragment,还是直接退出程序了。Google Baidu 查了好久也没弄明白原因。
写了个解决办法,在 MainActivity 中重写了 onPressed() 方法,代码如下:
@Override

// 按下 Back 按钮时触发

public void onBackPressed(){

    FragmentManager fragmentManager = getFragmentManager();

    // 判断 BackStack 中是否有 FragmentTransaction

    if(fragmentManager.getBackStackEntryCount() > 0){

        // FragmentTransaction 出栈,恢复前一个 Fragment

        fragmentManager.popBackStack();

        return;

    }

    super.onBackPressed();

}
其它(Miscellaneous)
尽管我试图在本文中尽量完整的进行描述,但受限于篇幅和我的个人水平,本文难免有所遗漏,欢迎在评论中指出。
如果您觉得阅读本文对您有帮助,请点一下“推荐”按钮,您的“推荐”将是我最大的写作动力!
关于作者(About Me)
addict
原文链接:http://www.cnblogs.com/DebugLife/p/4355669.html
本文谢绝转载,如需转载需征得作者本人同意,谢谢。
Android Studio 单刷《第一行代码》系列 05 —— Fragment 基础的更多相关文章
- Android Studio 单刷《第一行代码》系列目录
前言(Prologue) 本系列将使用 Android Studio 将<第一行代码>(书中讲解案例使用Eclipse)刷一遍,旨在为想入坑 Android 开发,并选择 Android ...
- Android Studio 单刷《第一行代码》系列 06 —— Fragment 生命周期
前情提要(Previously) 本系列将使用 Android Studio 将<第一行代码>(书中讲解案例使用Eclipse)刷一遍,旨在为想入坑 Android 开发,并选择 Andr ...
- Android Studio 单刷《第一行代码》系列 02 —— 日志工具 LogCat
前情提要(Previously) 本系列将使用 Android Studio 将<第一行代码>(书中讲解案例使用Eclipse)刷一遍,旨在为想入坑 Android 开发,并选择 Andr ...
- Android Studio 单刷《第一行代码》系列 01 —— 第一战 HelloWorld
前言(Prologue) 本系列将使用 Android Studio 将<第一行代码>(书中讲解案例使用Eclipse)刷一遍,旨在为想入坑 Android 开发,并选择 Android ...
- Android Studio 单刷《第一行代码》系列 07 —— Broadcast 广播
前情提要(Previously) 本系列将使用 Android Studio 将<第一行代码>(书中讲解案例使用Eclipse)刷一遍,旨在为想入坑 Android 开发,并选择 Andr ...
- Android Studio 单刷《第一行代码》系列 04 —— Activity 相关
前情提要(Previously) 本系列将使用 Android Studio 将<第一行代码>(书中讲解案例使用Eclipse)刷一遍,旨在为想入坑 Android 开发,并选择 Andr ...
- Android Studio 单刷《第一行代码》系列 03 —— Activity 基础
前情提要(Previously) 本系列将使用 Android Studio 将<第一行代码>(书中讲解案例使用Eclipse)刷一遍,旨在为想入坑 Android 开发,并选择 Andr ...
- 【java学习系列】 Android第一本书《第一行代码》
开始Java的学习,从Android,开始吧.<第一代码>开始阅读和调试demo例子. 下面是 <第一行代码>的思维导图:
- Android Studio:Unable to add window android.view.ViewRootImpl$W@5e2d85a -- permission denied for this window 第一行代码
学习<第一行代码>的时候,出现的错误. java.lang.RuntimeException: Unable to start receiver com.example.sevenun.l ...
随机推荐
- this指针在不同情况下的指代
说不同情况了吧,首先要分有几种情况使用this,然后再说分别指代什么 1)如果是一般标签下函数调用,this指代全局对象,也就是window对象或者document对象 2)如果在嵌套函数中被嵌套的 ...
- 在虚拟机中安装Linux
安装CentOS 6.4教程(详细步骤) CentOS是RHEL的克隆版本,功能上是一模一样的,另外重新编译之后还修复了一些后者的bug.主要区别就是CentOS免费,但没有官方的技术支持,而RHEL ...
- Linux 命令 - mv: 移动或重命名文件
命令格式 cp [OPTION]... [-T] SOURCE DEST cp [OPTION]... SOURCE... DIRECTORY cp [OPTION]... -t DIRECTORY ...
- C#算法基础之希尔排序
using System; using System.Collections.Generic; using System.Linq; using System.Text; using System.T ...
- Android第三方授权(QQ篇)
QQ授权比微信授权相对来说会方便一些 同样需要去官网下载sdk和导入sdk到自己的工程 http://wiki.connect.qq.com/%E7%A7%BB%E5%8A%A8%E5%BA%94%E ...
- 修改Windows硬盘分区名称
本文由 www.169it.com 收集整理 如果用户在将 XP 重装成Win7/Win8时,原本的硬盘分区名称可能会出现无法更改的情况,重新命名也都起不了作用.这种情况一般是因为使用 XP 系统下 ...
- ubuntu 更新软件源
ubuntu 更新软件源 修改文件sources.list 位于/etc/apt/sources.list,并备份原文件为sources.list.bak deb http://mirrors.163 ...
- 第二十九篇、UICollectionView瀑布流
1.实现思路 >第一种方案:UIScrollView 镶嵌三个UITableView (不推荐使用) >第二种方案:UIScrollView 镶嵌UIImageView (需要解决循环利用 ...
- 详解在Visual Studio中使用git版本系统
转自:http://www.uml.org.cn/pzgl/201206211.asp
- OC1_类方法的内存管理
// // Dog.h // OC1_类方法的内存管理 // // Created by zhangxueming on 15/6/19. // Copyright (c) 2015年 zhangxu ...