android自定义日期组件之双DatePicker
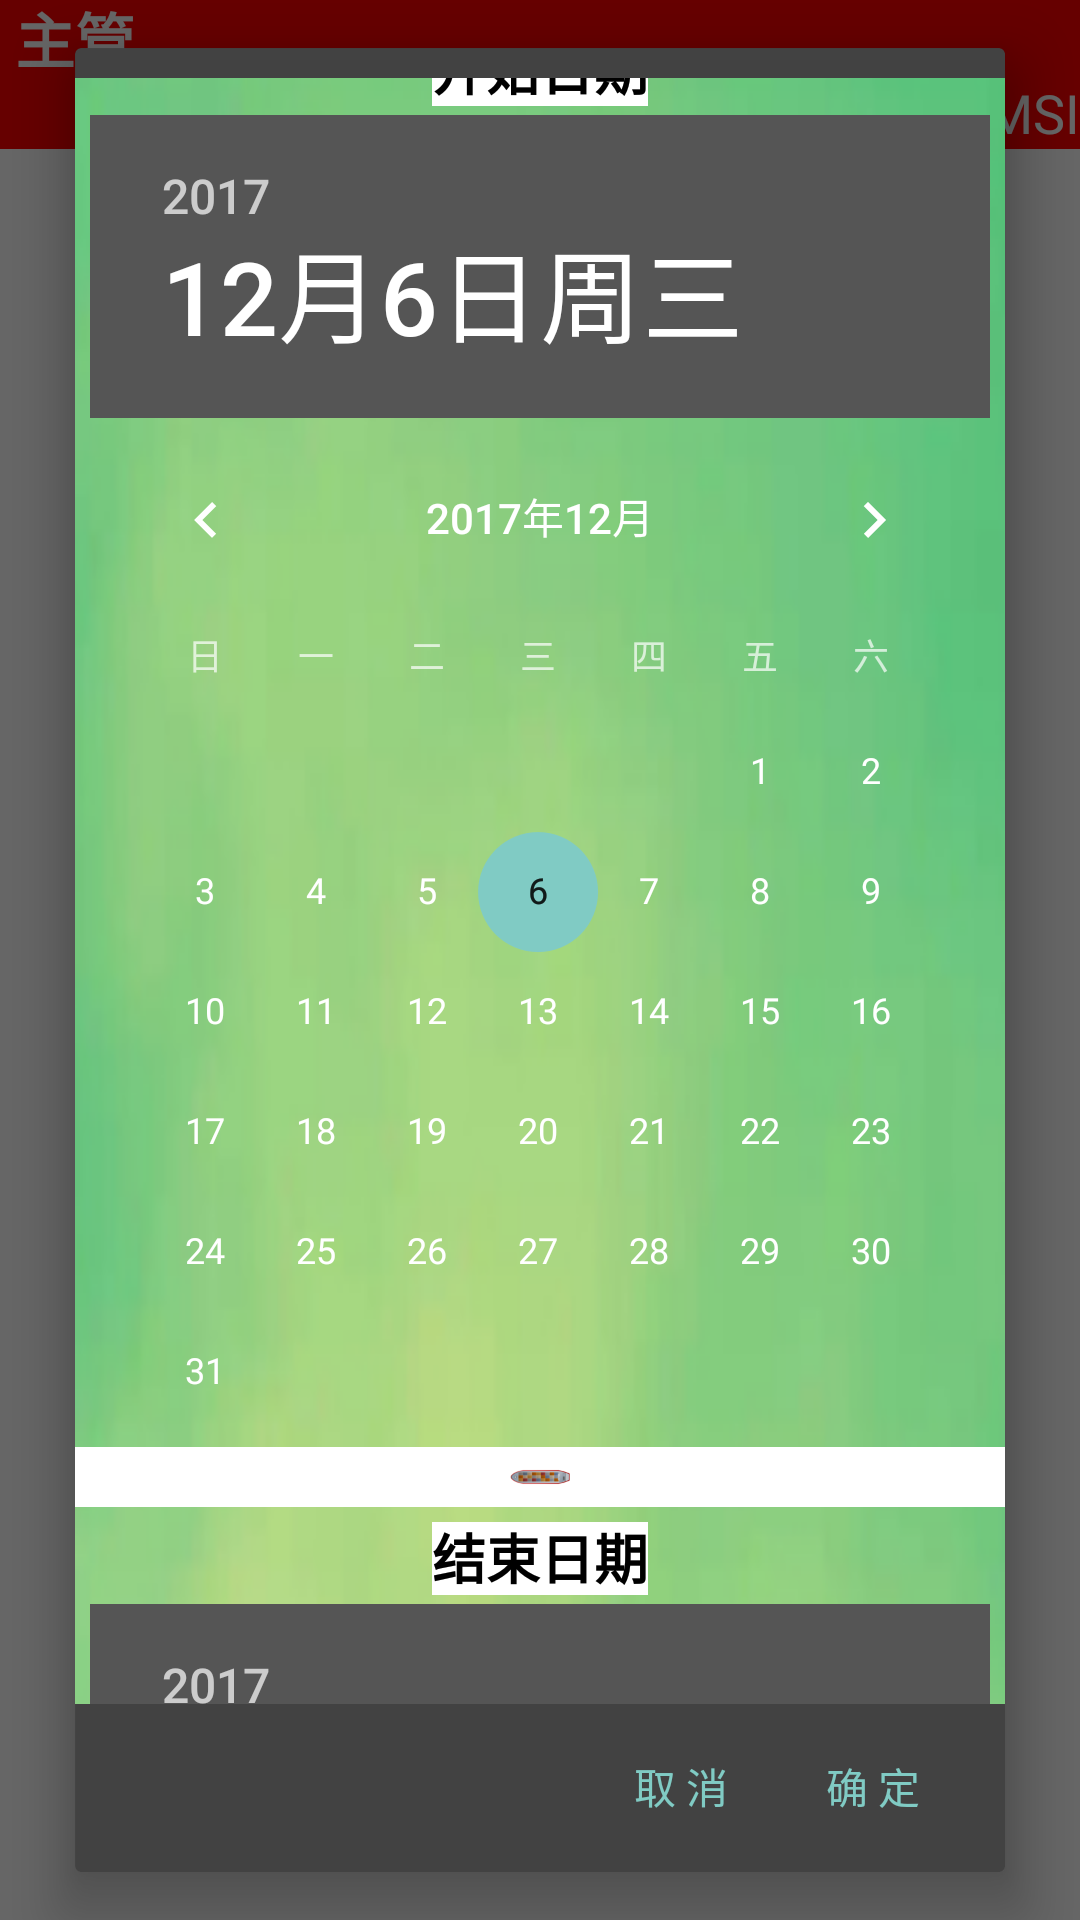
1、效果图(两个DatePicker放在一起,同时选择起始与结束时间):
2、实现
2.1布局文件:
 <?xml version="1.0" encoding="utf-8"?>

 <LinearLayout xmlns:android="http://schemas.android.com/apk/res/android"

     xmlns:app="http://schemas.android.com/apk/res-auto"

     android:layout_width="wrap_content"

     android:layout_height="wrap_content"

     android:gravity="center_horizontal"

     android:orientation="vertical"

     android:paddingTop="10dp">

     <ScrollView

         android:layout_width="match_parent"

         android:layout_height="match_parent">

         <LinearLayout

             android:layout_width="match_parent"

             android:layout_height="wrap_content"

             android:background="@drawable/time"

             android:orientation="vertical" >

             <LinearLayout

                 android:layout_width="match_parent"

                 android:layout_height="match_parent"

                 android:gravity="center_horizontal"

                 android:orientation="vertical"

                 android:padding="5dip">

                 <TextView

                     android:layout_width="wrap_content"

                     android:layout_height="wrap_content"

                     android:layout_marginBottom="3dp"

                     android:background="@color/white"

                     android:textSize="18dp"

                     android:textStyle="bold"

                     android:textColor="@color/black"

                     android:text="开始日期" />

                 <DatePicker

                     android:id="@+id/datePickerStart"

                     android:layout_width="wrap_content"

                     android:layout_height="wrap_content"

                     android:calendarViewShown="false" />

             </LinearLayout>

             <ImageView

                 android:id="@+id/imageView2"

                 android:background="@color/white"

                 android:layout_width="match_parent"

                 android:layout_height="20dp"

                 app:srcCompat="@drawable/redbound" />

             <LinearLayout

                 android:layout_width="match_parent"

                 android:layout_height="match_parent"

                 android:gravity="center_horizontal"

                 android:orientation="vertical"

                 android:padding="5dip">

                 <TextView

                     android:layout_width="wrap_content"

                     android:layout_height="wrap_content"

                     android:layout_marginBottom="3dp"

                     android:background="@color/white"

                     android:textSize="18dp"

                     android:textColor="@color/black"

                     android:textStyle="bold"

                     android:text="结束日期" />

                 <DatePicker

                     android:id="@+id/datePickerEnd"

                     android:layout_width="wrap_content"

                     android:layout_height="wrap_content"

                     android:calendarViewShown="false" />

             </LinearLayout>

         </LinearLayout>

     </ScrollView>

 </LinearLayout>
2.2 自定义类
 package com.easson.mx.pieceworkqc;

 import android.app.AlertDialog;

 import android.content.Context;

 import android.content.DialogInterface;

 import android.content.DialogInterface.OnClickListener;

 import android.os.Bundle;

 import android.view.LayoutInflater;

 import android.view.View;

 import android.widget.DatePicker;

 import android.widget.DatePicker.OnDateChangedListener;

 import java.lang.reflect.Field;

 /**

  * Created by zhangtao on 2017/11/21.

  */

 public class DoubleDatePickerDialog extends AlertDialog implements OnClickListener, OnDateChangedListener {

     private static final String START_YEAR = "start_year";

     private static final String END_YEAR = "end_year";

     private static final String START_MONTH = "start_month";

     private static final String END_MONTH = "end_month";

     private static final String START_DAY = "start_day";

     private static final String END_DAY = "end_day";

     private final DatePicker mDatePicker_start;

     private final DatePicker mDatePicker_end;

     private final OnDateSetListener mCallBack;

     /**

      * The callback used to indicate the user is done filling in the date.

      */

     public interface OnDateSetListener {

         void onDateSet(DatePicker startDatePicker, int startYear, int startMonthOfYear, int startDayOfMonth,

                        DatePicker endDatePicker, int endYear, int endMonthOfYear, int endDayOfMonth);

         void onConfirmed(DatePicker startDatePicker, int startYear, int startMonthOfYear, int startDayOfMonth,

                          DatePicker endDatePicker, int endYear, int endMonthOfYear, int endDayOfMonth) ;

     }

     /**

      * @param context

      *            The context the dialog is to run in.

      * @param callBack

      *            How the parent is notified that the date is set.

      * @param year

      *            The initial year of the dialog.

      * @param monthOfYear

      *            The initial month of the dialog.

      * @param dayOfMonth

      *            The initial day of the dialog.

      */

     public DoubleDatePickerDialog(Context context, OnDateSetListener callBack, int year, int monthOfYear, int dayOfMonth) {

         this(context, 0, callBack, year, monthOfYear, dayOfMonth);

     }

     public DoubleDatePickerDialog(Context context, int theme, OnDateSetListener callBack, int year, int monthOfYear,

                                   int dayOfMonth) {

         this(context, 0, callBack, year, monthOfYear, dayOfMonth, true);

     }

     /**

      * @param context

      *            The context the dialog is to run in.

      * @param theme

      *            the theme to apply to this dialog

      * @param callBack

      *            How the parent is notified that the date is set.

      * @param year

      *            The initial year of the dialog.

      * @param monthOfYear

      *            The initial month of the dialog.

      * @param dayOfMonth

      *            The initial day of the dialog.

      */

     public DoubleDatePickerDialog(Context context, int theme, OnDateSetListener callBack, int year, int monthOfYear,

                                   int dayOfMonth, boolean isDayVisible) {

         super(context, theme);

         mCallBack = callBack;

         Context themeContext = getContext();

         setButton(BUTTON_POSITIVE, "确 定", this);

         setButton(BUTTON_NEGATIVE, "取 消", this);

         setIcon(0);

         LayoutInflater inflater = (LayoutInflater) themeContext.getSystemService(Context.LAYOUT_INFLATER_SERVICE);

         View view = inflater.inflate(R.layout.doubledatepicker, null);

         setView(view);

         mDatePicker_start = (DatePicker) view.findViewById(R.id.datePickerStart);

         mDatePicker_end = (DatePicker) view.findViewById(R.id.datePickerEnd);

         mDatePicker_start.init(year, monthOfYear, dayOfMonth, this);

         mDatePicker_end.init(year, monthOfYear, dayOfMonth, this);

         // 如果要隐藏当前日期(day),则使用下面方法。

         if (!isDayVisible) {

             hidDay(mDatePicker_start);

             hidDay(mDatePicker_end);

         }

     }

     /**

      * 隐藏DatePicker中的日期显示

      * @param mDatePicker

      */

     private void hidDay(DatePicker mDatePicker) {

         Field[] datePickerfFields = mDatePicker.getClass().getDeclaredFields();

         for (Field datePickerField : datePickerfFields) {

             if ("mDaySpinner".equals(datePickerField.getName())) {

                 datePickerField.setAccessible(true);

                 Object dayPicker = new Object();

                 try {

                     dayPicker = datePickerField.get(mDatePicker);

                 } catch (IllegalAccessException e) {

                     e.printStackTrace();

                 } catch (IllegalArgumentException e) {

                     e.printStackTrace();

                 }

                 ((View) dayPicker).setVisibility(View.GONE);

             }

         }

     }

     public void onClick(DialogInterface dialog, int which) {

         if (which == BUTTON_NEGATIVE){

             tryNotifyDateSet();

         }

         //如果是“确 定”按钮,则往下执行

         else if(which==BUTTON_POSITIVE)

         {

             tryConfirmBtnEvent();

         }

     }

     @Override

     public void onDateChanged(DatePicker view, int year, int month, int day) {

         if (view.getId() == R.id.datePickerStart) {

             mDatePicker_start.init(year, month, day, this);

         }

         if (view.getId() == R.id.datePickerEnd) {

             mDatePicker_end.init(year, month, day, this);

         }

     }

     /**

      * 获得开始日期的DatePicker

      * @return The calendar view.

      */

     public DatePicker getDatePickerStart() {

         return mDatePicker_start;

     }

     /**

      * 获得结束日期的DatePicker

      * @return The calendar view.

      */

     public DatePicker getDatePickerEnd() {

         return mDatePicker_end;

     }

     /**

      * Sets the start date.

      *

      * @param year

      *            The date year.

      * @param monthOfYear

      *            The date month.

      * @param dayOfMonth

      *            The date day of month.

      */

     public void updateStartDate(int year, int monthOfYear, int dayOfMonth) {

         mDatePicker_start.updateDate(year, monthOfYear, dayOfMonth);

     }

     /**

      * Sets the end date.

      *

      * @param year

      *            The date year.

      * @param monthOfYear

      *            The date month.

      * @param dayOfMonth

      *            The date day of month.

      */

     public void updateEndDate(int year, int monthOfYear, int dayOfMonth) {

         mDatePicker_end.updateDate(year, monthOfYear, dayOfMonth);

     }

     private void tryNotifyDateSet() {

         if (mCallBack != null) {

             mDatePicker_start.clearFocus();

             mDatePicker_end.clearFocus();

             mCallBack.onDateSet(mDatePicker_start, mDatePicker_start.getYear(), mDatePicker_start.getMonth(),

                     mDatePicker_start.getDayOfMonth(), mDatePicker_end, mDatePicker_end.getYear(),

                     mDatePicker_end.getMonth(), mDatePicker_end.getDayOfMonth());

         }

     }

     private void tryConfirmBtnEvent()

     {

         if (mCallBack != null) {

             mCallBack.onConfirmed(mDatePicker_start, mDatePicker_start.getYear(), mDatePicker_start.getMonth(),

                     mDatePicker_start.getDayOfMonth(), mDatePicker_end, mDatePicker_end.getYear(),

                     mDatePicker_end.getMonth(), mDatePicker_end.getDayOfMonth());

         }

     }

     @Override

     protected void onStop() {

         super.onStop();

     }

     @Override

     public Bundle onSaveInstanceState() {

         Bundle state = super.onSaveInstanceState();

         state.putInt(START_YEAR, mDatePicker_start.getYear());

         state.putInt(START_MONTH, mDatePicker_start.getMonth());

         state.putInt(START_DAY, mDatePicker_start.getDayOfMonth());

         state.putInt(END_YEAR, mDatePicker_end.getYear());

         state.putInt(END_MONTH, mDatePicker_end.getMonth());

         state.putInt(END_DAY, mDatePicker_end.getDayOfMonth());

         return state;

     }

     @Override

     public void onRestoreInstanceState(Bundle savedInstanceState) {

         super.onRestoreInstanceState(savedInstanceState);

         int start_year = savedInstanceState.getInt(START_YEAR);

         int start_month = savedInstanceState.getInt(START_MONTH);

         int start_day = savedInstanceState.getInt(START_DAY);

         mDatePicker_start.init(start_year, start_month, start_day, this);

         int end_year = savedInstanceState.getInt(END_YEAR);

         int end_month = savedInstanceState.getInt(END_MONTH);

         int end_day = savedInstanceState.getInt(END_DAY);

         mDatePicker_end.init(end_year, end_month, end_day, this);

     }

 }
2.3调用
在其他类中:
实现DoubleDatePickerDialog 中接口OnDateSetListener中的方法,以完成相应操作
  //取时间区间

     private void confirmTimeSpace() {         Calendar c=Calendar.getInstance();

         new DoubleDatePickerDialog(ScrapedListActivity.this, 0, new DoubleDatePickerDialog.OnDateSetListener() {

             @Override

             public void onDateSet(DatePicker startDatePicker, int startYear, int startMonthOfYear, int startDayOfMonth,

                                   DatePicker endDatePicker, int endYear, int endMonthOfYear, int endDayOfMonth) {
                   //取起始结束时间

                 startTimeStr = startYear + SPACE_STR + (startMonthOfYear+1) + SPACE_STR + startDayOfMonth;

                 endTimeStr = endYear + SPACE_STR + (endMonthOfYear+1) + SPACE_STR + endDayOfMonth;

                 tstartTimeStr=startYear + TSPACE_STR + (startMonthOfYear+1)  + TSPACE_STR + startDayOfMonth;

                 tendTimeStr=endYear + TSPACE_STR + (endMonthOfYear+1) + TSPACE_STR + endDayOfMonth;
                   //要做的事

                 ScrapedListActivity.this.finish();

             }

             @Override

             public void onConfirmed(DatePicker startDatePicker, int startYear, int startMonthOfYear, int startDayOfMonth,

                                     DatePicker endDatePicker, int endYear, int endMonthOfYear, int endDayOfMonth) {
                   //取起始结束时间

                 startTimeStr = startYear + SPACE_STR + (startMonthOfYear+1) + SPACE_STR + startDayOfMonth;

                 endTimeStr = endYear + SPACE_STR + (endMonthOfYear+1) + SPACE_STR + endDayOfMonth;

                 tstartTimeStr=startYear + TSPACE_STR + (startMonthOfYear+1)  + TSPACE_STR + startDayOfMonth;

                 tendTimeStr=endYear + TSPACE_STR + (endMonthOfYear+1) + TSPACE_STR + endDayOfMonth;

                 //要做的事

                 initInfoEvent();

             }

         }, c.get(Calendar.YEAR), c.get(Calendar.MONTH), c.get(Calendar.DATE), true).show();

     }
android自定义日期组件之双DatePicker的更多相关文章
- vue自定义日期组件
vue-datepicker 基于 vuejs 2.x 可自定义主题的日期组件 github Usage 只需要在项目中加入 calendar.vue,就可以使用了. 向组件传入 prop 即可改变 ...
- Android图片管理组件(双缓存+异步加载)
转自:http://www.oschina.net/code/snippet_219356_18887?p=3#comments ImageManager2这个类具有异步从网络下载图片,从sd读取本地 ...
- Ionic4.x 中的 UI 组件(UI Components) 日期组件
1.日期组件的基本使用 官方文档:https://ionicframework.com/docs/api/datetime 模板中: <ion-datetime display-format=& ...
- Android自定义组件系列【4】——自定义ViewGroup实现双侧滑动
在上一篇文章<Android自定义组件系列[3]--自定义ViewGroup实现侧滑>中实现了仿Facebook和人人网的侧滑效果,这一篇我们将接着上一篇来实现双面滑动的效果. 1.布局示 ...
- 【Android 应用开发】Android - 时间 日期相关组件
源码下载地址 : -- CSDN : http://download.csdn.net/detail/han1202012/6856737 -- GitHub : https://github.co ...
- Android - 时间 日期相关组件
源码下载地址 : -- CSDN : http://download.csdn.net/detail/han1202012/6856737 -- GitHub : https://github.co ...
- Android自定义组件
[参考的原文地址] http://blog.csdn.net/l1028386804/article/details/47101387效果图: 实现方式: 一:自定义一个含有EditText和Butt ...
- Android Studio开发基础之自定义View组件
一般情况下,不直接使用View和ViewGroup类,而是使用使用其子类.例如要显示一张图片可以用View类的子类ImageView,开发自定义View组件可分为两个主要步骤: 一.创建一个继承自an ...
- 9.Android之日期对话框DatePicker控件学习
设置日期对话框在手机经常用到,今天来学习下. 首先设置好布局文件:如图 xml对应代码 <?xml version="1.0" encoding="utf-8&qu ...
随机推荐
- MySQL中事务的概述ACID了解
事务可由一条非常简单的SQL语句组成,也可以有一组复杂的SQL语句组成.事务是访问并更新数据库中各种数据项的一个程序执行单元.在事务中操作,要么都做修改,要么都不做,这就是事务的目的,也是事务模型区别 ...
- MySQL中锁的类型
InnoDB存储引擎实现了一下两种标准的行级锁: 共享锁S LOCK 允许事务读一行数据 排他锁 X LOCK 允许事务删除或更新一行数据 如果是一个事务T1斤获得了行r的共享锁,那么另外一个事务T2 ...
- 经典书Discrete.Mathematics上的大神
版权声明:本文作者靖心,靖空间地址:http://blog.csdn.net/kenden23/,未经本作者同意不得转载. https://blog.csdn.net/kenden23/article ...
- Oracle学习笔记—Oracle左连接、右连接、全外连接以及(+)号用法(转载)
转载自: Oracle左连接.右连接.全外连接以及(+)号用法 对于外连接,Oracle中可以使用“(+)”来表示. 关于使用(+)的一些注意事项: (+)操作符只能出现在WHERE子句中,并且不能与 ...
- 【AWS】AWS云计算赋能数字化转型专题研讨会圆满落幕
大会精彩回顾:查看原文 大会使用的PPT下载地址:点击下载
- python爬取百度翻译返回:{'error': 997, 'from': 'zh', 'to': 'en', 'query 问题
解决办法: 修改url为手机版的地址:http://fanyi.baidu.com/basetrans User-Agent也用手机版的 测试代码: # -*- coding: utf-8 -*- & ...
- pyhton3 logging模块
1.简单的将日志打印到屏幕 import logging logging.debug('This is debug message')logging.info('This is info mess ...
- iOS 事件响应者链的学习(也有叫 UI连锁链)
当发生事件响应的时候,必须知道由谁来响应事件.在iOS中,由响应链来对事件进行响应,所有的事件响应的类都是继承于UIResponder的子类,响应链是一个由不同对象组成的层次结构,其中每个对象将依次获 ...
- 每天一个Linux命令(54)chkconfig命令
chkconfig命令检查.设置系统的各种服务. (1)用法: 用法: chkconfig [必要参数] [服务] (2)功能: 功能: chkconf ...
- jpa,jdbc,hibernate/mybatis,数据库驱动
JPA是规范,hibernate/mybatis是对规范的实现,hibernate/mybatis是对jdbc的封装,也就是说hibernate/mybatis还是会调用jdbc. 我们平时使用 ...