好玩的WPF第四弹:用Viewport2DVisual3D实现3D旋转效果
原文:好玩的WPF第四弹:用Viewport2DVisual3D实现3D旋转效果

效果呢就是这么个效果,但是大家要发挥想象力,比如做成一个可以旋转的按钮等等。
定义一个这样的资源就好。
<Window.Resources>

        <DiffuseMaterial x:Key="DiffuseMaterialStyle" Viewport2DVisual3D.IsVisualHostMaterial="True"

                         Brush="White"/>

</Window.Resources>
关键是在Grid里放这么一个东西:
 <Viewport3D x:Name="view" ClipToBounds="True" RenderOptions.EdgeMode="Aliased">

     <Viewport3D.Camera>

          <PerspectiveCamera x:Name="perspectiveCam" FieldOfView="59" Position="0.5,0.5,2" LookDirection="0,0,-1">

              <PerspectiveCamera.Transform>

                   <RotateTransform3D x:Name="rot" CenterY="0.5" CenterX="0.5" CenterZ="-0.5">

                        <RotateTransform3D.Rotation>

                                <AxisAngleRotation3D x:Name="AxisAngleRot" Axis="0,1,0" Angle="0"/>

                        </RotateTransform3D.Rotation>

                   </RotateTransform3D>

               </PerspectiveCamera.Transform>

           </PerspectiveCamera>

      </Viewport3D.Camera>

      <ModelVisual3D>

          <ModelVisual3D.Content>

               <AmbientLight Color="White" />

          </ModelVisual3D.Content>

      </ModelVisual3D>

</Viewport3D>
正面:
<Viewport2DVisual3D Material="{StaticResource  DiffuseMaterialStyle }">

    <Viewport2DVisual3D.Geometry>

         <MeshGeometry3D Positions="0,1,0    0,0,0     1,0,0    1,1,0"

              TextureCoordinates="0,0   0,1     1,1     1,0"

              TriangleIndices="0 1 2  0 2 3"/>

    </Viewport2DVisual3D.Geometry>

    <Border BorderThickness="10" x:Name="FrontSide" BorderBrush="Blue" CornerRadius="1"

        PreviewMouseDown="FrontSide_PreviewMouseDown" >

        <TextBlock Text="欢迎访问我的博客" Foreground="Green" />

   </Border>

</Viewport2DVisual3D>
右侧:
<Viewport2DVisual3D Material="{StaticResource DiffuseMaterialStyle}">

      <Viewport2DVisual3D.Geometry>

            <MeshGeometry3D Positions="1,1,0     1,0,0     1,0,-1     1,1,-1"

                TextureCoordinates="0,0 0,1 1,1 1,0"

                TriangleIndices="0 1 2  0 2 3"/>

       </Viewport2DVisual3D.Geometry>

       <Border BorderThickness="1" x:Name="RightSide" BorderBrush="Lime" CornerRadius="4"

           PreviewMouseDown="RightSide_PreviewMouseDown"  >

           <Border.Background>

                <LinearGradientBrush EndPoint="0.5,1" StartPoint="0.5,0">

                    <GradientStop Color="White" />

                </LinearGradientBrush>

            </Border.Background>

            <TextBlock Text="感谢您的支持" FontSize="20"/>

       </Border>

</Viewport2DVisual3D>
大家对比上面这两个就知道正面的镂空是怎么来的了……
左侧:
<Viewport2DVisual3D Material="{StaticResource DiffuseMaterialStyle}">

      <Viewport2DVisual3D.Geometry>

            <MeshGeometry3D Positions="0,1,-1    0,0,-1   0,0,0    0,1,0"

            TextureCoordinates="0,0 0,1 1,1 1,0"

            TriangleIndices="0 1 3  0 2 3"/>

           </Viewport2DVisual3D.Geometry>

           <Border BorderThickness="40" x:Name="LeftSide" BorderBrush="White" CornerRadius="1"

                  PreviewMouseDown="LeftSide_PreviewMouseDown" >

              <Border.Background>

                  <LinearGradientBrush EndPoint="0.5,1" StartPoint="0.5,0">

                      <GradientStop Color="Black" />

                   </LinearGradientBrush>

               </Border.Background>

          <TextBlock Text="有问题直接评论就好" Foreground="Lime"/>

     </Border>

</Viewport2DVisual3D>
后方:
<Viewport2DVisual3D Material="{StaticResource DiffuseMaterialStyle}">

    <Viewport2DVisual3D.Geometry>

        <MeshGeometry3D Positions="1,1,-1    1,0,-1     0,0,-1     0,1,-1   0,0.5,-1"

           TextureCoordinates="0,0    0,1    1,1    1,0"

           TriangleIndices="0 1 2  0 2 4"/>

    </Viewport2DVisual3D.Geometry>

    <Border BorderThickness="1" x:Name="BackSide" BorderBrush="White" CornerRadius="4"

         PreviewMouseDown="BackSide_PreviewMouseDown" >

        <Border.Background>

           <LinearGradientBrush EndPoint="0.5,1" StartPoint="0.5,0">

               <GradientStop Color="White" />

           </LinearGradientBrush>

        </Border.Background>

        <TextBlock Text="常来哦……" FontSize="20"/>

   </Border>

</Viewport2DVisual3D>
大家先不管MeshGeometry3D这些东西是做什么的,后面我尽量简单快速的讲解它们。
所以先来看看程序的内部。
    public partial class MainWindow : Window

    {

        DispatcherTimer dispatTime = null;

        double AxAngle = 90;

        public MainWindow()

        {

            InitializeComponent();

            if (dispatTime == null)

                dispatTime = new DispatcherTimer();

            dispatTime.Tick += new EventHandler(DT_Tick);

            dispatTime.Interval = new TimeSpan(0, 0, 0, 0, 2);

        }

        private void DT_Tick(object sender, EventArgs e)

        {

            AxisAngleRot.Angle += 1;

            if (AxisAngleRot.Angle >= AxAngle)

                dispatTime.Stop();

        }

        private void FrontSide_PreviewMouseDown(object sender, MouseButtonEventArgs e)

        {

            AxisAngleRot.Angle = 0;

            AxAngle = 90;

            dispatTime.Start();

        }

        private void LeftSide_PreviewMouseDown(object sender, MouseButtonEventArgs e)

        {

            AxAngle = 360;

            dispatTime.Start();

        }

        private void BackSide_PreviewMouseDown(object sender, MouseButtonEventArgs e)

        {

            AxAngle = 270;

            dispatTime.Start();

        }

        private void RightSide_PreviewMouseDown(object sender, MouseButtonEventArgs e)

        {

            AxAngle = 180;

            dispatTime.Start();

        }

    }
像这种程序肯定会涉及到计时器的,就是DT_Tick方法。我将它设置为每次都转动1度,而下面这一行则是间隔的时间。
dispatTime.Interval = new TimeSpan(0, 0, 0, 0, 2);其余的每个方法都用于调节角度,可以看到在正面时会将角度重置一次。
所以接下来看看Positions是什么意思。
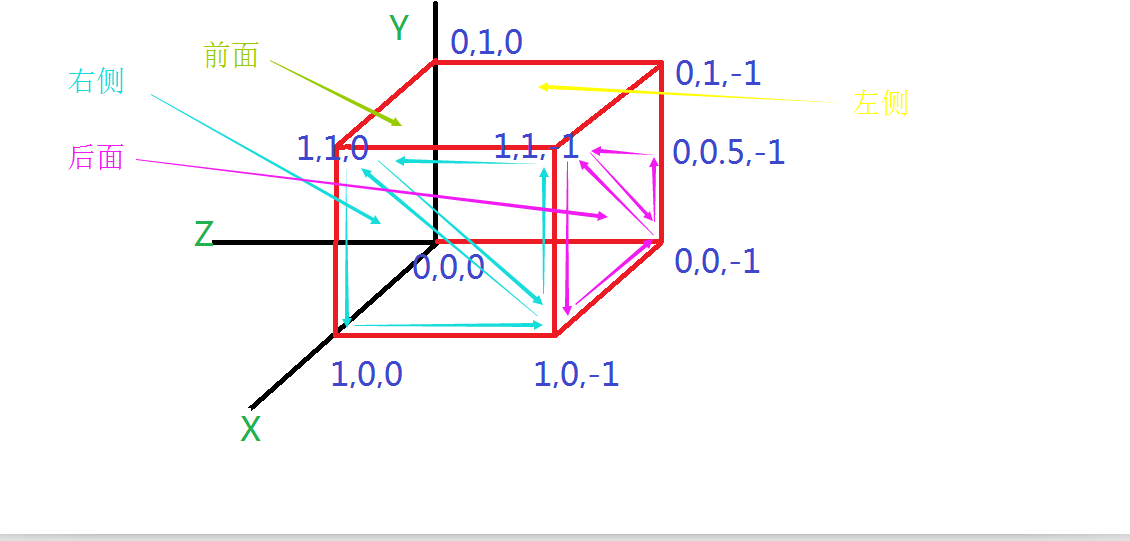
原谅我把正方体画歪了,图中另外用箭头指出了“正面”、“右侧”等。
大家看看Positions中都是3个数字一组对吧,这就是一个点,我在图中已经标识出来了。而TriangleIndices中也是3个数字一组,这3个数字指示了Positions中的组合索引(从0开始索引),然后3个数字组成三角形,如图中箭头所指向的。
而TextureCoordinates是WPF的3D纹理坐标,这里就不深究的,后面可以深入探讨写一篇博客。
大家也可以拿源码回去慢慢弄着玩嘛……
所以这篇博客就到此为止咯。掰掰……
好玩的WPF第四弹:用Viewport2DVisual3D实现3D旋转效果的更多相关文章
- 好玩的WPF第三弹:颤抖吧,地球!消失吧,地球!
原文:好玩的WPF第三弹:颤抖吧,地球!消失吧,地球! 版权声明:转载请联系本人,感谢配合!本站地址:http://blog.csdn.net/nomasp https://blog.csdn.net ...
- 好玩的WPF第一弹:窗口抖动+边框阴影效果+倒计时显示文字
原文:好玩的WPF第一弹:窗口抖动+边框阴影效果+倒计时显示文字 版权声明:转载请联系本人,感谢配合!本站地址:http://blog.csdn.net/nomasp https://blog.csd ...
- 好玩的WPF第二弹:电子表字体显示时间+多彩呼吸灯特效button
我们先来看看Quartz MS字体动态显示系统时间的效果,难度相较于上一篇也要简单很多. 首先是定义一个TextBlock例如以下. <Grid> <TextBlock Name=& ...
- 前端学习 第四弹: HTML(一)
前端学习 第四弹: HTML(一) 元素分类:块元素 内联元素 块级元素在浏览器显示时,通常会以新行来开始(和结束). 例子:<h1>, <p>, <ul>, &l ...
- WPF WebBrowser屏蔽弹出alert ,confirm ,prompt ,showModalDialog() ,window.open()
WPF WebBrowser屏蔽弹出alert ,confirm ,prompt ,showModalDialog() ,window.open()添加Microsoft.mshtml.dll,然后写 ...
- WPF案例 (四) 模拟Windows7桌面任务栏
原文:WPF案例 (四) 模拟Windows7桌面任务栏 这个程序模彷了Windows7的桌面任务栏,当在桌面上双击某个快捷方式时,将打开一个新的子界面,并且在任务栏里创建一个链接到此界面的任务栏图标 ...
- 『PyTorch』第四弹_通过LeNet初识pytorch神经网络_下
『PyTorch』第四弹_通过LeNet初识pytorch神经网络_上 # Author : Hellcat # Time : 2018/2/11 import torch as t import t ...
- jQuery 关于IE9上传文件无法进入后台问题的原因及解决办法(ajaxfileupload.js第四弹)
第四弹的诞生完全不在自己最初的计划之中,是有个网友看了先前关于<ajaxfileupload.js系列>的文章后提出的问题,由于自己一直是用chrome浏览器去测试demo,完全忽略IE浏 ...
- 模式匹配第四弹:if case,guard case,for case
2016-06-06 7388 作者:Olivier Halligon,原文链接,原文日期:2016-05-16 译者:walkingway:校对:Cee:定稿:numbbbbb 现在我们来重新回顾下 ...
随机推荐
- jquery-12 jquery常用动画效果有哪些
jquery-12 jquery常用动画效果有哪些 一.总结 一句话总结:jquery可以用户animate()自定义动画,也可以slide和fade系列方法来设置动画. 1.动画效果如何设置执行时间 ...
- js进阶 11-21 纯css实现选项卡
js进阶 11-21 纯css实现选项卡 一.总结 一句话总结:核心原理,a标签的锚点效果+父div限宽+多的部分隐藏. 1.如何实现a标签的锚点效果? href属性找到对应的位置就好,和选择器一样, ...
- html5+js压缩图片上传
最近在折腾移动站的开发,涉及到了一个手机里面上传图片.于是经过N久的折腾,找到一个插件,用法如下: 1 2 3 4 5 6 7 8 9 10 11 12 13 14 15 16 17 18 19 20 ...
- 【24.91】【Tsinsen 1302】&【BZOJ 2626】JZPFAR
时间限制:5.0s 内存限制:256.0MB 总提交次数:547 AC次数:137 平均分:40.31 将本题分享到: 查看未格式化的试题 提交 试题讨论 试题来 ...
- 【u027】神秘大三角
Time Limit: 1 second Memory Limit: 128 MB [问题描述] 判断一个点与已知三角形的位置关系. [输入格式] 前三行:每行一个坐标,表示该三角形的三个顶点 第四行 ...
- Android-通过Java代码来实现属性动画
Android-通过Java代码来实现属性动画 除了能够使用定义xml文件来设置动画之外.还能够使用java代码来进行控制动画. 示比例如以下: 布局文件: <RelativeLayout xm ...
- 代码在线执行工具(PHP,Java,C++ 等)
http://www.it1352.com/Onlinetools 支持几十种语言的在线运行. 缺点:对请求频率限制太严格了,一分钟不到十次吧...可以清理浏览器 Cookie 之后重新访问.必须用示 ...
- 基于 OAuth 安全协议的 Java 应用编程
OAuth 简介 OAuth 是由 Blaine Cook.Chris Messina.Larry Halff 及 David Recordon 共同发起的,目的在于为 API 访问授权提供一个安全. ...
- C语言编写静态链接库及其使用
本篇讲述使用C语言编写静态链接库,而且使用C和C++的方式来调用等. 一.静态库程序:执行时不独立存在,链接到可执行文件或者动态库中,目标程序的归档. 1.用C编写静态库步骤 a.建立项目(Win32 ...
- Input ANR处理流程
ANR时间区别便是指当前这次的事件dispatch过程中执行findFocusedWindowTargetsLocked()方法到下一次执行resetANRTimeoutsLocked()的时间区间. ...