spring boot 2.0 neo4j 使用
参考文档
官方文档
- http://spring.io/projects/spring-data-neo4j#learn
- https://docs.spring.io/spring-data/neo4j/docs/5.1.2.RELEASE/reference/html/
- https://neo4j.com/docs/
- https://neo4j.com/docs/developer-manual/current/
第三方使用文档
- https://blog.csdn.net/appleyk/article/category/7408344 系列文档
- https://blog.csdn.net/u013946356/article/details/81739079
中文手册(比较滞后)
- https://www.w3cschool.cn/neo4j/
安装 maven 包
<dependency>

      <groupId>org.neo4j</groupId>

      <artifactId>neo4j-ogm-http-driver</artifactId>

      <version>3.1.4</version>

</dependency>

<dependency>

      <groupId>org.springframework.boot</groupId>

      <artifactId>spring-boot-starter-data-neo4j</artifactId>

      <version>2.1.0.RELEASE</version>

</dependency>
添加 neo4j 配置
application.yml
spring:

  data:

    neo4j:

      username: neo4j

      password: 1234

      uri: http://172.16.235.175:7474
添加配置类
@Configuration

@EnableNeo4jRepositories(basePackages = "com.example.demo.repository")

@EnableTransactionManagement

public class Neo4jConfig {

    @Value("${spring.data.neo4j.uri}")

    private String databaseUrl;

    @Value("${spring.data.neo4j.username}")

    private String userName;

    @Value("${spring.data.neo4j.password}")

    private String password;

    @Bean

    public SessionFactory sessionFactory() {

        org.neo4j.ogm.config.Configuration configuration = new org.neo4j.ogm.config.Configuration.Builder()

                .uri(databaseUrl)

                .credentials(userName, password)

                .build();

        return new SessionFactory(configuration, "com.example.demo.entity");

    }

    @Bean

    public Neo4jTransactionManager transactionManager() {

        return new Neo4jTransactionManager(sessionFactory());

    }

}
添加 Neo4j 节点类
@NodeEntity

public class SGNode {

    private Long count;

    private Long error;

    private Double max;

    private Double min;

    /**

     * Neo4j会分配的ID(节点唯一标识 当前类中有效)

     */

    @Id

    @GeneratedValue

    private Long id;

    private String name;

    public Long getId() {

        return id;

    }

    public void setId(Long id) {

        this.id = id;

    }

    public String getName() {

        return name;

    }

    public void setName(String name) {

        this.name = name;

    }

    @Relationship(type = "call")

    private List<CallRelation> calls;

    public SGNode() {

        count = 0L;

        error = 0L;

        max = 0.0;

        min = 0.0;

        calls = new ArrayList<>();

    }

    public SGNode(String name) {

        this();

        this.name = name;

    }

    public Long getCount() {

        return count;

    }

    public void setCount(Long count) {

        this.count = count;

    }

    public Long getError() {

        return error;

    }

    public void setError(Long error) {

        this.error = error;

    }

    public Double getMax() {

        return max;

    }

    public void setMax(Double max) {

        this.max = max;

    }

    public Double getMin() {

        return min;

    }

    public void setMin(Double min) {

        this.min = min;

    }

    public List<CallRelation> getCalls() {

        return calls;

    }

    public void setCalls(List<CallRelation> calls) {

        this.calls = calls;

    }

    public void addCalls(SGNode node, Long count) {

        CallRelation relation = new CallRelation(this, node, count);

        this.calls.add(relation);

    }

}
添加 Neo4j 关系类
@RelationshipEntity(type = "call")

public class CallRelation {

    public CallRelation() {

        this.name = "call";

    }

    public CallRelation(SGNode start, SGNode end, Long count) {

        this();

        this.startNode = start;

        this.endNode = end;

        this.count = count;

    }

    /**

     * Neo4j会分配的ID(节点唯一标识 当前类中有效)

     */

    @Id

    @GeneratedValue

    private Long id;

    private String name;

    public Long getId() {

        return id;

    }

    public void setId(Long id) {

        this.id = id;

    }

    public String getName() {

        return name;

    }

    public void setName(String name) {

        this.name = name;

    }

    /**

     * 定义关系的起始节点 == StartNode

     */

    @StartNode

    private SGNode startNode;

    /**

     * 定义关系的终止节点 == EndNode

     */

    @EndNode

    private SGNode endNode;

    /**

     * 定义关系的属性

     */

    @Property(name = "count")

    private Long count;

    public SGNode getStartNode() {

        return startNode;

    }

    public void setStartNode(SGNode startNode) {

        this.startNode = startNode;

    }

    public SGNode getEndNode() {

        return endNode;

    }

    public void setEndNode(SGNode endNode) {

        this.endNode = endNode;

    }

    public Long getCount() {

        return count;

    }

    public void setCount(Long count) {

        this.count = count;

    }

}
添加 Reponsitory
@Repository

public interface SGNodeReponsitory extends Neo4jRepository<SGNode, Long> {
  // 此处用法可见 https://docs.spring.io/spring-data/neo4j/docs/5.1.2.RELEASE/reference/html/#_query_methods

    SGNode findByName(@Param("name") String name);

}
使用 Demo
@RestController

@RequestMapping("/sg")

public class SGNodeController {

    @Autowired

    SGNodeReponsitory sgNodeReponsitory;

    @DeleteMapping("/delete")

    public String delete() {

        sgNodeReponsitory.deleteAll();

        return "OK";

    }

    @GetMapping("/add")

    public String add() {

        addNodes();

        return "OK";

    }

    @GetMapping("/get")

    public String relation() {

        SGNode node = sgNodeReponsitory.findByName("tsp");

        List<Long> ids = new ArrayList<>();

        ids.add(node.getId());

        Iterable<SGNode> result = sgNodeReponsitory.findAllById(ids, 1);

        return "OK";

    }

    private void addNodes() {

        sgNodeReponsitory.deleteAll();

        List<SGNode> list = new ArrayList<>();

        SGNode node = new SGNode("tsp");

        list.add(node);

        for (Integer i = 1; i <= 10; i++) {

            node = new SGNode("tsp" + i);

            node.setCount(new Random().nextLong());

            node.setError(new Random().nextLong());

            node.setMax(new Random().nextDouble());

            node.setMin(new Random().nextDouble());

            list.add(node);

        }

        sgNodeReponsitory.saveAll(list);

        SGNode start = sgNodeReponsitory.findByName("tsp1");

        SGNode end = sgNodeReponsitory.findByName("tsp");

        start.addCalls(end, new Random().nextLong());

        sgNodeReponsitory.save(start);

        start = sgNodeReponsitory.findByName("tsp2");

        end = sgNodeReponsitory.findByName("tsp");

        start.addCalls(end, new Random().nextLong());

        sgNodeReponsitory.save(start);

        start = sgNodeReponsitory.findByName("tsp9");

        end = sgNodeReponsitory.findByName("tsp7");

        start.addCalls(end, new Random().nextLong());

        sgNodeReponsitory.save(start);

        start = sgNodeReponsitory.findByName("tsp7");

        end = sgNodeReponsitory.findByName("tsp2");

        start.addCalls(end, new Random().nextLong());

        sgNodeReponsitory.save(start);

        start = sgNodeReponsitory.findByName("tsp2");

        end = sgNodeReponsitory.findByName("tsp8");

        start.addCalls(end, new Random().nextLong());

        sgNodeReponsitory.save(start);

        start = sgNodeReponsitory.findByName("tsp");

        end = sgNodeReponsitory.findByName("tsp3");

        start.addCalls(end, new Random().nextLong());

        sgNodeReponsitory.save(start);

        start = sgNodeReponsitory.findByName("tsp");

        end = sgNodeReponsitory.findByName("tsp4");

        start.addCalls(end, new Random().nextLong());

        sgNodeReponsitory.save(start);

        start = sgNodeReponsitory.findByName("tsp6");

        end = sgNodeReponsitory.findByName("tsp3");

        start.addCalls(end, new Random().nextLong());

        sgNodeReponsitory.save(start);

        start = sgNodeReponsitory.findByName("tsp3");

        end = sgNodeReponsitory.findByName("tsp5");

        start.addCalls(end, new Random().nextLong());

        sgNodeReponsitory.save(start);

        start = sgNodeReponsitory.findByName("tsp5");

        end = sgNodeReponsitory.findByName("tsp10");

        start.addCalls(end, new Random().nextLong());

        sgNodeReponsitory.save(start);

    }

}
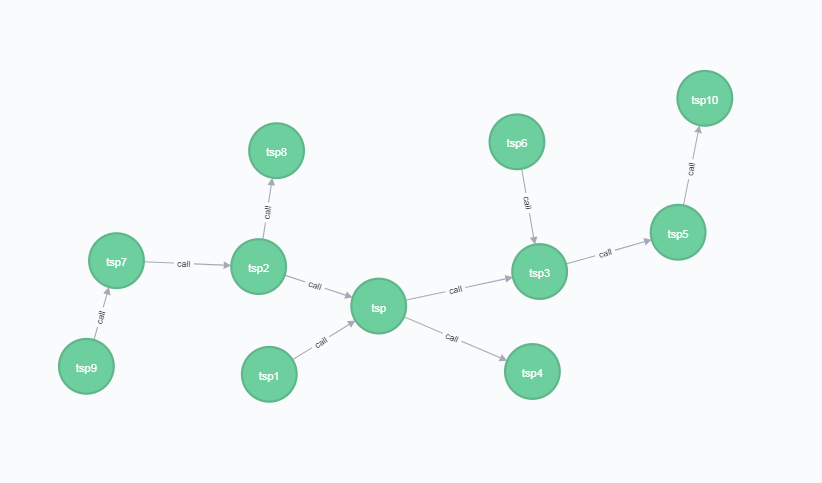
执行 Add 操作之后
spring boot 2.0 neo4j 使用的更多相关文章
- Spring Boot 2.0官方文档之 Actuator(转)
执行器(Actuator)的定义 执行器是一个制造业术语,指的是用于移动或控制东西的一个机械装置,一个很小的改变就能让执行器产生大量的运动. An actuator is a manufacturin ...
- springboot2.0(一):【重磅】Spring Boot 2.0权威发布
就在昨天Spring Boot2.0.0.RELEASE正式发布,今天早上在发布Spring Boot2.0的时候还出现一个小插曲,将Spring Boot2.0同步到Maven仓库的时候出现了错误, ...
- 业余草分享 Spring Boot 2.0 正式发布的新特性
就在昨天Spring Boot2.0.0.RELEASE正式发布,今天早上在发布Spring Boot2.0的时候还出现一个小插曲,将Spring Boot2.0同步到Maven仓库的时候出现了错误, ...
- Spring Boot 2.0(二):Spring Boot 2.0尝鲜-动态 Banner
Spring Boot 2.0 提供了很多新特性,其中就有一个小彩蛋:动态 Banner,今天我们就先拿这个来尝尝鲜. 配置依赖 使用 Spring Boot 2.0 首先需要将项目依赖包替换为刚刚发 ...
- Spring Boot 2.0(四):使用 Docker 部署 Spring Boot
Docker 技术发展为微服务落地提供了更加便利的环境,使用 Docker 部署 Spring Boot 其实非常简单,这篇文章我们就来简单学习下. 首先构建一个简单的 Spring Boot 项目, ...
- spring boot 2.0.0由于版本不匹配导致的NoSuchMethodError问题解析
spring boot升级到2.0.0以后,项目突然报出 NoSuchMethodError: org.springframework.boot.builder.SpringApplicationBu ...
- Spring Boot 2.0(六):使用 Docker 部署 Spring Boot 开源软件云收藏
云收藏项目已经开源2年多了,作为当初刚开始学习 Spring Boot 的练手项目,使用了很多当时很新的技术,现在看来其实很多新技术是没有必要使用的,但做为学习案例来讲确实是一个绝佳的 Spring ...
- Spring Boot 2.0系列文章(五):Spring Boot 2.0 项目源码结构预览
关注我 转载请务必注明原创地址为:http://www.54tianzhisheng.cn/2018/04/15/springboot2_code/ 项目结构 结构分析: Spring-boot-pr ...
- Spring Boot 2.0系列文章(七):SpringApplication 深入探索
关注我 转载请务必注明原创地址为:http://www.54tianzhisheng.cn/2018/04/30/springboot_SpringApplication/ 前言 在 Spring B ...
随机推荐
- PLSQL:orecal,tnsname简介
导入ORACLE遇到很多问题,学了好多,其中很长时间花在网络配置上,刚开始学,具体原因不知道,先把搜集到的好文章存下来,以后慢慢研究. 监听配置文件 为了使得外部进程 如 CA ...
- CMS Collector and G1 Collector
Understanding the CMS Collector CMS has three basic operations: CMS collects the young generation (s ...
- Lodop某个电脑打印内容大小有问题
可能原因分析:本地设置放大比例问题,是真实的放大或缩小,1.查看比例应在100%, 2.控制面板设置显示应在100%(win7 win10中) 3.超文本样式问题,分析样式中不同浏览器版本下显示不一致 ...
- python 高阶函数之 reduce
1.正常写法 >>> from functools import reduce >>> def fn(x, y): ... return x * 10 + y .. ...
- centos7关闭ipv6
方法一: 编辑文件 /etc/sysctl.conf ,新增以下两行 net.ipv6.conf.all.disable_ipv6 = net.ipv6.conf.default.disable_ip ...
- 添加sudo免密码
visudo 添加如下内容即可: lizhaojun ALL=(ALL) NOPASSWD: ALL
- mac/Linux/centos ssh连接服务器以及跳板机,实现类型Xshell 功能
1. 由于之前一段时间,公司测试服务器需要有跳板机这种操作,由于mac机器上没有类似Xshell这种程序,所以,只能自己造轮子啦. 本程序采用Shell+Expect脚本编写 具体代码请查看:http ...
- css实现弹出框
弹出框也是前端里面经常使用的一个应用场景了,最开始想到的是用js实现这个效果,看到codepen上面有用css实现的.其实就是用到了css里面的一个:target选择器+visibility属性. U ...
- 集成Tomcat环境到Eclipse中
集成Tomcat环境到Eclipse中 作者:尹正杰 版权声明:原创作品,谢绝转载!否则将追究法律责任. 一.安装Eclipse环境 1>.安装JDK环境 官方地址:https://www.or ...
- kubernetes云平台管理实战: 自动加载到负载均衡(七)
一.如何实现外界能访问 外界访问不了 1.启动svc [root@k8s-master ~]# cat myweb-svc.yaml apiVersion: v1 kind: Service meta ...