Android定位&地图&导航——基于百度地图,实现自定义图标绘制并点击时弹出泡泡
| 一、问题描述 |
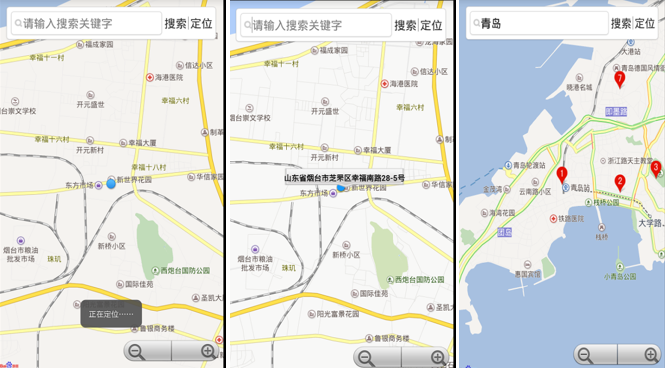
上一次我们使用百度地图实现基本的定位功能,接下来我们继续实现搜索和定位,并使用LocationOverlay绘制定位位置,同时展示如何使用自定义图标绘制并点击时弹出泡泡
如图所示:
| 二、编写MyApplication类 |
 public class MyApplication extends Application {

    private static MyApplication mInstance = null;

    public boolean m_bKeyRight = true;

    public BMapManager mBMapManager = null;

    public static final String strKey = "申请的应用key";

    @Override

    public void onCreate() {

        super.onCreate();

        mInstance = this;

        initEngineManager(this);

    }

    public void initEngineManager(Context context) {

        if (mBMapManager == null) {

            mBMapManager = new BMapManager(context);

        }

        if (!mBMapManager.init(strKey,new MyGeneralListener())) {

     Toast.makeText(MyApplication.getInstance().getApplicationContext(), "BMapManager  初始化错误!", Toast.LENGTH_LONG).show();

        }

}

    public static MyApplication getInstance() {

        return mInstance;

    }

    // 常用事件监听,用来处理通常的网络错误,授权验证错误等

    public static class MyGeneralListener implements MKGeneralListener {

        @Override

        public void onGetNetworkState(int iError) {

            if (iError == MKEvent.ERROR_NETWORK_CONNECT) {

     Toast.makeText(MyApplication.getInstance().getApplicationContext(), "您的网络出错啦!",Toast.LENGTH_LONG).show();

            }else if (iError == MKEvent.ERROR_NETWORK_DATA) {

             Toast.makeText(MyApplication.getInstance().getApplicationContext(), "输入正确的检索条件!",Toast.LENGTH_LONG).show();

            }

        }

        @Override

        public void onGetPermissionState(int iError) {

            //非零值表示key验证未通过

            if (iError != 0) {

                //授权Key错误:

    Toast.makeText(MyApplication.getInstance().getApplicationContext(),

                        "请在 DemoApplication.java文件输入正确的授权Key,并检查您的网络连接是否正常!error: "+iError, Toast.LENGTH_LONG).show();

                MyApplication.getInstance().m_bKeyRight = true;

            }

            else{

                MyApplication.getInstance().m_bKeyRight = true;

    //Toast.makeText(DemoApplication.getInstance().getApplicationContext(), "key认证成功", Toast.LENGTH_LONG).show();

            }

        }

    }

}
| 三、编写MyLocationMapView,继承MapView重写onTouchEvent实现泡泡处理操作 |
public class MyLocationMapView extends MapView {

    public static PopupOverlay pop = null;// 弹出泡泡图层,点击图标使用

    public MyLocationMapView(Context context) {

        super(context);

    }

    public MyLocationMapView(Context context, AttributeSet attrs) {

        super(context, attrs);

    }

    public MyLocationMapView(Context context, AttributeSet attrs, int defStyle) {

        super(context, attrs, defStyle);

    }

    @Override

    public boolean onTouchEvent(MotionEvent event) {

        if (!super.onTouchEvent(event)) {

            // 消隐泡泡

            if (pop != null && event.getAction() == MotionEvent.ACTION_UP)

                pop.hidePop();

        }

        return true;

    }

}
| 三、编写主程序MainActivity |
编写主程序MainActivity,用来展示如何结合定位SDK实现定位,并使用MyLocation Overlay绘制定位位置 同时展示如何使用自定义图标绘制并点击时弹出泡泡。
public class MainActivity extends Activity {

    private  EditText txtAddr;

    // 定位相关

    LocationClient mLocClient;

    LocationData locData = null;

    public MyLocationListenner myListener = new MyLocationListenner();

    public MyApplication app;

    //定位图层

    locationOverlay myLocationOverlay = null;

    //弹出泡泡图层

    private PopupOverlay   pop  = null;//弹出泡泡图层,浏览节点时使用

    private TextView  popupText = null;//泡泡view

    private View viewCache = null;

//地图相关,使用继承MapView的MyLocationMapView目的是重写touch事件实现泡泡处理

    //如果不处理touch事件,则无需继承,直接使用MapView即可

    public MyLocationMapView mMapView = null;    // 地图View

    private MapController mMapController = null;

    private MKSearch mMKSearch = null;//用于信息检索服务

    //UI相关

    OnCheckedChangeListener radioButtonListener = null;

    TextView requestLocButton ,btSerach;

    boolean isRequest = false;//是否手动触发请求定位

    boolean isFirstLoc = true;//是否首次定位

    @Override

    public void onCreate(Bundle savedInstanceState) {

        super.onCreate(savedInstanceState);

        /**

         * 使用地图sdk前需先初始化BMapManager.

         * BMapManager是全局的,可为多个MapView共用,它需要地图模块创建前创建,

         * 并在地图地图模块销毁后销毁,只要还有地图模块在使用,BMapManager就不应该销毁

         */

        app = (MyApplication)this.getApplication();

        if (app.mBMapManager == null) {

            app.mBMapManager = new BMapManager(getApplicationContext());

            /**

             * 如果BMapManager没有初始化则初始化BMapManager

             */

            app.mBMapManager.init(MyApplication.strKey,new MyApplication.MyGeneralListener());

        }

        setContentView(R.layout.activity_main);

           txtAddr=(EditText)findViewById(R.id.txtAddr);//关键字输入框

      //监听搜索单击事件

           btSerach= (TextView)findViewById(R.id.btOk);

        btSerach.setOnClickListener(new OnClickListener() {

            @Override

            public void onClick(View v) {

                mMKSearch.poiSearchInCity("", txtAddr.getText().toString());

            }

        });

        //定位按钮

        requestLocButton = (TextView)findViewById(R.id.btget);

        requestLocButton.setOnClickListener(new OnClickListener() {

            @Override

            public void onClick(View v) {

                requestLocClick();

            }

        });

        //地图初始化

        mMapView = (MyLocationMapView)findViewById(R.id.bmapView);

        mMapView.setTraffic(true);//设置地图模式为交通视图(也可为卫星视图)

        mMapController = mMapView.getController();

        mMapView.getController().setZoom(15);

        mMapView.getController().enableClick(true);

        mMapView.setBuiltInZoomControls(true);

      //信息检索初始化

        mMKSearch = new MKSearch();

        mMKSearch.init(app.mBMapManager, new MKSearchListener() {

            @Override

            public void onGetAddrResult(MKAddrInfo arg0, int arg1) {

            }

            @Override

            public void onGetBusDetailResult(MKBusLineResult arg0, int arg1) {

            }

            @Override

            public void onGetDrivingRouteResult(MKDrivingRouteResult arg0,

                    int arg1) {

            }

            @Override

            public void onGetPoiDetailSearchResult(int arg0, int arg1) {

            }

            @Override

            public void onGetPoiResult(MKPoiResult res, int type, int error) {

                if (error == MKEvent.ERROR_RESULT_NOT_FOUND) {

                    Toast.makeText(MainActivity.this, "抱歉,未找到结果",

                            Toast.LENGTH_LONG).show();

                    return;

                } else if (error != 0 || res == null) {

                    Toast.makeText(MainActivity.this, "搜索出错啦.."+error,

                            Toast.LENGTH_LONG).show();

                    return;

                }

                PoiOverlay poiOverlay = new PoiOverlay(MainActivity.this,

                        mMapView);

                poiOverlay.setData(res.getAllPoi());

                mMapView.getOverlays().clear();

                mMapView.getOverlays().add(poiOverlay);

                mMapView.refresh();

                for (MKPoiInfo info : res.getAllPoi()) {

                    if (info.pt != null) {

                        mMapView.getController().animateTo(info.pt);

                        break;

                    }

                }

            }

            @Override

            public void onGetShareUrlResult(MKShareUrlResult arg0, int arg1,

                    int arg2) {

            }

            @Override

            public void onGetSuggestionResult(MKSuggestionResult arg0, int arg1){

            }

            @Override

            public void onGetTransitRouteResult(MKTransitRouteResult arg0,

                    int arg1) {

            }

            @Override

            public void onGetWalkingRouteResult(MKWalkingRouteResult arg0,

                    int arg1) {

            }

        });

        createPaopao();

        //定位初始化

        mLocClient = new LocationClient( this );

        locData = new LocationData();

        mLocClient.registerLocationListener( myListener );

        LocationClientOption option = new LocationClientOption();

        option.setOpenGps(true);//打开gps

        option.setAddrType("all");//返回的定位结果包含地址信息

        option.disableCache(false);//禁止启用缓存定位

        option.setCoorType("bd09ll");     //设置坐标类型

        option.setScanSpan(1000);

        mLocClient.setLocOption(option);

        mLocClient.start();

        //定位图层初始化

        myLocationOverlay = new locationOverlay(mMapView);

        //设置定位数据

        myLocationOverlay.setData(locData);

        //添加定位图层

        mMapView.getOverlays().add(myLocationOverlay);

        myLocationOverlay.enableCompass();

        //修改定位数据后刷新图层生效

        mMapView.refresh();

    }

    /**

     * 手动触发一次定位请求

     */

    public void requestLocClick(){

        isRequest = true;

        mLocClient.requestLocation();

        Toast.makeText(MainActivity.this, "正在定位……", Toast.LENGTH_SHORT).show();

    }

    /**

     * 创建弹出泡泡图层

     */

    public void createPaopao(){

        viewCache = getLayoutInflater().inflate(R.layout.custom_text_view, null);

        popupText =(TextView) viewCache.findViewById(R.id.textcache);

        //泡泡点击响应回调

        PopupClickListener popListener = new PopupClickListener(){

            @Override

            public void onClickedPopup(int index) {

            }

        };

        pop = new PopupOverlay(mMapView,popListener);

        MyLocationMapView.pop = pop;

    }

    /**

     * 定位SDK监听函数

     */

    public class MyLocationListenner implements BDLocationListener {

        @Override

        public void onReceiveLocation(BDLocation location) {

            if (location == null)

                return ;

            locData.latitude = location.getLatitude();

            locData.longitude = location.getLongitude();

            //如果不显示定位精度圈,将accuracy赋值为0即可

            locData.accuracy = location.getRadius();

            // 此处可以设置 locData的方向信息, 如果定位 SDK 未返回方向信息,用户可以自己实现罗盘功能添加方向信息。

            locData.direction = location.getDerect();

            //更新定位数据

            myLocationOverlay.setData(locData);

            //更新图层数据执行刷新后生效

            mMapView.refresh();

            //是手动触发请求或首次定位时,移动到定位点

            if (isRequest || isFirstLoc){

                //移动地图到定位点

                //Log.d("LocationOverlay", "receive location, animate to it");

                mMapController.animateTo(new GeoPoint((int)(locData.latitude* 1e6), (int)(locData.longitude *  1e6)));

                isRequest = false;

                myLocationOverlay.setLocationMode(LocationMode.FOLLOWING);

            }

            //首次定位完成

            isFirstLoc = false;

        }

        public void onReceivePoi(BDLocation poiLocation) {

            if (poiLocation == null){

                return ;

            }

        }

    }

    //继承MyLocationOverlay重写dispatchTap实现点击处理

      public class locationOverlay extends MyLocationOverlay{

          public locationOverlay(MapView mapView) {

              super(mapView);

          }

          @Override

          protected boolean dispatchTap() {

              //处理点击事件,弹出泡泡

              popupText.setBackgroundResource(R.drawable.popup);

              popupText.setText(mLocClient.getLastKnownLocation().getAddrStr());

            pop.showPopup(BMapUtil.getBitmapFromView(popupText),new GeoPoint((int)(locData.latitude*1e6), (int)(locData.longitude*1e6)),8);

            return true;

          }

      }

    @Override

    protected void onPause() {

        mMapView.onPause();

        if(app.mBMapManager!=null){

            app.mBMapManager.stop();

     }

        super.onPause();

    }

    @Override

    protected void onResume() {

        mMapView.onResume();

        if(app.mBMapManager!=null){

            app.mBMapManager.start();

    }

        super.onResume();

    }

    @Override

    protected void onDestroy() {

        //退出时销毁定位

        if (mLocClient != null)

            mLocClient.stop();

        mMapView.destroy();

        if(app.mBMapManager!=null){

            app.mBMapManager.destroy();

            app.mBMapManager=null;

    }

        super.onDestroy();

    }

    @Override

    protected void onSaveInstanceState(Bundle outState) {

        super.onSaveInstanceState(outState);

        mMapView.onSaveInstanceState(outState);

    }

    @Override

    protected void onRestoreInstanceState(Bundle savedInstanceState) {

        super.onRestoreInstanceState(savedInstanceState);

        mMapView.onRestoreInstanceState(savedInstanceState);

    }

    @Override

    public boolean onCreateOptionsMenu(Menu menu) {

        return true;

    }

}
MainActivity的布局文件如下:
<?xml version="1.0" encoding="utf-8"?>

<RelativeLayout xmlns:android="http://schemas.android.com/apk/res/android"

    android:layout_width="match_parent"

    android:layout_height="match_parent" >

    <FrameLayout

        android:layout_width="fill_parent"

        android:layout_height="fill_parent" >

        <com.jerehedu.ljb.MyLocationMapView

            android:id="@+id/bmapView"

            android:layout_width="fill_parent"

            android:layout_height="fill_parent"

            android:clickable="true" />

        <RelativeLayout

            android:layout_width="fill_parent"

            android:layout_height="wrap_content"

            android:layout_marginLeft="10dp"

            android:layout_marginRight="10dp"

            android:layout_marginTop="10dp"

            android:background="@drawable/edit_bg_all" >

            <EditText

                android:id="@+id/txtAddr"

                android:layout_width="fill_parent"

                android:layout_height="40dp"

                android:layout_centerVertical="true"

                android:layout_marginRight="2dp"

                android:layout_toLeftOf="@+id/btOk"

                android:background="@drawable/edit_bg_all"

                android:completionThreshold="2"

                android:drawableLeft="@drawable/qz_icon_seabar_search"

                android:hint="请输入搜索关键字" />

            <TextView

                android:id="@+id/btOk"

                android:layout_width="wrap_content"

                android:layout_height="wrap_content"

                android:layout_centerVertical="true"

                android:layout_marginRight="2dp"

                android:layout_toLeftOf="@+id/s2"

                android:text="搜索"

                android:textSize="18sp" />

            <ImageView

                android:id="@+id/s2"

                android:layout_width="wrap_content"

                android:layout_height="wrap_content"

                android:layout_centerVertical="true"

                android:layout_marginRight="2dp"

                android:layout_toLeftOf="@+id/btget"

                android:src="@drawable/slide_center" />

            <TextView

                android:id="@+id/btget"

                android:layout_width="wrap_content"

                android:layout_height="wrap_content"

                android:layout_alignParentRight="true"

                android:layout_centerVertical="true"

                android:text="定位"

                android:textSize="18sp" />

        </RelativeLayout>

    </FrameLayout>

</RelativeLayout>
Android定位&地图&导航——基于百度地图,实现自定义图标绘制并点击时弹出泡泡的更多相关文章
- Android定位&地图&导航——基于百度地图实现的定位功能
一.问题描述 LBS位置服务是android应用中重要的功能,应用越来越广泛,下面我们逐步学习和实现lbs相关的应用如定位.地图.导航等,首先我们看如何基于百度地图实现定位功能 二.配置环境 1.注册 ...
- Android定位&地图&导航——基于百度地图移动获取位置和自动定位
一.问题描述 使用百度地图实现如图所示应用,首先自动定位当前我起始位置(小圆点位置),并跟随移动不断自动定位我的当前位置 百度Api不同版本使用会有些差异,本例中加入lib如下: 二.编写MyAppl ...
- Android学习-- 基于位置的服务 LBS(基于百度地图Android SDK)--定位SDK
原文:Android学习-- 基于位置的服务 LBS(基于百度地图Android SDK)--定位SDK 版权声明:本文为博主原创文章,未经博主允许不得转载. https://blog.csdn.ne ...
- Android学习笔记之使用百度地图实现Poi搜索
PS:装个系统装了一天.心力憔悴.感觉不会再爱了. 学习内容: 1.使用百度Map实现Poi搜索. 2.短串分享 3.在线建议查询 百度地图的研究也算是过半了.能够实现定位,实现相关信息的搜索,实 ...
- [github项目]基于百度地图二次开发实现的车辆监管(包含车辆定位、车辆图片和方向控制,电子围栏,图形绘制等功能)前端实现(不包含后端实现)
前言:基于百度地图javascript版本开发,百度地图中所用的key已承诺仅用于测试,不用于商业用途 注:本文所有代码可以到github上进行下载,github地址:http://map.eguid ...
- 记录开发基于百度地图API实现在地图上绘制轨迹并拾取轨迹对应经纬度的工具说明
前言: 最近一直在做数据可视化方面的工作,其中平面可视化没什么难度,毕竟已经有很多成熟的可供使用的框架,比如百度的echart.js,highcharts.js等.还有就是3D可视化了,整体来说难度也 ...
- Android学习笔记之使用百度地图实现地图控制
PS:吾之荣耀,离别已久. 学习内容: 1.实现地图控制. 2.百度地图开发的一些细节 1.实现地图控制: 这一篇主要写在百度地图上添加一些其他控制.上一篇书写了覆盖物的添加,地理编码和反 ...
- 基于百度地图api + AngularJS 的入门地图
转载请注明地址:http://www.cnblogs.com/enzozo/p/4368081.html 简介: 此入门地图为简易的“广州大学城”公交寻路地图,采用很少量的AngularJS进行inp ...
- Android Studio 项目中集成百度地图SDK报Native method not found: com.baidu.platform.comjni.map.commonmemcache.JNICommonMemCache.Create:()I错误
Android Studio 项目中集成百度地图SDK报以下错误: java.lang.UnsatisfiedLinkError: Native method not found: com.baidu ...
随机推荐
- 在vue-cli中引用公共过滤器filter
在实际项目开发中,在某一组件中声明的全局过滤器Vue.filter并不能在其他组件中使用,所以,我认为只要调用两次以上或者可能会被调用两次以上的过滤器,就应该写入统一个过滤器文件中,方便统一调用.下面 ...
- CSS三:CSS的三种引入方式
CSS的引入方式共有三种:行内样式.内部样式表.外部样式表. 一.行内样式 使用style属性引入CSS样式. 示例:<h1 style="color:red;">st ...
- poj3468
#include<iostream> #include<cstring> #include<cstdio> using namespace std; #define ...
- cf932d 树上倍增
题解链接 https://blog.csdn.net/my_sunshine26/article/details/79338601 感觉能做,但是倍增还不是很熟悉,回头再补
- jmeter正则表达式提取器多模块相互调用
提取return的结果 (1)例: 创建账户和转账功能 注:以下为soap协议 添加账户1 创建正则表达式提取器(提取创建的结果) 点击导入接口文档URL地址和方框内方法 同上方法添加账户2 点击正则 ...
- 浅谈Phoenix在HBase中的应用
一.前言 业务使用HBase已经有一段时间了,期间也反馈了很多问题,其中反馈最多的是HBase是否支持SQL查询和二级索引,由于HBase在这两块上目前暂不支持,导致业务在使用时无法更好的利用现有的经 ...
- Js引擎解析执行 阅读笔记
Js引擎解析执行 阅读笔记 一篇阅读笔记 http://km.oa.com/group/2178/articles/show/145691?kmref=search&from_page=1&a ...
- jquery.Inputmask 插件用法(中文API文档)
jquery.Inputmask 可以算是input文本输入限制的神器了,内部融合了多种输入限制, 如金额,电话号码,身份证号,网关等..,并且还可以自定义规则. inputmask 据说最早起源 ...
- java之定时器任务Timer用法
在项目开发中,经常会遇到需要实现一些定时操作的任务,写过很多遍了,然而每次写的时候,总是会对一些细节有所遗忘,后来想想可能是没有总结的缘故,所以今天小编就打算总结一下可能会被遗忘的小点: 1. pub ...
- A Simple Math Problem HDU1757
一次ac 在做递推关系的题目的时候 快速幂矩阵真的很有用 #include<iostream> #include<cstdio> #include<cstring> ...