如何让你的 React Native 应用在键盘弹出时优雅地响应
- 原文作者:Spencer Carli
- 译文出自:掘金翻译计划
- 译者:rccoder
- 校对者:atuooo、ZiXYu
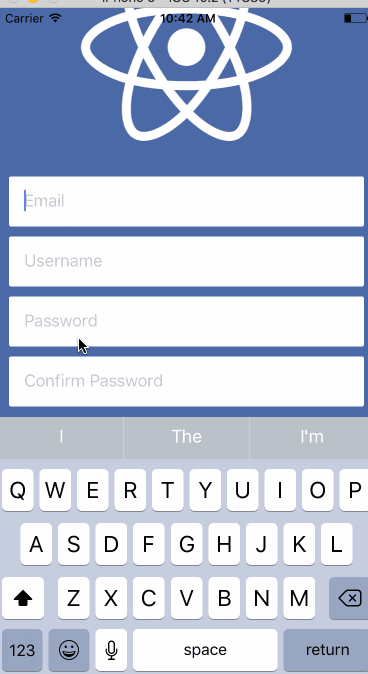
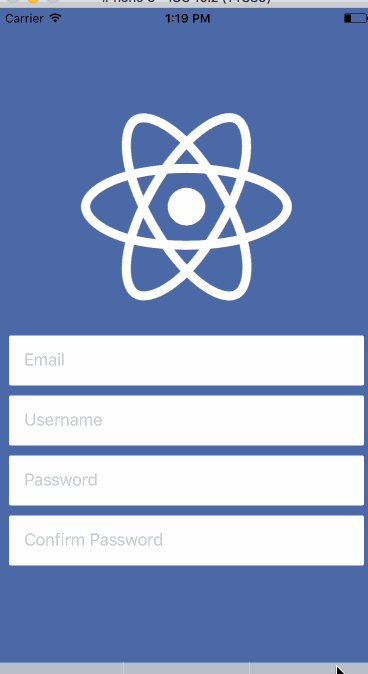
在使用 React Native 应用时,一个常见的问题是当你点击文本输入框时,键盘会弹出并且遮盖住输入框。就像这样:

有几种方式可以避免这种情况发生。一些方法比较简单,另一些稍微复杂。一些是可以自定义的,一些是不能自定义的。今天,我将向你展示 3 种不同的方式来避免 React Native 应用中的键盘遮挡问题。
文章中所有的代码都托管在 GitHub 上
KeyboardAvoidingView
最简单、最容易安装使用的方法是 KeyboardAvoidingView。这是一个核心组件,同时也非常简单。
你可以使用这段存在键盘覆盖输入框问题的 代码,然后更新它,使输入框不再被覆盖。你要做的第一件事是用 KeyboardAvoidView 替换 View,然后给它加一个 behavior 的 prop。查看文档的话你会发现,他可以接收三个不同的值作为参数 —— height, padding, position。我发现 padding 的表现是最在我意料之内的,所以我将使用它。
import React from 'react';

import { View, TextInput, Image, KeyboardAvoidingView } from 'react-native';

import styles from './styles';

import logo from './logo.png';

const Demo = () => {

  return (

    <KeyboardAvoidingView

      style={styles.container}

      behavior="padding"

    >

      <Image source={logo} style={styles.logo} />

      <TextInput

        placeholder="Email"

        style={styles.input}

      />

      <TextInput

        placeholder="Username"

        style={styles.input}

      />

      <TextInput

        placeholder="Password"

        style={styles.input}

      />

      <TextInput

        placeholder="Confirm Password"

        style={styles.input}

      />

      <View style={{ height:  }} />

    </KeyboardAvoidingView>

  );

};

export default Demo;
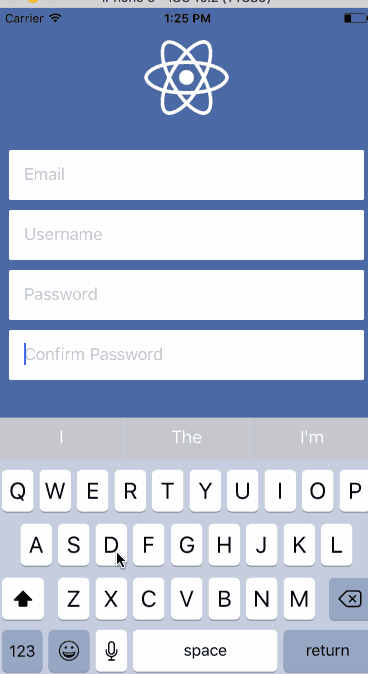
它的表现如下,虽然不是非常完美,但几乎不需要任何工作量。这在我看来是相当好的。
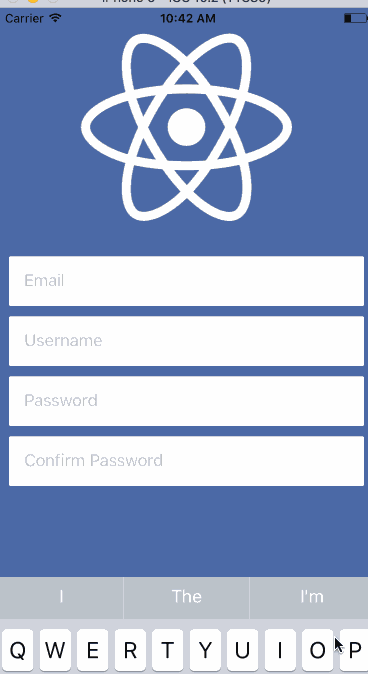
需要注意的事,在上个实例代码中的第 30 行,设置了一个高度为 60 的 View。我发现keyboardAvoidingView 对最后一个元素不适用,即使是添加了 padding/margin 属性也不奏效。所以我添加了一个新的元素去 “撑开” 一些像素。
使用这个方法时,顶部的图片会被推出到视图之外。在后面我会告诉你如何解决这个问题。
针对 Android 开发者:我发现这种方法是处理这个问题最好,也是唯一的办法。在 AndroidManifest.xml 中添加 android:windowSoftInputMode="adjustResize"。操作系统将为你解决大部分的问题,KeyboardAvoidingView 会为你解决剩下的问题。参见 这个。接下的部分可能不适用于你。
Keyboard Aware ScrollView
下一种解决办法是使用 react-native-keyboard-aware-scroll-view,他会给你很大的冲击。实际上它使用了 ScrollView 和 ListView 处理所有的事情(取决于你选择的组件),让滑动交互变得更加自然。它另外一个优点是它会自动将屏幕滚动到获得焦点的输入框处,这会带来非常流畅的用户体验。
它的使用方法同样非常简单 —— 只需要替换 基础代码 的 View。下面是具体代码,我会做一些相关的说明:
import React from 'react';

import { View, TextInput, Image } from 'react-native';

import { KeyboardAwareScrollView } from 'react-native-keyboard-aware-scroll-view'

import styles from './styles';

import logo from './logo.png';

const Demo = () => {

  return (

    <KeyboardAwareScrollView

      style={{ backgroundColor: '#4c69a5' }}

      resetScrollToCoords={{ x: , y:  }}

      contentContainerStyle={styles.container}

      scrollEnabled={false}

    >

        <Image source={logo} style={styles.logo} />

        <TextInput

          placeholder="Email"

          style={styles.input}

        />

        <TextInput

          placeholder="Username"

          style={styles.input}

        />

        <TextInput

          placeholder="Password"

          style={styles.input}

        />

        <TextInput

          placeholder="Confirm Password"

          style={styles.input}

        />

    </KeyboardAwareScrollView>

  );
首先你需要设置 ScrollView 的 backgroundColor(如果你想使用滚动的话)。接下来你需要告诉默认组件在哪里,当你的键盘收起时,界面就会返回到默认的那个位置 —— 如果省略 View 的这个 prop,可能会导致键盘在关闭之后界面依旧停留在顶部。
在设置好 resetScrollToCoords 这个 prop 之后你需要设置 contentContainerStyle —— 这本质上会替换掉你之前给 View 设置的样式。最后一件事是禁止掉从用户产生的滚动交互。这可能并不是完全适合你的 UI 交互(比如对于用户需要编辑很多字段的界面),但是在这里,允许用户滚动没有任何意义,因为并没有其它的内容需要用户来进行滚动操作。
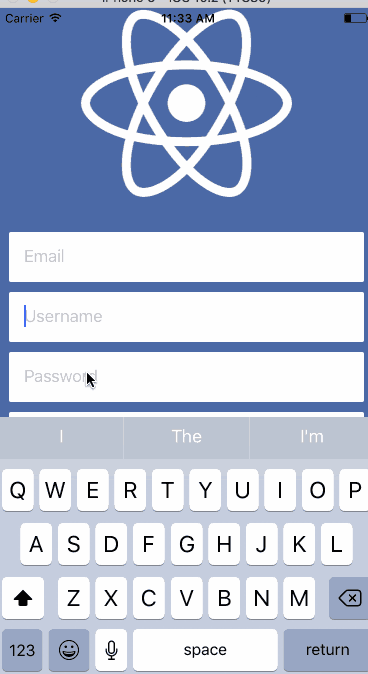
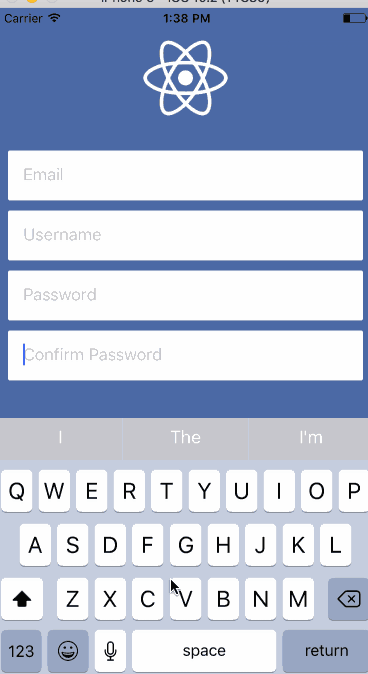
把这些所有的 prop 放到一起就会产生下面的效果,看起来很不错:
Keyboard Module
这是迄今为止最为手动的方式,但也同时给开发者最大的控制权。你可以使用一些动画库来帮助实现之前看到的那种平滑滚动。
React Native 在官方文档是没有说 Keyboard Module 可以监听从设备上产生的键盘事件。你使用的事件是 keyboardWillShow 和 keyboardWillHide,来产生一个键盘展开的动画(或者其他信息)。
当 keyboardWillShow 事件产生时,需要设置一个动画变量到键盘的最终高度,并使其与键盘弹出滑动时间保持一致。然后你可以用这个动画变量的值在容器的底部设置 padding,将所有的内容上移。
我会在后面展示具体代码,先展示一下上面所说的内容会产生的效果:

这次我将修复 UI 中的那个图片。为此,需要使用动画变量的值来管理图片的高度,你可以在弹出键盘的同时调整图片的高度。下面是具体代码:
import React, { Component } from 'react';

import { View, TextInput, Image, Animated, Keyboard } from 'react-native';

import styles, { IMAGE_HEIGHT, IMAGE_HEIGHT_SMALL} from './styles';

import logo from './logo.png';

class Demo extends Component {

  constructor(props) {

    super(props);

    this.keyboardHeight = new Animated.Value();

    this.imageHeight = new Animated.Value(IMAGE_HEIGHT);

  }

  componentWillMount () {

    this.keyboardWillShowSub = Keyboard.addListener('keyboardWillShow', this.keyboardWillShow);

    this.keyboardWillHideSub = Keyboard.addListener('keyboardWillHide', this.keyboardWillHide);

  }

  componentWillUnmount() {

    this.keyboardWillShowSub.remove();

    this.keyboardWillHideSub.remove();

  }

  keyboardWillShow = (event) => {

    Animated.parallel([

      Animated.timing(this.keyboardHeight, {

        duration: event.duration,

        toValue: event.endCoordinates.height,

      }),

      Animated.timing(this.imageHeight, {

        duration: event.duration,

        toValue: IMAGE_HEIGHT_SMALL,

      }),

    ]).start();

  };

  keyboardWillHide = (event) => {

    Animated.parallel([

      Animated.timing(this.keyboardHeight, {

        duration: event.duration,

        toValue: ,

      }),

      Animated.timing(this.imageHeight, {

        duration: event.duration,

        toValue: IMAGE_HEIGHT,

      }),

    ]).start();

  };

  render() {

    return (

      <Animated.View style={[styles.container, { paddingBottom: this.keyboardHeight }]}>

        <Animated.Image source={logo} style={[styles.logo, { height: this.imageHeight }]} />

        <TextInput

          placeholder="Email"

          style={styles.input}

        />

        <TextInput

          placeholder="Username"

          style={styles.input}

        />

        <TextInput

          placeholder="Password"

          style={styles.input}

        />

        <TextInput

          placeholder="Confirm Password"

          style={styles.input}

        />

      </Animated.View>

    );

  }

};

export default Demo;
它确实是一个和其他解决方案不一样的方案。使用 Animated.View 和 Animated.Image 而非 View 和 Image,以便可以使用动画变量的值。有趣的部分是 keyboardWillShow 和 keyboardWillHide,它们会改变动画变量的参数。
这里用两个动画同时并行驱动 UI 的改变。会给你留下下面的印象:
虽然写了非常多的代码,但好歹让整个操作看上去非常流畅。你有很大的余地去选择你要做什么,真正的自定义与你所关心内容的互动。
Combining Options
如果想提炼一些代码,我倾向于结合几种情况在一起。例如: 通选方案 1 和方案 3,你就只需要关心和图像高度相关的动画。
随着 UI 复杂性的增加,使用下面代码会比方案 3 精简很多:
import React, { Component } from 'react';

import { View, TextInput, Image, Animated, Keyboard, KeyboardAvoidingView } from 'react-native';

import styles, { IMAGE_HEIGHT, IMAGE_HEIGHT_SMALL } from './styles';

import logo from './logo.png';

class Demo extends Component {

  constructor(props) {

    super(props);

    this.imageHeight = new Animated.Value(IMAGE_HEIGHT);

  }

  componentWillMount () {

    this.keyboardWillShowSub = Keyboard.addListener('keyboardWillShow', this.keyboardWillShow);

    this.keyboardWillHideSub = Keyboard.addListener('keyboardWillHide', this.keyboardWillHide);

  }

  componentWillUnmount() {

    this.keyboardWillShowSub.remove();

    this.keyboardWillHideSub.remove();

  }

  keyboardWillShow = (event) => {

    Animated.timing(this.imageHeight, {

      duration: event.duration,

      toValue: IMAGE_HEIGHT_SMALL,

    }).start();

  };

  keyboardWillHide = (event) => {

    Animated.timing(this.imageHeight, {

      duration: event.duration,

      toValue: IMAGE_HEIGHT,

    }).start();

  };

  render() {

    return (

      <KeyboardAvoidingView

        style={styles.container}

        behavior="padding"

      >

          <Animated.Image source={logo} style={[styles.logo, { height: this.imageHeight }]} />

          <TextInput

            placeholder="Email"

            style={styles.input}

          />

          <TextInput

            placeholder="Username"

            style={styles.input}

          />

          <TextInput

            placeholder="Password"

            style={styles.input}

          />

          <TextInput

            placeholder="Confirm Password"

            style={styles.input}

          />

      </KeyboardAvoidingView>

    );

  }

};

export default Demo;
每种实现都有它的优点和缺点 —— 你必须选择最适合给定用户体验的方案。
如何让你的 React Native 应用在键盘弹出时优雅地响应的更多相关文章
- react native 之 获取键盘高度
多说不如多撸: /** * Created by shaotingzhou on 2017/2/23. *//** * Sample React Native App * https://github ...
- React Native(十三)——ios键盘挡住textInput
渐入佳境 用React Native重构的项目也快接近尾声,剩下的就是适配ios的功能了.慢慢地也从中琢磨出了一点门道,于是就遇见了键盘遮挡textInput问题斑斑: 正常页面: android点击 ...
- react native 获取 软键盘高度 和 新增软键盘的组件
import React, { Component } from 'react'; import { AppRegistry, StyleSheet, Text, View, Keyboard, Te ...
- react 点击空白处隐藏弹出层
点击空白处隐藏弹出层的原理是:在 document 上绑定事件来隐藏弹出层,这样点击任何元素的时候都会冒泡到 document 上,都会执行隐藏弹出层的功能.然后我们在不需要隐藏弹出层的元素上阻止冒泡 ...
- react native 0.6x 在创建项目时,CocoaPods 的依赖安装步骤卡解决方案
前言 你需要做两件事 gem换源 pod repo 换源 实战 如果你已经成功安装了CocoaPods.那么这里你需要卸载它.gem换源1. 卸载CocoaPods 查看gem安装的东西 gem li ...
- React Native:使用 JavaScript 构建原生应用
[转载] 本篇为联合翻译,译者:寸志,范洪春,kmokidd,姜天意 数月前,Facebook 对外宣布了正在开发的 React Native 框架,这个框架允许你使用 JavaScript 开发原生 ...
- React Native at first sight
what is React Native? 跟据官方的描述, React Native是一套使用 React 构建 Native app 的编程框架. 推出不久便引发了广泛关注, 这也得益于 Java ...
- 腾讯优测优分享 | 探索react native首屏渲染最佳实践
腾讯优测是专业的移动云测试平台,旗下的优分享不定时提供大量移动研发及测试相关的干货~ 此文主要与以下内容相关,希望对大家有帮助. react native给了我们使用javascript开发原生app ...
- 深入浅出 React Native:使用 JavaScript 构建原生应用
深入浅出 React Native:使用 JavaScript 构建原生应用 链接:https://zhuanlan.zhihu.com/p/19996445 原文:Introducing React ...
随机推荐
- Mysql for Linux安装配置之—— rpm(bundle)安装
1.准备及安装1)下载rpm安装包(或rpm bundle) rpm安装包包括两个(bundle会更多),一个是client,另一个是server,例如:MySQL-client-5.5.44-1. ...
- 【转】Code First 属性详解
下面解释每个配置的作用 Table :用于指定生成表的表名.架构信息. Column :用于指定生成数据表的列信息,如列名.数据类型.顺序等. Key :用于指定任何名称的属性作为主键列并且默认将此列 ...
- 禁止网站被别人通过iframe引用
https://blog.csdn.net/dugujiancheng/article/details/51669164 解决方案一:js方法这种方法不可靠,不推荐使用 <script type ...
- spring boot 入门 使用spring.profiles.active来分区配置
很多时候,我们项目在开发环境和生成环境的环境配置是不一样的,例如,数据库配置,在开发的时候,我们一般用测试数据库,而在生产环境的时候,我们是用正式的数据,这时候,我们可以利用profile在不同的环境 ...
- valgrind 工具介绍和简单的使用
最近老是遇上各种奇奇怪怪的core dump,不太会分析的情况下看到了这款工具.在这记录分享下. Valgrind 是个开源的工具,功能很多.例如检查内存泄漏工具---memcheck. Valgri ...
- CAFFE 调试
在Make.config 文件里将DEBUG=1的注释去掉,再make.可以用IDE如eclipse来import makefile工程.必要时按照IDE的提示将源文件cpp和对应的bin文件对应.
- swap分区不足ubuntu休眠
安装uswsusp Ubuntu gnu/linux只需 代码: sudo aptitude install uswsusp Arch gnu/linux系统 代码: sudo pacman -S u ...
- linux系统管理 vi编辑器
Vim是vi improved的缩写是vi的改进版本,vi被认为是事实上的标准编辑器 所有版本的Linux都带有vi编辑器 占用的资源少 与ed,ex等其他编辑器相比,vi对用户更加友好 进入vi编辑 ...
- html 多媒体使用
HTML插件 辅助应用程序(helper application)是由浏览器启动的程序,辅助应用程序也称为插件. 辅助应用程序可用于播放音频和视频(或其他 ).辅助程序是使用<Object> ...
- 计算机基础part1
一:计算机的基本组成 1.计算机由输入单元.控制单元.算法逻辑单元.输出单元.存储单元,五大单元组成 二:概念篇 CPU:中央处理器,其内含有指令集(取码-解码-执行的过程) CPU同一时刻只能干一件 ...