
【idea&spring mvc】搭建简易的spring mvc项目(基于maven)!
一、创建项目
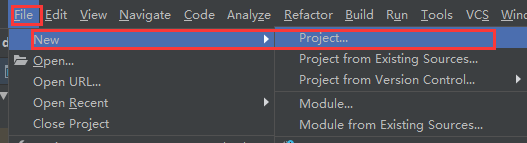
1、打开idea,file--new--project
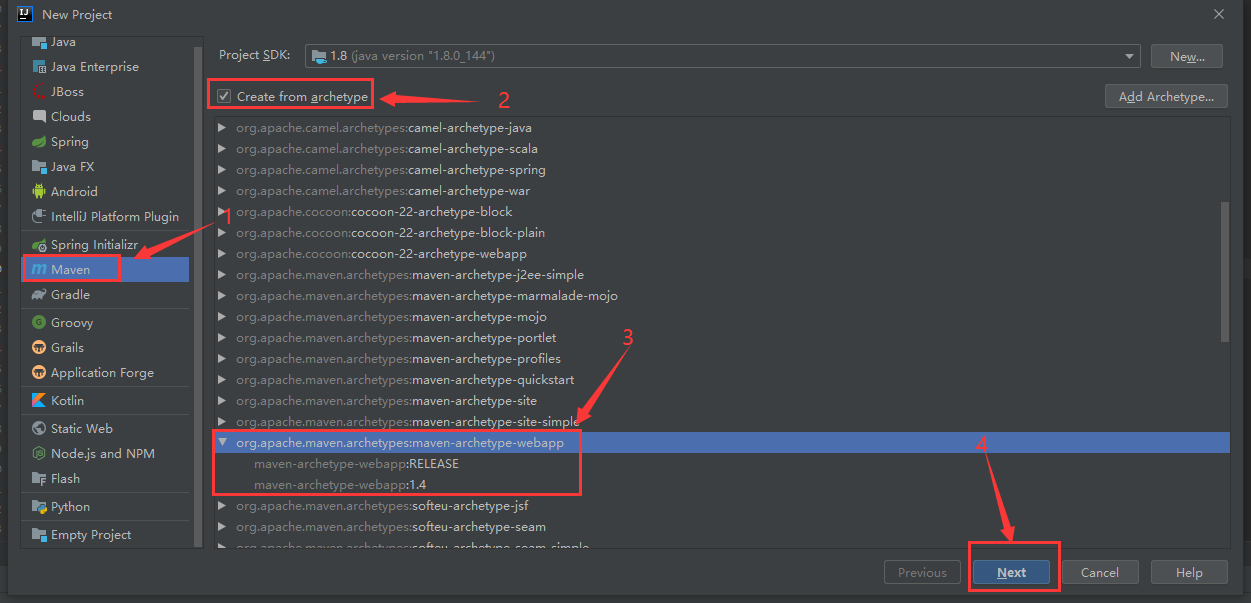
2、按照步骤①②③④操作
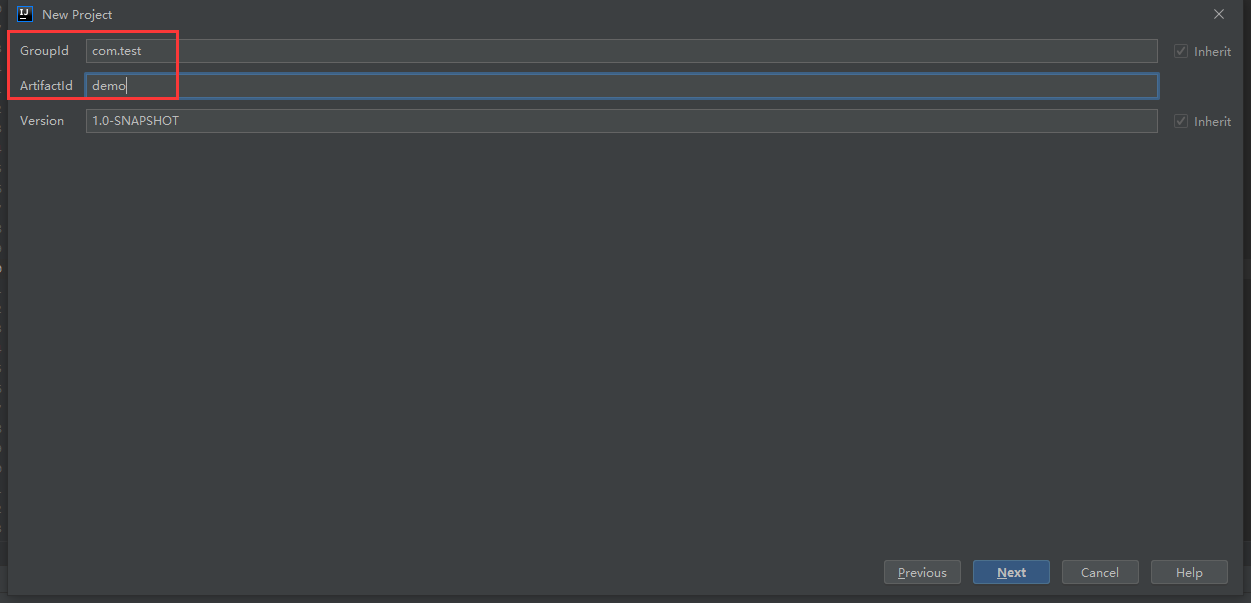
3、输入包名,并点击下一步
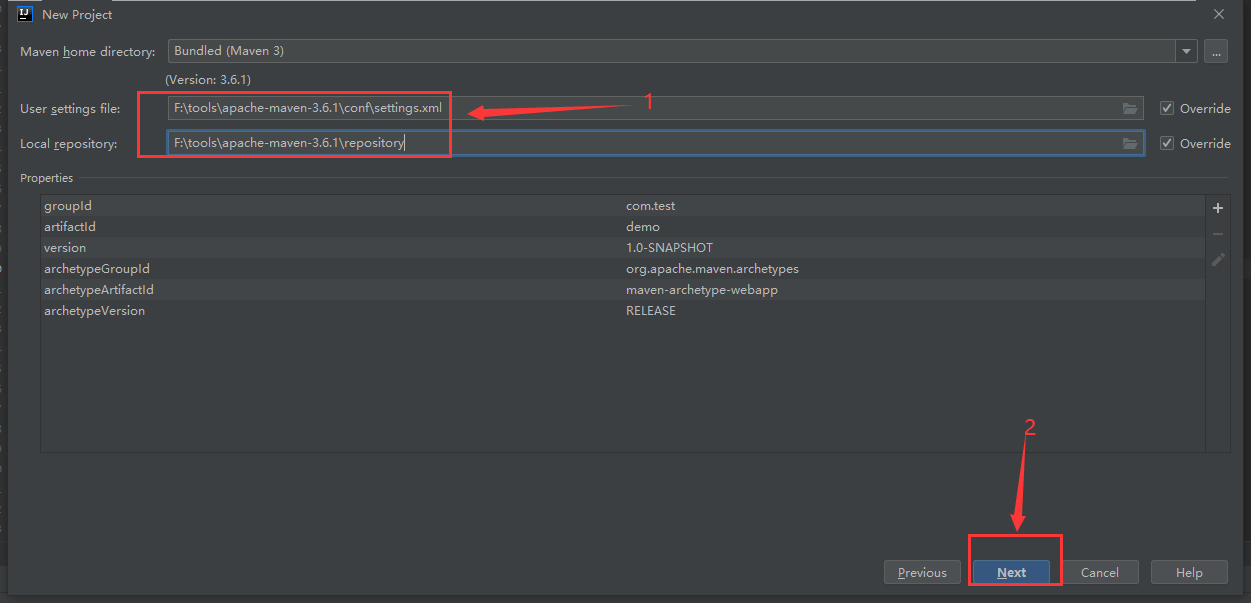
4、选择下载包的maven的setting.xml配置路径和包的存放地,然后点击next
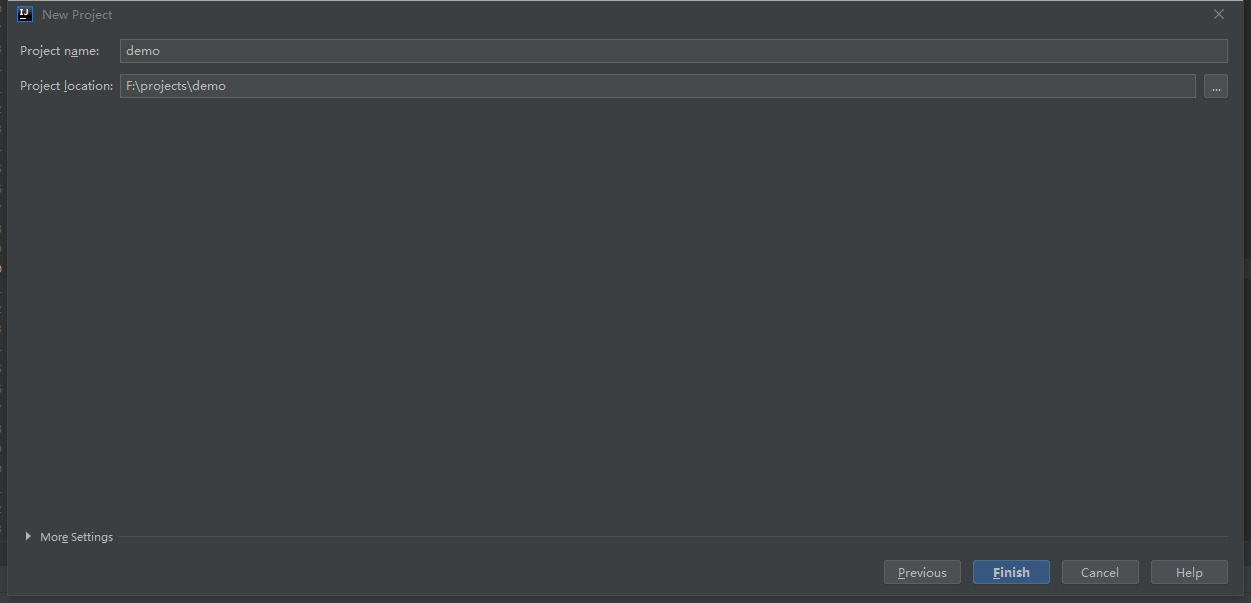
5、确认最终的项目存放目录和项目名,点击finish
二、项目配置
1、在webapp/WEB-INF/web.xml里面配置web服务调度器和启动的一些xml配置参数等
<?xml version="1.0" encoding="UTF-8"?>

<web-app xmlns:xsi="http://www.w3.org/2001/XMLSchema-instance"

         xmlns="http://java.sun.com/xml/ns/javaee" xmlns:web="http://java.sun.com/xml/ns/javaee/web-app_2_5.xsd"

         xsi:schemaLocation="http://java.sun.com/xml/ns/javaee http://java.sun.com/xml/ns/javaee/web-app_2_5.xsd"

         id="WebApp_ID" version="2.5">

  <display-name>demo</display-name>

  <welcome-file-list>

    <welcome-file>index.html</welcome-file>

    <welcome-file>index.htm</welcome-file>

    <welcome-file>index.jsp</welcome-file>

  </welcome-file-list>

  <listener>

    <listener-class>org.springframework.web.servlet.DispatcherServlet</listener-class>

  </listener>

  <servlet>

    <servlet-name>springmvc</servlet-name>

    <servlet-class>org.springframework.web.servlet.DispatcherServlet</servlet-class>

    <init-param>

      <param-name>contextConfigLocation</param-name>

      <param-value>classpath:root.xml</param-value>

    </init-param>

    <load-on-startup>1</load-on-startup>

  </servlet>

  <servlet-mapping>

    <servlet-name>springmvc</servlet-name>

    <url-pattern>/*</url-pattern>

  </servlet-mapping>

</web-app>
注意:classpath加载的东西是随着项目启动而加载的,无需加载的则不需要配置
3、resources/root.xml文件配置
<?xml version="1.0" encoding="UTF-8"?>

<beans xmlns="http://www.springframework.org/schema/beans"

       xmlns:xsi="http://www.w3.org/2001/XMLSchema-instance"

       xsi:schemaLocation="http://www.springframework.org/schema/beans

       http://www.springframework.org/schema/beans/spring-beans-4.0.xsd">

    <!-- 注解、扫包、读取配置文件内容 -->

    <import resource="spring-mvc.xml" />

    <import resource="classpath:/spring/base-context.xml"/>

</beans>
注意:import是要导入的一些xml文件,此处导入了sprin-mvc.xml(mvc的web文件)文件和base-context.xml文件(基础的配置文件)
4、resources/spring-mvc.xml文件配置
<?xml version="1.0" encoding="UTF-8"?>

<beans xmlns="http://www.springframework.org/schema/beans"

    xmlns:context="http://www.springframework.org/schema/context"

    xmlns:xsi="http://www.w3.org/2001/XMLSchema-instance" xmlns:mvc="http://www.springframework.org/schema/mvc"

    xsi:schemaLocation="http://www.springframework.org/schema/beans

    http://www.springframework.org/schema/beans/spring-beans-3.1.xsd

    http://www.springframework.org/schema/context

    http://www.springframework.org/schema/context/spring-context-3.0.xsd

    http://www.springframework.org/schema/mvc

    http://www.springframework.org/schema/mvc/spring-mvc.xsd">

    <!-- 这里是扫描controller-->

    <context:component-scan base-package="com.test.controller"/>

    <mvc:default-servlet-handler/>

    <mvc:annotation-driven />

</beans>
这里是扫描controller层的代码目录,在base-package下,其他的配置一般不动
5、resources/spring/base-context.xml文件配置
<?xml version="1.0" encoding="UTF-8"?>

<beans xmlns="http://www.springframework.org/schema/beans"

       xmlns:xsi="http://www.w3.org/2001/XMLSchema-instance"

       xmlns:context="http://www.springframework.org/schema/context"

       xsi:schemaLocation="http://www.springframework.org/schema/beans http://www.springframework.org/schema/beans/spring-beans-4.0.xsd http://www.springframework.org/schema/context http://www.springframework.org/schema/context/spring-context.xsd">

    <!-- 引入定义/props/*.properties配置文件 -->

    <context:property-placeholder location="classpath:/props/*.properties" ignore-unresolvable="true"/>

    <!--<context:property-placeholder location="classpath:/data/*" ignore-unresolvable="true"/>-->

    <!-- spring 扫描所有注解-->

    <context:component-scan base-package="com.test">

         <!-- spring 排除@Controller -->

        <context:exclude-filter type="annotation" expression="org.springframework.stereotype.Controller"/>

    </context:component-scan>

</beans>
注意:这里是扫描除controller外的其他代码随着服务启动而初始化的配置项。如service和resources下的一些静态文件等
6、代码分层中的controller添加对外的访问路径、service层实现具体的业务逻辑、dao层是对于数据库操作的接口层(对应还有service下的mapper映射以及xml映射,若没有数据库操作则无需这些)、model层对应数据库的实体类层(也可使用bean)、util层对应的一些工具类层、enums层对应的是一些枚举映射(以上是基本的分层设计)
package com.test.controller;

import com.test.services.impl.CommonServiceImpl;

import org.springframework.stereotype.Controller;

import org.springframework.web.bind.annotation.CrossOrigin;

import org.springframework.web.bind.annotation.RequestMapping;

import org.springframework.web.bind.annotation.RequestMethod;

import org.springframework.web.bind.annotation.ResponseBody;

import javax.annotation.Resource;

import javax.servlet.http.HttpServletRequest;

import javax.servlet.http.HttpServletResponse;

@Controller

@RequestMapping(value = "/common")

public class TestController {

    @ResponseBody

    @CrossOrigin

    @RequestMapping(value ="/getSMSRecord.html",method =  RequestMethod.GET,produces = "text/html;charset=utf8")

    public String test(HttpServletRequest req, HttpServletResponse res){

        String mobile = req.getParameter("mobile");

        String env = req.getParameter("env");

        return "success";

    }

}
注意:以上是controller层的代码示例;@Controller标识这个类是对外的服务的(必加);@RequestMapping标识对外映射的路径(必加,值自定义);@ResponseBody表示这个方法是对外的方法(关于spring的一些注解可百度自行搜索)
以上就是spring-mvc的简单项目配置(连接数据库除外//todo),若还想要本地调试,则还需要配置本地tomcat启动
三、配置tomcat启动本地服务
1、首先下载tomcat服务器,至少是8.0以上,并解压
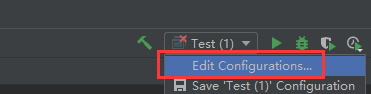
2、从以下入口编辑启动配置
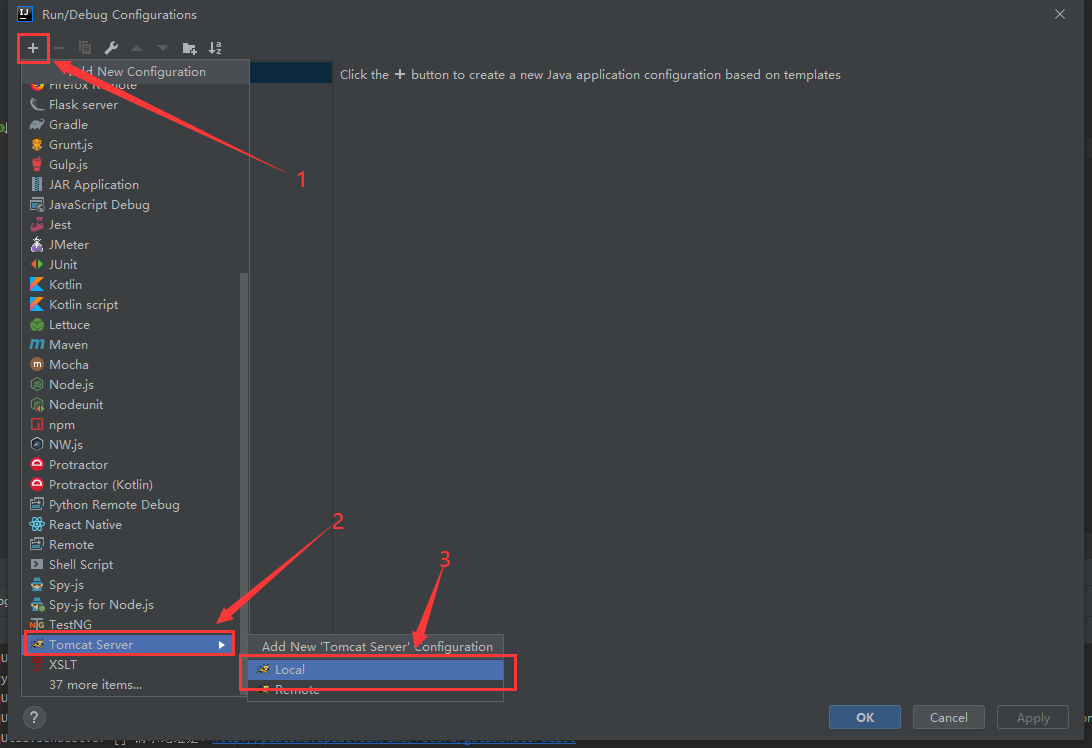
3、按照以下顺序添加tomcat本地服务器
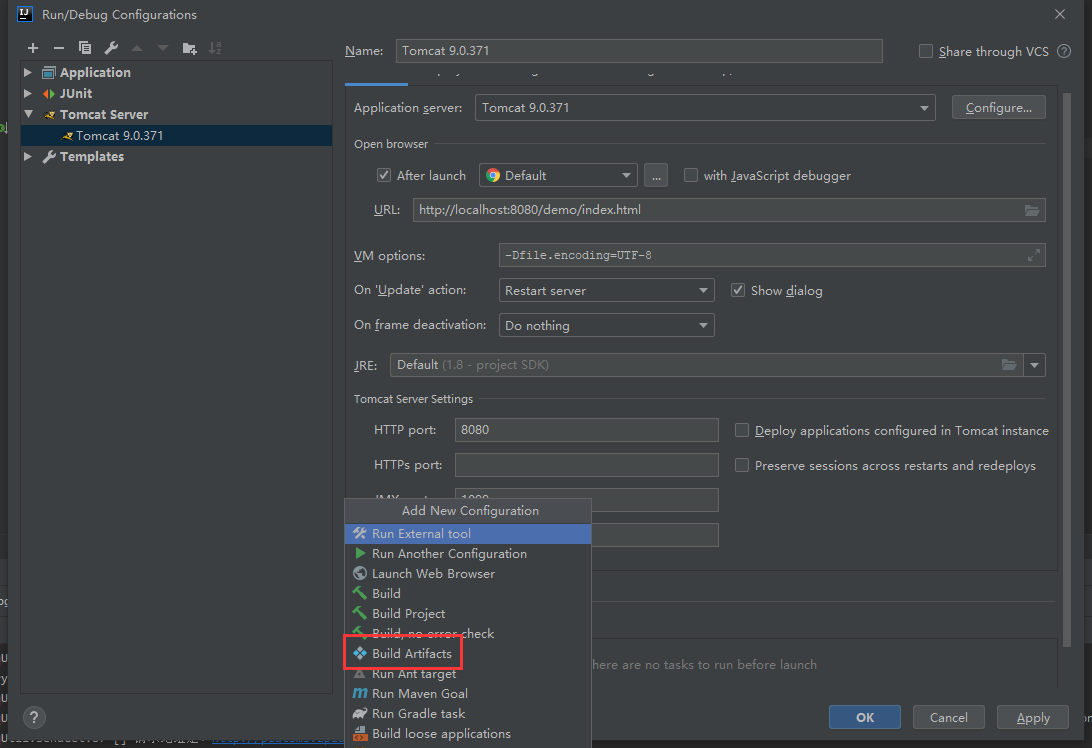
4、再次点击第三步的编辑配置,然后选中刚才的tomcat,会出现下面的页面,并配置相关的参数
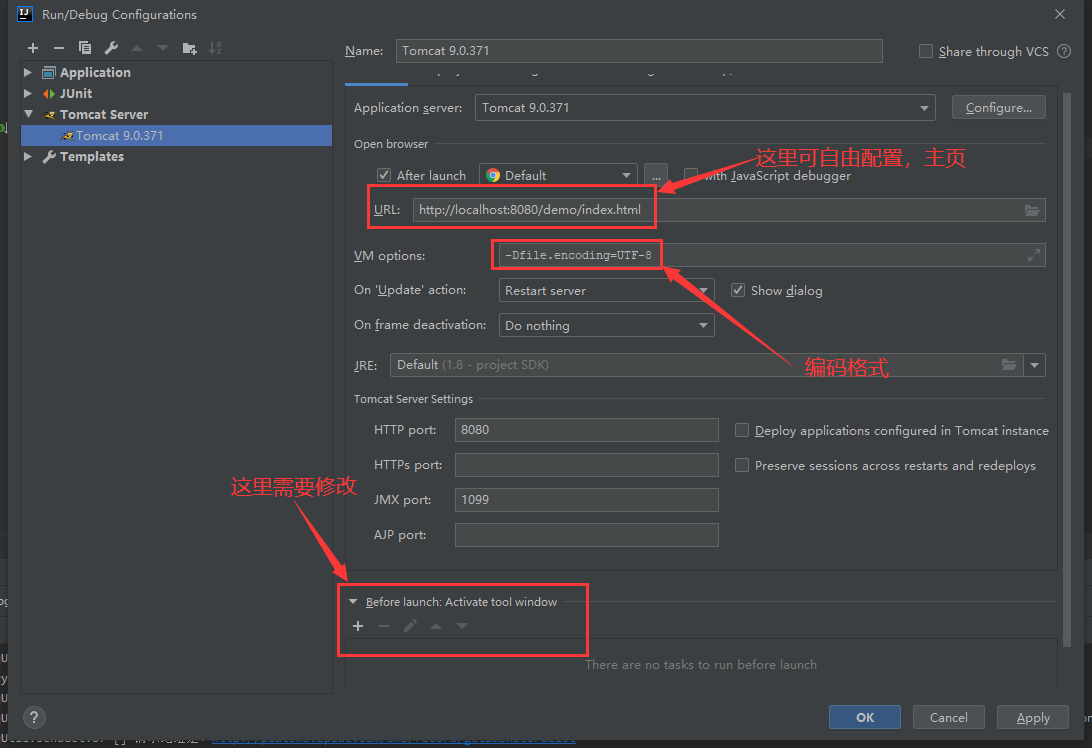
5、点击上一步的第③步的“+”号会出现以下画面,选中红框的那个
6、勾选中出现的额war包,并点击ok
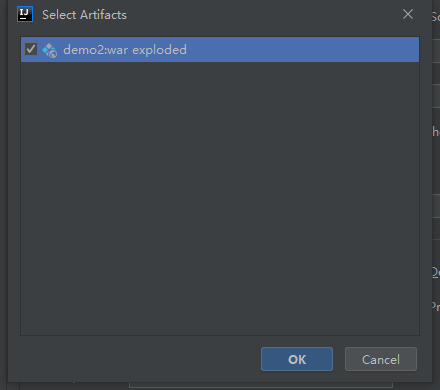
7、最后点击页面右下角的apply,然后就能本地运行服务了。
注意:index.xml里面的内容是主页的内容,可自定义设置任何值。
注意2:没出现第六步的war包需要手动通过maven编译器打一个war包(需要依赖pom的一些配置参数,可自行百度//todo)
【idea&spring mvc】搭建简易的spring mvc项目(基于maven)!的更多相关文章
- 一步一步深入spring(1)--搭建和测试spring的开发环境
1.引用jar包 到spring的网站上下载spring的jar包(本文是2.5.6),解压缩后找到 使用spring必须引用的jar包 spring.jar commons-logging.jar ...
- ActiveMQ JMS 项目 基于 Maven 搭建 部署
JAVA版本: IntellJ IDEA 版本: IntelliJ IDEA 2017.2Build #IU-172.3317.76, built on July 15, 2017Licensed t ...
- ASP.NET Core ASP.NET Core+MVC搭建及部署
ASP.NET Core+MVC搭建及部署 一.创建项目: 1.选择ASP.NET Core Web Application(.NET Core) 注意框架 2.选择Web Application: ...
- Spring MVC 项目搭建 -3- 快速 添加 spring security
Spring MVC 项目搭建 -3- 快速 添加 spring security 1.添加 spring-sample-security.xml <!-- 简单的安全检验实现 --> & ...
- 基于Maven的Spring + Spring MVC + Mybatis的环境搭建
基于Maven的Spring + Spring MVC + Mybatis的环境搭建项目开发,先将环境先搭建起来.上次做了一个Spring + Spring MVC + Mybatis + Log4J ...
- Spring MVC 搭建web项目示例
环境为Eclipse 1:新建Dynamic web project : springMvcDemo 2:下载spring的jar包,把jar包复制到WEB-INF/lib目录下 3.添加配置文件w ...
- 25、ASP.NET MVC入门到精通——Spring.net-业务层仓储
本系列目录:ASP.NET MVC4入门到精通系列目录汇总 上一节,我们已经把项目框架的雏形搭建好了,那么现在我来开始业务实现,在业务实现的过程当中,不断的来完善我们现有的框架. 1.假设我们来做一个 ...
- Spring MVC 3.0.5+Spring 3.0.5+MyBatis3.0.4全注解实例详解(二)
在上一篇文章中我详细的介绍了如何搭建maven环境以及生成一个maven骨架的web项目,那么这章中我将讲述Spring MVC的流程结构,Spring MVC与Struts2的区别,以及例子中的一些 ...
- 从一个简单案例上手Spring MVC,同时分析Spring MVC面试问题
很多公司都会用Spring MVC,而且初级程序员在面试时,一定会被问到这方面的问题,所以这里我们来通过一个简单的案例来分析Spring MVC,事实上,我们在培训中就用这个举例,很多零基础的程序员能 ...
随机推荐
- Wampserver报错、橙色、mysql打不开
Wampserver下的几个常见的问题 最近在弄Wampserver,发现有几个问题存留在这里,今天就来解决一下吧 首先就是关于报错的这个一个问题: 第二就是关于一直不变绿的原因 关于报错: 在我的电 ...
- leetcode刷题-86分隔链表
题目 给定一个链表和一个特定值 x,对链表进行分隔,使得所有小于 x 的节点都在大于或等于 x 的节点之前. 你应当保留两个分区中每个节点的初始相对位置. 示例: 输入: head = 1->4 ...
- Git 沙盒模拟实战(基础篇)
Git 沙盒模拟实战 分支 现有一个主分支 创建分支 # 创建分支 $ git branch bugFix # 切换到指定分支 $ git checkout bugFix 或者 # 创建分支,并切换到 ...
- 11.redis cluster的hash slot算法和一致性 hash 算法、普通hash算法的介绍
分布式寻址算法 hash 算法(大量缓存重建) 一致性 hash 算法(自动缓存迁移)+ 虚拟节点(自动负载均衡) redis cluster 的 hash slot 算法 一.hash 算法 来了一 ...
- python文件的读写权限以及相关应用read、write和文件指针
f=open('ceshi.txt','a',encoding='utf-8')r=open('ceshi.txt','r',encoding='utf-8')上面的2种写法可以用with来写:wit ...
- VS调试出现解决 尝试加载 Oracle 客户端库时引发 BadImageFormatException。如果在安装 32 位 Oracle 客户端组件的情况下以 64 位模式运行,将出现此问题
- Robotframework自动化7-数据库连接
一.连接mysql数据库 1.安装pymysql: pip install pymysql pip install robotframework-databaselibrary 导入库Datab ...
- Java学习预热
预备知识 什么是计算机 点击进入百度百科(计算机) 计算机硬件组成 主要部件 CPU 内存 主板 IO设备 键盘 鼠标 麦克风 显示器 音箱 冯·诺依曼体系结构 计算机软件 系统软件 DOS wind ...
- python文档翻译之概述
Python是一个使用方便且功能强大的变成语言.它具有高效的高级数据结构和面向对象编程特性.其优雅的语法.动态类型.解释型特性使得它成为大多数平台上脚本和快速应用程序开发的理想语言. Python解释 ...
- 登录、认证、token处理、前台cookie存储token
免费课程相关表设计 models的设计 from django.contrib.contenttypes.fields import GenericRelation class Course(mode ...