
CCNP之OSPF实验报告
OSPF实验报告
一、实验要求
1、R4为ISP,其上只能配置IP地址;R4与其它所有直连设备间使用公有IP
2、R3——R5/6/7为MGRE环境,R3为中心站点
3、整个OSPF环境IP地址为172.16.0.0/16
4、所有设备均可访问R4的环回
5、减少LSA的更新量,加快收敛,保证更新安全
6、全网可达
二、实验拓扑图
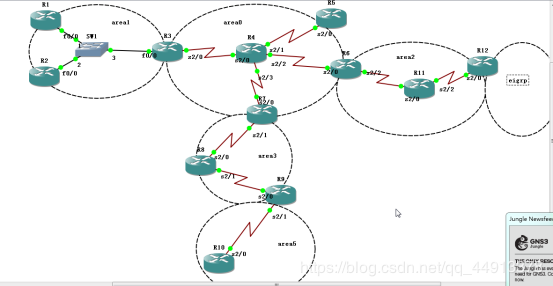
三、OSPF知识点介绍
- Open Shortest Path First,最短路径优先
(1)基本概念
- 标准的LS型协议---->共享拓扑
- 组播更新----->224.0.0.5/6
- 触发更新,存在周期更新---->30min
- 是跨层封装协议,协议号--->89
- 需要结构化部署----->1.区域划分 2.IP地址规划
- 链路状态型路由协议的距离矢量特征:在OSPF中,区域内传拓扑,区域间传路由
- 管理距离----->110
- 度量值------->使用cost值作为度量值,有计算公式
(2)OSPF的数据包
- hello---->用于发现、建立和保活(10s)邻居关系。存在全网唯一的Router-ID,表示路由器建立邻居关系所用的身份标识,使用IP地址的方式表示
- DbD---->Database Description,携带着链路状态的目录
- LSR---->链路状态请求
- LSU---->链路状态更新--携带了真正的LSA
- LSAck---->确认
LSA:链路状态通告,就是OSPF中不同拓扑或路由信息
LSDB:链路状态数据库,是所有LSA的集合
(3)OSPF状态机:
- down----->未开启OSPF协议。一旦启动协议并宣告之后,接口发出hello包,立即切换到下一状态
- Init----->初始化状态,若接收到的hello包中存在自己的router-id,则和对方一起进入下一状态
- 2-way----->此状态表明邻居关系建立完成
- 条件匹配----->关注网络类型,点到点网络类型直接将进入邻接关系的建立,MA网络类型需要DR/BDR的选举,选举时间40s
- Exstart----->预启动,双方使用类hello的DBD包,进行主从关系选举-比较RID,大者优先进入下一状态
- Exchange----->准交换,交互真正的DBD报文,需要使用ACK确认
- Loading----->加载,使用LSR/LSU/LSAck获取未知的LSA信息
- Full----->邻接关系建立完成
- 启动配置完成后,本地基于224.0.0.5组播收发hello包,建立邻居关系,生成邻居
- 再进行条件的匹配,匹配失败将停留于邻居关系,仅hello包周期保活即可
- 匹配成功者间可以建立邻接(毗邻)关系,需要DBD共享数据库目录,LSR/LSU/LSack来获取未知的LSA信息,当收集完网络中所有的LSA后,生成数据表--LSDB
- LSDB建立完成后,本地基于SPF选路规则,计算本地到达所有未知网段的最短路径,然后将其加载到路由表中;完成收敛
- 收敛完成后--hello包周期保活 -- 30min周期的DBD比对,若不一致将使用LSR/LSU/LSack重新获取
四、划分IP地址
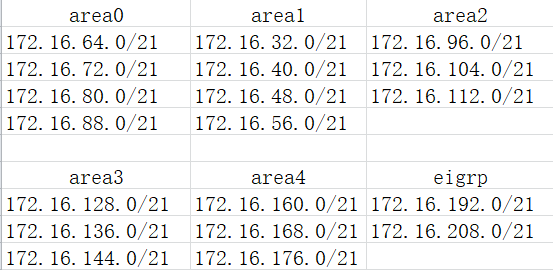
五、配置
1.配置IP地址和环回
R1配置:
R1(config)#int lo 1
R1(config-if)#ip add 172.16.32.1 255.255.248.0
R1(config-if)#int f0/0
R1(config-if)#ip add 172.16.40.0 255.255.248.0
R1(config-if)#no shu
R2配置:
R2(config)#int lo 1
R2(config-if)#ip add 172.16.48.1 255.255.248.0
R2(config-if)#int f0/0
R2(config-if)#ip add 172.16.40.2 255.255.248.0
R2(config-if)#no shut
R3的配置:
Enter configuration commands, one per line. End with CNTL/Z.
R3(config)#int s2/0
R3(config-if)#ip add 34.1.1.1 255.255.255.0
R3(config-if)#no shut
R4的配置:
R4(config)#int lo 1
R4(config-if)#ip add 4.4.4.4 255.255.255.0
R5的配置:
R5(config)#int s2/0
R5(config-if)#ip add 45.1.1.1 255.255.255.0
R5(config-if)#no shu
R5(config-if)#int lo 1
R5(config-if)#ip add 172.16.72.1
R6的配置:
R6(config)#int s2/0
R6(config-if)#ip add 46.1.1.1 255.255.255.0
R6(config-if)#int lo 1
R6(config-if)#ip add 172.16.80.1 255.255.248.0
R6(config-if)#no shu
R6(config-if)#int s2/2
R6(config-if)#ip add 172.16.96.1 255.255.248.0
R6(config-if)#no
R7的配置:
R7(config)#int s2/0
R7(config-if)#ip add 47.1.1.1 255.255.255.0
R7(config-if)#no shu
R7(config-if)#int lo 1
R7(config-if)#ip add 172.16.88.1 255.255.248.0
R7(config-if)#int s2/1
R7(config-if)#ip address 172.16.128.1 255.255.248.0
R7(config-if)#no shu
R8的配置:
R8(config)#int s2/0
R8(config-if)#ip add 172.16.136.1 255.255.248.0
R8(config-if)#no shut
R8(config-if)#int s2/1
R8(config-if)#ip add 172.16.144.1 255.255.248.0
R8(config-if)#no shut
R9的配置:
R9(config)#int s2/0
R9(config-if)#ip add 172.16.144.2 255.255.248.0
R9(config-if)#no shut
R9(config-if)#int s2/1
R9(config-if)#ip add 172.16.168.1 255.255.248.0
R9(config-if)#no shut
R9(config-if)#int lo 1
R9(config-if)#ip address 172.16.160.1 255.255.248.0
R10的配置:
R10(config)#int s2/0
R10(config-if)#ip add 172.16.168.2 255.255.248.0
R10(config-if)#no shu
R10(config-if)#int lo 1
R10(config-if)#ip add 172.16.176.1 255.255.248.0
R10(config-if)#end
R11的配置:
R11(config)#int s2/0
R11(config-if)#ip address 172.16.96.2 255.255.248.0
R11(config-if)#no shut
R11(config-if)#int lo 1
R11(config-if)#ip add 172.16.104.1 255.255.248.0
R11(config-if)#int s2/2
R11(config-if)#ip add 172.16.112.1 255.255.248.0
R11(config-if)#no shu
R12的配置:
R12(config)#int s2/0
R12(config-if)#ip add 172.16.112.2 255.255.248.0
R12(config-if)#no shut
R12(config-if)#int lo 1
R12(config-if)#ip add 172.16.192.1 255.255.240.0
R12(config-if)#int lo 2
R12(config-if)#ip address 172.16.208.1 255.255.240.0
2.中心站点设置
将R3设为中心站点
R3(config)#int tunnel 1
R3(config-if)#ip add 172.16.64.1 255.255.248.0
R3(config-if)#tunnel source 34.1.1.1
R3(config-if)#tunnel mode gre multipoint
R3(config-if)#ip nhrp map multicast dy
R3(config-if)#ip nhrp network-id 100
3.隧道技术
- 一种简单的VPN技术,普通的tunnel为点到点网络类型
- 原理:生成隧道接口,流量通过路由查询后,若通过隧道接口转发时,需要在原有的三层报头前,再添加一个共有地址间的报头
- 将两个仅可以通过WAN通讯的LAN,合成一个
- 注意:建立tunnel,还需要编辑路由表,来将流量引向隧道接口
配置
R5配置:
R5(config)#ip rou 0.0.0.0 0.0.0.0 45.1.1.2
R5(config)#int tunnel 1
R5(config-if)#ip add 172.16.64.2 255.255.248.0
R5(config-if)#tunnel source s2/0
R5(config-if)#tunnel mode gre multipoint
R5(config-if)#ip nhrp nhs 172.16.64.1
R5(config-if)#ip nhrp map 172.16.64.1 34.1.1.1
R5(config-if)#ip nhrp network-id 100
R6配置:
R6(config)#ip route 0.0.0.0 0.0.0.0 46.1.1.2
R6(config)#int tunnel 1
R6(config-if)#ip address 172.16.64.3 255.255.248.0
R6(config-if)#tunnel source s2/0
R6(config-if)#tunnel mode gre multipoint
R6(config-if)#ip nh nhs 172.16.64.1
R6(config-if)#ip nhrp map 172.16.64.1 34.1.1.1
R6(config-if)#ip nhrp network-id 100
R7配置:
R7(config)#ip route 0.0.0.0 0.0.0.0 47.1.1.2
R7(config)#int tunnel 1
R7(config-if)#ip add 172.16.64.4 255.255.248.0
R7(config-if)#tunnel source s2/0
R7(config-if)#tunnel mode gre multipoint
R7(config-if)#ip nhrp nhs 172.16.64.1
R7(config-if)#ip nh map 172.16.64.1 34.1.1.1
R7(config-if)#ip nhrp network-id 100
4.开启OSPF配置:
R1配置:
R1(config)#router ospf 1
R1(config-router)#router-id 1.1.1.1
R1(config-router)#network 172.16.0.0 0.0.255.255 a 1
R2配置:
R2(config)#router ospf 1
R2(config-router)#router-id 2.2.2.2
R2(config-router)#net172.16.0.0 0.0.255.255 a 1
R3配置:
R3(config)#router ospf 1
R3(config-router)#router-id 3.3.3.3
R3(config-router)#net 172.16.40.3 0.0.0.0 a 1
R3(config-router)#net 172.16.64.1 0.0.0.0 a 0
R3(config-router)#net 172.16.56.1 0.0.0.0 a 1
R5配置:
R5(config)#router ospf 1
R5(config-router)#router-id 5.5.5.5
R5(config-router)#net 172.16.0.0 0.0.255.255 a 0
R6配置:
R6(config)#router ospf 1
R6(config-router)#router-id 6.6.6.6
R6(config-router)#net 172.16.64.3 0.0.0.0 a 0
R6(config-router)#net 172.16.80.1 0.0.0.0 a 0
R6(config-router)#network 172.16.96.1 0.0.0.0 a 2
R7配置:
R7(config)#router ospf 1
R7(config-router)#router-id 7.7.7.7
R7(config-router)#net172.16.64.4 0.0.0.0 a 0
R7(config-router)#net 172.16.88.1 0.0.0.0 a 0
R7(config-router)#net 172.16.128.1 0.0.0.0 a 3
R8配置:
R8(config)#router ospf 1
R8(config-router)#router-id 8.8.8.8
R8(config-router)#network 172.16.0.0 0.0.255.255 a 3
R11配置:
R11(config)#router ospf 1
R11(config-router)#router-id 11.11.11.11
R11(config-router)#network 172.16.0.0 0.0.255.255 a 2
R12配置:
R12(config)#router ospf 1
R12(config-router)#router-id 12.12.12.12
R12(config-router)#network 172.16.112.2 0.0.0.0 a 2
R12(config-router)#exit
R12(config)#router eigrp 90
R12(config-router)#network 172.16.192.1 0.0.0.0
R12(config-router)#network 172.16.208.1 0.0.0.0
R12(config-router)#no auto-summary
5.开启伪广播
R5(config)#int tunnel 1
R5(config-if)#ip nhrp map multicast 34.1.1.1
R6(config)#int tunnel 1
R6(config-if)#ip nhrp map multicast 34.1.1.1
R7(config)#int tunnel 1
R7(config-if)#ip nhrp map multicast 34.1.1.1
6.点到点配置
- 点到点:仅适用于一个网段两个节点的网;
- 在MGRE环境下若适用tunnel口默认的工作方式,那么一个网段内若存在两个以上节点将出现邻居关系翻滚
配置:
R5配置:
R5(config)#int tunnel 1
R5(config-if)#ip ospf net point-to-multipoint
R6配置:
R6(config)#int tunnel 1
R6(config-if)#ip ospf net point-to-multipoint
R7配置:
R7(config)#int tunnel 1
R7(config-if)#ip ospf network point-to-multipoint
R3配置:
R3(config)#int tunnel 1
R3(config-if)#ip ospf network point-to-multipoint
7.宣告和重发布:
- 一台设备同时运行于两个协议或两个进程,默认从两端学习到的路由条目不共享;重发布技术就是人为的进行共享
- 规则:
将A协议发布到B协议时,在ASBR上的B协议中配置
将A协议发布到B协议时,将ASBR上所有通过A协议学习,及ASBR直连到A协议中的所有路由全部共享到B协议中
- 名词:
单点单向重发布
单点双向重发布
多点单向(双向)重发布
R9配置:
R9(config)#router ospf 1
R9(config-router)#router-id 9.9.9.9
R9(config-router)#network 172.16.144.2 0.0.0.0 a 3
R9(config)#router ospf 2
R9(config-router)#router-id 99.9.9.9
R9(config-router)#network 172.16.160.1 0.0.0.0 a 4
R9(config-router)#network 172.16.168.1 0.0.0.0 a 4
R9(config-router)#exit
R9(config)#router ospf 1
R9(config-router)#redistribute ospf 2 subnets
R9(config-router)#exit
R9(config)#router ospf 2
R9(config-router)#redistribute ospf 1 subnets
R12的配置:
R12(config)#router ospf 1
R12(config-router)#router-id 12.12.12.12
R12(config-router)#network 172.16.112.2 0.0.0.0 a 2
R12(config-router)#exit
R12(config)#router eigrp 90
R12(config-router)#network 172.16.192.1 0.0.0.0
R12(config-router)#network 172.16.208.1 0.0.0.0
R12(config-router)#no auto-summary
R12(config-router)#exit
R12(config)#router ospf 1
R12(config-router)#redistribute eigrp 90 subnets
R10的配置:
R10(config)#router ospf 1
R10(config-router)#router-id 10.10.10.10
R10(config-router)#network 172.16.0.0 0.0.255.255 a 4
8.NAT配置
R3配置:
R3(config)#int serial 2/0
R3(config-if)#ip nat outside
R3(config-if)#int f0/0
R3(config-if)#ip nat inside
R3(config)#access-list 1 permit 172.16.0.0 0.0.255.255
R3(config)#ip nat inside source list 1 interface serial 2/0
R5的配置:
R5(config)#access-list 1 permit 172.16.0.0 0.0.255.255
R5(config)#int s2/0
R5(config-if)#ip nat outside
R5(config-if)#exit
R5(config)#ip nat inside source list 1 interface s2/0
R6的配置:
R6(config)#int s2/0
R6(config-if)#ip nat outside
R6(config-if)#int s2/2
R6(config-if)#ip nat inside
R6(config-if)#exit
R6(config)#access-list 1 permit 172.16.0.0 0.0.255.255
R6(config)#ip nat inside source list 1 int s2/0
R7的配置:
R7(config)#access-list 1 permit 172.16.0.0 0.0.255.255
R7(config)#int s2/0
R7(config-if)#ip nat outside
R7(config-if)#int s2/1
R7(config-if)#ip nat inside
R7(config-if)#exit
R7(config)#ip nat inside source list 1 int s2/0
9.缺省路由:(专用命令)
R3的配置:
R3(config)#router ospf 1
R3(config-router)#default-information originate
R6(config)#router ospf 1
R6(config-router)#default-information originate
R7的配置:
R7(config)#router ospf 1
R7(config-router)#default-information originate
R9的配置:
R9(config)#router ospf 2
R9(config-router)#default-information originate
R9(config-router)#end
10.手工汇总
- 减少骨干区域LSA量
area 0上的汇总:
R3(config)#router ospf 1
R3(config-router)#area 1 range 172.16.32.0 255.255.224.0
area 2上的汇总:
R6(config)#router ospf 1
R6(config-router)#area 2 range 172.16.96.0 255.255.224.0
area 3上的汇总:
R7(config)#router ospf 1
R7(config-router)#area 3 range 172.16.128.0 255.255.224.0
域外汇总:
eigrp上的汇总
R12(config)#router ospf 1
R12(config-router)#summary-address 172.16.192.0 255.255.224.0
area 4上的汇总:
R9(config)#router ospf 1
R9(config-router)#summary-address 172.16.160.0 255.255.224.0
11.完全末梢
特殊区域:
该类在area 1 上:
R1(config)#router ospf 1
R1(config-router)#area 1 stub
- stub,末梢区域—拒绝4/5类的LSA,ABR自动产生3类缺省发向该区域
R2(config)#router ospf 1
R2(config-router)#area 1 stub
R3(config)#router ospf 1
R3(config-router)#area 1 stub
仅在ABR
完全末梢:
R3(config-router)#area 1 stub
R3(config-router)#area 1 stub no-summary
area2上:
R6(config-router)#area 2 nssa (该区域所有设备配置)
R6(config-router)#area 2 nssa no-summary
R11(config-router)#area 2 nssa
R12(config-router)#area 2 nssa
R3上:
R7(config-router)#area 3 nssa
R7(config-router)#area 3 nssa no-summary
R8(config-router)#area 3 nssa
R9(config-router)#area 3 nssa
*完全NSSA–在NSSA的基础上进一步拒绝3的LSA,自动产生3类缺省
先将该区域配置为NSSA,然后仅在ABR上定义完全即可
OSPF实验完成
CCNP之OSPF实验报告的更多相关文章
- CCNP之MERG实验报告
MGRE实验报告 一.实验要求: 1.R5为ISP,只能配置IP地址 2.R1--R3间建立MGRE环境,且使用EIGRP来学习各自环回 3.R4可以正常访问R5的环回 4.R1与R5进行chap认证 ...
- 第五次实验报告:使用Packet Tracer理解OSPF路由协议
目录 1 实验目的 2 实验内容 3. 实验报告 3.1 建立网络拓扑结构 4. 配置 4.1 配置并激活串行地址和以太网地址 4.1.1 R1 4.1.2 R2 4.1.3 R3 4.1.4 PC ...
- CCNP之静态路由实验报告
静态路由实验报告 一.实验要求: 1.内网IP基于172.16.0.0/16自行子网划分 2.除了R2--R4路由器各有两个环回接口 3.R1下的PC自动获取IP地址 4 ...
- 北京电子科技学院(BESTI)实验报告5
北京电子科技学院(BESTI)实验报告5 课程: 信息安全系统设计基础 班级:1452.1453 姓名:(按贡献大小排名) 郑凯杰.周恩德 学号:(按贡献大小排名) 20145314.20145217 ...
- 北京电子科技学院(BESTI)实验报告4
北京电子科技学院(BESTI)实验报告4 课程: 信息安全系统设计基础 班级:1452.1453 姓名:(按贡献大小排名)周恩德 .郑凯杰 学号:(按贡献大小排名)20145217 .201453 指 ...
- 20145215&20145307信息安全系统设计基础实验报告
20145215&20145307信息安全系统设计基础实验报告 PART1 一.实验原理 交叉编译,简单地说,就是在一个平台上生成另一个平台上的可执行代码.同一个体系结构可以运行不同的操作系统 ...
- 北京电子科技学院(BESTI)实验报告1
北京电子科技学院(BESTI)实验报告1 课程: 信息安全系统设计基础 班级:1452.1453 姓名:(按贡献大小排名)郑凯杰 .周恩德 学号:(按贡献大小排名)20145314 .20145217 ...
- 北京电子科技学院(BESTI)实验报告3
北京电子科技学院(BESTI)实验报告3 课程: 信息安全系统设计基础 班级:1452.1453 姓名:(按贡献大小排名)周恩德 .郑凯杰 学号:(按贡献大小排名)20145217 .201453 指 ...
- 20145205 《Java程序设计》实验报告五:Java网络编程及安全
20145205 <Java程序设计>实验报告五:Java网络编程及安全 实验要求 1.掌握Socket程序的编写: 2.掌握密码技术的使用: 3.客户端中输入明文,利用DES算法加密,D ...
随机推荐
- kube-flannel.yml 文件
---kind: ClusterRoleapiVersion: rbac.authorization.k8s.io/v1beta1metadata: name: flannelrules: - api ...
- 浅谈 van Emde Boas 树——从 u 到 log log u 的蜕变
本文参考算法导论完成. 模板题在此 QwQ 优化的过程比较长,还请读者耐心阅读,认真理解. 最初的想法 我会暴力! 用一个 \(size\) 数组维护每个元素出现的次数. 不细讲,时间复杂度 \(O( ...
- Java基础教程——线程通信
线程通信:等待.唤醒 Object方法 这些方法在拥有资源时才能调用 notify 唤醒某个线程.唤醒后不是立马执行,而是等CPU分配 wait 等待,释放锁,不占用CPU资源 notifyAll 唤 ...
- Snap Build Your Own Blocks输入中文解决办法
Snap Build Your Own Blocks输入中文解决办法 Snap! (formerly BYOB) is a visual, drag-and-drop programming lang ...
- java实验作业类的定义与描述
1 //1三角形的定义与描述 2 package test; 3 4 public class sjx { 5 private double a,b,c; 6 7 public sjx(double ...
- Codeforces Round #677 (Div. 3)
F. Zero Remainder Sum || dp #include <cstdio> #include <algorithm> #include <cstring& ...
- 面试官:说一下List排序方法
1. 前言 排序算是比较高频的面试题了,节前面试了的两家公司都有问到排序问题,整理后分享给大家(文末见总结). 通常我们想到实现排序就是 Collections 工具类的 sort() 方法,而 so ...
- Python之【模块】
双层装饰器 一个函数可以被多个装饰器装饰: 多层装饰器的本质是:嵌套: 执行规则是:解释自下而上,执行自上而下 •简单的用户权限验证程序: USE_INFO = {} # 初始化一个字典,用户存放用户 ...
- 数据库原理-事务隔离与多版本并发控制(MVCC)
刚来美团实习,正好是星期天,不得不说,其内部的资料很丰富,看了部分文档后,对数据库事务这块更理解了.数据库事务的ACID,大家都知道,为了维护这些性质,主要是隔离性和一致性,一般使用加锁这种方式.同时 ...
- Python基础教程目录
老猿Python博文目录 专栏:使用PyQt开发图形界面Python应用 老猿Python部分代码样例 老猿Python重难点知识博文汇总 老猿Python博客地址 第1章 Python学习环境构建目 ...