[IOS] 详解图片局部拉伸 + 实现图片局部收缩
 (图为微信首页右上角『+』效果)
当初还在开发WP7的时候,从IOS同事那边了解到类似微信以上功能的实现。
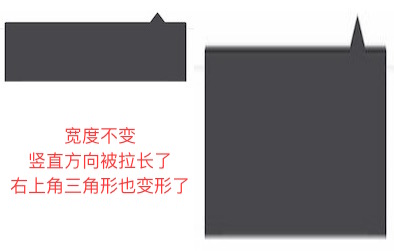
Item条数不同,总高度也不同,这就需要将背景图片进行局部拉伸到响应的高度,并且保持上方的三角形不变型。
然而回想WP,没找到有API能对图片做此处理,只要图片显示比例与源图比例不一样,就会导致图片拉伸变形。
(因此我只能让设计给一个右上角三角形,之后一个纯色长方形,纯色长方形拉伸后不会有问题。想要图片局部改变也行,得自己处理像素)
一. 局部拉伸
现在我们就来看看如何进行图片局部拉伸,相关API如下:
- (UIImage *)resizableImageWithCapInsets:(UIEdgeInsets)capInsets resizingMode:(UIImageResizingMode)resizingMode;
capInsets定义图片的不拉伸范围(这个范围是相对于源图片大小而言),resizingMode定义了图片以拉伸/平铺的方式变换。

在设置了四周的不拉伸范围后,中间的蓝色部分将会以 拉伸/平铺的方式 被拉伸。
1. 我们先讨论讨论基于某一点进行拉伸。
原图片大小为 200 * 78,需把它拉伸成200 * 250 ,宽度保持不变。
①.在不进行局部拉伸的情况下,我们得到的效果:
②. 可以知道,为了达到效果,图片周围都不能够拉伸,现在我们来拉伸正中间的一个点。
- (void)viewDidLoad {

  [super viewDidLoad];

  //源图片大小 可以通过对其触摸查看拉伸点改变后相应的效果

 UIImage *originImage = [UIImage imageNamed:@"wechat"]; //200 * 78

 originButton = [[UIButton alloc] initWithFrame:CGRectMake(, , , )];

 originButton.userInteractionEnabled = NO;

 [originButton setBackgroundImage:originImage forState:UIControlStateNormal];

 [self.view addSubview:originButton];

 //拉伸后的图片

 CGFloat width = originImage.size.width / 2.0;

 CGFloat height = originImage.size.height / 2.0;

 UIImage *newImage = [originImage resizableImageWithCapInsets:UIEdgeInsetsMake(height,width,height,width) resizingMode:UIImageResizingModeStretch];//取正中间一个点,拉伸方式

 resizableButton = [[UIButton alloc] initWithFrame:CGRectMake(, , , )];//高度由78变为250

 [resizableButton setBackgroundImage:originImage forState:UIControlStateNormal];

 [self.view addSubview:resizableButton];

}

//实现触摸  如果在左边的原图内部 则根据触摸点所在位置去拉伸图片

-(void)touchesMoved:(NSSet<UITouch *> *)touches withEvent:(UIEvent *)event{

    UITouch *touch = [touches anyObject];

    CGPoint point = [touch locationInView:self.view];

    CGPoint actualPoint = [self.view convertPoint:point toView:originButton];//坐标转换

    if(actualPoint.x >=  && actualPoint.x <= originButton.frame.size.width &&

       actualPoint.y >=  && actualPoint.y <= originButton.frame.size.height){

        NSLog(@"--------%@---------",NSStringFromCGPoint(actualPoint));

        UIImage *image1 = [UIImage imageNamed:@"wechat"];

        CGFloat top = actualPoint.y;

        CGFloat left = actualPoint.x;

        CGFloat bottom = image1.size.height - actualPoint.y;

        CGFloat right = image1.size.width - actualPoint.x;

     UIImage *newImage = [image1 resizableImageWithCapInsets:UIEdgeInsetsMake(top,left,bottom,right) resizingMode:UIImageResizingModeStretch]; [resizableButton setBackgroundImage:newImage forState:UIControlStateNormal]; } }

③.宽度大于图片实际宽度时:

④.长和宽都大于图片时,横向纵向都会被拉伸。

相当于在上面的纵向拉伸结束的基础上(同时拉伸点也被拉伸的)继续由拉伸点横向拉伸。
总结:以上我们都是基于一个点进行拉伸。
纵向拉伸时,会以拉伸点横向延伸形成的线,拉伸至新的高度。
横向拉伸时,会以拉伸点纵向延伸形成的线,拉伸至新的宽度。
2. 现在我们看看基于某一块区域进行拉伸
①.宽度不变,高度变大,使用拉伸Stretch的方式,其他亦然。


②.高和宽都增加,使用平铺Tile的方式。
也更好的解释了上述的Stretch拉伸

二. 图片局部收缩
但是如果控件的大小比图片的小的话,就会导致图片压缩。三角形处特别明显

既然能够将图片进行局部拉伸,那是否能够将图片进行局部压缩呢?
想了很久,用拉伸resizableImageWithCapInsets的方式没找到解决办法,那只有自己写了。
1.不管是横向还是纵向,都只能收缩要收缩的部分,因此也跟拉伸一样,需要一个UIEdgeInsets。
2.要把收缩的部分裁剪下来,变得更小。 因此需要知道变化后的宽和高,即图片最终的宽高CGRect。
3.这个局部收缩的过程就是将图片裁剪、收缩、拼接的过程。
为了方便,写了一个分类,和拉伸的方法类似//capInsets 相对图片来说,不需要拉伸的部分
//actualSize 需要显示的大小

- (UIImage *)shrinkImageWithCapInsets:(UIEdgeInsets)capInsets actualSize:(CGSize)actualSize{

    UIImage newImage = self;

    if(actualSize.width < self.size.width){

        //宽度变小了

        newImage = 裁剪-中间收缩-拼接(newImage);//最多分为三列  详细代码见文末demo
if(actualSize.height >= self.size.height){

                return newAllImage;

         }//否则继续纵向处理

    }

    if(actualSize.height < self.size.height){

        //高度变小了

        newImage = 裁剪-中间收缩-拼接(newImage);//最多分为三行 详情见文末demo
return newAllImage; } return nil; }
图片裁剪:
//裁剪图片

-(UIImage *)clipImageWithClipRect:(CGRect)clipRect{

    CGImageRef clipImageRef = CGImageCreateWithImageInRect(self.CGImage, clipRect);

    UIGraphicsBeginImageContext(clipRect.size);//设置图片大小

    CGContextRef context = UIGraphicsGetCurrentContext();

    CGContextDrawImage(context, clipRect, clipImageRef);

    UIImage *clipImage = [UIImage imageWithCGImage :clipImageRef];

    UIGraphicsEndImageContext();

    return clipImage;

}
图片收缩:
//按照一定大小缩放图片

-(UIImage *)scaleImageToSize:(CGSize)size{

    UIGraphicsBeginImageContext(size);//设定新的大小

    [self drawInRect:CGRectMake(, , size.width, size.height)];

    UIImage *scaleImage = UIGraphicsGetImageFromCurrentImageContext();

    UIGraphicsEndImageContext();

    return scaleImage;

}
多个图片拼接:
+(UIImage *)combineWithImages:(NSArray *)images orientation:(YFImageCombineType)orientation{

    NSMutableArray *sizeArray = [[NSMutableArray alloc] init];

    CGFloat maxHeight = , maxWidth = ;

    for (id image in images) {

//        if([image isKindOfClass:[UIImage class]]){

            CGSize size = ((UIImage *)image).size;

            if(orientation == YFImageCombineHorizental){//横向

                maxWidth += size.width;

                maxHeight = (size.height > maxHeight) ? size.height : maxHeight;

            }

            else{

                maxHeight += size.height;

                maxWidth = (size.width > maxWidth) ? size.width : maxWidth;

            }

            [sizeArray addObject:[NSValue valueWithCGSize:size]];

//        }

    }

    CGFloat lastLength = ;//记录上一次的最右或者最下边值

    UIGraphicsBeginImageContext(CGSizeMake(maxWidth, maxHeight));

    for (int i = ; i < sizeArray.count; i++){

        CGSize size = [[sizeArray objectAtIndex:i] CGSizeValue];

        CGRect currentRect;

        if(orientation == YFImageCombineHorizental){//横向

            currentRect = CGRectMake(lastLength, (maxHeight - size.height) / 2.0, size.width, size.height);

            [[images objectAtIndex:i] drawInRect:currentRect];

            lastLength = CGRectGetMaxX(currentRect);

        }

        else{

            currentRect = CGRectMake((maxWidth - size.width) / 2.0, lastLength, size.width, size.height);

            [[images objectAtIndex:i] drawInRect:currentRect];

            lastLength = CGRectGetMaxY(currentRect);

        }

    }

    UIImage* combinedImage = UIGraphicsGetImageFromCurrentImageContext();

    UIGraphicsEndImageContext();

    return combinedImage;

}
使用:引入头文件 #import "UIImage+YFShrink.h"
    //收缩后的图片  150 * 70   需要传入一个显示的实际大小

    //实际显示宽度须actualWidth <= left + right;

    //实际显示高度须actualHeight <= top + bottom;

    UIImage *originImage = [UIImage imageNamed:@"wechat"]; //200 * 78

    UIImage *shrinkImage = [originImage shrinkImageWithCapInsets:UIEdgeInsetsMake(, , , ) actualSize:CGSizeMake(, )];

    shrinkButton = [[UIButton alloc] initWithFrame:CGRectMake(, , , )];

    [shrinkButton setBackgroundImage:shrinkImage forState:UIControlStateNormal];

    [self.view addSubview:shrinkButton];
效果: 标注:


[IOS] 详解图片局部拉伸 + 实现图片局部收缩的更多相关文章
- iOS UIImage 图片局部拉伸的一些学习要点
之前 做纯色局部拉伸 通过 top bottom left right 相交的阴影拉伸 屡试不爽 实施方法: imageView.image = [[UIImage imageNamed: @&q ...
- IOS详解TableView——选项抽屉(天猫商品列表)
在之前的有篇文章讲述了利用HeaderView来写类似QQ好友列表的表视图. 这里写的天猫抽屉其实也可以用该方法实现,具体到细节每个人也有所不同.这里采用的是点击cell对cell进行运动处理以展开“ ...
- jquery详解图片平滑滚动
jquery详解图片平滑滚动 随便写了个DOM,没有美观性,见谅 原理: 1.定义两组ul列表放图,第一个ul放5张图,第二个ul为空 2.为什么要用两个ul?因为要用到jQuery的克隆方法clon ...
- 【Matplotlib】详解图像各个部分
首先一幅Matplotlib的图像组成部分介绍. 在matplotlib中,整个图像为一个Figure对象.在Figure对象中可以包含一个或者多个Axes对象.每个Axes(ax)对象都是一个拥有自 ...
- iOS开发UI篇—Quartz2D使用(图片剪切)
iOS开发UI篇—Quartz2D使用(图片剪切) 一.使用Quartz2D完成图片剪切 1.把图片显示在自定义的view中 先把图片绘制到view上.按照原始大小,把图片绘制到一个点上. 代码: - ...
- 修正ios h5上传图时的图片方向问题
.ios上传会在exif中带一个 Orientation的属性,这个属性在windows中不会生效,在ios浏览器中会生效,造成图片在windows资源管理器中与ios浏览器中方向不一致 为了用户 ...
- UIImage分类:返回一个可以拉伸的图片
// 返回一个可拉伸的图片 // UIImage的分类 + (UIImage *)resizedImage:(NSString *)name { UIImage *image = [self imag ...
- iOS - 选取相册中iCloud云上图片和视频的处理
关于iOS选取相册中iCloud云上图片和视频 推荐看:TZImagePickerController的源码,这个是一个非常靠谱的相册选择图片视频的库 .当然也可以自己写 如下遇到的问题 工作原因, ...
- IOS 绘制基本图形(画文字、图片水印)
- (void)drawRect:(CGRect)rect { // Drawing code // [self test]; // 1.加载图片到内存中 UIImage *image = [UIIm ...
随机推荐
- 关于时间查询的sql语句
今天 select * from 表名 where to_days(时间字段名) = to_days(now()); 昨天 SELECT * FROM 表名 WHERE TO_DAYS( NOW( ) ...
- javascript 中 if (window != top) top.location.href = location.href;的意思
如果当前窗口不是顶级窗口,就强制修改为顶级窗口: 目的是为了不让别人用iframe嵌入你的页面
- JAVA知识积累 JSP第一篇【JSP介绍、工作原理、生命周期、语法、指令、行为】
什么是JSP JSP全名为Java Server Pages,java服务器页面.JSP是一种基于文本的程序,其特点就是HTML和Java代码共同存在! 为什么需要JSP JSP是为了简化Servle ...
- mybatis框架入门程序:演示通过mybatis实现数据库的查询操作
我们现在工程基于的数据库见“https://www.cnblogs.com/wyhluckdog/p/10147754.html”这篇博文. 1.mybatis下载 mybatis的代码由githua ...
- mybatis框架的架构(图解)
1. mybatis配置 SqlMapConfig.xml,此文件作为mybatis的全局配置文件,配置了mybatis的运行环境等信息. mapper.xml文件即sql映射文件,文件中配置了操作数 ...
- 【.Net姿势随记】const 与 readonly 初始化姿势
using System; class P { static readonly int A=B*10; static readonly int B=10; public ...
- MVC仓储使用join
代码: var result = from mpc in this.Context.Set<Domain.S_MENU_PURVIEWCODE>() join menu in this.C ...
- .NET中的Request
获得浏览器中的URL 例:http://121.41.30.93:8010/ch/spell.aspx?id=58 Request.Url.PathAndQuery:/ch/spell.aspx?id ...
- 在 Microsoft Dynamics 365 Online中如何调试Plugins in
How to debug plugins in Microsoft Dynamics 365 Online 调试方式请查阅https://www.linkedin.com/pulse/how-debu ...
- python不用声明数据类型
不用声明变量一样,Python不用去声明函数的返回类型,是由于其“若类型”的语言特性决定的. 在其他语言中,例如C/C++语言中在存储一个数据之前,都需要在内存中给这个数据开辟一个固定的内存空间,并给 ...