ARM Linux 驱动Input子系统之按键驱动测试
上一篇已经谈过,在现内核的中引入设备树之后对于内核驱动的编写,主要集中在硬件接口的配置上了即xxxx.dts文件的编写。
在自己的开发板上移植按键驱动:
1、根据开发板的原理图

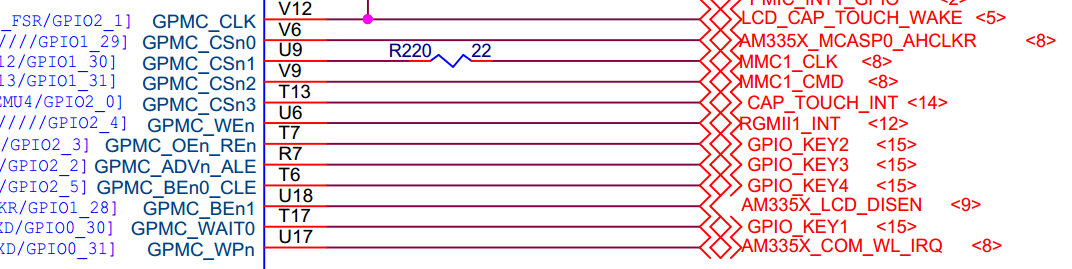
确定按键的硬件接口为:GPIO2_2、GPIO2_3、GPIO2_5、GPIO0_30。
修改dts文件使其与原理图的按键接口一致。
gpio_buttons: gpio_buttons@ {

        compatible = "gpio-keys";

        #address-cells = <>;

        #size-cells = <>;

        switch@ {

            label = "button0";

            linux,code = <0x100>;

            gpios = <&gpio2  GPIO_ACTIVE_HIGH>;

        };

        switch@ {

            label = "button1";

            linux,code = <0x101>;

            gpios = <&gpio2  GPIO_ACTIVE_HIGH>;

        };

        switch@ {

            label = "button2";

            linux,code = <0x102>;

            gpios = <&gpio0  GPIO_ACTIVE_HIGH>;

            gpio-key,wakeup;

        };

        switch@ {

            label = "button3";

            linux,code = <0x103>;

            gpios = <&gpio2  GPIO_ACTIVE_HIGH>;

        };

    };
gpio_keys_s0: gpio_keys_s0 {

        pinctrl-single,pins = <

            0x94 (PIN_INPUT_PULLDOWN | MUX_MODE7)    /* gpmc_oen_ren.gpio2_3 */

            0x90 (PIN_INPUT_PULLDOWN | MUX_MODE7)    /* gpmc_advn_ale.gpio2_2 */

            0x70 (PIN_INPUT_PULLDOWN | MUX_MODE7)    /* gpmc_wait0.gpio0_30 */

            0x9c (PIN_INPUT_PULLDOWN | MUX_MODE7)    /* gpmc_ben0_cle.gpio2_5 */

        >;

    };
保存编译生成zyr-am335x-evmsk.dtb
在内核中确保xxx/linux3.14.65/drivers/input/keyboard/gpio_key.c被编译进去(可以通过各层的Makefile与Kconfig还有menuconfig来实现)
编译好的内核和dtb文件下载到开发板中查看按键的事件类型:
[root@zyr-am335x mnt]#cd

[root@zyr-am335x ]#cat /proc/bus/input/devices

I: Bus= Vendor= Product= Version=

N: Name="gpio_buttons.7"

P: Phys=gpio-keys/input0

S: Sysfs=/devices/gpio_buttons./input/input0

U: Uniq=

H: Handlers=event0

B: PROP=

B: EV=

B: KEY=f

[root@zyr-am335x ]#
可以看到按键的事件或者是用户接口吧为event0.。知道了用户的按键接口就可以编写测试程序了。
测试程序目的:实现一个按键对应一个LED灯,按键按一次LED灯的状态变化一次(前提是led子系统对应的LED驱动已经加载入内核中):
#include <stdio.h>

#include <linux/input.h>

#include <fcntl.h>

#include <sys/time.h>

#include <unistd.h>

void keyboard_test()

{

    int count_sw1 = ;

    int count_sw2 = ;

    int count_sw3 = ;

    int count_sw4 = ;

    int fd=open("/dev/input/event0",O_RDWR);

    if( fd <=  )

    {

        printf("Can not open keyboard input file\n");

    }

    struct input_event *event;

    char buf[] = {};

    fd_set rfds;

    FD_ZERO(&rfds);

    FD_SET(fd, &rfds);

    while()

    {

        int ret = select(fd + ,&rfds, NULL,NULL,NULL);

        if(ret < )

            continue;

        if( FD_ISSET(fd, &rfds) )

        {

            int readn = read(fd, buf, sizeof(struct input_event));

            if (readn <= )

            {

                printf("uart read error %d\n", readn);

                continue;

            }

            struct input_event *my_event=(struct input_event*)buf;

            if(my_event->type == EV_KEY)

            {

                switch( my_event->code )

                {

                    case :

                        printf("This is a button:%d %d\n", my_event->code,my_event->value);

                        count_sw1++;

                        if(count_sw1==)

                        {

                            system("echo 1 > /sys/class/leds/zyrD1:green:usr0/brightness");

                        }

                        else if(count_sw1==)

                        {

                            system("echo 0 > /sys/class/leds/zyrD1:green:usr0/brightness");

                            count_sw1=;

                        }

                        break;

                    case :

                        printf("This is a button:%d %d\n", my_event->code,my_event->value);

                        count_sw2++;

                        if(count_sw2==)

                        {

                            system("echo 1 > /sys/class/leds/zyrD2:green:usr1/brightness");

                        }

                        else if(count_sw2==)

                        {

                            system("echo 0 > /sys/class/leds/zyrD2:green:usr1/brightness");

                            count_sw2=;

                        }

                        break;

                    case :

                        printf("This is a button:%d %d\n", my_event->code,my_event->value);

                        count_sw3++;

                        if(count_sw3==)

                        {

                            system("echo 1 > /sys/class/leds/zyrD3:green:heartbeat/brightness");

                        }

                        else if(count_sw3==)

                        {

                            system("echo 0 > /sys/class/leds/zyrD3:green:heartbeat/brightness");

                            count_sw3=;

                        }

                        break;

                    case :

                        printf("This is a button:%d %d\n", my_event->code,my_event->value);

                        count_sw4++;

                        if(count_sw4==)

                        {

                            system("echo 1 > /sys/class/leds/zyrD4:green:mmc0/brightness");

                        }

                        else if(count_sw4==)

                        {

                            system("echo 0 > /sys/class/leds/zyrD4:green:mmc0/brightness");

                            count_sw4=;

                        }

                        break;

                    default:

                        break;

                }

            }

        }

    }

}

int main()

{

    keyboard_test();

    return ;

}
将生成的可执行文件copy到nfs的共享目录下运行:
[root@zyr-am335x ]#cd mnt/

[root@zyr-am335x mnt]#ls

LED_zixitong       gpio_keys.ko       leds-gpio.ko       zyr-hello.ko

gpio_buttons_leds  led_test           zleds-gpio.ko

[root@zyr-am335x mnt]#./gpio_buttons_leds

This is a button:

This is a button:

This is a button:

This is a button:

This is a button:

This is a button:

This is a button:

This is a button:

This is a button:

This is a button:

This is a button:

This is a button:

This is a button:

This is a button:

This is a button:

This is a button: 0
其中的256,257,258,259分别对应dts文件中的linux,code = <0x101>;linux,code = <0x102>;linux,code = <0x103>;linux,code = <0x104>;
ARM Linux 驱动Input子系统之按键驱动测试的更多相关文章
- ARM Linux内核Input输入子系统浅解
--以触摸屏驱动为例 第一章.了解linux input子系统 Linux输入设备总类繁杂,常见的包括有按键.键盘.触摸屏.鼠标.摇杆等等,他们本身就是字符设备,而linux内核将这些 ...
- linux kernel input 子系统分析
Linux 内核为了处理各种不同类型的的输入设备 , 比如说鼠标 , 键盘 , 操纵杆 , 触摸屏 , 设计并实现了一个对上层应用统一的试图的抽象层 , 即是Linux 输入子系统 . 输入子系统的层 ...
- Linux/Android——input子系统核心 (三)【转】
本文转载自:http://blog.csdn.net/jscese/article/details/42123673 之前的博客有涉及到linux的input子系统,这里学习记录一下input模块. ...
- linux输入子系统之按键驱动
上一节中,我们讲解了Linux input子系统的框架,到内核源码里详细分析了输入子系统的分离分层的框架等. 上一节文章链接:http://blog.csdn.net/lwj103862095/ar ...
- 基于input子系统的sensor驱动调试(二)
继上一篇:http://www.cnblogs.com/linhaostudy/p/8303628.html#_label1_1 一.驱动流程解析: 1.模块加载: static struct of_ ...
- 基于input子系统的sensor驱动调试(一)
要想弄明白世界的本质,就要追根溯源:代码也是一样的道理: 最近调试几个sensor驱动,alps sensor驱动.compass sensor驱动.G-sensor驱动都是一样的架构: 一.基于in ...
- linux之i2c子系统架构---总线驱动
编写i2c设备驱动(从设备)一般有两种方式: 1.用户自己编写独立的从设备驱动,应用程序直接使用即可. 2.linux内核内部已经实现了一个通用的设备驱动,利用通用设备驱动编写一个应用程序(用户态驱动 ...
- linux字符驱动之poll机制按键驱动
在上一节中,我们讲解了如何自动创建设备节点,实现一个中断方式的按键驱动.虽然中断式的驱动,效率是蛮高的,但是大家有没有发现,应用程序的死循环里的读函数是一直在读的:在实际的应用场所里,有没有那么一种情 ...
- linux内核input子系统解析【转】
转自:http://emb.hqyj.com/Column/Column289.htm 时间:2017-01-04作者:华清远见 Android.X windows.qt等众多应用对于linux系统中 ...
随机推荐
- 详细讲解安全升级MySQL的方法
MySQL升级是非常必要的. 我们在Percona Support上列出了关于MySQL升级最佳实践的各种问题.这篇文章推荐了一些不同情况下升级MySQL的方法. 为什么MySQL升级是必须的? 原因 ...
- mysql处理旧数据-使用模板以及临时表,不建议直接使用本表!!
一 业务背景新版本中新建了一个项目的角色表,即每个项目都拥有几个角色,原来历史项目是没有角色的,这就要求使用脚本对表中的历史项目进行处理, 业务需求:每个项目都要有三个角色: 表 : pm_proje ...
- SqlServer存储过程(增删改查)
* IDENT_CURRENT 返回为任何会话和任何作用域中的特定表最后生成的标识值. CREATE PROCEDURE [dbo].[PR_NewsAffiche_AddNewsEntity] ( ...
- numpy细碎知识点
np.random.rand() 基于python自带模块random的random函数的一个延伸吧,生成指定数量的列表 np.random.rand(a,b) 参数a,b均为整型,生成含有a个元素的 ...
- p,br,hn,b,i,u,s,sup,sub标签
<!-- -->注释 <p></p>段落标签 <br />换行标签 <h1></h1> 字体标签 最大 <h6> ...
- Python之 context manager
在context manager中,必须要介绍两个概念: with as... , 和 enter , exit. 下文将先介绍with语句,然后介绍 __enter__和exit, 最后介绍cont ...
- .net 下的集合
集合的操作在编码的时候很常见.但是由于经常使用几种集合.而忽略了一些不常用的集合.在这里我整理下. 首先先了解下接口: 1.IEnumerable,返回一个循环访问集合的枚举器. 2.IEnumera ...
- 在Mac上搭建ReactNative开发环境
1.安装Homebrew, Mac系统的包管理器,用于安装NodeJS和一些其他必需的工具软件. /usr/bin/ruby -e "$(curl -fsSL https://raw.g ...
- mac下PHPStorm2018.2破解教程
1.首先安装phpstorm 2.下载JetbrainsCrack-3.1-release-enc.jar然后把这个文件放入安装phpstorm/contents/lib目录下 3.用文本编辑器打开p ...
- css文字环绕图片--遇到的问题及解决方法
一.前言 需要实现一个文字环绕图片的效果,心想so easy嘛. 1)代码部分 <style> .img-left { border: 3px solid #005588; width:3 ...