springboot整合spring @Cache和Redis
转载请注明出处:https://www.cnblogs.com/wenjunwei/p/10779450.html
spring基于注解的缓存
对于缓存声明,spring的缓存提供了一组java注解:
- @Cacheable:触发缓存写入。
- @CacheEvict:触发缓存清除。
- @CachePut:更新缓存(不会影响到方法的运行)。
- @Caching:重新组合要应用于方法的多个缓存操作。
- @CacheConfig:设置类级别上共享的一些常见缓存设置。
@Cacheable注解
顾名思义,@Cacheable可以用来进行缓存的写入,将结果存储在缓存中,以便于在后续调用的时候可以直接返回缓存中的值,而不必再执行实际的方法。 最简单的使用方式,注解名称=缓存名称,使用例子如下:
  @Cacheable("books")

    public Book findBook(ISBN isbn) {...}
一个方法可以对应两个缓存名称,如下:
    @Cacheable({"books", "isbns"})

    public Book findBook(ISBN isbn) {...}
@Cacheable的缓存名称是可以配置动态参数的,比如选择传入的参数,如下: (以下示例是使用SpEL声明,如果您不熟悉SpEL,可以阅读Spring Expression Language)
    @Cacheable(cacheNames="books", key="#isbn")

    public Book findBook(ISBN isbn, boolean checkWarehouse, boolean includeUsed)

    @Cacheable(cacheNames="books", key="#isbn.rawNumber")

    public Book findBook(ISBN isbn, boolean checkWarehouse, boolean includeUsed)

    @Cacheable(cacheNames="books", key="T(someType).hash(#isbn)")

    public Book findBook(ISBN isbn, boolean checkWarehouse, boolean includeUsed)
@Cacheable还可以设置根据条件判断是否需要缓存
- condition:取决于给定的参数是否满足条件
- unless:取决于返回值是否满足条件
以下是一个简单的例子:
    @Cacheable(cacheNames="book", condition="#name.length() < 32")

    public Book findBook(String name)

    @Cacheable(cacheNames="book", condition="#name.length() < 32", unless="#result.hardback")

    public Book findBook(String name)
@Cacheable还可以设置:keyGenerator(指定key自动生成方法),cacheManager(指定使用的缓存管理),cacheResolver(指定使用缓存的解析器)等,这些参数比较适合全局设置,这里就不多做介绍了。
@CachePut注解
@CachePut:当需要更新缓存而不干扰方法的运行时 ,可以使用该注解。也就是说,始终执行该方法,并将结果放入缓存,注解参数与@Cacheable相同。 以下是一个简单的例子:
    @CachePut(cacheNames="book", key="#isbn")

    public Book updateBook(ISBN isbn, BookDescriptor descriptor)
通常强烈建议不要对同一方法同时使用@CachePut和@Cacheable注解,因为它们具有不同的行为。可能会产生不可思议的BUG哦。
@CacheEvict注解
@CacheEvict:删除缓存的注解,这对删除旧的数据和无用的数据是非常有用的。这里还多了一个参数(allEntries),设置allEntries=true时,可以对整个条目进行批量删除。 以下是个简单的例子:
    @CacheEvict(cacheNames="books")

    public void loadBooks(InputStream batch)

    //对cacheNames进行批量删除

    @CacheEvict(cacheNames="books", allEntries=true)

    public void loadBooks(InputStream batch)
@Caching注解
@Caching:在使用缓存的时候,有可能会同时进行更新和删除,会出现同时使用多个注解的情况.而@Caching可以实现。 以下是个简单的例子:
    @Caching(evict = { @CacheEvict("primary"), @CacheEvict(cacheNames="secondary", key="#p0") })

    public Book importBooks(String deposit, Date date)
@CacheConfig注解
@CacheConfig:缓存提供了许多的注解选项,但是有一些公用的操作,我们可以使用@CacheConfig在类上进行全局设置。 以下是个简单的例子:
    @CacheConfig("books")

    public class BookRepositoryImpl implements BookRepository {

        @Cacheable

        public Book findBook(ISBN isbn) {...}

    }
可以共享缓存名称,统一配置KeyGenerator,CacheManager,CacheResolver。
实例
来看看我们在springboot中怎么使用redis来作为缓存吧.
为spring cache配置redis作为缓存
1.在pom.xml引入redis依赖
        <dependency>

            <groupId>org.springframework.boot</groupId>

            <artifactId>spring-boot-starter-data-redis</artifactId>

        </dependency>
2.springboot集成redis配置文件(在本地启动的redis),在springboot中使用redis,只要配置文件写有redis配置,代码就可以直接使用了。
spring:

  redis:

    database: 0 # Database index used by the connection factory.

    url: redis://user:@127.0.0.1:6379 # Connection URL. Overrides host, port, and password. User is ignored. Example: redis://user:password@example.com:6379

    host: 127.0.0.1 # Redis server host.

    password: # Login password of the redis server.

    port: 6379 # Redis server port.

    ssl: false # Whether to enable SSL support.

    timeout: 5000 # Connection timeout.
3.redis缓存配置类CacheConfig,这里对spring的缓存进行了配置,包括KeyGenerator,CacheResolver,CacheErrorHandler,CacheManager,还有redis序列化方式。
/**

 * @author wwj

 */

@Configuration

public class CacheConfig extends CachingConfigurerSupport {

    @Resource

    private RedisConnectionFactory factory;

    /**

     * 自定义生成redis-key

     *

     * @return

     */

    @Override

    @Bean

    public KeyGenerator keyGenerator() {

        return (o, method, objects) -> {

            StringBuilder sb = new StringBuilder();

            sb.append(o.getClass().getName()).append(".");

            sb.append(method.getName()).append(".");

            for (Object obj : objects) {

                sb.append(obj.toString());

            }

            System.out.println("keyGenerator=" + sb.toString());

            return sb.toString();

        };

    }

    @Bean

    public RedisTemplate<Object, Object> redisTemplate() {

        RedisTemplate<Object, Object> redisTemplate = new RedisTemplate<>();

        redisTemplate.setConnectionFactory(factory);

        GenericJackson2JsonRedisSerializer genericJackson2JsonRedisSerializer = new GenericJackson2JsonRedisSerializer();

        redisTemplate.setKeySerializer(genericJackson2JsonRedisSerializer);

        redisTemplate.setValueSerializer(genericJackson2JsonRedisSerializer);

        redisTemplate.setHashKeySerializer(new StringRedisSerializer());

        redisTemplate.setHashValueSerializer(genericJackson2JsonRedisSerializer);

        return redisTemplate;

    }

    @Bean

    @Override

    public CacheResolver cacheResolver() {

        return new SimpleCacheResolver(cacheManager());

    }

    @Bean

    @Override

    public CacheErrorHandler errorHandler() {

        // 用于捕获从Cache中进行CRUD时的异常的回调处理器。

        return new SimpleCacheErrorHandler();

    }

    @Bean

    @Override

    public CacheManager cacheManager() {

        RedisCacheConfiguration cacheConfiguration =

                defaultCacheConfig()

                        .disableCachingNullValues()

                        .serializeValuesWith(RedisSerializationContext.SerializationPair.fromSerializer(new GenericJackson2JsonRedisSerializer()));

        return RedisCacheManager.builder(factory).cacheDefaults(cacheConfiguration).build();

    }

}
代码使用
测试@Cacheable方法
    @Test

    public void findUserTest() {

        for (int i = 0; i < 3; i++) {

            System.out.println("第" + i + "次");

            User user = userService.findUser();

            System.out.println(user);

        }

    }

    @Override

    @Cacheable(value = {"valueName", "valueName2"}, key = "'keyName1'")

    public User findUser() {

        System.out.println("执行方法...");

        return new User("id1", "张三", "深圳", "1234567", 18);

    }
执行结果
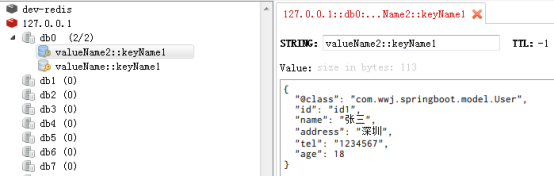
只有一次输出了'执行方法...',后面直接从缓存获取,不会再进入方法。
第0次

执行方法...

User{id='id1', name='张三', address='深圳', tel='1234567', age=18}

第1次

User{id='id1', name='张三', address='深圳', tel='1234567', age=18}

第2次

User{id='id1', name='张三', address='深圳', tel='1234567', age=18}
测试@CachePut方法:对缓存进行了修改
    @Test

    public void updateUserTest() {

        userService.updateUser();

        User user = userService.findUser();

        System.out.println(user);

    }

    @Override

    @CachePut(value = "valueName", key = "'keyName1'")

    public User updateUser() {

        System.out.println("更新用户...");

        return new User("id1", "李四", "北京", "1234567", 18);

    }
执行结果
对缓存进行了更新,获取值的时候取了新的值
更新用户...

User{id='id1', name='李四', address='北京', tel='1234567', age=18}

测试@CacheEvict方法:缓存被清空,再次findUser的时候又重新执行了方法。
    @Test

    public void clearUserTest() {

        userService.clearUser();

        User user = userService.findUser();

        System.out.println(user);

    }

    @Override

    @CacheEvict(value = "valueName",allEntries = true)

    public void clearUser() {

        System.out.println("清除缓存...");

    }
执行结果
这里清除了缓存,为什么还是没有执行方法呢?因为这个方法我们定了两个value值,清了一个还有一个
清除缓存...

User{id='id1', name='张三', address='深圳', tel='1234567', age=18}

最后贴一下代码吧
User.java
package com.wwj.springboot.model;

import java.io.Serializable;

/**

 * @author wwj

 */

public class User implements Serializable {

    public User() {

    }

    private String id;

    private String name;

    private String address;

    private String tel;

    private Integer age;

    //省略get,set,tostring

}
CacheTest.java
package com.wwj.springboot.cache;

import com.wwj.springboot.model.User;

import com.wwj.springboot.service.UserService;

import org.junit.Test;

import org.junit.runner.RunWith;

import org.springframework.boot.test.context.SpringBootTest;

import org.springframework.cache.annotation.EnableCaching;

import org.springframework.test.context.junit4.SpringRunner;

import javax.annotation.Resource;

/**

 * @author wwj

 */

@RunWith(SpringRunner.class)

@SpringBootTest

@EnableCaching

public class CacheTest {

    @Resource

    private UserService userService;

    @Test

    public void findUserTest() {

        for (int i = 0; i < 3; i++) {

            System.out.println("第" + i + "次");

            User user = userService.findUser();

            System.out.println(user);

        }

    }

    @Test

    public void updateUserTest() {

        userService.updateUser();

        User user = userService.findUser();

        System.out.println(user);

    }

    @Test

    public void clearUserTest() {

        userService.clearUser();

        User user = userService.findUser();

        System.out.println(user);

    }

}
UserService.java
package com.wwj.springboot.service;

import com.wwj.springboot.model.User;

import java.util.List;

/**

 * @author wwj

 */

public interface UserService {

    /**

     * 获取用户

     * @return user

     */

    User findUser();

    /**

     * 更新用户信息

     * @return user

     */

    User updateUser();

    /**

     * 清除缓存的用户信息

     */

    void clearUser();

}
UserServiceImpl.java
package com.wwj.springboot.service.impl;

import com.wwj.springboot.model.User;

import com.wwj.springboot.service.UserService;

import org.springframework.cache.annotation.CacheConfig;

import org.springframework.cache.annotation.CacheEvict;

import org.springframework.cache.annotation.CachePut;

import org.springframework.cache.annotation.Cacheable;

import org.springframework.stereotype.Service;

/**

 * @author wwj

 */

@Service

@CacheConfig(cacheNames = "CacheConfigName")

public class UserServiceImpl implements UserService {

    @Override

    @Cacheable(value = {"valueName", "valueName2"}, key = "'keyName1'")

    public User findUser() {

        System.out.println("执行方法...");

        return new User("id1", "张三", "深圳", "1234567", 18);

    }

    @Override

    @CachePut(value = "valueName", key = "'keyName1'")

    public User updateUser() {

        System.out.println("更新用户...");

        return new User("id1", "李四", "北京", "1234567", 18);

    }

    @Override

    @CacheEvict(value = "valueName",allEntries = true)

    public void clearUser() {

        System.out.println("清除缓存...");

    }

}
本文欢迎各位转载,但是转载文章之后必须在文章开头给出原文链接。感谢您的阅读,如果您觉得阅读本文对您有帮助,请点个“推荐”支持一下。
springboot整合spring @Cache和Redis的更多相关文章
- SpringBoot 结合 Spring Cache 操作 Redis 实现数据缓存
系统环境: Redis 版本:5.0.7 SpringBoot 版本:2.2.2.RELEASE 参考地址: Redus 官方网址:https://redis.io/ 博文示例项目 Github 地址 ...
- 【快学SpringBoot】Spring Cache+Redis实现高可用缓存解决方案
前言 之前已经写过一篇文章介绍SpringBoot整合Spring Cache,SpringBoot默认使用的是ConcurrentMapCacheManager,在实际项目中,我们需要一个高可用的. ...
- springboot 用redis缓存整合spring cache注解,使用Json序列化和反序列化。
springboot下用cache注解整合redis并使用json序列化反序列化. cache注解整合redis 最近发现spring的注解用起来真的是很方便.随即产生了能不能吧spring注解使用r ...
- 【Spring】17、spring cache 与redis缓存整合
spring cache,基本能够满足一般应用对缓存的需求,但现实总是很复杂,当你的用户量上去或者性能跟不上,总需要进行扩展,这个时候你或许对其提供的内存缓存不满意了,因为其不支持高可用性,也不具备持 ...
- SpringBoot整合Shiro+MD5+Salt+Redis实现认证和动态权限管理|前后端分离(下)----筑基后期
写在前面 在上一篇文章<SpringBoot整合Shiro+MD5+Salt+Redis实现认证和动态权限管理(上)----筑基中期>当中,我们初步实现了SpringBoot整合Shiro ...
- Spring Boot(八)集成Spring Cache 和 Redis
在Spring Boot中添加spring-boot-starter-data-redis依赖: <dependency> <groupId>org.springframewo ...
- springboot中使用cache和redis
知识点:springboot中使用cache和redis (1)springboot中,整合了cache,我们只需要,在入口类上加 @EnableCaching 即可开启缓存 例如:在service层 ...
- 使用Spring Cache集成Redis
SpringBoot 是为了简化 Spring 应用的创建.运行.调试.部署等一系列问题而诞生的产物,自动装配的特性让我们可以更好的关注业务本身而不是外部的XML配置,我们只需遵循规范,引入相关的依赖 ...
- springBoot整合spring security+JWT实现单点登录与权限管理--筑基中期
写在前面 在前一篇文章当中,我们介绍了springBoot整合spring security单体应用版,在这篇文章当中,我将介绍springBoot整合spring secury+JWT实现单点登录与 ...
随机推荐
- 做一个树莓派Raspberry Pi拍立得
用树莓派Raspberry Pi打造一台拍立得,作法如下: 材料:树莓派+数字相机模块+热敏打印机 因为打印机所需电流较高,所以电源供应器的规格需要5V 3A以上. 再找一个稳定的电源以及够大的外壳装 ...
- while循环计算规则:内循环—外循环!
num= 1 #值 =1while num <= 10 : # num(1)小于10 print(num) # 应该打印 这个1的值 num +=1 # num+=1等价于 num再加1 所以这 ...
- [MIT Intro. to algo]Lecture 1: 课程介绍,算法优势,插入算法和归并算法分析,渐近符号
The theoretical study of computer program performance and resource useage. First, analysis and the ...
- dom学习要点
Dom操作 1.文本内容操作 - innerText:操作文本 - innerHtml:操作全内容 //innerText标签: <div id='i2' ><a>土味程序员& ...
- [Hanani]高数相关知识记录
分部积分 \(\int uv'{\rm d}x=uv-\int u'v{\rm d}x\)
- access和MySQL mssql
Access.MSSQL.MYSQL数据库之间有什么区别? Access数据库.MSSQL数据库.MYSQL数据库之间有什么区别? 不少企业和个人站长在网站制作时,会对数据库的概 ...
- 使用cors解决跨域遇到浏览器发出options嗅探
前言: 本地开发起的服务器,通过修改hosts文件设置域名映射到本地,接口在测试环境 1. 服务器端设置cors, 配置access-control-allow-origin 头部 使用蚂蚁金服的up ...
- 使用Python批量修改数据库执行Sql文件
由于上篇文章中批量修改了文件,有的时候数据库也需要批量修改一下,之前的做法是使用宝塔的phpMyAdmin导出一个已经修改好了的sql文件,然后依次去其他数据库里导入,效率不说极低,也算低了,且都是些 ...
- Thunder团队--Beta发布用户使用报告
Thunder爱阅app Beta 发布用户使用报告 用户数量:14人 以下为用户评论:(注:为了保护用户的姓名权,以下用户名以昵称形式给出.) 序号 昵称 个人信息 获得软件途径 使用次数 用户评论 ...
- 团队项目-北航MOOC系统Android客户端 NABC
北航MOOC系统Android客户端 NABC (N) Need 需求 MOOC的全名是Massive Open Online Course,被称作大型开放式网络课程.2012年,美国的顶尖大学陆续设 ...