ELK+Filebeat 安装配置入门
# cat /etc/issue

CentOS release 6.5 (Final)
> vim /etc/elasticsearch/elasticsearch.yml

# ---------------------------------- Network -----------------------------------

#

# Set the bind address to a specific IP (IPv4 or IPv6):

#

# network.host: 127.0.0.1

network.host: 192.168.20.50

#

# Set a custom port for HTTP:

#

http.port:

...

bootstrap.system_call_filter: false
!使用本地 IP(127.0.0.1)时,Elasticsearch 进入 dev mode,只能从本机访问,只显示警告。
ERROR: bootstrap checks failed

max file descriptors [] for elasticsearch process likely too low, increase to at least []

memory locking requested for elasticsearch process but memory is not locked

max number of threads [] for user [jason] likely too low, increase to at least []

max virtual memory areas vm.max_map_count [] likely too low, increase to at least []

system call filters failed to install; check the logs and fix your configuration or disable system call filters at your own risk
需要针对这些参数进行设置:
> vim /etc/security/limits.conf

...

elasticsearch hard nofile   # 针对 max file descriptors

elasticsearch soft nproc     # 针对 max number of threads

> vim /etc/sysctl.conf

...

vm.max_map_count=          # 针对 max virtual memory areas

> vim /etc/elasticsearch/elasticsearch.yml

...

bootstrap.system_call_filter: false   # 针对 system call filters failed to install, 参见 https://www.elastic.co/guide/en/elasticsearch/reference/current/system-call-filter-check.html
sudo chkconfig --add elasticsearch   # configure Elasticsearch to start automatically when the system boots up

sudo -i service elasticsearch start

sudo -i service elasticsearch stop
日志: /var/log/elasticsearch/
rpm -vi logstash-5.2..rpm
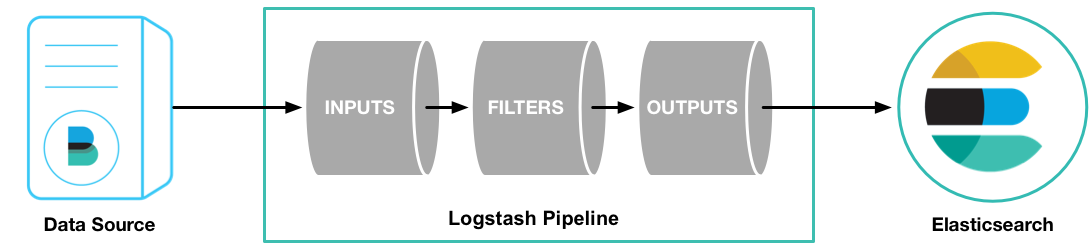
这个例子里使用 Filebeat 将测试用的 Apache web log 作为 logstash的输入,解析并写入数据到 ElasticSearch 中。
> vim /etc/logstash/conf.d/first-pipeline.conf

input {

    beats {

        port => ""

    }

}

filter {

    grok {

        match => { "message" => "%{COMBINEDAPACHELOG}"}

    }

    geoip {

        source => "clientip"

    }

}

output {

    elasticsearch {

        hosts => [ "192.168.20.50:9200" ]

        index => "testlog-%{+YYYY.MM.dd}"

    }

}
grok 可以解析未结构化的日志数据,Grok filter pattern 测试网站:http://grokdebug.herokuapp.com/%{COMBINEDAPACHELOG}
%{IPORHOST:clientip} %{USER:ident} %{USER:auth}

\[%{HTTPDATE:timestamp}\] "(?:%{WORD:verb} %{NOTSPACE:request}

(?: HTTP/%{NUMBER:httpversion})?|%{DATA:rawrequest})" %{NUMBER:response}

(?:%{NUMBER:bytes}|-) %{QS:referrer} %{QS:agent}
启动:
sudo initctl start logstash // 作为服务运行,在使用Upstart的系统中
curl -L -O https://artifacts.elastic.co/downloads/beats/filebeat/filebeat-5.2.0-x86_64.rpm

sudo rpm -vi filebeat-5.2.-x86_64.rpm
> vim /etc/filebeat/filebeat.yml

filebeat.prospectors:

- input_type: log

  paths:

    - /var/log/logstash-tutorial.log   # 之前下载的测试文件

    #- /var/log/*.log

    #- c:\programdata\elasticsearch\logs\*

...

#----------------------------- Logstash output --------------------------------

output.logstash:

  # The Logstash hosts

  #hosts: ["localhost:5044"]

  hosts: ["localhost:5043"]
curl -L -O https://artifacts.elastic.co/downloads/beats/filebeat/filebeat-5.2.0-x86_64.rpm

sudo rpm -vi filebeat-5.2.-x86_64.rpm

sudo /etc/init.d/filebeat start
> vim /etc/kibana/kibana.yml

server.host: "192.168.20.50"

elasticsearch.url: "http://192.168.20.50:9200"
> sudo chkconfig --add kibana   # 设置自动启动

> sudo -i service kibana start

> sudo -i service kibana stop
echo '1.1.1.3 - - [04/Jan/2015:05:13:42 +0000] "GET /test.png HTTP/1.1" 200 203023 "http://test.com/" "Mozilla/5.0"' >> /var/log/logstash-tutorial.log
ELK+Filebeat 安装配置入门的更多相关文章
- ELK 架构之 Logstash 和 Filebeat 安装配置
上一篇:ELK 架构之 Elasticsearch 和 Kibana 安装配置 阅读目录: 1. 环境准备 2. 安装 Logstash 3. 配置 Logstash 4. Logstash 采集的日 ...
- ELK 架构之 Elasticsearch、Kibana、Logstash 和 Filebeat 安装配置汇总(6.2.4 版本)
相关文章: ELK 架构之 Elasticsearch 和 Kibana 安装配置 ELK 架构之 Logstash 和 Filebeat 安装配置 ELK 架构之 Logstash 和 Filebe ...
- ELK 6安装配置 nginx日志收集 kabana汉化
#ELK 6安装配置 nginx日志收集 kabana汉化 #环境 centos 7.4 ,ELK 6 ,单节点 #服务端 Logstash 收集,过滤 Elasticsearch 存储,索引日志 K ...
- FileBeat安装配置
在ELK中因为logstash是在jvm上跑的,资源消耗比较大,对机器的要求比较高.而Filebeat是一个轻量级的logstash-forwarder,在服务器上安装后,Filebeat可以监控日志 ...
- elk集成安装配置
三台虚拟机 193,194,195 本机 78 流程 pythonserver -> nginx -> logstash_shipper->kafka->logstash_in ...
- 转载maven安装,配置,入门
转载:http://www.cnblogs.com/dcba1112/archive/2011/05/01/2033805.html 本书代码下载 大家可以从我的网站下载本书的代码:http://ww ...
- 第二篇:Filebeat 安装配置
Filebeat 简介:Filebeat 是一款轻量型日志收集工具,可转发汇总日志.文件等内容. 其主要特点为:1. 断点续传.(如遇日志转发过程中网络 ...
- Docker: 安装配置入门[二]
一.安装配置启动 1.环境 [root@docker1 ~]# cat /etc/redhat-release CentOS Linux release 7.4.1708 (Core) [root@d ...
- Keepalived安装配置入门
准备两台虚拟机,IP如下: A:192.168.1.11 B:192.168.1.12 A为Master,B为BackUp 1.安装 yum install keepalived -y 2.配置 A服 ...
随机推荐
- ACM训练计划建议(转)
ACM训练计划建议 From:freecode# Date:2015/5/20 前言: 老师要我们整理一份训练计划给下一届的学弟学妹们,整理出来了,费了不少笔墨,就也将它放到博客园上供大家参考. 菜 ...
- ZOJ 4010 Neighboring Characters(ZOJ Monthly, March 2018 Problem G,字符串匹配)
题目链接 ZOJ Monthly, March 2018 Problem G 题意 给定一个字符串.现在求一个下标范围$[0, n - 1]$的$01$序列$f$.$f[x] = 1$表示存在一种 ...
- java中的dao模式
java中Dao模式 什么是DAO 1.Data Access Object(数据存取对象) 2.位于业务逻辑和持久化数据之间 3.实现对持久化数据的访问 DAO模式的作用 1隔离业务逻辑代码 ...
- [MySQL-笔记]创建高性能索引
索引,MySQL中也叫“键”,是存储引擎中用于快速找到记录的一种数据结构,具体的工作方式就像书本中的索引一样,但是具体的实现方式会有差别. 一.索引分类 B-Tree索引: 优点: MyISAM中,索 ...
- [ 原创 ] Java基础2--构造方法的继承和重载
1.构造方法的重载是指同一个类中定义不同参数的多个构造方法,已完成不同情况下对象的初始化. 例如: Point(); Point(x); Point(x,y); 2.一个类的若干个构造方法之间可以相互 ...
- python opencv3 获取摄像头视频
git:https://github.com/linyi0604/Computer-Vision # coding:utf8 import cv2 """ 捕获摄像头10 ...
- 机器学习之路: python 实践 word2vec 词向量技术
git: https://github.com/linyi0604/MachineLearning 词向量技术 Word2Vec 每个连续词汇片段都会对后面有一定制约 称为上下文context 找到句 ...
- [UOJ422]小Z的礼物
设要取的物品集合为$S$,$E=n(m-1)+(n-1)m$,$x_T$为覆盖了$T$中至少一个元素的$1\times2$数量 $$\begin{aligned}\sum\limits_{i=1}^\ ...
- 【Codeforces528D】Fuzzy Search FFT
D. Fuzzy Search time limit per test:3 seconds memory limit per test:256 megabytes input:standard inp ...
- BZOJ 1012: [JSOI2008]最大数maxnumber 单调队列/线段树/树状数组/乱搞
1012: [JSOI2008]最大数maxnumber Time Limit: 3 Sec Memory Limit: 162 MBSubmit: 4750 Solved: 2145[Submi ...