nginx版本无缝升级与回滚
chookie和session
你们公司的会话保持怎么做的?
1、开发做的:记录用户登陆的状态,将用户登陆状态保存到,redis服务器中,nfs,mysql。
记录用户的登陆状态。
通过登陆用户对应的userid和cookie结合,记录用户的状态;如果是保存在本地,那么在其它用户使用该机器的时候去更改cookie的userid就能登陆其它用户的登陆状态,这样很不安全。
这样就引入了session。
2、运维:因为开发没有写会话保持功能,我们公司使用的是nginx的upstream模块的ip_hash调度算法。
什么是session
session保存在服务端
什么是cookie?
保存在客户端
源码安装nginx
# 1、下载源码包

[root@lb01 ~]# wget http://nginx.org/download/nginx-1.14.2.tar.gz

# 2、解压

[root@lb01 ~]# tar -xf nginx-1.14.2.tar.gz

# 3、查看yum安装时所需要的模块

[root@lb01 ~/nginx-1.14.2]# nginx -V

--with-compat --with-file-aio --with-threads --with-http_addition_module --with-http_auth_request_module --with-http_dav_module --with-http_flv_module --with-http_gunzip_module --with-http_gzip_static_module --with-http_mp4_module --with-http_random_index_module --with-http_realip_module --with-http_secure_link_module --with-http_slice_module --with-http_ssl_module --with-http_stub_status_module --with-http_sub_module --with-http_v2_module --with-mail --with-mail_ssl_module --with-stream --with-stream_realip_module --with-stream_ssl_module --with-stream_ssl_preread_module --with-cc-opt='-O2 -g -pipe -Wall -Wp,-D_FORTIFY_SOURCE=2 -fexceptions -fstack-protector-strong --param=ssp-buffer-size=4 -grecord-gcc-switches -m64 -mtune=generic -fPIC' --with-ld-opt='-Wl,-z,relro -Wl,-z,now -pie'

# 4、安装依耐

[root@lb01 ~/nginx-1.14.2]# yum -y install openssl-devel

# 5、生成

[root@lb01 ~/nginx-1.14.2]# ./configure --prefix=/app/nginx-1.14.2 --user=www --group=www --with-compat --with-file-aio --with-threads --with-http_addition_module --with-http_auth_request_module --with-http_dav_module --with-http_flv_module --with-http_gunzip_module --with-http_gzip_static_module --with-http_mp4_module --with-http_random_index_module --with-http_realip_module --with-http_secure_link_module --with-http_slice_module --with-http_ssl_module --with-http_stub_status_module --with-http_sub_module --with-http_v2_module --with-mail --with-mail_ssl_module --with-stream --with-stream_realip_module --with-stream_ssl_module --with-stream_ssl_preread_module --with-cc-opt='-O2 -g -pipe -Wall -Wp,-D_FORTIFY_SOURCE=2 -fexceptions -fstack-protector-strong --param=ssp-buffer-size=4 -grecord-gcc-switches -m64 -mtune=generic -fPIC' --with-ld-opt='-Wl,-z,relro -Wl,-z,now -pie'

# 6、编译安装

[root@lb01 ~/nginx-1.14.2]# make && make install

# 7、创建软链接

[root@lb01 ~]# ln -s /app/nginx-1.14.2/ /app/nginx

# 8、添加环境变量并生效

[root@lb01 ~]# vi /etc/profile.d/nginx.sh

export PATH="/app/nginx/sbin:$PATH"

[root@lb01 ~]# source /etc/profile

# 9、编辑配置文件

[root@lb01 /app/nginx/conf]# vi nginx.conf

...

http {

    include       mime.types;

    default_type  application/octet-stream;

    log_format  main  '$remote_addr - $remote_user [$time_local] "$request" '

                      '$status $body_bytes_sent "$http_referer" '

                      '"$http_user_agent" "$http_x_forwarded_for"';

    access_log  logs/access.log  main;

    sendfile        on;

    #tcp_nopush     on;

    #keepalive_timeout  0;

    keepalive_timeout  65;

# 10、放网站配置文件的地方

    include conf.d/*.conf;

}

## 11、创建一个配置文件的目录。

[root@lb01 /app/nginx/conf]# mkdir conf.d

# 12、配置一个负载均衡

[root@lb01 /app/nginx/conf/conf.d]# vi upstream.conf

upstream phpadmin {

        server 172.16.1.7;

        server 172.16.1.8;

}

server {

        listen 80;

        server_name php.gong.com;

        location / {

                proxy_pass http://phpadmin;

                include proxy_params;

        }

}

# ----------------------------#

[root@lb01 /app/nginx/conf]# vi proxy_params

proxy_set_header Host $http_host;

proxy_set_header X-Real-IP $remote_addr;

proxy_set_header X-Forwarded-For $proxy_add_x_forwarded_for;

proxy_next_upstream error timeout http_500 http_502 http_503 http_504;

proxy_connect_timeout 30;

proxy_send_timeout 60;

proxy_read_timeout 60;

proxy_buffering on;

proxy_buffer_size 32k;

proxy_buffers 4 128k;

# 11、启动nginx;访问测试,目前是1.14.2的版本

版本升级
在不影响用户体验的情况下把nginx的版本升级到nginx-1.16.1的版本,并添加nginx负载均衡的健康检查模块。
# 1、下载1.16.1版本的额包

[root@lb01 ~]# wget http://nginx.org/download/nginx-1.16.1.tar.gz

# 2、下载补丁包

[root@lb01 ~]# wget https://github.com/yaoweibin/nginx_upstream_check_module/archive/master.zip

# 3、解压nginx

[root@lb01 ~]# tar -xf nginx-1.16.1.tar.gz

# 4、解压master扩展包

[root@lb01 ~]# unzip master.zip

# 5、安装打补丁的命令

[root@lb01 ~]# yum -y install patch

# 6、打补丁

[root@lb01 ~/nginx-1.16.1]# patch -p1 < ../nginx_upstream_check_module-master/check_1.16.1+.patch

# 7、生成,指定安装模块

[root@lb01 ~/nginx-1.16.1]# ./configure --prefix=/app/nginx-1.16.1 --user=www --group=www --with-compat --with-file-aio --with-threads --with-http_addition_module --with-http_auth_request_module --with-http_dav_module --with-http_flv_module --with-http_gunzip_module --with-http_gzip_static_module --with-http_mp4_module --with-http_random_index_module --with-http_realip_module --with-http_secure_link_module --with-http_slice_module --with-http_ssl_module --with-http_stub_status_module --with-http_sub_module --with-http_v2_module --with-mail --with-mail_ssl_module --with-stream --with-stream_realip_module --with-stream_ssl_module --with-stream_ssl_preread_module --with-cc-opt='-O2 -g -pipe -Wall -Wp,-D_FORTIFY_SOURCE=2 -fexceptions -fstack-protector-strong --param=ssp-buffer-size=4 -grecord-gcc-switches -m64 -mtune=generic -fPIC' --with-ld-opt='-Wl,-z,relro -Wl,-z,now -pie' --add-module=/root/nginx_upstream_check_module-master

# 8、编译安装

[root@lb01 ~/nginx-1.16.1]# make && make install

# 9、安装好的目录下生成的文件

[root@lb01 /app]# ll

total 0

lrwxrwxrwx  1 root root  18 May 28 22:02 nginx -> /app/nginx-1.14.2/

drwxr-xr-x 11 root root 151 May 28 22:10 nginx-1.14.2

drwxr-xr-x  6 root root  54 May 28 22:31 nginx-1.16.1

# 10、复制必要的文件

## 主配置文件

[root@lb01 /app]# \cp nginx-1.14.2/conf/nginx.conf nginx-1.16.1/conf/nginx.conf

## 添加的配置文件

[root@lb01 /app]# \cp nginx-1.14.2/conf/conf.d/upstream.conf nginx-1.16.1/conf/conf.d/upstream.conf

## 配置文件里面指定的优化参数

[root@lb01 /app]# \cp nginx-1.14.2/conf/proxy_params nginx-1.16.1/conf/proxy_params

## 复制pid

[root@lb01 /app]# \cp nginx-1.14.2/logs/nginx.pid nginx-1.16.1/logs/

# 11、创建新的链接文件

[root@lb01 /app]# rm -fr nginx && ln -s /app/nginx-1.16.1/  nginx

# 12、秒级重启nginx;现在使用nginx的命令走的是/app/nginx-1.16.1/sbin/下的nginx;但是stop结束的是原来版本下的pid文件,从老版本复制过来的,所以实现了对原来版本的进程结束;通过&&在瞬间进行nginx新版本的启动,添加新的进程和pid

[root@lb01 /app]# nginx -s stop && nginx
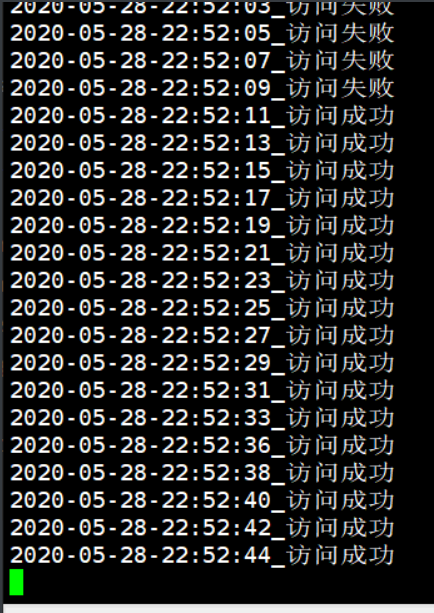
访问测试的脚本
[root@db01 ~]# cat test.sh

#!/bin/bash

while true;do

status=$(curl -I -m 10 -o /dev/null -s -w %{http_code} php.gong.com)

	if [ $status -eq 200 ];then

		echo "$(date +%F-%T)_访问成功"

	else

		echo "$(date +%F-%T)_访问失败"

	fi

sleep 2

done
健康检查的配置
[root@lb01 /app]# vi /app/nginx/conf/conf.d/upstream.conf

upstream phpadmin {

        server 172.16.1.7;

        server 172.16.1.8;

        check interval=3000 rise=2 fall=3 timeout=1000 type=tcp;

             #interval  检测间隔时间,单位为毫秒

   	 		#rise      表示请求2次正常,标记此后端的状态为up

    		#fall      表示请求3次失败,标记此后端的状态为down

    		#type      类型为tcp

    		#timeout   超时时间,单位为毫秒

}

server {

        listen 80;

        server_name php.gong.com;

        location / {

                proxy_pass http://phpadmin;

                include proxy_params;

                }

        location /uc {

                check_status;

        }

        }

nginx版本无缝升级与回滚的更多相关文章
- 022.掌握Pod-Pod升级和回滚
一 deploymentPod升级和回滚 1.1 deployment升级 若Pod是通过Deployment创建的,可以在运行时修改Deployment的Pod定义(spec.template)或镜 ...
- Hadoop HDFS概念学习系列之HDFS升级和回滚机制(十二)
不多说,直接上干货! HDFS升级和回滚机制 作为一个大型的分布式系统,Hadoop内部实现了一套升级机制,当在一个集群上升级Hadoop时,像其他的软件升级一样,可能会有新的bug或一些会影响现有应 ...
- Java项目多版本部署及快速回滚(含完整命令)
1. 场景描述 java项目linux环境下快速部署,以前介绍过,今天主要结合linux的软连接,实现版本的快速切换(回滚),包含完整的start.sh与stop.sh,只需修改包名和路径即可运行,有 ...
- 原创|1分钟搞定 Nginx 版本的平滑升级与回滚
Nginx无论是对于运维.开发.还是测试来说,都是日常工作需要掌握的一个知识点,之前也写过不少关于Nginx相关的文章: Nginx服务介绍与安装 Nginx服务配置文件介绍 Nginx配置虚拟主机 ...
- kubernetes Pod的升级与回滚
一:Deployment的升级 1.通过kubectl set image命令为Deployment设置新的镜像名称kubectl set image deployment/nginx-deploym ...
- Docker & Kubenetes 系列四:集群,扩容,升级,回滚
本篇将会讲解应用部署到Kubenetes集群,集群副本集查看,集群自愈能力演示,集群扩容,滚动升级,以及回滚. 本篇是Docker&Kubenetes系列的第四篇,在前面的篇幅中,我们向Kub ...
- 9.1 k8s pod版本更新流程及命令行实现升级与回滚
1.创建 Deployment root@k8-deploy:~/k8s-yaml/controllers/deployments# vim nginx-deployment.yaml apiVers ...
- Kubernetes:Pod 升级、回滚
本篇主要讨论如何实现滚动更新和回滚,任意更换版本并且回滚以前的版本(版本更新),而下一章会讨论到 Pod 缩放,根据机器资源自动拓展和收缩应用(自动扩容实例). 本文为作者的 Kubernetes 系 ...
- kubernetes deployment升级和回滚
a.创建deployment pod kubectl run mynginx --image=docker.io/nginx: --record 准备svc文件 apiVersion: v1 kind ...
随机推荐
- oo第二单元——多线程魔鬼电梯
在初步认识了面向对象思想后,立刻进入了多线程的学习,本单元的难点主要是锁的理解,需要保证线程安全的同时防止死锁的发生,也要尽可能缩小锁的范围,提高性能.这一单元以电梯为载体,让我们从生活出发,从电梯运 ...
- JavaScript深入理解-正则表达式
正则表达式 正则表达式是用于匹配字符串中字符组合的模式.在JavaScript中,正则表达式也是对象.这些模式被用于RegExp的 exec和 text方法,以及String中的 match.matc ...
- 【笔记】《Redis设计与实现》chapter20 Lua脚本
chapter20 Lua脚本 Redis从2.6版本开始引入对Lua脚本的支持,通过在服务器中嵌入Lua环境,Redis客户端可以使用Lua脚本,直接在服务器端原子地执行多个Redis命令 20.1 ...
- 自动化kolla-ansible部署ubuntu20.04+openstack-victoria之镜像制作debian9.6.0-17
自动化kolla-ansible部署ubuntu20.04+openstack-victoria之镜像制作debian9.6.0-17 欢迎加QQ群:1026880196 进行交流学习 制作Ope ...
- 如果你的application.properties中还存在明文密码----加密Spring Boot中的application.properties
1 概述 什么?都2020年了还在Spring Boot的配置文件中写明文密码? 虽然是小项目,明文也没人看. 明文简单快捷方便啊!!! 你看直接用户名root密码123456多么简单!!! ... ...
- 9. resultMap 结果映射集
@Data public class CreditCard extends BankCard { /** * 消费额度 */ private String creditLine; } @Data pu ...
- 由电脑专卖系统引发的Java设计模式:访问者模式
目录 定义 意图 解决问题 何时使用 优缺点 结构 电脑专卖系统 定义 访问者模式是对象的行为型模式,它的目的是封装一些施加于某些数据结构元素之上的操作,一旦这些操作需要修改的话,接收这个操作的数据结 ...
- ASP.NET Core扩展库之Http请求模拟
如今,完全独立的业务应用几乎不存在,不管是在企业内部微服务之间的调用,还是与外部第三方服务的调用,Http的API交互是常见的场景,这些实际情况给我们的开发带来了比较大的挑战,一是第三方服务可能会牵制 ...
- pyqt5 多线程+定时器+读取本地图片
前言 一个程序界面有多个button 按钮时,单击一个按钮,若此按钮对应的信号正在执行,且还未执行完毕: 此时再次单击另外一个按钮,就会出现假死状态. 这个时候我们就需要使用 多线程去解决 多线程+定 ...
- 织梦DedeCMS自定义表单diy_list.htm
<!DOCTYPE html PUBLIC "-//W3C//DTD XHTML 1.0 Transitional//EN" "http://www.w3.org/ ...