Lnmmp
简介
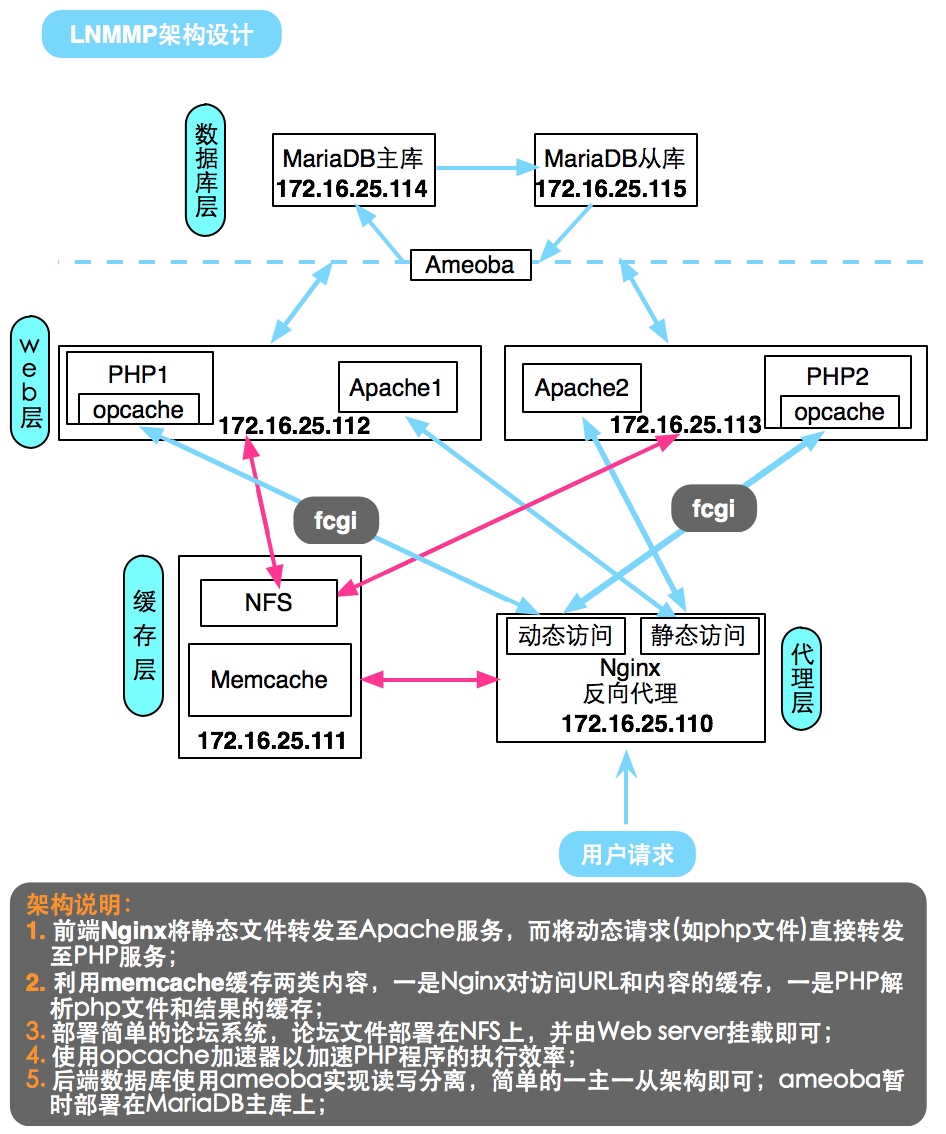
LNMMP=Linux+Nginx+MySQL+Memcache+PHP;
利用Nginx的高性能特点做前端反向代理服务器,分发用户请求,并在能够利用缓存的地方使用Memcache缓存服务,以加速缓存效率,具体架构图如下;
具体部署
代理层:Nginx
编译安装Nginx
yum install gcc openssl-devel pcre-devel zlib-devel

groupadd -r nginx

useradd -r -g nginx -M nginx

./configure \

  --prefix=/usr/local/nginx \

  --sbin-path=/usr/sbin/nginx \

  --conf-path=/etc/nginx/nginx.conf \

  --error-log-path=/var/log/nginx/error.log \

  --http-log-path=/var/log/nginx/access.log \

  --pid-path=/var/run/nginx/nginx.pid  \

  --lock-path=/var/lock/nginx.lock \

  --user=nginx \

  --group=nginx \

  --with-http_ssl_module \

  --with-http_flv_module \

  --with-http_stub_status_module \

  --with-http_gzip_static_module \

  --http-client-body-temp-path=/var/tmp/nginx/client/ \

  --http-proxy-temp-path=/var/tmp/nginx/proxy/ \

  --http-fastcgi-temp-path=/var/tmp/nginx/fcgi/ \

  --http-uwsgi-temp-path=/var/tmp/nginx/uwsgi \

  --http-scgi-temp-path=/var/tmp/nginx/scgi \

  --with-pcre

make && make install

vi /etc/init.d/nginx # 编辑服务脚本

#!/bin/sh

#

# nginx - this script starts and stops the nginx daemon

#

# chkconfig:   -

# description:  Nginx is an HTTP(S) server, HTTP(S) reverse \

#               proxy and IMAP/POP3 proxy server

# processname: nginx

# config:      /etc/nginx/nginx.conf

# config:      /etc/sysconfig/nginx

# pidfile:     /var/run/nginx.pid

# Source function library.

. /etc/rc.d/init.d/functions

# Source networking configuration.

. /etc/sysconfig/network

# Check that networking is up.

[ "$NETWORKING" = "no" ] && exit

nginx="/usr/sbin/nginx"

prog=$(basename $nginx)

NGINX_CONF_FILE="/etc/nginx/nginx.conf"

[ -f /etc/sysconfig/nginx ] && . /etc/sysconfig/nginx

lockfile=/var/lock/subsys/nginx

make_dirs() {

   # make required directories

   user=`nginx -V >& | grep "configure arguments:" | sed 's/[^*]*--user=\([^ ]*\).*/\1/g' -`

   options=`$nginx -V >& | grep 'configure arguments:'`

   for opt in $options; do

       if [ `echo $opt | grep '.*-temp-path'` ]; then

           value=`echo $opt | cut -d "=" -f `

           if [ ! -d "$value" ]; then

               # echo "creating" $value

               mkdir -p $value && chown -R $user $value

           fi

       fi

   done

}

start() {

    [ -x $nginx ] || exit

    [ -f $NGINX_CONF_FILE ] || exit

    make_dirs

    echo -n $"Starting $prog: "

    daemon $nginx -c $NGINX_CONF_FILE

    retval=$?

    echo

    [ $retval -eq  ] && touch $lockfile

    return $retval

}

stop() {

    echo -n $"Stopping $prog: "

    killproc $prog -QUIT

    retval=$?

    echo

    [ $retval -eq  ] && rm -f $lockfile

    return $retval

}

restart() {

    configtest || return $?

    stop

    sleep

    start

}

reload() {

    configtest || return $?

    echo -n $"Reloading $prog: "

    killproc $nginx -HUP

    RETVAL=$?

    echo

}

force_reload() {

    restart

}

configtest() {

  $nginx -t -c $NGINX_CONF_FILE

}

rh_status() {

    status $prog

}

rh_status_q() {

    rh_status >/dev/null >&

}

case "$1" in

    start)

        rh_status_q && exit

        $

        ;;

    stop)

        rh_status_q || exit

        $

        ;;

    restart|configtest)

        $

        ;;

    reload)

        rh_status_q || exit

        $

        ;;

    force-reload)

        force_reload

        ;;

    status)

        rh_status

        ;;

    condrestart|try-restart)

        rh_status_q || exit

            ;;

    *)

        echo $"Usage: $0 {start|stop|status|restart|condrestart|try-restart|reload|force-reload|configtest}"

        exit

esac
配置Nginx
upstream memcached {

        server    172.16.25.111:;

        keepalive ;

    }

    upstream webserver {

        server    172.16.25.112:;

        server    172.16.25.113:;

    }

    upstream phpserver {

        server    172.16.25.112:;

        server    172.16.25.113:;

    }

    server {

        listen       ;

        server_name  xxrenzhe.lnmmp.com;

    access_log      /var/log/nginx/lnmmp.access.log;

    error_log       /var/log/nginx/lnmmp.errors.log notice;

    root              /www/lnmmp.com;

    index       index.php index.html;

    location / {

        set $memcached_key $request_uri;

        add_header X-mem-key $memcached_key;

        memcached_pass memcached;

        default_type test/html;

        error_page     = @webnocache;

    }

    location @webnocache {

        rewrite ^(\/)?$ /index.php last; # 配置直接访问域名或IP地址时,重定向至index.php文件

        rewrite ^/.*$ /set_mem.php?$request_uri last; # 将静态访问重定向至后端set_mem.php,以实现set memcache的功能

        proxy_pass http://webserver;

    }

    location ~* \.php(\?.*)?$ {

        fastcgi_pass phpserver;

        fastcgi_param SCRIPT_FILENAME $document_root$fastcgi_script_name;

        include fastcgi_params;

    }
启动服务
chmod +x /etc/init.d/nginx

chkconfig --add nginx

chkconfig nginx on

service nginx start
缓存层:Memcache+NFS
安装配置memcache
# 安装libevent

tar xf libevent-2.0.-stable.tar.gz

cd libevent-2.0.

./configure --prefix=/usr/local/libevent

make && make install

echo "/usr/local/libevent/lib" > /etc/ld.so.conf.d/libevent.conf

ldconfig

# 安装memcache

tar xf memcached-1.4..tar.gz

cd memcached-1.4.

./configure --prefix=/usr/local/memcached --with-libevent=/usr/local/libevent

make && make install

# 编辑服务脚本 # 一次启动了2个memcache实例,一个用于Nginx,一个用于后端PHP服务

vi /etc/init.d/memcached

#!/bin/bash

#

# Init file for memcached

#

# chkconfig: -

# description: Distributed memory caching daemon

#

# processname: memcached

# config: /etc/sysconfig/memcached

. /etc/rc.d/init.d/functions

## Default variables

PORT1=""

PORT2=""

USER="nobody"

MAXCONN=""

CACHESIZE=""

OPTIONS=""

RETVAL=

prog="/usr/local/memcached/bin/memcached"

desc="Distributed memory caching"

lockfile1="/var/lock/subsys/memcached_$PORT1"

lockfile2="/var/lock/subsys/memcached_$PORT2"

start() {

        echo -n $"Starting $desc (memcached): "

        daemon $prog -d -p $PORT1 -u $USER -c $MAXCONN -m $CACHESIZE -o "$OPTIONS"

daemon $prog -d -p $PORT2 -u $USER -c $MAXCONN -m $CACHESIZE -o "$OPTIONS"

        RETVAL=$?

        [ $RETVAL -eq  ] && success && touch $lockfile1 && touch $lockfile2 || failure

        echo

        return $RETVAL

}

stop() {

        echo -n $"Shutting down $desc (memcached): "

        killproc $prog

        RETVAL=$?

        [ $RETVAL -eq  ] && success && rm -f $lockfile1 && rm -f $lockfile2 | failure

        echo

        return $RETVAL

}

restart() {

        stop

        start

}

reload() {

        echo -n $"Reloading $desc ($prog): "

        killproc $prog -HUP

        RETVAL=$?

        [ $RETVAL -eq  ] && success || failure

        echo

        return $RETVAL

}

case "$1" in

  start)

        start

        ;;

  stop)

        stop

        ;;

  restart)

        restart

        ;;

  condrestart)

        [ -e $lockfile1 ] && [ -e $lockfile1 ] && restart

        RETVAL=$?

        ;;

  reload)

        reload

        ;;

  status)

        status $prog

        RETVAL=$?

        ;;

   *)

        echo $"Usage: $0 {start|stop|restart|condrestart|status}"

        RETVAL=

esac

exit $RETVAL
启动memcache服务
# 安装libevent

tar xf libevent-2.0.-stable.tar.gz

cd libevent-2.0.

./configure --prefix=/usr/local/libevent

make && make install

echo "/usr/local/libevent/lib" > /etc/ld.so.conf.d/libevent.conf

ldconfig

# 安装memcache

tar xf memcached-1.4..tar.gz

cd memcached-1.4.

./configure --prefix=/usr/local/memcached --with-libevent=/usr/local/libevent

make && make install

# 编辑服务脚本 # 一次启动了2个memcache实例,一个用于Nginx,一个用于后端PHP服务

vi /etc/init.d/memcached

#!/bin/bash

#

# Init file for memcached

#

# chkconfig: -

# description: Distributed memory caching daemon

#

# processname: memcached

# config: /etc/sysconfig/memcached

. /etc/rc.d/init.d/functions

## Default variables

PORT1=""

PORT2=""

USER="nobody"

MAXCONN=""

CACHESIZE=""

OPTIONS=""

RETVAL=

prog="/usr/local/memcached/bin/memcached"

desc="Distributed memory caching"

lockfile1="/var/lock/subsys/memcached_$PORT1"

lockfile2="/var/lock/subsys/memcached_$PORT2"

start() {

        echo -n $"Starting $desc (memcached): "

        daemon $prog -d -p $PORT1 -u $USER -c $MAXCONN -m $CACHESIZE -o "$OPTIONS"

daemon $prog -d -p $PORT2 -u $USER -c $MAXCONN -m $CACHESIZE -o "$OPTIONS"

        RETVAL=$?

        [ $RETVAL -eq  ] && success && touch $lockfile1 && touch $lockfile2 || failure

        echo

        return $RETVAL

}

stop() {

        echo -n $"Shutting down $desc (memcached): "

        killproc $prog

        RETVAL=$?

        [ $RETVAL -eq  ] && success && rm -f $lockfile1 && rm -f $lockfile2 | failure

        echo

        return $RETVAL

}

restart() {

        stop

        start

}

reload() {

        echo -n $"Reloading $desc ($prog): "

        killproc $prog -HUP

        RETVAL=$?

        [ $RETVAL -eq  ] && success || failure

        echo

        return $RETVAL

}

case "$1" in

  start)

        start

        ;;

  stop)

        stop

        ;;

  restart)

        restart

        ;;

  condrestart)

        [ -e $lockfile1 ] && [ -e $lockfile1 ] && restart

        RETVAL=$?

        ;;

  reload)

        reload

        ;;

  status)

        status $prog

        RETVAL=$?

        ;;

   *)

        echo $"Usage: $0 {start|stop|restart|condrestart|status}"

        RETVAL=

esac

exit $RETVAL
安装配置NFS
yum -y install nfs-utils

vi /etc/exports

/www/lnmmp.com 172.16.0.0/(rw,no_root_squash)

exportfs -ar # 导出NFS共享目录

cd /www/lnmmp.com

unzip phpwind_v9.0_utf8.zip

mv phpwind_v9.0_utf8/upload/* .

chmod -R 777 attachment conf data html res src themes windid
Web层:Apache
Apache的安装见博客"httpd-2.4 编译安装";
PHP-fpm的安装见博客“LAMP架构之PHP-FPM 服务器”;
PHP加速器opcache的安装配置见博客“LAMP-PHP各加速器性能剖析”;
配置PHP支持memcache
tar xf memcache-2.2..tgz

cd memcache-2.2.

/usr/local/php/bin/phpize

./configure --with-php-config=/usr/local/php/bin/php-config --enable-memcache

make && make install

# 上述安装完后会有类似这样的提示:

Installing shared extensions:     /usr/local/php/lib/php/extensions/no-debug-non-zts-/

vi /usr/local/php/lib/php.ini # 配置memcache模块位置及php会话保存至memcache中

extension=/usr/local/php/lib/php/extensions/no-debug-non-zts-/memcache.so

session.save_handler = memcache

session.save_path = "tcp://172.16.25.111:11311"

# 自定义set memcache的程序

vi /www/lnmmp.com/set_mem.php

<?php

    $fn = dirname(__FILE__).$_SERVER['QUERY_STRING'];

    if (file_exists($fn)) {

        $data = file_get_contents($fn);

        $mem = new Memcache();

        $mem->connect("172.16.25.111",) or die("Could not connect");

        $mem->set($_SERVER['QUERY_STRING'],$data,,) or die("Failed to save data at the memcached server");

        header('Content-Length: '.filesize($fn)."\r\n");

        header('Content-Type: text/html'."\r\n");

        header('X-cache: MISS'."\r\n");

        print "$data";

    } else {

        header('Location: http://xxrenzhe.lnmmp.com'."\r\n");

        header('Content-Length: '.filesize($fn)."\r\n");

        header('X-cache: '.$fn."\r\n");

    }

?>
Apache配置
vi /etc/httpd/httpd.conf

# DocumentRoot "/usr/local/apache/htdocs" # 注释掉此行

Include /etc/httpd/extra/httpd-vhosts.conf # 取消此行注释

vi /etc/httpd/extra/httpd-vhosts.conf

<VirtualHost *:>

    DocumentRoot "/www/lnmmp.com"

    ServerName xxrenzhe.lnmmp.com

    ErrorLog "logs/lnmmp.com-error_log"

    CustomLog "logs/lnmmp.com-access_log"common

    <Directory "/www/lnmmp.com">

        Options Indexes FollowSymLinks

        AllowOverride None

        Require all granted

    </Directory>

</VirtualHost>
NFS目录挂载
mount -t nfs 172.16.25.111:/www/lnmmp.com /www/lnmmp.com
服务启动
service httpd start

service php-fpm start
数据库层:Ameoba+MariaDB
MariaDB的安装详见博客“MySQL初识-架构-安装-初始化-连接-管理工具-数据文件”;
MariaDB的主从复制架构配置见博客“Maria10实现主从复制架构及SSL复制”;
Ameoba安装见“http://docs.hexnova.com/amoeba/index.html”;
Ameoba实现读写分离见“http://docs.hexnova.com/amoeba/rw-splitting.html”
测试验证
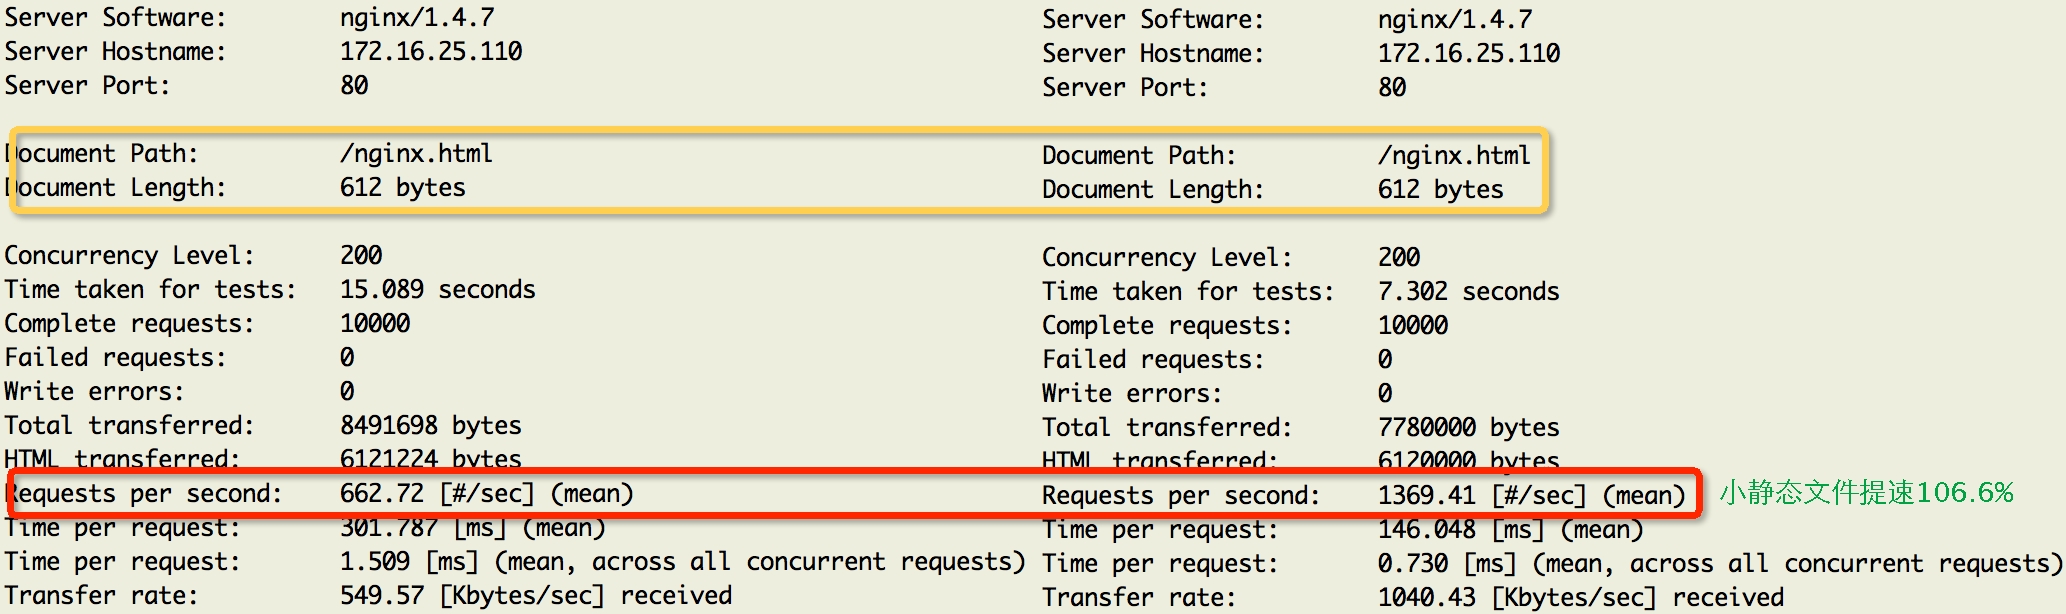
Nginx利用memcache缓存小静态文件测试效果
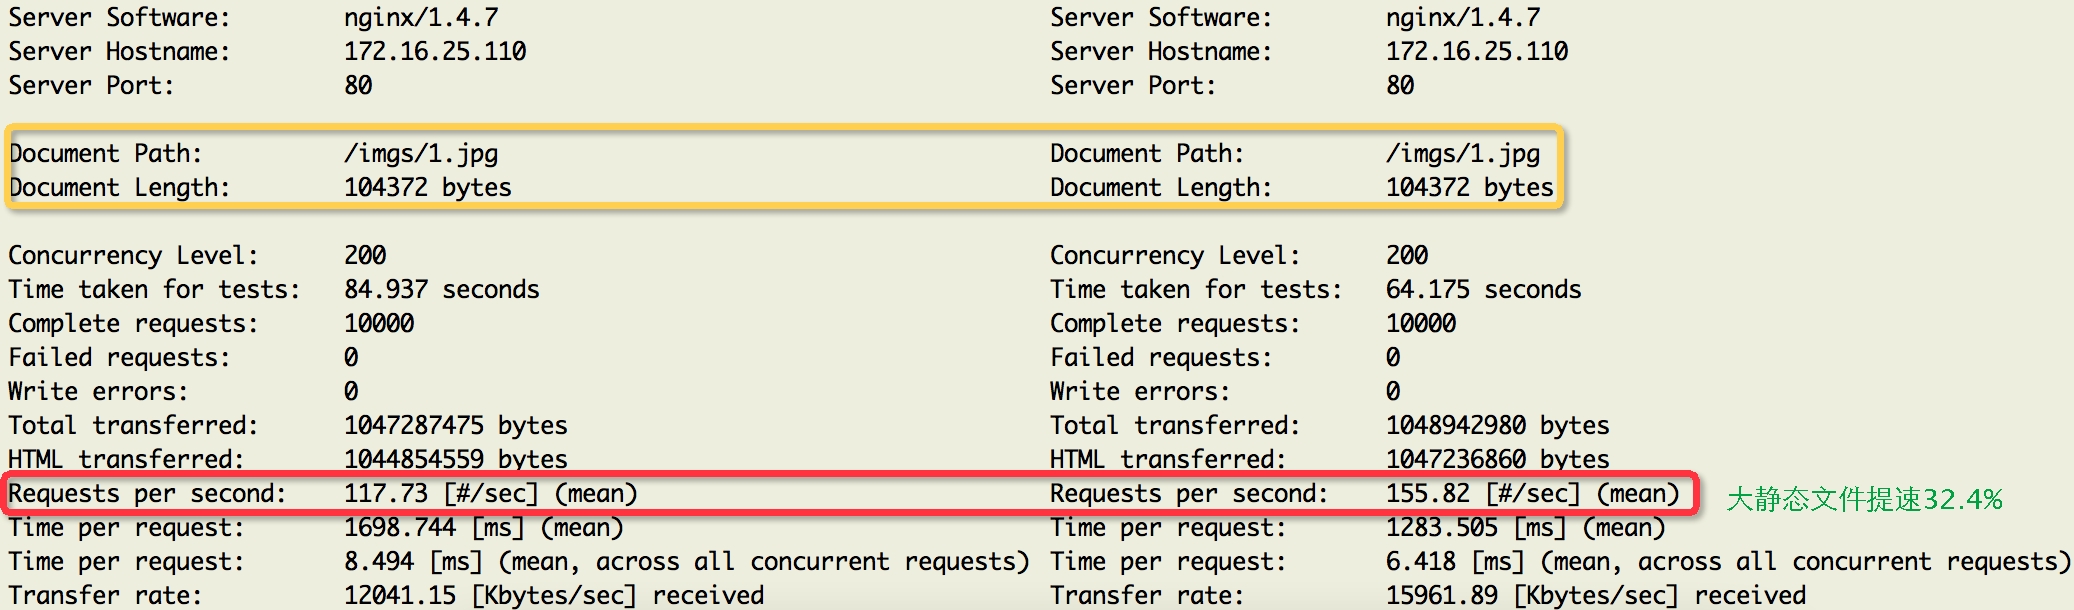
Nginx利用memcache缓存大静态文件测试效果
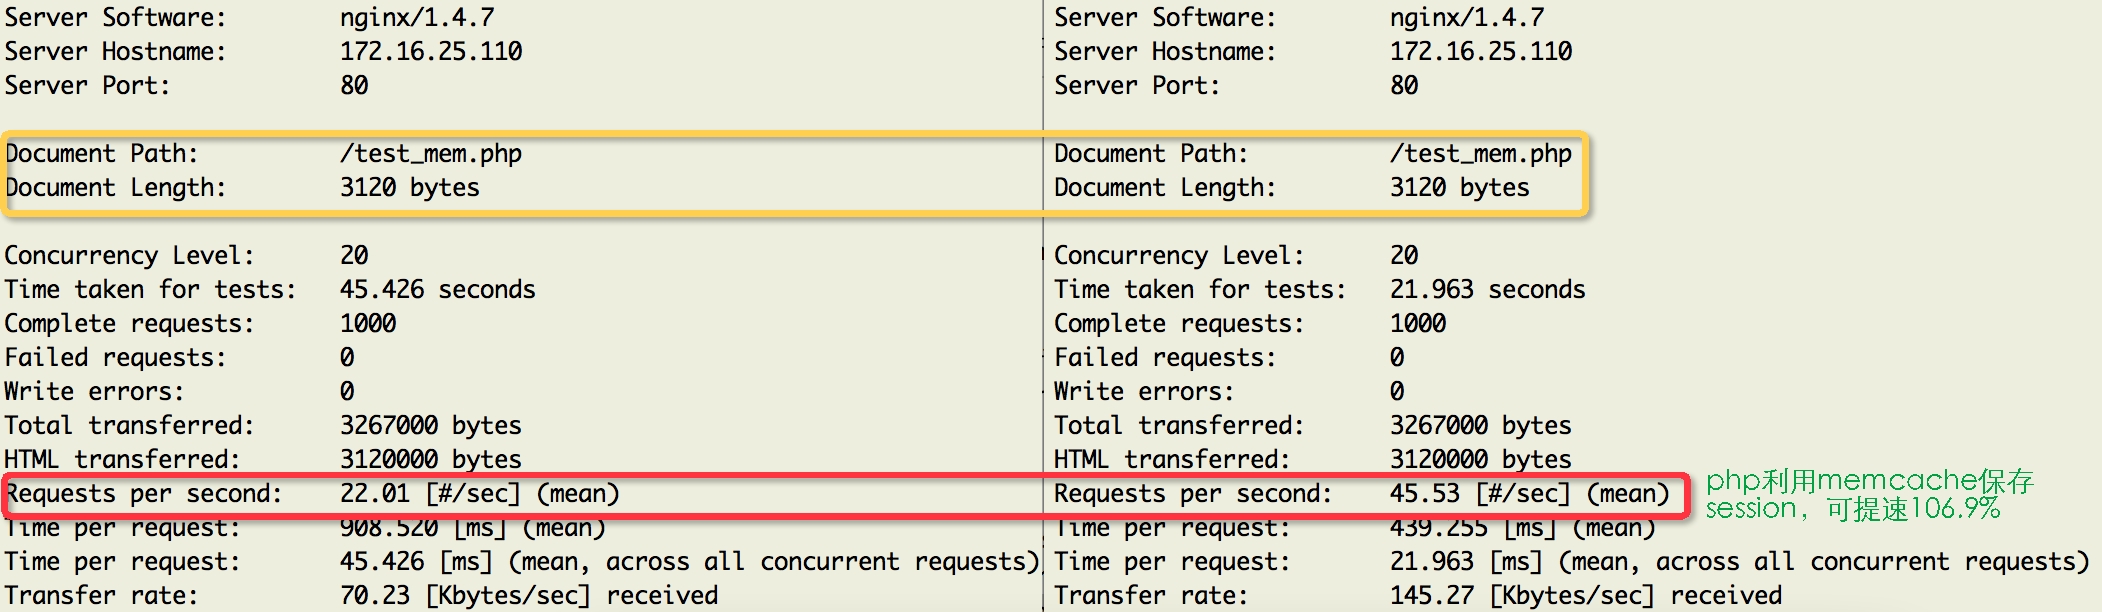
PHP利用memcache保存session数据测试效果
Lnmmp的更多相关文章
- Web服务之LNMMP架构及动静分离实现
原文链接:http://hoolee.blog.51cto.com/7934938/1413346 讲的非常详细,尽管我只看动静分离,可是看了一下其他的部署,也是非常不错,适合新手 一.LNMMP ...
- Varnish 4.0 实战(转)
简介 Varnish 是一款高性能且开源的反向代理服务器和 HTTP 加速器,其采用全新的软件体系机构,和现在的硬件体系紧密配合,与传统的 squid 相比,varnish 具有性能更高.速度更快.管 ...
- Varnish 4.0
Varnish 4.0 实战 简介 Varnish 是一款高性能且开源的反向代理服务器和 HTTP 加速器,其采用全新的软件体系机构,和现在的硬件体系紧密配合,与传统的 squid 相比,varn ...
- Varnish 4.0 实战
简介 Varnish 是一款高性能且开源的反向代理服务器和 HTTP 加速器,其采用全新的软件体系机构,和现在的硬件体系紧密配合,与传统的 squid 相比,varnish 具有性能更高.速度更快.管 ...
- 编译安装lamp (php)
用户账号及权限管理 用户账号:'user'@'host' user: 用户名 host: 此用户访问mysqld服务时允许通过哪些主机远程创建连接: host类型:IP.网络地址.主机名.通配符(%和 ...
- Apache 如何反向代理tomcat并且实现Session保持
简介 LAMT=Linux+Apache+MySQL+Tomcat: Tomcat 服务器是一个免费的开放源代码的Web 应用服务器,属于轻量级应用服务器: 在中小型系统和并发访问用户不是很多的场合下 ...
- NGINX如何反向代理Tomcat并且实现Session保持
简介 LNMT=Linux+Nginx+MySQL+Tomcat: Tomcat 服务器是一个免费的开放源代码的Web 应用服务器,属于轻量级应用服务器: 在中小型系统和并发访问用户不是很多的场合下被 ...
- 如何测试Nginx的高性能
简介 Nginx ("engine x") 是一个高性能的HTTP和反向代理服务器,也是一个IMAP/POP3/SMTP代理服务器: 作为一款轻量级的Web服务器,具有占有内存少, ...
- HAproxy + keepalived 实现双机热备
一.HAProxy简介: HAProxy提供高可用性.负载均衡以及基于TCP和HTTP应用的代理,支持虚拟主机,它是免费.快速并且可靠的一种解决方案.HAProxy特别适用于那些负载特大的web站点, ...
随机推荐
- React 16 源码瞎几把解读 【二】 react组件的解析过程
一.一个真正的react组件编译后长啥样? 我们瞎几把解读了react 虚拟dom对象是怎么生成的,生成了一个什么样的解构.一个react组件不光由若干个这些嵌套的虚拟dom对象组成,还包括各种生命周 ...
- git中如何查看一个文件的修改(更新)历史
有些时候有些文件或文件夹被移除了, 或者更换了路径或被改名了, 想跟踪一下这个文件被修改(更新)的历史, 可以用如下命令: git log -p matser -- filename 格式是: git ...
- 百度2017春招<空间中最大三角形面积的问题>
题目: 三维空间中有N个点,每个点可能是三种颜色的其中之一,三种颜色分别是红绿蓝,分别用'R', 'G', 'B'表示. 现在要找出三个点,并组成一个三角形,使得这个三角形的面积最大.但是三角形必须满 ...
- ASP .NET CORE MVC 部署Windows 系统上 IIS具体步骤---.Net Core 部署到 IIS位系统中的步骤
一.IIS 配置 启用 Web 服务器 (IIS) 角色并建立角色服务. 1.Windows Ddesktop 桌面操作系统(win7及更高版本) 导航到“控制面板” > “程序” > “ ...
- mac 安装mongodb与常用操作
1.安装 brew update brew install mongodb 2.启动mongo mongod --config /usr/local/etc/mongod.conf 3.启动 mong ...
- html5弹性布局两则,有交互。
要开发一个后台管理框架,要求如下效果. 然后开始找各种弹性布局啊什么的,用了flex写了一个,但是觉得不好,首先是兼容,其次它会破坏掉里面子元素的一些css特性,为了不给自己找麻烦我还是用传统写法吧. ...
- java 反射 报错:Attempt to get java.lang.Integer field "..." with illegal data type conversion to int
类: Integer id; 反射时: Field f = User.class.getDeclaredField("id"); f.setAccessible(true); in ...
- python的types模块
python的types模块 1.types是什么: types模块中包含python中各种常见的数据类型,如IntType(整型),FloatType(浮点型)等等. >>> im ...
- PBR Step by Step(三)BRDFs
BRDF BRDF(Bidirectional Reflectance Distribution Function)双向反射分布函数,用来描述给定入射方向上的入射辐射度以及反射方向上的出辐射度分布,B ...
- Linux_x86_Pwn溢出漏洞
基础栈溢出:未开启任何保护的程序 漏洞程序源码 #include <stdio.h>#include <stdlib.h>#include <unistd.h>v ...