
用map函数来完成Python并行任务的简单示例
众所周知,Python的并行处理能力很不理想。我认为如果不考虑线程和GIL的标准参数(它们大多是合法的),其原因不是因为技术不到位,而是我们的使用方法不恰当。大多数关于Python线程和多进程的教材虽然都很出色,但是内容繁琐冗长。它们的确在开篇铺陈了许多有用信息,但往往都不会涉及真正能提高日常工作的部分。
经典例子
DDG上以“Python threading tutorial (Python线程教程)”为关键字的热门搜索结果表明:几乎每篇文章中给出的例子都是相同的类+队列。
事实上,它们就是以下这段使用producer/Consumer来处理线程/多进程的代码示例:
|
1
2
3
4
5
6
7
8
9
10
11
12
13
14
15
16
17
18
19
20
21
22
23
24
25
26
27
28
29
30
31
32
33
34
35
36
37
38
39
40
41
42
43
44
45
46
47
48
49
50
51
52
53
54
55
56
57
|
#Example.py'''Standard Producer/Consumer Threading Pattern''' import timeimport threadingimport Queue class Consumer(threading.Thread): def __init__(self, queue): threading.Thread.__init__(self) self._queue = queue def run(self): while True: # queue.get() blocks the current thread until # an item is retrieved. msg = self._queue.get() # Checks if the current message is # the "Poison Pill" if isinstance(msg, str) and msg == 'quit': # if so, exists the loop break # "Processes" (or in our case, prints) the queue item print "I'm a thread, and I received %s!!" % msg # Always be friendly! print 'Bye byes!' def Producer(): # Queue is used to share items between # the threads. queue = Queue.Queue() # Create an instance of the worker worker = Consumer(queue) # start calls the internal run() method to # kick off the thread worker.start() # variable to keep track of when we started start_time = time.time() # While under 5 seconds.. while time.time() - start_time < 5: # "Produce" a piece of work and stick it in # the queue for the Consumer to process queue.put('something at %s' % time.time()) # Sleep a bit just to avoid an absurd number of messages time.sleep(1) # This the "poison pill" method of killing a thread. queue.put('quit') # wait for the thread to close down worker.join() if __name__ == '__main__': Producer() |
唔…….感觉有点像Java。
我现在并不想说明使用Producer / Consume来解决线程/多进程的方法是错误的——因为它肯定正确,而且在很多情况下它是最佳方法。但我不认为这是平时写代码的最佳选择。
它的问题所在(个人观点)
首先,你需要创建一个样板式的铺垫类。然后,你再创建一个队列,通过其传递对象和监管队列的两端来完成任务。(如果你想实现数据的交换或存储,通常还涉及另一个队列的参与)。
Worker越多,问题越多。
接下来,你应该会创建一个worker类的pool来提高Python的速度。下面是IBM tutorial给出的较好的方法。这也是程序员们在利用多线程检索web页面时的常用方法。
|
1
2
3
4
5
6
7
8
9
10
11
12
13
14
15
16
17
18
19
20
21
22
23
24
25
26
27
28
29
30
31
32
33
34
35
36
37
38
39
40
41
42
43
44
45
46
47
48
49
50
51
52
53
54
|
#Example2.py'''A more realistic thread pool example''' import timeimport threadingimport Queueimport urllib2 class Consumer(threading.Thread): def __init__(self, queue): threading.Thread.__init__(self) self._queue = queue def run(self): while True: content = self._queue.get() if isinstance(content, str) and content == 'quit': break response = urllib2.urlopen(content) print 'Bye byes!' def Producer(): urls = [ # etc.. ] queue = Queue.Queue() worker_threads = build_worker_pool(queue, 4) start_time = time.time() # Add the urls to process for url in urls: queue.put(url) # Add the poison pillv for worker in worker_threads: queue.put('quit') for worker in worker_threads: worker.join() print 'Done! Time taken: {}'.format(time.time() - start_time) def build_worker_pool(queue, size): workers = [] for _ in range(size): worker = Consumer(queue) worker.start() workers.append(worker) return workers if __name__ == '__main__': Producer() |
它的确能运行,但是这些代码多么复杂阿!它包括了初始化方法、线程跟踪列表以及和我一样容易在死锁问题上出错的人的噩梦——大量的join语句。而这些还仅仅只是繁琐的开始!
我们目前为止都完成了什么?基本上什么都没有。上面的代码几乎一直都只是在进行传递。这是很基础的方法,很容易出错(该死,我刚才忘了在队列对象上还需要调用task_done()方法(但是我懒得修改了)),性价比很低。还好,我们还有更好的方法。
介绍:Map
Map是一个很棒的小功能,同时它也是Python并行代码快速运行的关键。给不熟悉的人讲解一下吧,map是从函数语言Lisp来的。map函数能够按序映射出另一个函数。例如
|
1
2
|
results = map(urllib2.urlopen, urls) |
这里调用urlopen方法来把调用结果全部按序返回并存储到一个列表里。就像:
|
1
2
3
|
results = []for url in urls: results.append(urllib2.urlopen(url)) |
Map按序处理这些迭代。调用这个函数,它就会返回给我们一个按序存储着结果的简易列表。
为什么它这么厉害呢?因为只要有了合适的库,map能使并行运行得十分流畅!
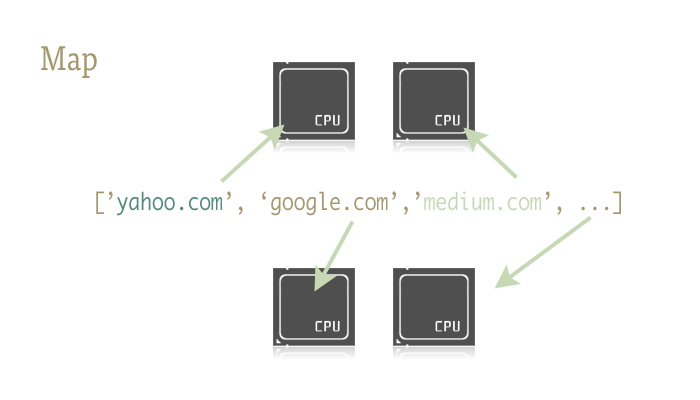
有两个能够支持通过map函数来完成并行的库:一个是multiprocessing,另一个是鲜为人知但功能强大的子文件:multiprocessing.dummy。
题外话:这个是什么?你从来没听说过dummy多进程库?我也是最近才知道的。它在多进程的说明文档里面仅仅只被提到了一句。而且那一句就是大概让你知道有这么个东西的存在。我敢说,这样几近抛售的做法造成的后果是不堪设想的!
Dummy就是多进程模块的克隆文件。唯一不同的是,多进程模块使用的是进程,而dummy则使用线程(当然,它有所有Python常见的限制)。也就是说,数据由一个传递给另一个。这能够使得数据轻松的在这两个之间进行前进和回跃,特别是对于探索性程序来说十分有用,因为你不用确定框架调用到底是IO 还是CPU模式。
准备开始
要做到通过map函数来完成并行,你应该先导入装有它们的模块:
|
1
2
|
from multiprocessing import Poolfrom multiprocessing.dummy import Pool as ThreadPool |
再初始化:
|
1
|
pool = ThreadPool() |
这简单的一句就能代替我们的build_worker_pool 函数在example2.py中的所有工作。换句话说,它创建了许多有效的worker,启动它们来为接下来的工作做准备,以及把它们存储在不同的位置,方便使用。
Pool对象需要一些参数,但最重要的是:进程。它决定pool中的worker数量。如果你不填的话,它就会默认为你电脑的内核数值。
如果你在CPU模式下使用多进程pool,通常内核数越大速度就越快(还有很多其它因素)。但是,当进行线程或者处理网络绑定之类的工作时,情况会比较复杂所以应该使用pool的准确大小。
|
1
|
pool = ThreadPool(4) # Sets the pool size to 4 |
如果你运行过多线程,多线程间的切换将会浪费许多时间,所以你最好耐心调试出最适合的任务数。
我们现在已经创建了pool对象,马上就能有简单的并行程序了,所以让我们重新写example2.py中的url opener吧!
|
1
2
3
4
5
6
7
8
9
10
11
12
13
14
15
16
17
18
19
20
21
22
23
24
25
26
27
28
|
import urllib2from multiprocessing.dummy import Pool as ThreadPool urls = [ # etc.. ] # Make the Pool of workerspool = ThreadPool(4)# Open the urls in their own threads# and return the resultsresults = pool.map(urllib2.urlopen, urls)#close the pool and wait for the work to finishpool.close()pool.join() |
看吧!这次的代码仅用了4行就完成了所有的工作。其中3句还是简单的固定写法。调用map就能完成我们前面例子中40行的内容!为了更形象地表明两种方法的差异,我还分别给它们运行的时间计时。
|
1
2
3
4
5
6
7
8
9
10
11
12
13
14
15
16
17
18
19
20
|
# results = []# for url in urls:# result = urllib2.urlopen(url)# results.append(result) # # ------- VERSUS ------- # # # ------- 4 Pool ------- ## pool = ThreadPool(4)# results = pool.map(urllib2.urlopen, urls) # # ------- 8 Pool ------- # # pool = ThreadPool(8)# results = pool.map(urllib2.urlopen, urls) # # ------- 13 Pool ------- # # pool = ThreadPool(13)# results = pool.map(urllib2.urlopen, urls) |
结果:
|
1
2
3
4
|
# Single thread: 14.4 Seconds# 4 Pool: 3.1 Seconds# 8 Pool: 1.4 Seconds# 13 Pool: 1.3 Seconds |
相当出色!并且也表明了为什么要细心调试pool的大小。在这里,只要大于9,就能使其运行速度加快。
实例2:
生成成千上万的缩略图
我们在CPU模式下来完成吧!我工作中就经常需要处理大量的图像文件夹。其任务之一就是创建缩略图。这在并行任务中已经有很成熟的方法了。
基础的单线程创建
|
1
2
3
4
5
6
7
8
9
10
11
12
13
14
15
16
17
18
19
20
21
22
23
24
25
26
27
28
29
30
|
import osimport PIL from multiprocessing import Poolfrom PIL import Image SIZE = (75,75)SAVE_DIRECTORY = 'thumbs' def get_image_paths(folder): return (os.path.join(folder, f) for f in os.listdir(folder) if 'jpeg' in f) def create_thumbnail(filename): im = Image.open(filename) im.thumbnail(SIZE, Image.ANTIALIAS) base, fname = os.path.split(filename) save_path = os.path.join(base, SAVE_DIRECTORY, fname) im.save(save_path) if __name__ == '__main__': folder = os.path.abspath( '11_18_2013_R000_IQM_Big_Sur_Mon__e10d1958e7b766c3e840') os.mkdir(os.path.join(folder, SAVE_DIRECTORY)) images = get_image_paths(folder) for image in images: create_thumbnail(Image) |
对于一个例子来说,这是有点难,但本质上,这就是向程序传递一个文件夹,然后将其中的所有图片抓取出来,并最终在它们各自的目录下创建和储存缩略图。
我的电脑处理大约6000张图片用了27.9秒。
如果我们用并行调用map来代替for循环的话:
|
1
2
3
4
5
6
7
8
9
10
11
12
13
14
15
16
17
18
19
20
21
22
23
24
25
26
27
28
29
30
31
32
|
import osimport PIL from multiprocessing import Poolfrom PIL import Image SIZE = (75,75)SAVE_DIRECTORY = 'thumbs' def get_image_paths(folder): return (os.path.join(folder, f) for f in os.listdir(folder) if 'jpeg' in f) def create_thumbnail(filename): im = Image.open(filename) im.thumbnail(SIZE, Image.ANTIALIAS) base, fname = os.path.split(filename) save_path = os.path.join(base, SAVE_DIRECTORY, fname) im.save(save_path) if __name__ == '__main__': folder = os.path.abspath( '11_18_2013_R000_IQM_Big_Sur_Mon__e10d1958e7b766c3e840') os.mkdir(os.path.join(folder, SAVE_DIRECTORY)) images = get_image_paths(folder) pool = Pool() pool.map(create_thumbnail,images) pool.close() pool.join() |
5.6秒!
对于只改变了几行代码而言,这是大大地提升了运行速度。这个方法还能更快,只要你将cpu 和 io的任务分别用它们的进程和线程来运行——但也常造成死锁。总之,综合考虑到 map这个实用的功能,以及人为线程管理的缺失,我觉得这是一个美观,可靠还容易debug的方法。
好了,文章结束了。一行完成并行任务。
用map函数来完成Python并行任务的简单示例的更多相关文章
- C#调用Python脚本的简单示例
C#调用Python脚本的简单示例 分类:Python (2311) (0) 举报 收藏 IronPython是一种在 .NET及 Mono上的 Python实现,由微软的 Jim Huguni ...
- python信号signal简单示例
进程间通信之类的,用得着, 可以自定义接到信息之后的动作. file1.py #!/usr/bin/env python # -*- coding: utf-8 -*- import os impor ...
- python selenium 最简单示例
使用 pip 安装 selenium 下载 chromedriver,添加在PATH中 # -*- coding: utf-8 -*- from selenium import webdriver ...
- Python基础总结之认识lambda函数、map函数、filter() 函数。第十二天开始(新手可相互督促)
今天周日,白天在学习,晚上更新一些笔记,希望对大家能更好的理解.学习python~ lambda函数,也就是大家说的匿名函数.它没有具体的名称,也可以叫做一句话函数,我觉得也不过分,大家看下代码,来体 ...
- 实现python中的map函数
假设Python没有提供map()函数,自行编写my_map()函数实现与map()相同的功能.以下代码在Python 2.7.8中实现. 实现代码: def my_map(fun,num): i = ...
- python map函数
map()函数 map()是 Python 内置的高阶函数,它接收一个函数 f 和一个 list,并通过把函数 f 依次作用在 list 的每个元素上,得到一个新的 list 并返回. 例如,对于li ...
- Python中的map()函数和reduce()函数的用法
Python中的map()函数和reduce()函数的用法 这篇文章主要介绍了Python中的map()函数和reduce()函数的用法,代码基于Python2.x版本,需要的朋友可以参考下 Py ...
- python的map()函数
map()是 Python 内置的高阶函数,它接收一个函数 f 和一个 list,并通过把函数 f 依次作用在 list 的每个元素上,得到一个新的 list 并返回. 例如,对于list [1, 2 ...
- Python中map()函数浅析
MapReduce的设计灵感来自于函数式编程,这里不打算提MapReduce,就拿python中的map()函数来学习一下. 文档中的介绍在这里: map(function, iterable, .. ...
随机推荐
- 如何点焊过的镍片再次焊接到 PCBA 上?
如何将点焊过的镍片再次焊接到 PCBA 上? 在 PCBA 上贴了镍片再点焊,这样的制造工艺可以大大减少人工处理,提高生产通过率. 由于种种原因,有些机器可能有故障需要维修,而且电池又需要拆下来,才能 ...
- C#实现 OPC历史数据存取研究
来源:http://blog.csdn.net/gjack/article/details/5641794 C#实现 OPC历史数据存取研究 (原文)Research of Accessing the ...
- bfs判断子图是否连通
int judge() { int v[13] = { 0 }; queue<int> myq; myq.push(ans[0]); v[ans[0]] = 1; while (!myq. ...
- CentOS7 php7 安装 curl 扩展
直接从php源码包中,使用root权限安装. 找到原先安装PHP的源码包文件(如果已经删掉需要重新下载原来版本的源码包并解压) 我的php源码包在root家目录下. cd /php-7.1.4/ext ...
- 2017百度之星初赛A-1006(HDU-6113)
思路:在图的外面包一圈'0'字符,然后dfs统计'0'字符的个数和'1'字符的个数.结果如下(num0表示0字符的个数,num1表示1字符的个数): num0 == 1 && num1 ...
- PyQt 5的基本功能
PyQt5常用的模块 PyQt5的类别分为几个模块,包括: QtCore:包含非核心的GUI功能,此模块用于处理时间.文件和目录.各种数据类型.流.URL.MIME类型.线程或进程 QtGui:包括窗 ...
- java程序中的ibatis连接mySql的基本实例
属性文件:SqlMap.properties driver=com.mysql.jdbc.Driver url=jdbc:mysql://localhost:3306/ibatis username= ...
- 基于JDBC的跨平台数据库管理工具DbVisualizer安装步骤(图文详解)(博主推荐)
首先,关于跨平台数据库管理工具DbVisualizer是什么?这个不多说,大家自行去看. 这个工具可以自定义连接其他没有驱动的数据库. 公司的项目牵扯到的数据库有mysql,sqlserver,o ...
- Mysql进行复杂查询
1.查询“生物”课程比“物理”课程成绩高的所有学生的学号: 思路: (1)获取所有选了 生物 课程的学生的成绩(学号,成绩) --临时表 (2)获取所有选了 物理 课程的学生的成绩(学号,成绩 ...
- redmineBUG系统
bitnami-redmine-2.6.3-0-linux-x64-installer.run 我的是linux 64位 官网下载bitnami-redmine http://bitnami.com/ ...