yolov1代码阅读
yolov1使用的backbone是由GoogLeNet启发而来,有24个卷积层,最后接2个全连接层,详细结构如下图:
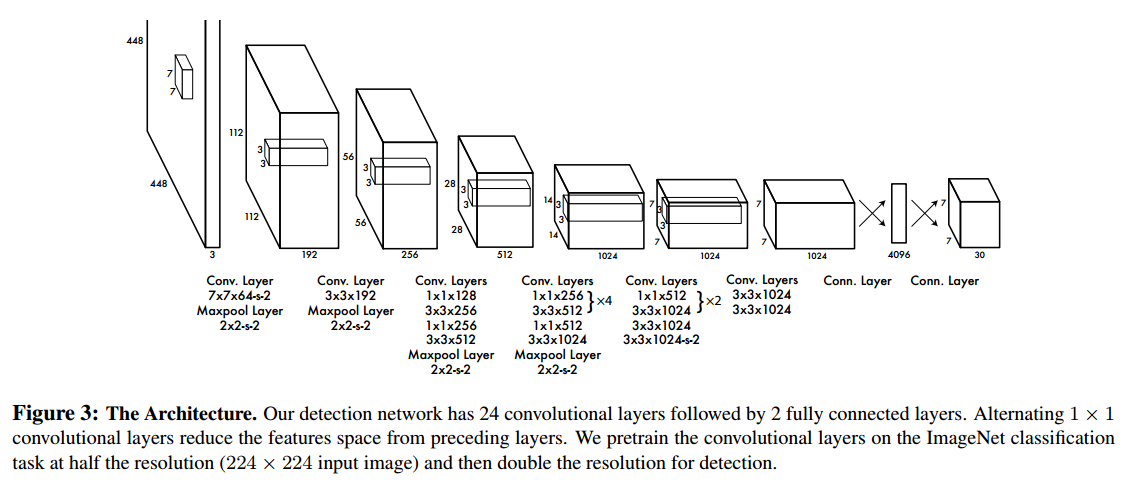
检测网络的输入分辨率是448X448,最后的特征图大小为7X7。在特征图的每一个位置都预测如下数据项:
1、一个C维的向量,表示在该位置含有物体的条件下,含有的物体属于C个类别中每一类别的条件概率;
2、一个B维的向量,网络为每个位置预测了B个bounding boxes,每个bounding boxes都有一个“分数”,表示该box与真正的物体框的IOU,也可以理解成该bounding box含有物体的概率。这里的“分数”和1中的每个类别的分数相乘就是每个框含有每一类物体的概率;
3、一个B*4维的向量。前两个数是bbox的中心点坐标,坐标值是在7X7的尺度下,相对于feature map当前位置的偏移量,范围为[0, 1],当前位置坐标和偏移量相加即为实际的中心点坐标。这个中心点坐标的范围实际上就在以当前位置为左上角顶点的grid cell内。
综上输出的Tensor元素的排列顺序为:7*7*C-->7*7*B-->7*7*4*B,而标签Tensor元素的排列顺序为(1-->C-->4)*7*7。
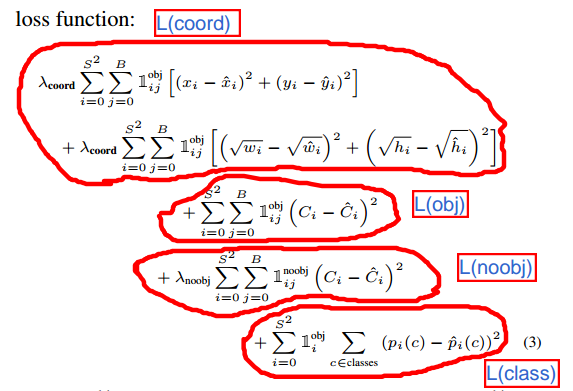
yolov1的Loss由4部分组成,如下图:
yolov1最后一层的代码如下:
/*

l.coord_scale=5

l.object_scale=1

l.noobject_scale=0.5

l.class_scale=1

l.delta[box_index+0] = l.coord_scale*(net.truth[tbox_index + 0] - l.output[box_index + 0]);

l.delta[box_index+1] = l.coord_scale*(net.truth[tbox_index + 1] - l.output[box_index + 1]);

l.delta[box_index+2] = l.coord_scale*(sqrt(net.truth[tbox_index + 2]) - l.output[box_index + 2]);

l.delta[box_index+3] = l.coord_scale*(sqrt(net.truth[tbox_index + 3]) - l.output[box_index + 3]);

l.delta[p_index] = l.object_scale * (iou - l.output[p_index]);

l.delta[p_index] = l.noobject_scale*(0 - l.output[p_index]);

l.delta[class_index+j] = l.class_scale * (net.truth[truth_index+1+j] - l.output[class_index+j]);

*/

void forward_detection_layer(const detection_layer l, network net)

{

    int locations = l.side*l.side;

    int i,j;

    memcpy(l.output, net.input, l.outputs*l.batch*sizeof(float));

    //if(l.reorg) reorg(l.output, l.w*l.h, size*l.n, l.batch, 1);

    int b;

    // l.softmax=0

    if (l.softmax){

        for(b = ; b < l.batch; ++b){

            int index = b*l.inputs;

            for (i = ; i < locations; ++i) {

                int offset = i*l.classes;

                softmax(l.output + index + offset, l.classes, , ,

                        l.output + index + offset);

            }

        }

    }

    if(net.train){

        float avg_iou = ;

        float avg_cat = ;

        float avg_allcat = ;

        float avg_obj = ;

        float avg_anyobj = ;

        int count = ;

        *(l.cost) = ;

        int size = l.inputs * l.batch;

        memset(l.delta, , size * sizeof(float));

        for (b = ; b < l.batch; ++b){

            int index = b*l.inputs;

            for (i = ; i < locations; ++i) {

                int truth_index = (b*locations + i)*(+l.coords+l.classes);

                int is_obj = net.truth[truth_index];

                for (j = ; j < l.n; ++j) {

                    int p_index = index + locations*l.classes + i*l.n + j;

                    // l.noobject_scale=0.5

                    l.delta[p_index] = l.noobject_scale*( - l.output[p_index]);

                    *(l.cost) += l.noobject_scale*pow(l.output[p_index], );

                    avg_anyobj += l.output[p_index];

                }

                if (!is_obj){

                    continue;

                }

                // l.class_scale=1

                int class_index = index + i*l.classes;

                for(j = ; j < l.classes; ++j) {

                    l.delta[class_index+j] = l.class_scale * (net.truth[truth_index++j] - l.output[class_index+j]);

                    *(l.cost) += l.class_scale * pow(net.truth[truth_index++j] - l.output[class_index+j], );

                    if(net.truth[truth_index +  + j]) avg_cat += l.output[class_index+j];

                    avg_allcat += l.output[class_index+j];

                }

                int best_index = -;

                float best_iou = ;

                float best_rmse = ;

                int row = i / l.side;

                int col = i % l.side;

                box truth = float_to_box(net.truth + truth_index +  + l.classes, );

                truth.x = (truth.x + col) / l.side;

                truth.y = (truth.y + row) / l.side;

                for(j = ; j < l.n; ++j){

                    int box_index = index + locations*(l.classes + l.n) + (i*l.n + j) * l.coords;

                    box out = float_to_box(l.output + box_index, );

                    out.x = (out.x + col) / l.side;

                    out.y = (out.y + row) / l.side;

                    // l.sqrt=1

                    if (l.sqrt){

                        out.w = out.w*out.w;

                        out.h = out.h*out.h;

                    }

                    float iou  = box_iou(out, truth);

                    float rmse = box_rmse(out, truth);

                    if(best_iou >  || iou > ){

                        if(iou > best_iou){

                            best_iou = iou;

                            best_index = j;

                        }

                    }else{

                        if(rmse < best_rmse){

                            best_rmse = rmse;

                            best_index = j;

                        }

                    }

                }

                // l.forced=0

                if(l.forced){

                    if(truth.w*truth.h < .){

                        best_index = ;

                    }else{

                        best_index = ;

                    }

                }

                // l.random=0

                if(l.random && *(net.seen) < ){

                    best_index = rand()%l.n;

                }

                int box_index = index + locations*(l.classes + l.n) + (i*l.n + best_index) * l.coords;

                int tbox_index = truth_index +  + l.classes;

                box out = float_to_box(l.output + box_index, );

                out.x = (out.x + col) / l.side;

                out.y = (out.y + row) / l.side;

                if (l.sqrt) {

                    out.w = out.w*out.w;

                    out.h = out.h*out.h;

                }

                float iou  = box_iou(out, truth);

                // l.noobject_scale=0.5, l.object_scale=1

                int p_index = index + locations*l.classes + i*l.n + best_index;

                *(l.cost) -= l.noobject_scale * pow(l.output[p_index], );

                *(l.cost) += l.object_scale * pow(-l.output[p_index], );

                avg_obj += l.output[p_index];

                l.delta[p_index] = l.object_scale * (.-l.output[p_index]);

                // l.rescore=1

                if(l.rescore){

                    l.delta[p_index] = l.object_scale * (iou - l.output[p_index]);

                }

                // l.coord_scale=5

                l.delta[box_index+] = l.coord_scale*(net.truth[tbox_index + ] - l.output[box_index + ]);

                l.delta[box_index+] = l.coord_scale*(net.truth[tbox_index + ] - l.output[box_index + ]);

                l.delta[box_index+] = l.coord_scale*(net.truth[tbox_index + ] - l.output[box_index + ]);

                l.delta[box_index+] = l.coord_scale*(net.truth[tbox_index + ] - l.output[box_index + ]);

                if(l.sqrt){

                    l.delta[box_index+] = l.coord_scale*(sqrt(net.truth[tbox_index + ]) - l.output[box_index + ]);

                    l.delta[box_index+] = l.coord_scale*(sqrt(net.truth[tbox_index + ]) - l.output[box_index + ]);

                }

                *(l.cost) += pow(-iou, );

                avg_iou += iou;

                ++count;

            }

        }

        *(l.cost) = pow(mag_array(l.delta, l.outputs * l.batch), );

        printf("Detection Avg IOU: %f, Pos Cat: %f, All Cat: %f, Pos Obj: %f, Any Obj: %f, count: %d\n", avg_iou/count, avg_cat/count, avg_allcat/(count*l.classes), avg_obj/count, avg_anyobj/(l.batch*locations*l.n), count);

        //if(l.reorg) reorg(l.delta, l.w*l.h, size*l.n, l.batch, 0);

    }

}

void backward_detection_layer(const detection_layer l, network net)

{

    axpy_cpu(l.batch*l.inputs, , l.delta, , net.delta, );

}
预测时根据最终的输出得到bbox的代码如下:(值得注意的是,在yolov1的训练阶段,会使用原图的宽、高将标注的bbox归一化,在预测阶段输出的bbox坐标也是归一化的。)
void get_detection_detections(layer l, int w, int h, float thresh, detection *dets)

{

    int i,j,n;

    float *predictions = l.output;

    //int per_cell = 5*num+classes;

    for (i = ; i < l.side*l.side; ++i){

        int row = i / l.side;

        int col = i % l.side;

        for(n = ; n < l.n; ++n){

            int index = i*l.n + n;

            int p_index = l.side*l.side*l.classes + i*l.n + n;

            float scale = predictions[p_index];

            int box_index = l.side*l.side*(l.classes + l.n) + (i*l.n + n)*;

            box b;

//            b.x = (predictions[box_index + 0] + col) / l.side * w;

//            b.y = (predictions[box_index + 1] + row) / l.side * h;

//            b.w = pow(predictions[box_index + 2], (l.sqrt?2:1)) * w;

//            b.h = pow(predictions[box_index + 3], (l.sqrt?2:1)) * h;

            b.x = (predictions[box_index + ] + col) / l.side;

            b.y = (predictions[box_index + ] + row) / l.side;

            b.w = pow(predictions[box_index + ], (l.sqrt?:));

            b.h = pow(predictions[box_index + ], (l.sqrt?:));

            dets[index].bbox = b;

            dets[index].objectness = scale;

            for(j = ; j < l.classes; ++j){

                int class_index = i*l.classes;

                float prob = scale*predictions[class_index+j];

              dets[index].prob[j] = (prob > thresh) ? prob : ;

            }

        }

    }

}
生成net.truth的关键代码如下:
void fill_truth_region(char *path, float *truth, int classes, int num_boxes, int flip, float dx, float dy, float sx, float sy)

{

    char labelpath[];

    find_replace(path, "images", "labels", labelpath);

    find_replace(labelpath, "JPEGImages", "labels", labelpath);

    find_replace(labelpath, ".jpg", ".txt", labelpath);

    find_replace(labelpath, ".png", ".txt", labelpath);

    find_replace(labelpath, ".JPG", ".txt", labelpath);

    find_replace(labelpath, ".JPEG", ".txt", labelpath);

    int count = ;

    box_label *boxes = read_boxes(labelpath, &count);

    randomize_boxes(boxes, count);

    correct_boxes(boxes, count, dx, dy, sx, sy, flip);

    float x,y,w,h;

    int id;

    int i;

    for (i = ; i < count; ++i) {

        x =  boxes[i].x;

        y =  boxes[i].y;

        w =  boxes[i].w;

        h =  boxes[i].h;

        id = boxes[i].id;

        if (w < . || h < .) continue;

        // num_boxes is S in article, yolov1 divides the input image into SxS grid

        int col = (int)(x*num_boxes);

        int row = (int)(y*num_boxes);

        x = x*num_boxes - col;

        y = y*num_boxes - row;

        int index = (col+row*num_boxes)*(+classes);

        if (truth[index]) continue;

        truth[index++] = ;

        if (id < classes) truth[index+id] = ;

        index += classes;

        truth[index++] = x;

        truth[index++] = y;

        truth[index++] = w;

        truth[index++] = h;

    }

    free(boxes);

}
yolov1代码阅读的更多相关文章
- 代码阅读分析工具Understand 2.0试用
Understand 2.0是一款源代码阅读分析软件,功能强大.试用过一段时间后,感觉相当不错,确实可以大大提高代码阅读效率.由于Understand功能十分强大,本文不可能详尽地介绍它的所有功能,所 ...
- Android 上的代码阅读器 CoderBrowserHD 修改支持 go 语言代码
我在Android上的代码阅读器用的是 https://github.com/zerob13/CoderBrowserHD 改造的版本,改造后的版本我放在 https://github.com/ghj ...
- Linux协议栈代码阅读笔记(二)网络接口的配置
Linux协议栈代码阅读笔记(二)网络接口的配置 (基于linux-2.6.11) (一)用户态通过C库函数ioctl进行网络接口的配置 例如,知名的ifconfig程序,就是通过C库函数sys_io ...
- [置顶] Linux协议栈代码阅读笔记(一)
Linux协议栈代码阅读笔记(一) (基于linux-2.6.21.7) (一)用户态通过诸如下面的C库函数访问协议栈服务 int socket(int domain, int type, int p ...
- 图形化代码阅读工具——Scitools Understand
Scitools出品的Understand 2.0.用了很多年了,比Source Insight强大很多.以前的名字叫Understand for C/C++,Understand for Java, ...
- Python - 关于代码阅读的一些建议
初始能力 让阅读思路保持清晰连贯,主力关注在流程架构和逻辑实现上,不被语法.技巧和业务流程等频繁地阻碍和打断. 建议基本满足以下条件,再开始进行代码阅读: 具备一定的语言基础:熟悉基础语法,常用的函数 ...
- MediaInfo代码阅读
MediaInfo是一个用来分析媒体文件的开源工具. 支持的文件非常全面,基本上支持所有的媒体文件. 最近是在做HEVC开发,所以比较关注MediaInfo中关于HEVC的分析与处理. 从Meid ...
- Tools - 一些代码阅读的方法
1 初始能力 让阅读思路清晰连贯,保持在程序的流程架构和逻辑实现上,不被语法.编程技巧和业务流程等频繁地阻碍和打断. 语言基础:熟悉基础语法,常用的函数.库.编程技巧等: 了解设计模式.构建工具.代码 ...
- Bleve代码阅读(二)——Index Mapping
引言 Bleve是Golang实现的一个全文检索库,类似Lucene之于Java.在这里通过阅读其代码,来学习如何使用及定制检索功能.也是为了通过阅读代码,学习在具体环境下Golang的一些使用方式. ...
随机推荐
- Vue 指令大全
准备开始本章要给大家带来的内容是相关Vue中的组件以及一系列常用属性.本章合适人群囊括了除已有开发经验人员以外的小白新手,从how.why.what三个角度来让大家理解并使用该技术历史介绍angula ...
- Shiro学习(19)动态URL权限限制
用过spring Security的朋友应该比较熟悉对URL进行全局的权限控制,即访问URL时进行权限匹配:如果没有权限直接跳到相应的错误页面.Shiro也支持类似的机制,不过需要稍微改造下来满足实际 ...
- Linux下常用的配置文件位置
1.别名配置文件 [root@room8pc205 ~]# vim /root/.bashrc #此处是root用户定义的别名文件的位置,只有root用户登录可用 [root@room8pc2 ...
- 简单理解Ext.extend
<!DOCTYPE html> <html lang="en"> <head> <meta charset="UTF-8&quo ...
- (抓)ubuntu下安装mysql --- 我主要参考的文章
转:http://cycnet.blog.51cto.com/117809/812625 现在的软件越来越好安装,尤其是在ubuntu下安装软件,更是没有技巧,只需要在联网的情况下使用apt-get ...
- Linux环境进程间通信----信号与管道
一.信号: 信号主要用来通知进程异步事件的发生.可以使用“kill -l ”命令来显示系统中的信号.进程可以忽略大部分信号,但是有两个是不能忽略的: (1)SIGSTOP:这个信号将中断进程的执行. ...
- 工具类--Excel 导出poi
实现功能 --批量导出excel 文件,配置一个sheet多少条数据,根据查询数据量的多少确定生成几个sheet页. pom 文件导入ExcelUtils工具包,依赖于poi包. <!-- ht ...
- java8的正确使用姿势
ackage com.expgiga.Java8; import java.util.ArrayList; import java.util.Arrays; import java.util.List ...
- 3、加强siege性能测试
需求1:使用siege对多个页面进行加压 1.对如下3个页面加压 http://jrjf.hscx365.com/ http://jrjf.hscx365.com/solution/armyone.h ...
- HDU 6693 Valentine's Day (概率)
2019 杭电多校 10 1003 题目链接:HDU 6693 比赛链接:2019 Multi-University Training Contest 10 Problem Description O ...