Spring Aop和Spring Ioc(二)
Spring IOC:
DI注入集合类型:
实体类:
package cn.spring.entity;

import java.util.*;

public class Dientity {

    private String[] array;         //数组

    private List<String> list;      //List集合

    private Set<String> set;       //Set集合

    private Map<String,Object> map;   //Map集合

    private Properties properties;   //Porperties配置

    public String[] getArray() {

        return array;

    }

    public void setArray(String[] array) {

        this.array = array;

    }

    public List<String> getList() {

        return list;

    }

    public void setList(List<String> list) {

        this.list = list;

    }

    public Set<String> getSet() {

        return set;

    }

    public void setSet(Set<String> set) {

        this.set = set;

    }

    public Map<String, Object> getMap() {

        return map;

    }

    public void setMap(Map<String, Object> map) {

        this.map = map;

    }

    public Properties getProperties() {

        return properties;

    }

    public void setProperties(Properties properties) {

        this.properties = properties;

    }

    @Override

    public String toString() {

        return "Dientity{" +

                "array=" + Arrays.toString(array) +

                ",\n list=" + list +

                ",\nset=" + set +

                ",\n map=" + map +

                ",\n properties=" + properties +

                '}';

    }

}
applicationcontextbean.xml中:
<bean id="dientity" class="cn.spring.entity.Dientity">
       数组注入

        <property name="array" >

            <array>

                <value>李一</value>

                <value>王二</value>

                <value>刘三</value>

            </array>

        </property>
       List集合注入

        <property name="list">

            <list>

                <value>李一</value>

                <value>王二</value>

                <value>刘三</value>

            </list>

        </property>
        Map集合注入

        <property name="map">

            <map>

                <entry key="name1" value="李一"></entry>

                <entry key="name2" value="王二"></entry>

                <entry key="name3" value="刘三"></entry>

            </map>

        </property>
        Set集合注入

        <property name="set">

            <set>

                <value>李一</value>

                <value>王二</value>

                <value>刘三</value>

            </set>

        </property>
properties注入

<property name="properties">

    <props>

        <prop key="jdbc.driver">com.mysql.jdbc.Driver</prop>

        <prop key="jdbc.username">root</prop>

    </props>

</property>
</bean>
结果:

域属性自动注入:byName,byType
    <!--byName:实体类中的域属性的名字和id一致-->

     <bean id="studentBean" class="cn.spring.entity.StudentBean" autowire="byName">

        <property name="stu_id" value="18"></property>

        <property name="stu_name" value="VVV"></property>

     <!-- <property name="teacherBean" ref="teacherBean"></property>-->

    </bean>

    <!--byType:类型是唯一的,在applicationtextbean.xml中bean只能有一个。-->

    <bean id="studentBean" class="cn.spring.entity.StudentBean" autowire="byType">

        <property name="stu_id" value="18"></property>

        <property name="stu_name" value="VVV"></property>

       <!-- <property name="teacherBean" ref="teacherBean"></property>-->

    </bean>

    <bean id="teacherBean" class="cn.spring.entity.TeacherBean">

        <property name="T_id" value="9"></property>

        <property name="T_name" value="WWW"></property>

    </bean>
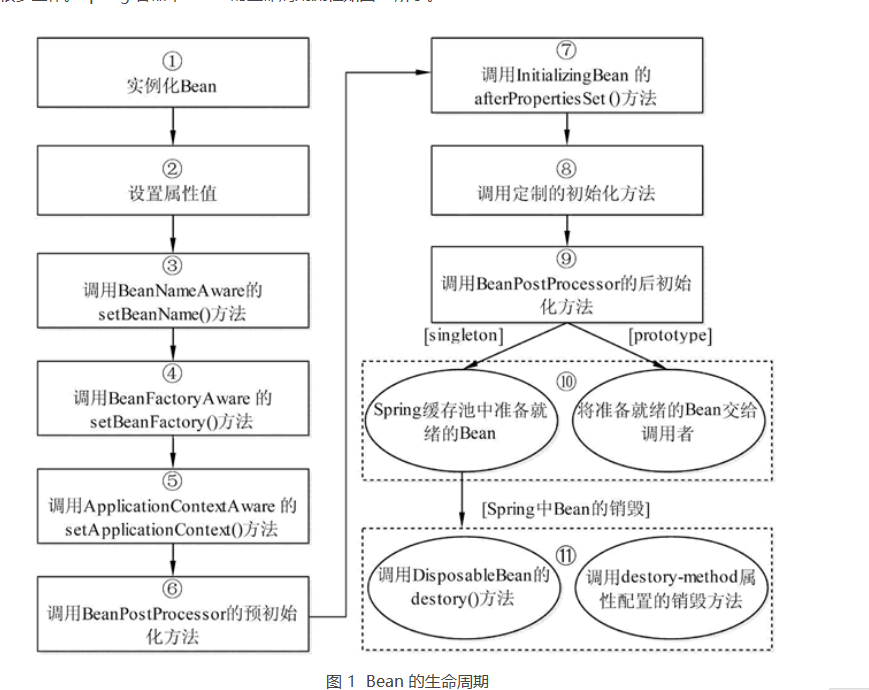
SpringBean的生命周期和作用域:
生命周期:
spring bean的作用域:

代理模式:
静态代理:
代理模式可以在不修改被代理对象的基础上,通过扩展代理类,进行一些功能的附加与增强。值得注意的是,代理类和被代理类应该共同实现一个接口,或者是共同继承某个类。
静态代理的内容,为什么叫做静态呢?因为它的类型是事先预定好的。
动态代理:
动态代理有两种:jdk动态代理和Cglib动态代理
jdk动态代理:
JDK动态代理中包含一个类和一个接口:
InvocationHandler接口:

public interface InvocationHandler {

public Object invoke(Object proxy,Method method,Object[] args) throws Throwable;

}

参数说明:

Object proxy:指被代理的对象。

Method method:要调用的方法

Object[] args:方法调用时所需要的参数
可以将InvocationHandler接口的子类想象成一个代理的最终操作类,替换掉ProxySubject。
Proxy类:
Proxy类是专门完成代理的操作类,可以通过此类为一个或多个接口动态地生成实现类,此类提供了如下的操作方法:
public static Object newProxyInstance(ClassLoader loader, Class<?>[] interfaces,

InvocationHandler h)

                               throws IllegalArgumentException

参数说明:

ClassLoader loader:类加载器

Class<?>[] interfaces:得到全部的接口

InvocationHandler h:得到InvocationHandler接口的子类实例
Ps:类加载器
在Proxy类中的newProxyInstance()方法中需要一个ClassLoader类的实例,ClassLoader实际上对应的是类加载器,在Java中主要有一下三种类加载器;
Booststrap ClassLoader:此加载器采用C++编写,一般开发中是看不到的;
Extendsion ClassLoader:用来进行扩展类的加载,一般对应的是jre\lib\ext目录中的类;
AppClassLoader:(默认)加载classpath指定的类,是最常使用的是一种加载器。
实例:
Suject接口
package cn.spring.jdkporxy;

/**

 * 抽象主题:真实业务接口

 */

public interface Subject {

   void  doSome();

}

Subject接口实现

package cn.spring.jdkporxy;

/**

 * 真实主题:将业务代码封装到此主题当中

 */

public class RealSubject implements Subject {

    @Override

    public void doSome() {

        System.out.println("========================真实业务====================");

    }

}

package cn.spring.jdkporxy;

import java.lang.reflect.InvocationHandler;

import java.lang.reflect.Method;

import java.lang.reflect.Proxy;

public class JDKProxyTest {

    public static void main(String[] args) {

        //JDK动态代理,利用了Proxy类生成代理对象      运行期间    必须原对象必须拥有interface   在内存当中生成代理对象

        //cglib动态代理:在编译期间,利用Enhancer类生成代理对象(要求原对象可以不具备接口)

        //JDK动态代理:要求必须有抽象主题

        //代表的是代理对象  指定对象的原始类型

        /**

         * ClassLoader loader,   类加载器:应该是代理对象的类加载器

         * Class<?>[] interfaces,   接口:原始对象实现的接口类型

         * InvocationHandler h

         */

        //创建一个原始对象

        final Subject subject=new RealSubject();

        Subject subjectProxy = (Subject) Proxy.newProxyInstance(subject.getClass().getClassLoader(), subject.getClass().getInterfaces(), new InvocationHandler() {

            /**

             *

             * @param proxy   代理对象

             * @param method    目标代理方法

             * @param args      目标代理方法的参数

             * @return

             * @throws Throwable

             */

            @Override

            public Object invoke(Object proxy, Method method, Object[] args) throws Throwable {

                System.out.println("前置增强");

                //如何去调用原始对象的业务方法

                Object invoke = method.invoke(subject, args);

                System.out.println("后置增强");

                return invoke;

            }

        });

        subjectProxy.doSome();

        System.out.println(subject);

        System.out.println(subjectProxy);

    }

}
动态代理类的字节码在程序运行时由Java反射机制动态生成,无需程序员手工编写它的源代码。动态代理类不仅简化了编程工作,而且提高了软件系统的可扩展性,因为Java 反射机制可以生成任意类型的动态代理类。java.lang.reflect 包中的Proxy类和InvocationHandler 接口提供了生成动态代理类的能力。
JDK的动态代理依靠接口实现,如果有些类并没有实现接口,则不能使用JDK代理,这就要使用cglib动态代理了。
Cglib动态代理:
cglib是针对类来实现代理的,他的原理是对指定的目标类生成一个子类,并覆盖其中方法实现增强,但因为采用的是继承,所以不能对final修饰的类进行代理。
实例:
package cn.spring.cglibporxy;

/**

 * 业务类

 */

public class IService {

    public void doSome(){

        System.out.println("我是实现业务的方法");

    }

}

package cn.spring.cglibporxy;

import org.springframework.cglib.proxy.Callback;

import org.springframework.cglib.proxy.Enhancer;

import org.springframework.cglib.proxy.MethodInterceptor;

import org.springframework.cglib.proxy.MethodProxy;

import java.lang.reflect.Method;

public class CglibProxyTest {

    public static void main(String[] args) {

        //CGLIB动态代理(当前项目必须有CGLIB的支持)

        //步骤一:目标对象

        final IService iService=new IService();

        //步骤二:通过CGLIB提供的Enhancer类生成代理

        Enhancer enhancer=new Enhancer();

        //步骤三:指定需要代理的目标对象模板(将目标对象放入到代理工厂当中,生成代理对象)

        enhancer.setSuperclass(iService.getClass());

        //步骤四:实现增强的处理操作

        enhancer.setCallback(new MethodInterceptor() {

            /**

             *

             * @param o             目标对象

             * @param method        目标对象的方法

             * @param objects       目标对象方法内的参数

             * @param methodProxy   代理目标对象方法

             * @return

             * @throws Throwable

             */

            @Override

            public Object intercept(Object o, Method method, Object[] objects, MethodProxy methodProxy) throws Throwable {

                System.out.println("前置");

                Object invoke = methodProxy.invoke(iService, objects);

                System.out.println("后置");

                return invoke;

            }

        });

        //最后一步:创建代理

        IService iServiceProxy = (IService)enhancer.create();

        iServiceProxy.doSome();

    }

}
Spring Aop和Spring Ioc(二)的更多相关文章
- 5.2 Spring5源码--Spring AOP源码分析二
目标: 1. 什么是AOP, 什么是AspectJ 2. 什么是Spring AOP 3. Spring AOP注解版实现原理 4. Spring AOP切面原理解析 一. 认识AOP及其使用 详见博 ...
- 5.2 spring5源码--spring AOP源码分析二--切面的配置方式
目标: 1. 什么是AOP, 什么是AspectJ 2. 什么是Spring AOP 3. Spring AOP注解版实现原理 4. Spring AOP切面原理解析 一. 认识AOP及其使用 详见博 ...
- Spring框架学习之IOC(二)
Spring框架学习之IOC(二) 接着上一篇的内容,下面开始IOC基于注解装配相关的内容 在 classpath 中扫描组件 <context:component-scan> 特定组件包 ...
- [Spring框架]Spring AOP基础入门总结二:Spring基于AspectJ的AOP的开发.
前言: 在上一篇中: [Spring框架]Spring AOP基础入门总结一. 中 我们已经知道了一个Spring AOP程序是如何开发的, 在这里呢我们将基于AspectJ来进行AOP 的总结和学习 ...
- Spring Aop和Spring Ioc(一)
Spring Aop Aop: 面向切面编程的本质:面向切面编程,指扩展功能不修改源代码,将功能代码从业务逻辑代码中分离出来. 1:主要功能:日志记录,性能统计,安全控制,事务处理,异常处理等等. 2 ...
- 死磕Spring之AOP篇 - Spring AOP自动代理(二)筛选合适的通知器
该系列文章是本人在学习 Spring 的过程中总结下来的,里面涉及到相关源码,可能对读者不太友好,请结合我的源码注释 Spring 源码分析 GitHub 地址 进行阅读. Spring 版本:5.1 ...
- 【Spring AOP】Spring AOP之如何通过注解的方式实现各种通知类型的AOP操作进阶篇(3)
一.切入点表达式的各种类型 切入点表达式的作用:限制连接点的匹配(满足时对应的aspect方法会被执行) 1)execution:用于匹配方法执行连接点.Spring AOP用户可能最经常使用exec ...
- 【Spring AOP】Spring AOP之你必须知道的AOP相关概念(1)
一.什么是AOP AOP(Aspect-oriented Programming)即面向切面编程,是对OOP( Object-oriented Programming)即面向对象编程的一种补充,AOP ...
- 【Spring AOP】Spring AOP的使用方式【Q】
Spring AOP的三种使用方式 经典AOP使用方式 改进XML配置方式 基于注解的方式 第1种方式可以作为理解spring配置AOP的基础,是最原始的配置方式,也体现了spring处理的过程. 使 ...
随机推荐
- Codeforces_734_E
http://codeforces.com/problemset/problem/734/E 每次操作可以把连通的同颜色的点全部换颜色,缩点,找直径,第一遍dfs找起点,第二遍dfs求直径. #inc ...
- JMeter之If Controller深究一
1.背景 大家最近还好么,截止目前新型冠状病毒累计确诊病例已超7万4千多例,希望大家无论是在家办公还是单位办公,一定要注意自我防护.今天跟大家分享一下,最近一次真实生产压测遇到的问题,如题:if co ...
- 基于LNMP架构部署NextCloud私有云盘
一.NextCloud 概述 云盘这个词无论是做技术出身的朋友还是普通的网民.想必已经听的非常多了.在日常生活当中我们用的最多的云盘莫过于百度网盘了 在前几年百花齐放的网盘市场.到现如今只剩下了百度网 ...
- Apache httpd.conf配置文件 3(虚拟主机)
### Section 3: Virtual Hosts 第三部分 虚拟主机 注意:在使用虚拟主机前,请先检查 http.conf 的 辅助配置文件httpd-vhosts.conf 是否注释 # ...
- [HTML5] input标签 disable属性
<span>服务器名称:<input type="text" name="server_name" placeholder="服务器 ...
- light oj 1045 - Digits of Factorial K进制下N!的位数
1045 - Digits of Factorial Factorial of an integer is defined by the following function f(0) = 1 f(n ...
- 国产安全自主可控IT智能运维管理解决方案
新一轮科技革命和产业变革席卷全球,大数据.云计算.物联网.人工智能.区块链等新技术不断涌现,数字经济正深刻地改变着人类的生产和生活方式,作为经济增长新动能的作用日益凸显.伴随增长的,还有网络中不断涌现 ...
- flyway使用简介
官网 https://flywaydb.org/ 背景 Flyway是独立于数据库的应用.管理并跟踪数据库变更的数据库版本管理工具.用通俗的话讲,Flyway可以像Git管理不同人的代码那样,管理不同 ...
- python网络爬虫(二)requests库的基本介绍和使用
一.requests库的七个重要方法 (1)最常用方法:requests.get(url,params=None,**kwargs)//对应HTTP协议的GET()操作 (请求获得URL位置的资源) ...
- 传智播客C++视频学习笔记(5)
#include <iostream> using namespace std; void swapInt(int& a, int& b) { int temp = a; ...