Vue电商后台管理系统项目第2天-首页添加表格动态渲染数据&分页
0x01.使用Github学习的姿势
基于昨天的内容,今天的内容需要添加几个单文件组件,路由文件也需要做相应的增加,今天重点记录使用Element-UI中的表格组件实现数据动态渲染的实现流程和分页功能的实现流程。
多说无用,项目已经上传到Github了,想了解每一步的详细实现流程的可以在Github的commit中查看提交的历史版本,根据历史版本进行详细的学习。
第一步:

第二步:
第三步:
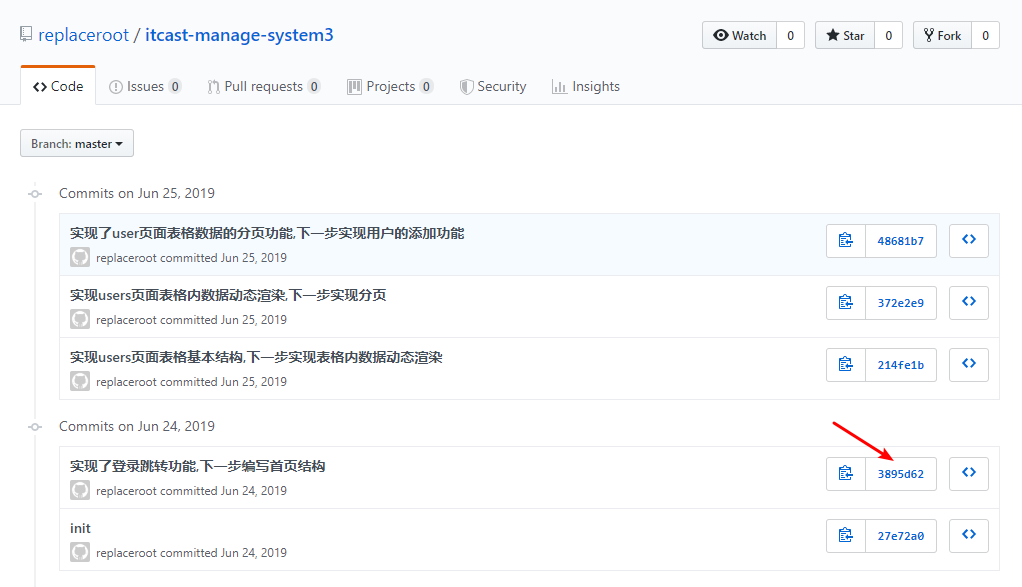
点击右边的拆分按钮,就可以看到实现此功能在上一个版本上做了哪些修改,绿色内容部分是在上一个版本做出修改/添加的内容,注意克隆的时候要克隆最旧的版本,这样才知道我加了什么代码实现了什么功能,一步一步跟着思路走,这样才爽。

ok,马上开始重头戏!
0x02.Element-UI表格应用
1.首先找到Table表格,点进去之后有很多不同种类的表格,这个不用管,找到我们项目需要的带边框表格。

2.查看源代码,注意在每次查看源码的时候都应该认真看一遍解释和表格底部的属性解释(Table Attributes),将源代码复制到user.vue组件中,然后进行修改。
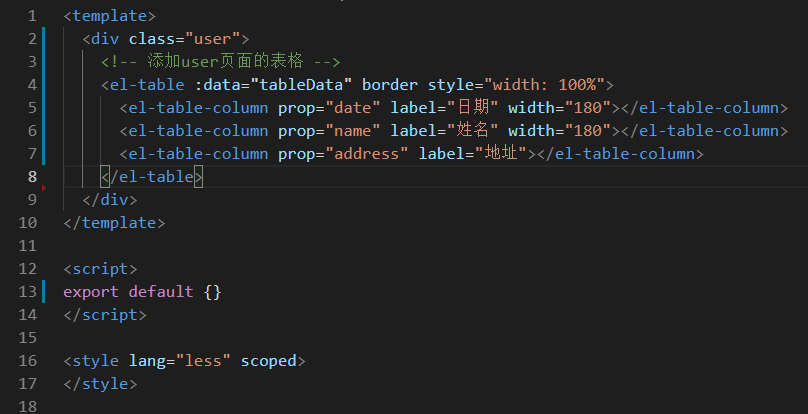

3.对源码内容进行修改,实现表格静态数据结构。
<template>

  <div class="user">

    <!-- 添加user页面的表格 -->

    <el-table :data="tableData" border style="width: 100%">

      <el-table-column prop="date" label="日期" width="180"></el-table-column>

      <el-table-column prop="name" label="姓名" width="180"></el-table-column>

      <el-table-column prop="address" label="地址"></el-table-column>

    </el-table>

  </div>

</template>

<script>

export default {

  // data是一个函数,返回一个对象

  data () {

    return {

      tableData: [

        {

          date: '2016-05-02',

          name: '王小虎',

          address: '上海市普陀区金沙江路 1518 弄'

        },

        {

          date: '2016-05-04',

          name: '王小虎',

          address: '上海市普陀区金沙江路 1517 弄'

        },

        {

          date: '2016-05-01',

          name: '王小虎',

          address: '上海市普陀区金沙江路 1519 弄'

        },

        {

          date: '2016-05-03',

          name: '王小虎',

          address: '上海市普陀区金沙江路 1516 弄'

        }

      ]

    }

  }

}

</script>

<style lang="less" scoped>

</style>
写死数据
4.添加右侧编辑,删除,分配角色按钮,增加索引
找到表格选项中的自定义列模版,从操作部分开始复制源码,然后增加合适的button按钮,在首列中加上<el-table-column type="index" width="50"></el-table-column>代码实现索引显示;
注意:在template中嵌套template这种写法可以叫插槽,官方叫自定义列模版,通过scope.row这个属性可以拿到当前行的数据,如果怀疑可以自己打印一下scope。
5.使用Tooltip 组件进行按钮的文字提示
复制源码,将源码里面的button按钮替换成你的编辑、删除、分配角色按钮;
    <el-tooltip class="item" effect="dark" content="Top Center 提示文字" placement="top">

      <el-button>上边</el-button>

    </el-tooltip>
6.利用switch开关组件实现用户状态切换
复制源码并新建一个插槽结构(自定义列模版),然后把代码粘贴进去,在data返回对象中添加value:true就完事了。
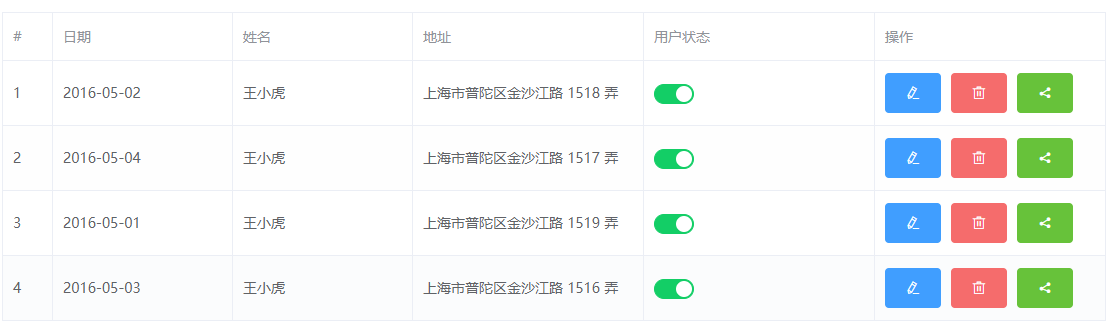
表格静态数据结构
<template>

  <div class="user">

    <!-- 添加user页面的表格 -->

    <el-table :data="tableData" border style="width: 100%">

      <!-- 使用index属性增加索引 -->

      <el-table-column type="index" width="50"></el-table-column>

      <!--  -->

      <el-table-column prop="date" label="日期" width="180"></el-table-column>

      <el-table-column prop="name" label="姓名" width="180"></el-table-column>

      <el-table-column prop="address" label="地址"></el-table-column>

      <el-table-column label="用户状态">

        <template slot-scope="scope">

          <el-switch v-model="value" active-color="#13ce66" inactive-color="#ff4949"></el-switch>

        </template>

      </el-table-column>

      <el-table-column label="操作">

        <template slot-scope="scope">

          <el-tooltip class="item" effect="dark" content="编辑用户" placement="top">

            <el-button type="primary" icon="el-icon-edit" @click="handleEdit(scope.row)"></el-button>

          </el-tooltip>

          <el-tooltip class="item" effect="dark" content="删除用户" placement="top">

            <el-button type="danger" icon="el-icon-delete"></el-button>

          </el-tooltip>

          <el-tooltip class="item" effect="dark" content="分配角色" placement="top">

            <el-button type="success" icon="el-icon-share"></el-button>

          </el-tooltip>

        </template>

      </el-table-column>

    </el-table>

  </div>

</template>

<script>

export default {

  // data是一个函数,返回一个对象

  data () {

    return {

      value: true,

      tableData: [

        {

          date: '2016-05-02',

          name: '王小虎',

          address: '上海市普陀区金沙江路 1518 弄'

        },

        {

          date: '2016-05-04',

          name: '王小虎',

          address: '上海市普陀区金沙江路 1517 弄'

        },

        {

          date: '2016-05-01',

          name: '王小虎',

          address: '上海市普陀区金沙江路 1519 弄'

        },

        {

          date: '2016-05-03',

          name: '王小虎',

          address: '上海市普陀区金沙江路 1516 弄'

        }

      ]

    }

  },

  methods: {

    handleEdit (obj) {

      console.log(obj)

    }

  }

}

</script>

<style lang="less" scoped>

</style>
表格静态数据结构
7.调用接口方法请求数据实现表格动态数据渲染
查看对应的接口文档得知具体的请求路径、请求方式、传递的数据。
本文的内容只是演示,和github上的项目有差异,具体实现看github项目代码。
用户数据列表接口:
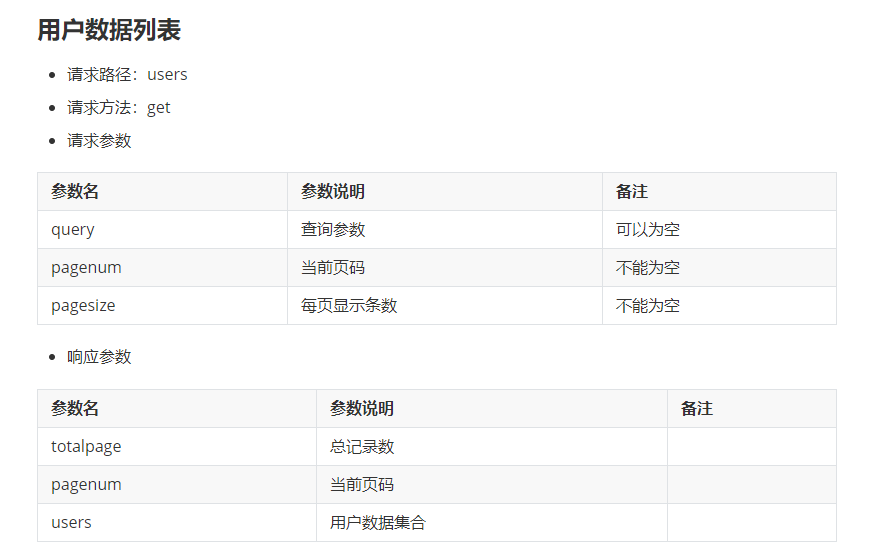
实现代码:
<template>

  <div class="user">

    <!-- 添加user页面的表格 -->

    <el-table :data="tableData" border style="width: 100%">

      <!-- 使用index属性增加索引 -->

      <el-table-column type="index" width="50"></el-table-column>

      <!--  -->

      <el-table-column prop="username" label="用户名" width="180"></el-table-column>

      <el-table-column prop="email" label="邮箱" width="180"></el-table-column>

      <el-table-column prop="mobile" label="手机号"></el-table-column>

      <el-table-column label="用户状态">

        <template slot-scope="scope">

          <el-switch v-model="value" active-color="#13ce66" inactive-color="#ff4949"></el-switch>

        </template>

      </el-table-column>

      <el-table-column label="操作">

        <template slot-scope="scope">

          <el-tooltip class="item" effect="dark" content="编辑用户" placement="top">

            <el-button type="primary" icon="el-icon-edit" @click="handleEdit(scope.row)"></el-button>

          </el-tooltip>

          <el-tooltip class="item" effect="dark" content="删除用户" placement="top">

            <el-button type="danger" icon="el-icon-delete"></el-button>

          </el-tooltip>

          <el-tooltip class="item" effect="dark" content="分配角色" placement="top">

            <el-button type="success" icon="el-icon-share"></el-button>

          </el-tooltip>

        </template>

      </el-table-column>

    </el-table>

  </div>

</template>

<script>

import { getAllList } from '@/api/users.js'

export default {

  // data是一个函数,返回一个对象

  data () {

    return {

      query: '',

      pagenum: 1,

      pagesize: 7,

      value: true,

      tableData: []

    }

  },

  methods: {

    handleEdit (obj) {

      console.log(obj)

    }

  },

  mounted () {

    getAllList({

      query: this.query,

      pagenum: this.pagenum,

      pagesize: this.pagesize

    })

      .then(result => {

        // 成功后将获取到的数据进行覆盖

        console.log(result)

        this.tableData = result.data.data.users

      })

      .catch(err => {

        console.log(err)

      })

  }

}

</script>

<style lang="less" scoped>

</style>
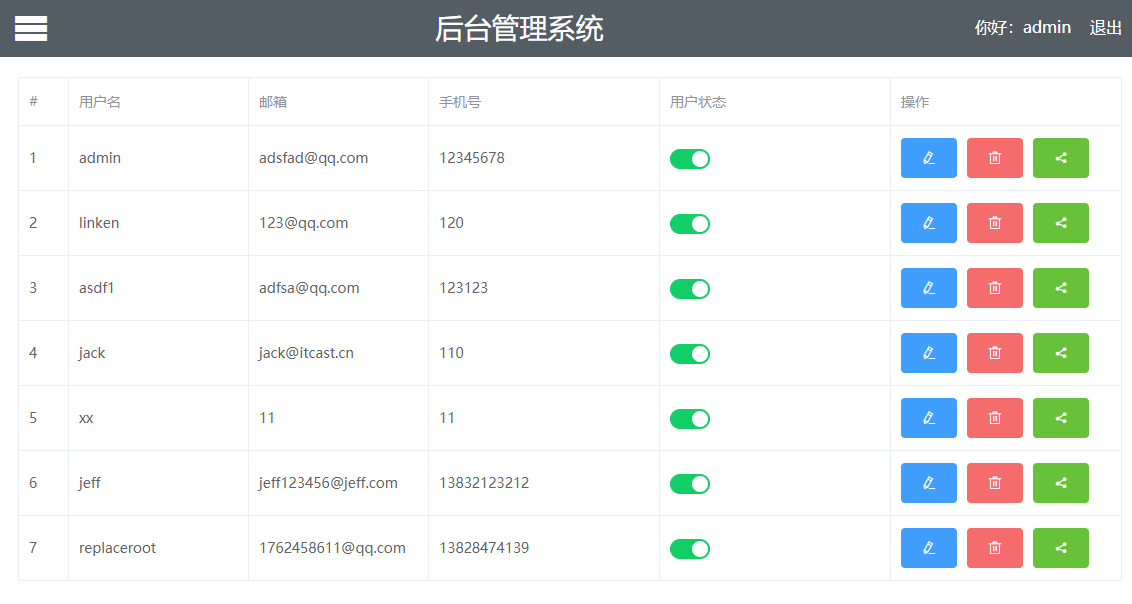
最终代码
最终效果:
0x03.Element-UI分页功能应用
注意看文档中分页各个属性的意思!
代码:
<template>

  <div class="user">

    <!-- 添加user页面的表格 -->

    <el-table :data="tableData" border style="width: 100%">

      <!-- 使用index属性增加索引 -->

      <el-table-column type="index" width="50"></el-table-column>

      <!--  -->

      <el-table-column prop="username" label="用户名" width="180"></el-table-column>

      <el-table-column prop="email" label="邮箱" width="180"></el-table-column>

      <el-table-column prop="mobile" label="手机号"></el-table-column>

      <el-table-column label="用户状态">

        <template slot-scope="scope">

          <el-switch v-model="value" active-color="#13ce66" inactive-color="#ff4949"></el-switch>

        </template>

      </el-table-column>

      <el-table-column label="操作">

        <template slot-scope="scope">

          <el-tooltip class="item" effect="dark" content="编辑用户" placement="top">

            <el-button type="primary" icon="el-icon-edit" @click="handleEdit(scope.row)"></el-button>

          </el-tooltip>

          <el-tooltip class="item" effect="dark" content="删除用户" placement="top">

            <el-button type="danger" icon="el-icon-delete"></el-button>

          </el-tooltip>

          <el-tooltip class="item" effect="dark" content="分配角色" placement="top">

            <el-button type="success" icon="el-icon-share"></el-button>

          </el-tooltip>

        </template>

      </el-table-column>

    </el-table>

    <!-- 实现分页 -->

    <el-pagination

      @size-change="handleSizeChange"

      @current-change="handleCurrentChange"

      :current-page="pagenum"

      :page-sizes="[1, 2, 3, 4]"

      :page-size="pagesize"

      layout="total, sizes, prev, pager, next, jumper"

      :total="total-0"

    ></el-pagination>

  </div>

</template>

<script>

import { getAllList } from '@/api/users.js'

export default {

  // data是一个函数,返回一个对象

  data () {

    return {

      total: '',

      query: '',

      // 当前页码

      pagenum: 1,

      // 每页显示记录数

      pagesize: 3,

      value: true,

      tableData: []

    }

  },

  methods: {

    handleEdit (obj) {

      console.log(obj)

    },

    handleSizeChange (val) {

      console.log(`每页 ${val} 条`)

      this.pagesize = val

      this.init()

    },

    handleCurrentChange (val) {

      console.log(`当前页: ${val}`)

      this.pagenum = val

      this.init()

    },

    init () {

      getAllList({

        query: this.query,

        pagenum: this.pagenum,

        pagesize: this.pagesize

      })

        .then(result => {

        // 成功后将获取到的数据进行覆盖

          console.log(result)

          this.tableData = result.data.data.users

          this.total = result.data.data.total

        })

        .catch(err => {

          console.log(err)

        })

    }

  },

  mounted () {

    this.init()

  }

}

</script>

<style lang="less" scoped>

</style>
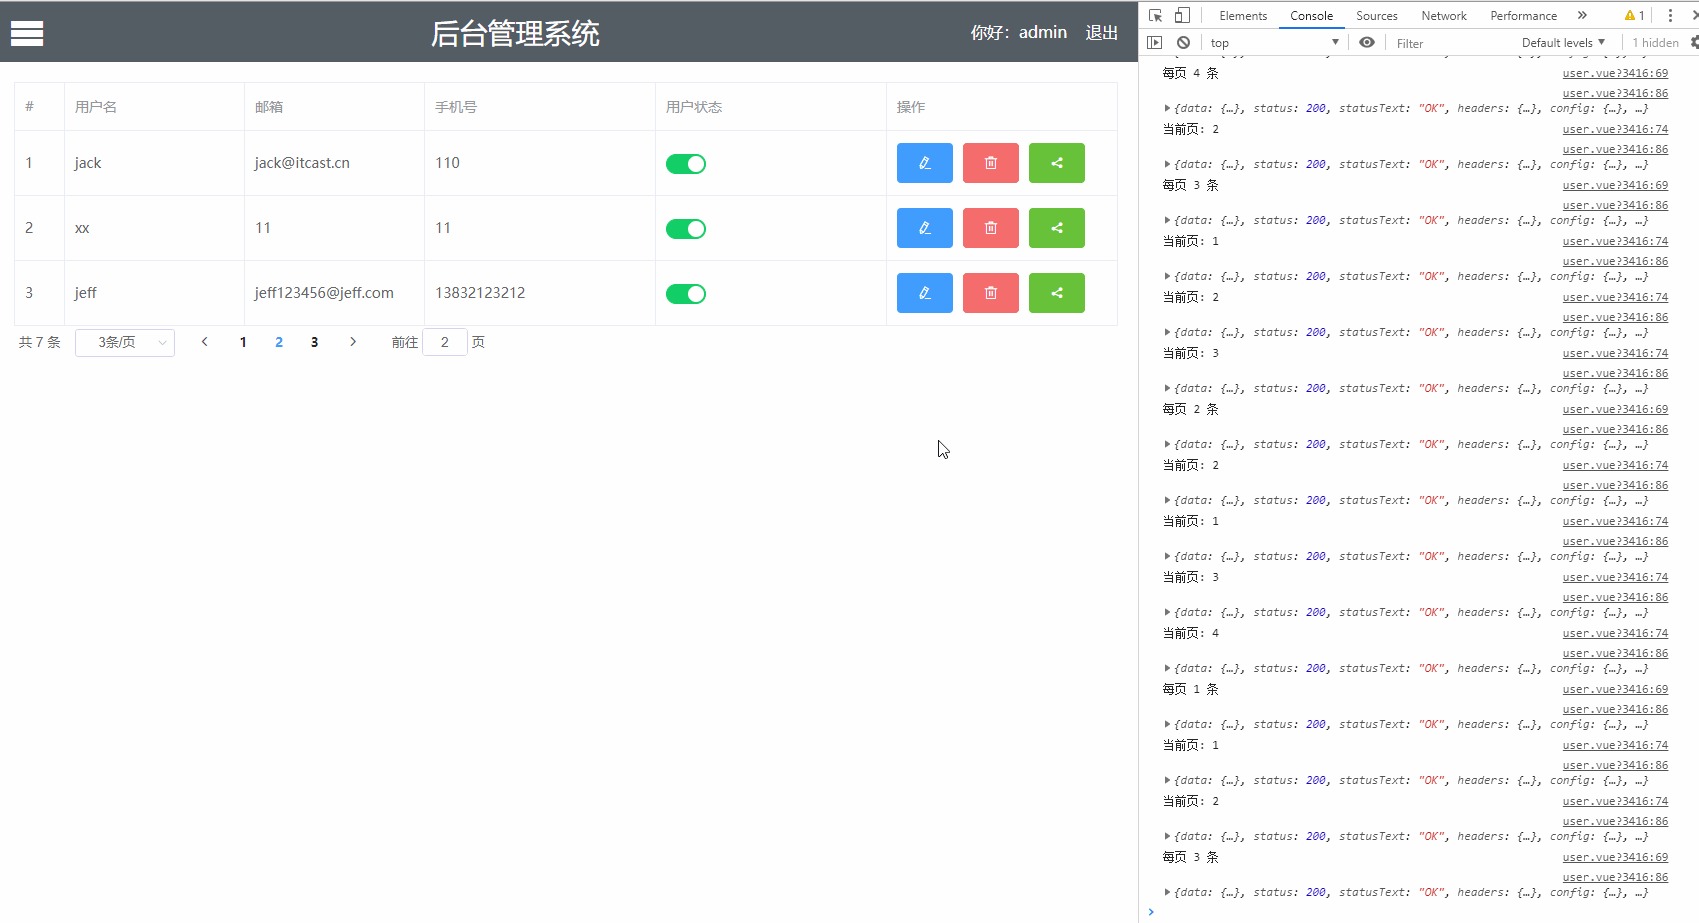
分页功能
效果:
Vue电商后台管理系统项目第2天-首页添加表格动态渲染数据&分页的更多相关文章
- Vue电商后台管理系统项目第1天-基本环境搭建&登录功能
基本环境搭建完成 安装npm包:npm -S i vue vue-router axios element-ui 配置Eslint: 打开设置,搜索Eslint拓展,然后将下面代码覆盖进去即可 { , ...
- GitHub Vue项目推荐|Vue+Element实现的电商后台管理系统功能丰富
GitHub Vue项目推荐|mall-admin-web是一个电商后台管理系统的前端项目基于Vue+Element实现 主要包括商品管理.订单管理.会员管理.促销管理.运营管理.内容管理.统计报表. ...
- vue_shop(基于vue电商管理后台网站)
vue_shop 目录 vue_shop day01 实现登录功能 项目预开发处理 Login.vue完整代码: 处理步骤: 添加element-ui的表单组件 添加第三方字体: 添加表单验证 导入a ...
- Vue + Element-ui实现后台管理系统(1) --- 总述
总述 一.项目效果 整体效果 登陆页 后台首页 用户管理页 说明 这里所有的数据都不是直接通过后端获取的, 而是通过Mock这个工具来模拟后端返回的接口数据. 附上github地址: mall-ma ...
- Spring Boot 构建电商基础秒杀项目 (九) 商品列表 & 详情
SpringBoot构建电商基础秒杀项目 学习笔记 ItemDOMapper.xml 添加 <select id="listItem" resultMap="Bas ...
- Spring Boot 构建电商基础秒杀项目 (六) 用户登陆
SpringBoot构建电商基础秒杀项目 学习笔记 userDOMapper.xml 添加 <select id="selectByTelphone" resultMap=& ...
- Spring Boot 构建电商基础秒杀项目 (七) 自动校验
SpringBoot构建电商基础秒杀项目 学习笔记 修改 UserModel 添加注解 public class UserModel { private Integer id; @NotBlank(m ...
- 【共享单车】—— React后台管理系统开发手记:AntD Table基础表格
前言:以下内容基于React全家桶+AntD实战课程的学习实践过程记录.最终成果github地址:https://github.com/66Web/react-antd-manager,欢迎star. ...
- Vue + Element-ui实现后台管理系统(2)---项目搭建 + ⾸⻚布局实现
项目搭建 + ⾸⻚布局实现 上篇对该项目做了个总述 :Vue + Element-ui实现后台管理系统(1) --- 总述 这篇主要讲解 项目搭建 + 后台⾸⻚布局实现 : 整体效果 后台首页按布局一 ...
随机推荐
- jquery全部选是,全部选否。
<div class="col-md-9"> <div class="box box-primary"> <div class=& ...
- angular依赖注入(2)——注入器的使用
一.显示注入器 injector = ReflectiveInjector.resolveAndCreate([Car, Engine, Tires]); let car = injector.get ...
- WPF学习笔记-用Expression Blend制作自定义按钮
1.从Blend工具箱中添加一个Button,按住shift,将尺寸调整为125*125; 2.右键点击此按钮,选择Edit control parts(template)>Edit a cop ...
- org.springframework.beans.BeanInstantiationException: Could not instantiate bean class [com.hs.model.StudentModel]: No default constructor found; nested exception is java.lang.NoSuchMethodException: c
root cause org.springframework.beans.BeanInstantiationException: Could not instantiate bean class [c ...
- IntelliJ IDEA 17 创建maven项目
参考博客: https://yq.aliyun.com/articles/111053# 部署服务器时 没有Tomcat Server选项
- SpringCloud微服务实战二:Spring Cloud Ribbon 负载均衡 + Spring Cloud Feign 声明式调用
1.Spring Cloud Ribbon的作用 Ribbon是Netflix开发的一个负载均衡组件,它在服务体系中起着重要作用,Pivotal将其整合成为Spring Cloud Ribbon,与其 ...
- Linux图形界面安装卸载,与命令界面之间的转换
1.图形界面与命令界面之间的转换 软切换: ctrl+alt+F6进入命令行模式,ctrl+alt+F1进入图形界面,(有些情况下不管用) 注意: 该方法转为命令行界面后图形界面依然占据着系统资源. ...
- 学习JDK1.8集合源码之--PriorityQueue
1. PriorityQueue简介 PriorityQueue是一种优先队列,不同于普通队列的先进先出原则,优先队列是按照元素的优先级出列,每次出列都是优先级最高的元素.优先队列的应用很多,最典型的 ...
- Linux 下安装和使用 Redis
系统: CentOS-7-1611 首先安装gcc 因为要make编译 参照官网 wget 下载包 解压 make 编译完成后会在src目录下生成几个可执行文件 然后执行:make install ...
- vue+ElementUI项目中,input只能输入正整数的验证
代码如下: <el-input v-model="famount" placeholder="请输入内容" @keyup.native=&q ...