学习springboot整合mybatis并编写测试类
报名立减200元。暑假直降6888。
邀请链接:http://www.jnshu.com/login/1/20535344
邀请码:20535344

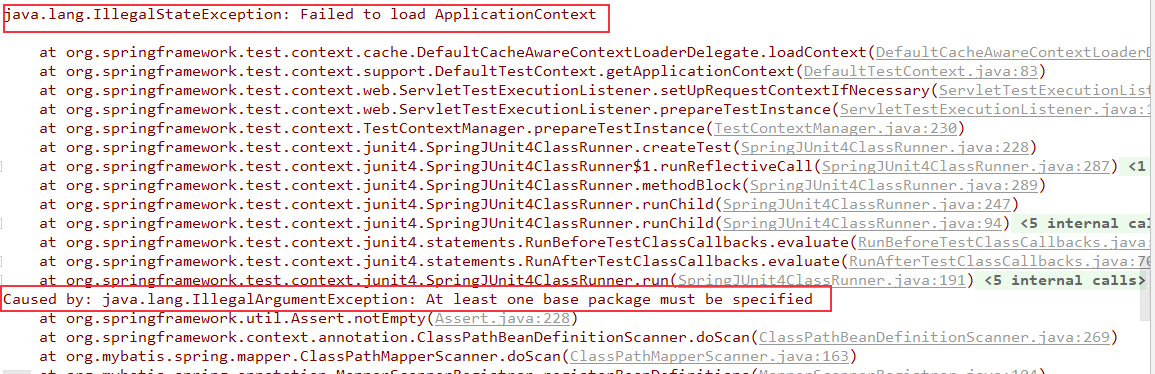
遇到的问题:
1.原因是在启动类上只有一个@MapperScan注解。需要配置这个注解的basePackages。
@MapperScan(basePackages = {"com.chenxin.springboot_0702"})
之后删除掉@EnableAutoConfiguration和@ComponentScan(basePackages = {"com.chenxin.springboot_0702"})也照样运行成功。
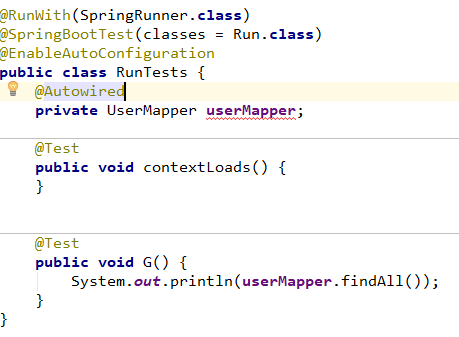
第二个问题:测试类 里面用@Autowired注解自动装配UserMapper时会有提示报错,但是执行起来没有问题,可以通过。
改成@Resource注解则没有红线了。

首先配置pom.xml文件。springboot的项目都是jar包,不是war包。还有就是依赖模块spring-boot-starter-jdbc不需要,因为在mybatis-spring-boot-starter中已经包含了。
<?xml version="1.0" encoding="UTF-8"?>

<project xmlns="http://maven.apache.org/POM/4.0.0"

         xmlns:xsi="http://www.w3.org/2001/XMLSchema-instance"

         xsi:schemaLocation="http://maven.apache.org/POM/4.0.0 http://maven.apache.org/xsd/maven-4.0.0.xsd">

    <modelVersion>4.0.0</modelVersion>

    <groupId>com.chenxin</groupId>

    <artifactId>springboot_0702</artifactId>

    <version>0.0.1-SNAPSHOT</version>

    <packaging>jar</packaging>

    <name>springboot_0702</name>

    <description>Demo project for Spring Boot</description>

    <parent>

        <groupId>org.springframework.boot</groupId>

        <artifactId>spring-boot-starter-parent</artifactId>

        <version>1.5.9.RELEASE</version>

        <relativePath/> <!-- lookup parent from repository -->

    </parent>

    <properties>

        <project.build.sourceEncoding>UTF-8</project.build.sourceEncoding>

        <project.reporting.outputEncoding>UTF-8</project.reporting.outputEncoding>

        <java.version>1.8</java.version>

    </properties>

    <dependencies>

        <dependency>

            <groupId>org.springframework.boot</groupId>

            <artifactId>spring-boot-starter-web</artifactId>

        </dependency>

        <dependency>

            <groupId>org.springframework.boot</groupId>

            <artifactId>spring-boot-starter-thymeleaf</artifactId>

        </dependency>

        <dependency>

            <groupId>org.springframework.boot</groupId>

            <artifactId>spring-boot-starter-test</artifactId>

            <scope>test</scope>

        </dependency>

        <!-- Junit依赖 -->

        <!--junit不需要springboot已经自动加载了。-->
     <!--spring-boot-starter-jdbc已经包含在了mybatis-spring-boot-starter中了。-->

        <dependency>

            <groupId>mysql</groupId>

            <artifactId>mysql-connector-java</artifactId>

        </dependency>

        <dependency>

            <groupId>com.alibaba</groupId>

            <artifactId>druid</artifactId>

            <version>1.0.5</version>

        </dependency>

        <!--引入mybatis-->

        <dependency>

            <groupId>org.mybatis.spring.boot</groupId>

            <artifactId>mybatis-spring-boot-starter</artifactId>

            <version>1.3.0</version>

        </dependency>

        <!--mybatis分页插件-->

        <!-- https://mvnrepository.com/artifact/com.github.pagehelper/pagehelper-spring-boot-starter -->

        <dependency>

            <groupId>com.github.pagehelper</groupId>

            <artifactId>pagehelper-spring-boot-starter</artifactId>

            <version>1.1.1</version>

        </dependency>

    </dependencies>

    <build>

        <plugins>

            <plugin>

                <groupId>org.springframework.boot</groupId>

                <artifactId>spring-boot-maven-plugin</artifactId>

            </plugin>

        </plugins>

    </build>

</project>
application.properties
#配置mysql的连接配置

spring.datasource.url=jdbc:mysql://localhost:3306/testx

spring.datasource.username=root

spring.datasource.password=123

spring.datasource.driver-class-name=com.mysql.jdbc.Driver
接着是model类。
| users | CREATE TABLE `users` (
  `id` bigint(20) unsigned NOT NULL AUTO_INCREMENT,
  `username` varchar(45) NOT NULL,
  `password` varchar(145) NOT NULL,
  `name` varchar(45) DEFAULT NULL,
  `courseId` int(11) DEFAULT NULL,
  `image` varchar(150) DEFAULT NULL,
  `email` varchar(45) DEFAULT NULL,
  `address` varchar(45) DEFAULT NULL,
  `phone` varchar(45) DEFAULT NULL,
  `createdAt` bigint(20) DEFAULT NULL,
  `updatedAt` bigint(20) DEFAULT NULL,
  PRIMARY KEY (`id`),
  UNIQUE KEY `username` (`username`) USING HASH
) ENGINE=InnoDB AUTO_INCREMENT=17 DEFAULT CHARSET=utf8 |

import java.io.Serializable;
public class User implements Serializable {

    private long id;

    private String userName;

    private String password;

    private String name;

    private int courseId;

    private String image;

    private String email;

    private String address;

    private String phone;

    private long createdAt;

    protected long updatedAt;

    public User() {

    }

    //其他getter和setter
   //toString方法

}
然后是mapper类。
import com.chenxin.springboot_0702.model.User;

import org.apache.ibatis.annotations.*;

import org.apache.ibatis.mapping.StatementType;

import java.util.List;

import java.util.Map;

@Mapper

public interface UserMapper {

    @Select("select * from users")

    public List<Map> findAll();

}
接着说springboot启动类。最开始提过了在这里只用了springboot整合mybatis和mysql。所以@ComponentScan和@EnableAutoConfiguration。
import org.mybatis.spring.annotation.MapperScan;

import org.springframework.boot.SpringApplication;

import org.springframework.boot.autoconfigure.EnableAutoConfiguration;

import org.springframework.boot.autoconfigure.SpringBootApplication;

import org.springframework.context.annotation.ComponentScan;

@SpringBootApplication

//开启通用注解扫描

//@ComponentScan(basePackages = {"com.chenxin.springboot_0702"})

@MapperScan(basePackages = {"com.chenxin.springboot_0702"})

//@EnableAutoConfiguration

public class Run {

    public static void main(String[] args) {

        SpringApplication.run(Run.class, args);

    }

}
测试类
import com.chenxin.springboot_0702.dao.UserMapper;

import org.junit.Test;

import org.junit.runner.RunWith;

import org.springframework.boot.SpringBootConfiguration;

import org.springframework.boot.autoconfigure.EnableAutoConfiguration;

import org.springframework.boot.test.context.SpringBootTest;

import org.springframework.test.context.junit4.SpringRunner;

import javax.annotation.Resource;

@RunWith(SpringRunner.class)

@SpringBootTest(classes = Run.class)

@EnableAutoConfiguration

public class RunTests {

    @Resource

    private UserMapper userMapper;

    @Test

    public void contextLoads() {

    }

    @Test

    public void G() {

        System.out.println(userMapper.findAll());

    }

}
接下来是其他的增删改查。其中更新使用的@Update注解,貌似可以自动判断是否为空,只要为空就不更新了。
import com.chenxin.springboot_0702.model.User;

import org.apache.ibatis.annotations.*;

import org.apache.ibatis.mapping.StatementType;

import java.util.List;

import java.util.Map;

@Mapper

public interface UserMapper {

    //查询

    @Select("select * from users where id = #{id}")

    public User findById(@Param("id") long id) throws Exception;

    @Select("select * from users")

    public List<User> findAll() throws Exception;

    @Select("select * from users where phone=#{phone}")

    public List<User> findByPhone(@Param("phone") String phone) throws Exception;

    //新增

    @Insert("INSERT INTO users(id,username,password,name,courseId,image,email,address,phone,createdAt,updatedAt) VALUES (#{id},#{username},#{password},#{name},#{courseId},#{image},#{email},#{address},#{phone},#{createdAt},#{updatedAt})")

    @Options(useGeneratedKeys = true, keyProperty = "id")

    public int add(User user) throws Exception;

    //删除

    @Delete("delete from users where id = #{id}")

    public boolean delete(@Param("id") long id) throws Exception;

    //更新

    @Update("update users set username=#{username}, password=#{password}, name=#{name}, courseId=#{courseId}, image=#{image}, email=#{email}, address=#{address}, phone=#{phone}, updatedAt=#{updatedAt} where id=#{id}")

    public boolean update(User user) throws Exception;

}
测试单元
import com.chenxin.springboot_0702.dao.UserMapper;

import com.chenxin.springboot_0702.model.User;

import org.junit.Test;

import org.junit.runner.RunWith;

import org.springframework.boot.autoconfigure.EnableAutoConfiguration;

import org.springframework.boot.test.context.SpringBootTest;

import org.springframework.test.context.junit4.SpringRunner;

import javax.annotation.Resource;

import java.util.List;

@RunWith(SpringRunner.class)

@SpringBootTest(classes = Run.class)

@EnableAutoConfiguration

public class RunTests {

    @Resource

    private UserMapper userMapper;

    @Test

    public void G() throws Exception {

        System.out.println(userMapper.findAll());

    }

    @Test

    public void g1() throws Exception {

        System.out.println(userMapper.findById(12L));

    }

    @Test

    public void g3() throws Exception {

        User user = new User();

        user.setName("无极");

        user.setUsername("六六qijiu");

        user.setPassword("12443345");

        userMapper.add(user);

        System.out.println(user.getId());

    }

    @Test

    //删除

    public void g4() throws Exception{

        long id = 14;

        System.out.println(userMapper.delete(id));

    }

    @Test

    //更新

    public void g5() throws Exception{

        User user = userMapper.findById(16);

        user.setUsername("七七七");

        System.out.println(userMapper.update(user));

    }

    @Test

    public void g6() throws Exception{

        List<User> users = userMapper.findByPhone("13101436674");

        for (User user : users)

            System.out.println(user.getId() + "***" + user.getPhone());

    }

}
学习springboot整合mybatis并编写测试类的更多相关文章
- SpringBoot 整合 Mybatis 进行CRUD测试开发
今天来和大家分享下 Spring Boot 整合 MyBatis 的 CRUD 测试方法开发.因为 MyBaits 有两种开发形式,一种基于注解,一种基于 xml . SpringBoot配置文件也有 ...
- springboot整合mybatis的时候报错Caused by: java.lang.IllegalArgumentException: Property 'sqlSessionFactory' or 'sqlSessionTemplate' are required
今天闲来无事,学习springboot整合mybatis,在bilibili看视频学的,视频中在dao层的interface上面加上org.apache.ibatis.annotations.Mapp ...
- SpringBoot学习之整合Mybatis
本博客使用IDEA开发工具,通过Maven构建SpringBoot项目,初始化项目添加的依赖有:spring-boot-starter-jdbc.spring-boot-starter-web.mys ...
- Java开发学习(三十九)----SpringBoot整合mybatis
一.回顾Spring整合Mybatis Spring 整合 Mybatis 需要定义很多配置类 SpringConfig 配置类 导入 JdbcConfig 配置类 导入 MybatisConfig ...
- springboot学习随笔(四):Springboot整合mybatis(含generator自动生成代码)
这章我们将通过springboot整合mybatis来操作数据库 以下内容分为两部分,一部分主要介绍generator自动生成代码,生成model.dao层接口.dao接口对应的sql配置文件 第一部 ...
- mybatis源码学习(四)--springboot整合mybatis原理
我们接下来说:springboot是如何和mybatis进行整合的 1.首先,springboot中使用mybatis需要用到mybatis-spring-boot-start,可以理解为mybati ...
- springboot学习2 整合mybatis
springboot整合mybatis 一.添加mybatis和数据库连接的依赖 <!--整合mybatis--> <dependency> <groupId>or ...
- SpringBoot整合Mybatis案例
SpringBoot整合Mybatis案例 2019/7/15以实习生身份入职公司前端做Angular ,但是感觉前途迷茫,于是乎学习一下Java的框架——SpringBooot. 参照大神博客:ht ...
- SpringBoot系列七:SpringBoot 整合 MyBatis(配置 druid 数据源、配置 MyBatis、事务控制、druid 监控)
1.概念:SpringBoot 整合 MyBatis 2.背景 SpringBoot 得到最终效果是一个简化到极致的 WEB 开发,但是只要牵扯到 WEB 开发,就绝对不可能缺少数据层操作,所有的开发 ...
随机推荐
- C#WeakReference弱引用
原文:C#WeakReference弱引用 弱引用:在引用对象的同时,允许垃圾回收该对象. .NET中提供了WeakReference对象来实现这个功能. 对于那些创建便宜但耗费大量内存的对象,即希望 ...
- UWP ObservableCollection<Evaluate>集合中ObservableCollection<PictureInfo>变更通知到xaml界面
ObservableCollection<Evaluate> EvaluateList = new ObservableCollection<Evaluate>();//评论集 ...
- 深入浅出RPC——浅出篇(转载)
本文转载自这里是原文 近几年的项目中,服务化和微服务化渐渐成为中大型分布式系统架构的主流方式,而 RPC 在其中扮演着关键的作用. 在平时的日常开发中我们都在隐式或显式的使用 RPC,一些刚入行的程序 ...
- QT多个UI文件加入一个项目
这样可在多个UI界面上进行分部开发.避免都在一个UI下太凌乱…… 在网上找了一些资料,很少有介绍这方面的,以及类似这样项目的源码. 看 一些基本控件的使用时,想到了一种方法:使用gridLayout控 ...
- delphi dispose释放内存的方法
delphi dispose释放内存的方法 2010-06-08 19:39:59| 分类: DELPHI | 标签: |举报 |字号大中小 订阅 dispose使用方法的简单介绍在本文末 ...
- MongoDB自学日记1——基本操作
作为一个做底层及后台研发的,最近对NoSQL却产生了浓厚的兴趣,加入了一个DBA群,据说北京排的上号的DBA都在里面,然而里面基本都是Oracle系的,MySQL和MongoDB系的少之又少.学习靠不 ...
- git实战经验(很实用)
推荐学习git很好的网站https://www.breakyizhan.com/git/216.html 以下内容,虽然编排不行,但是请认真的读下去,都是自己平时请自操作的,放心使用. 这是个人的gi ...
- 很多程序员都没搞明白的时间与时区知识 - 24时区/GMT/UTC/DST/CST/ISO8601
全球24个时区的划分 相较于两地时间表,可以显示世界各时区时间和地名的世界时区表(World Time),就显得精密与复杂多了,通常世界时区表的表盘上会标示着全球24个时区的城市名称,但究竟 ...
- kubernetes实战篇之nexus oss服务器部署及基于nexus的docker镜像仓库搭建
系列目录 Nexus oss仓库管理平台搭建 Nexus是一款仓库管理工具,支持Npm,bower,maven,nuget,apt,yum甚至docker,helm等各种仓库,说的通俗以下,就是私服镜 ...
- javascript“命名空间”的费曼输出[原创]
Javascript由于没有命名空间的概念,所以好多的框架或库就用了某些“命名空间”的技巧.在学习作为函数的命名空间时,我翻阅了好多的书本和blog,很多的概念和说明都是要么过于烦杂或过于简单.现在由 ...