
android 背景选择器
<?xml version="1.0" encoding="utf-8" ?>
<selector xmlns:android="http://schemas.android.com/apk/res/android">
<!-- 默认时的背景图片-->
<item android:drawable="@drawable/pic1" />
<!-- 没有焦点时的背景图片 -->
<item android:state_window_focused="false"
android:drawable="@drawable/pic1" />
<!-- 非触摸模式下获得焦点并单击时的背景图片 -->
<item android:state_focused="true"
android:state_pressed="true"
android:drawable= "@drawable/pic2" />
<!-- 触摸模式下单击时的背景图片-->
<item android:state_focused="false"
android:state_pressed="true"
android:drawable="@drawable/pic3" />
<!--选中时的图片背景-->
<item android:state_selected="true"
android:drawable="@drawable/pic4" />
<!--获得焦点时的图片背景-->
<item android:state_focused="true"
android:drawable="@drawable/pic5" />
</selector>
<?xml version="1.0" encoding="utf-8"?>

<shape xmlns:android="http://schemas.android.com/apk/res/android" >

    <!-- 圆角 -->

    <corners

        android:radius="9dp"

        android:topLeftRadius="2dp"

        android:topRightRadius="2dp"

        android:bottomLeftRadius="2dp"

        android:bottomRightRadius="2dp"/><!-- 设置圆角半径 -->

    <!-- 渐变 -->

    <gradient

        android:startColor="@android:color/white"

        android:centerColor="@android:color/black"

        android:endColor="@android:color/black"

        android:useLevel="true"

        android:angle="45"

        android:type="radial"

        android:centerX="0"

        android:centerY="0"

        android:gradientRadius="90"/>

    <!-- 间隔 -->

    <padding

        android:left="2dp"

        android:top="2dp"

        android:right="2dp"

        android:bottom="2dp"/><!-- 各方向的间隔 -->

    <!-- 大小 -->

    <size

        android:width="50dp"

        android:height="50dp"/><!-- 宽度和高度 -->

    <!-- 填充 -->

    <solid

        android:color="@android:color/white"/><!-- 填充的颜色 -->

    <!-- 描边 -->

    <stroke

        android:width="2dp"

        android:color="@android:color/black"

        android:dashWidth="1dp"

        android:dashGap="2dp"/>

</shape>
state_selected="true" 选中状态
shape 设置形状,可以在selector,layout等里面使用,有6个子标签
填充:设置填充的颜色
间隔:设置四个方向上的间隔
大小:设置大小
圆角:同时设置五个属性,则Radius属性无效
android:Radius="20dp" 设置四个角的半径
android:topLeftRadius="20dp" 设置左上角的半径
android:topRightRadius="20dp" 设置右上角的半径
android:bottomLeftRadius="20dp" 设置右下角的半径
android:bottomRightRadius="20dp" 设置左下角的半径描边:dashWidth和dashGap属性,只要其中一个设置为0dp,则边框为实现边框
android:width="20dp" 设置边边的宽度
android:color="@android:color/black" 设置边边的颜色
android:dashWidth="2dp" 设置虚线的宽度
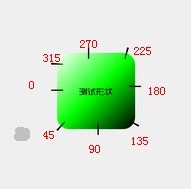
android:dashGap="20dp" 设置虚线的间隔宽度渐变:当设置填充颜色后,无渐变效果。angle的值必须是45的倍数(包括0),仅在type="linear"有效,不然会报错。android:useLevel 这个属性不知道有什么用。
angle对应值的起点如图:
android 背景选择器的更多相关文章
- android背景选择器selector用法汇总
一.创建xml文件,位置:drawable/xxx.xml,同目录下记得要放相关图片 <?xml version="1.0" encoding="utf-8&quo ...
- 【Android】Android背景选择器selector用法汇总
一.创建xml文件,位置:drawable/xxx.xml,同目录下记得要放相关图片 <?xml version="1.0" encoding="utf-8&quo ...
- android selector 背景选择器的使用, button (未点击,点击,选中保持状态)效果实现
android selector 背景选择器的使用, button (未点击,点击,选中保持状态)效果实现 首先看到selector的属性: android:state_focus ...
- Android:关于背景选择器Selector的item顺序
在使用背景选择器的时候,如果item的顺序不对,会导致不起作用. 1.首先背景选择器的normal选项一定要放在最后. 2.pressed的选择器应该在seclet的前面.我在使用的时候找了半天问题, ...
- Android中selector背景选择器
http://blog.csdn.net/forsta/article/details/26148403 http://blog.csdn.net/wswqiang/article/details/6 ...
- Android View 背景选择器编写技巧
在项目中选择器的使用是非常多的,以下是本人在项目中的一些常用的背景选择器的写法 带边框下划线背景选择器效果图: 上面布局中放了10个CheckBox,然后设置了CheckBox的背景图片位,背景选择器 ...
- 【原创】Android selector选择器无效或无法正常显示的一点研究
想将LinearLayout作为一个按钮,加上一个动态背景,按下的时候,背景变色,这个理所当然应该使用selector背景选择器来做: <LinearLayout android:id=&quo ...
- Android文件选择器的实例分享
本文给大家讲解下Android文件选择器的使用.实际上就是获取用户在SD卡中选择的文件或文件夹的路径,这很像C#中的OpenFileDialog控件. 此实例的实现过程很简单,这样可以让大家快速的熟悉 ...
- 第01讲- Android背景知识
第01讲Android背景知识 Android是基于Linux系统 Android系统框图 : 第一.操作系统层(OS) 第二.各种库(Libraries)和Android 运行环境(RunTime) ...
随机推荐
- python进程概要
进程 狭义:正在运行的程序实例. 广义:进程是一个具有一定独立功能的程序关于某个数据集合的一次运行活动,他是操作系统动态执行的基本单元. python的进程都是并行的. 并行:两个进程同时执行一起走. ...
- Filebeat自定义索引 && 多output过滤
一.目标 1)实现自定义索引 2)不同的input输出到各自对应的索引,nginx的日志输出到index-nginx的索引,zabbix的日志输出到index-zabbix,app的日志输出到inde ...
- wordpress开源小程序
wordpress多端开源小程序正式发布了,目前支持微信/QQ/百度/今日头条. 目前我们的开源小程序,已经建立了微信QQ交流群,需要的可以加下,微信添加hackdex(备注开源拉你入群),QQ群:7 ...
- 【2018寒假集训 Day1】【位运算】翻转游戏
翻转游戏(flip) [问题描述] 翻转游戏是在一个 4 格×4 格的长方形上进行的,在长方形的 16 个格上每 个格子都放着一个双面的物件.每个物件的两个面,一面是白色,另一面是黑色, 每个物件要么 ...
- es5设置属性不能修改
/*es5*/ { var Person ={ name:'es5', age:19 } Object.defineProperty(Person,'sex',{ writable:false, va ...
- Java基础面试题及答案(一)
Java 基础部分 1. JDK 和 JRE 有什么区别? JDK:Java Development Kit 的简称,java 开发工具包,提供了 java 的开发环境和运行环境. JRE:Java ...
- 实战webpack系列03
03.Webpack的强大功能 一.生成Source Maps(使调试更容易) 通过简单的配置,webpack就可以在打包时为我们生成的source maps,这为我们提供了一种对应编译文件和源文件的 ...
- 启动项目报错:org.apache.catalina.LifecycleException: Failed to start component
原因 环境异常重启,项目java进程未关闭,原项目的端口依旧在占用. 一般为8080端口被占用 解决方法 以下两种方法都可以解决,原理相同(结束异常进程) 1. 简单粗暴: 打开任务管理器找到java ...
- Spring Boot 2.0 学习笔记(一)——JAVA EE简介
本章内容:JAVA EE>Spring>Spring Boot 一.JAVA EE简介 1.1 Java ee优点:结束了Web开发的技术无序状态,让程序员.架构师用同一种思维去思考如何架 ...
- Spring Cloud第四篇 | 客户端负载均衡Ribbon
本文是Spring Cloud专栏的第四篇文章,了解前三篇文章内容有助于更好的理解本文: Spring Cloud第一篇 | Spring Cloud前言及其常用组件介绍概览 Spring Cl ...