赌十包辣条,你一定没见过这么通透的ThreadLocal讲解
如果转载请声明,转自【https://www.cnblogs.com/andy-songwei/p/12040372.html】,谢谢!
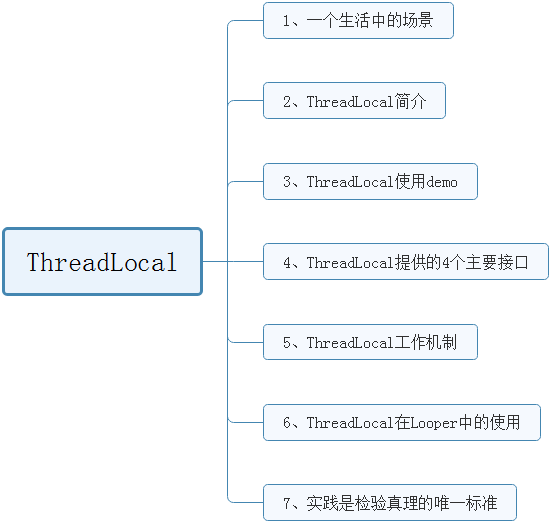
本文的主要内容为:
1、一个生活中的场景
鉴于普罗大众都喜欢看热闹,咱们先来看个热闹再开工吧!

场景一:

 中午了, 张三、李四和王五一起去食堂大菜吃饭。食堂刚经营不久,还很简陋,负责打菜的只有一位老阿姨。

 张三:我要一份鸡腿。

 李四:我要一份小鸡炖蘑菇。

 张三:我再要一份红烧肉。

 王五:我要一份红烧排骨。

 李四:我不要小鸡炖蘑菇了,换成红烧鲫鱼。

 王五:我再要一份椒盐虾。

 张三:我再要一份梅菜扣肉。

 ......

 张三:我点的红烧肉,为啥给我打红烧鲫鱼?

 李四:我的红烧鲫鱼呢?

 王五:我有点红烧肉吗?

 ......

 李四:我点了15元的菜,为啥扣我20?

 王五:我点了20元的菜,只扣了我15元,赚了,窃喜!

 张三:我已经刷了卡了,怎么还叫我刷卡?

 ......

 老阿姨毕竟上了年纪,不那么利索,这几个小伙子咋咋呼呼,快言快语,老阿姨也被搅晕了,手忙脚乱,忙中出错,这仨小伙也是怨声载道。

 场景二:

 食堂领导看到这个场景,赶紧要求大家排队,一个一个来。后来,老阿姨轻松多了,也没有再犯错了。

 但是,新的问题又来了,打菜的人当中,很多妹子很磨叽,点个菜犹犹豫豫想半天。

 张三:太慢了,我快饿死了!

 李四:再这么慢,下次去别家!

 王五:我等得花儿都谢啦!

 赵六:啥?我点了啥菜,花了多少钱,其它人怎么都知道?是阿姨多嘴了,还是其它人偷偷关注我很久了?太不安全了,一点隐私都没有,以后不来了。

 ......

 场景三:

  领导听到这些怨言,心里很不是滋味,大手一挥:扩大经营,以后为你们每一个人开一个流动窗口并请一位私人阿姨,只为你一个人服务!

  从此,再也没有怨言,阿姨也没有再犯错了,皆大欢喜......
场景一就像多个线程同时去操作一个数据,最终的结果就是混乱。于是出现了同步锁synchronized,同一时刻只运行一个线程操作,就像场景二,大家先来后到排队,混乱的问题解决了。但是此时一个线程在操作的时候,其它线程只能闲等着,而且这些数据是共享的,每个线程希望拥有只能自己操作的私人数据,ThreadLocal就正好满足了这个需求。
所以,相比于synchronized,Threadlocal通过牺牲空间来换取时间和效率。
2、ThreadLocal简介
ThreadLocal官方的介绍为:
 /**

  * This class provides thread-local variables.  These variables differ from

  * their normal counterparts in that each thread that accesses one (via its

  * {@code get} or {@code set} method) has its own, independently initialized

  * copy of the variable.  {@code ThreadLocal} instances are typically private

  * static fields in classes that wish to associate state with a thread (e.g.,

  * a user ID or Transaction ID).

  */
大致意思是:ThreadLocal提供了线程本地变量。这些变量与一般变量相比,其不同之处在于,通过它的get()和set()方法,每个线程可以访问自己独立拥有的初始变量副本。翻译成人话就是,ThreadLocal为每一个线程开辟了一个独立的存储器,只有对应的线程才能够访问其数据,其它线程则无法访问。对应于前文的场景,就像食堂为每一个人安排了一个窗口和专属阿姨为其打菜,这个过程中,这个窗口和阿姨就是其专属的独立的资源,其他人就无从知道他点了什么菜,花了多少钱。
3、ThreadLocal的简单使用示例
是骡子是马,先拉出来溜溜!先直观看看它的能耐,再来了解它丰富的内心:
 // =========实例3.1========

 private ThreadLocal<String> mThreadLocal = new ThreadLocal<>();

 private void testThreadLocal() throws InterruptedException {

     mThreadLocal.set("main-thread");

     Log.i("threadlocaldemo", "result-1=" + mThreadLocal.get());

     Thread thread_1 = new Thread() {

         @Override

         public void run() {

             super.run();

             mThreadLocal.set("thread_1");

             Log.i("threadlocaldemo", "result-2=" + mThreadLocal.get());

         }

     };

     thread_1.start();

     //该句表示thread_1执行完后才会继续执行

     thread_1.join();

     Thread thread_2 = new Thread() {

         @Override

         public void run() {

             super.run();

             Log.i("threadlocaldemo", "result-3=" + mThreadLocal.get());

         }

     };

     thread_2.start();

     //该句表示thread_2执行完后才会继续执行

     thread_2.join();

     Log.i("threadlocaldemo", "result-4=" + mThreadLocal.get());

 }
在主线程中调用这个方法,运行结果:
 12-13 13:42:50.117 25626-25626/com.example.demos I/threadlocaldemo: result-1=main-thread

 12-13 13:42:50.119 25626-25689/com.example.demos I/threadlocaldemo: result-2=thread_1

 12-13 13:42:50.119 25626-25690/com.example.demos I/threadlocaldemo: result-3=null

 12-13 13:42:50.120 25626-25626/com.example.demos I/threadlocaldemo: result-4=main-thread
看到这个结果会不会惊掉下巴呢?明明在第9行中set了值,第10行中也得到了对应的值,但第20行的get得到的却是null,第26行得到的是第3行set的值。这就是ThreadLocal的神奇功效,主线程set的值,只能在主线程get到;thread_1内部set的值,thread_1中才能get;thread_2中没有set,所以get到的就是null。
而实现这,不要999,也不要99,只要3......三步即可:
 ThreadLocal<T> mThreadLocal = new ThreadLocal<>();

 mThreadLocal.set(T);

 mThreadLocal.get();
就是这么方便,就是这么简洁!
4、提供的4个主要接口
ThreadLocal以其使用简单,风格简洁让人一见倾心。它对外提供的接口很少,当前SDK中,主要有4个:
 public void set(T value) { }

 public T get() { }

 public void remove() { }

 protected T initialValue() { }
为了保持对这些方法说明的原滋原味,我们直接通过源码中对其的注释说明来认识它们。
(1)set()
 /**

  * Sets the current thread's copy of this thread-local variable

  * to the specified value.  Most subclasses will have no need to

  * override this method, relying solely on the {@link #initialValue}

  * method to set the values of thread-locals.

  *

  * @param value the value to be stored in the current thread's copy of

  *        this thread-local.

  */

 public void set(T value)
设置当前线程的ThreadLocal值为指定的value。大部分子类没有必要重写该方法,可以依赖initialValue()方法来设置ThreadLocal的值。
(2)get()
 /**

  * Returns the value in the current thread's copy of this

  * thread-local variable.  If the variable has no value for the

  * current thread, it is first initialized to the value returned

  * by an invocation of the {@link #initialValue} method.

  *

  * @return the current thread's value of this thread-local

  */

 public T get()
用于获取当前线程所对应的ThreadLocal值。如果当前线程下,该变量没有值,会通过调用initialValue()方法返回的值对其进行初始化。
(3)remove()
 /**

  * Removes the current thread's value for this thread-local

  * variable.  If this thread-local variable is subsequently

  * {@linkplain #get read} by the current thread, its value will be

  * reinitialized by invoking its {@link #initialValue} method,

  * unless its value is {@linkplain #set set} by the current thread

  * in the interim.  This may result in multiple invocations of the

  * {@code initialValue} method in the current thread.

  *

  * @since 1.5

  */

  public void remove()
该接口是从JDK1.5开始提供的,用于删除当前线程对应的ThreadLocal值,从而减少内存占用。在同一线程中,如果该方法被调用了,随后再调用get()方法时,会使得initialValue()被调用,从而ThreadLocal的值被重新初始化,除非此时在调用get()前调用了set()来赋值。该方法可能导致initialValue()被多次调用。该方法可以不用显示调用,因为当线程结束后,系统会自动回收线程局部变量值。所以该方法不是必须调用的,只不过显示调用可以加快内存回收。
(4)initialValue()
 /**

  * Returns the current thread's "initial value" for this

  * thread-local variable.  This method will be invoked the first

  * time a thread accesses the variable with the {@link #get}

  * method, unless the thread previously invoked the {@link #set}

  * method, in which case the {@code initialValue} method will not

  * be invoked for the thread.  Normally, this method is invoked at

  * most once per thread, but it may be invoked again in case of

  * subsequent invocations of {@link #remove} followed by {@link #get}.

  *

  * <p>This implementation simply returns {@code null}; if the

  * programmer desires thread-local variables to have an initial

  * value other than {@code null}, {@code ThreadLocal} must be

  * subclassed, and this method overridden.  Typically, an

  * anonymous inner class will be used.

  *

  * @return the initial value for this thread-local

  */

 protected T initialValue() {

     return null;

 }
返回当前线程对应的ThreadLocal的初始值。当当前线程是通过get()方法第一次对ThreadLocal进行访问时,该方法将会被调用,除非当前线程之前调用过set()方法,在这种情况下initialValue()方法将不会被当前线程所调用。一般而言,该方法最多只会被每个线程调用一次,除非随后在当前线程中调用remove()方法,然后调用get()方法。该实现会简单地返回null;如果程序员希望ThreadLocal拥有一个初始值,而不是null,ThreadLocal需要定义一个子类,并且在子类中重写initialValue()方法。比较典型的做法是使用一个匿名内部类。该方法由protected修饰,可见其这样设计通常是为了供用户重写,从而自定义初始值。后面会再通过实例来演示该方法的使用。
5、ThreadLocal工作机制
ThreadLocal使用起来非常简单,但它是如何实现为每一个Thread保存一份独立的数据的呢?我们先结合实例3.1来看set()方法都做了些什么:
 //=========ThreadLocal=======源码5.1

 public void set(T value) {

     Thread t = Thread.currentThread();

     ThreadLocalMap map = getMap(t);

     if (map != null)

         map.set(this, value);

     else

         createMap(t, value);

 }
首先就是获取当前的线程,然后根据当前线程来获取一个ThreadLocalMap,如果map不为null,就往map中插入指定值,注意这的key是ThreadLocal实例;如果map为null,就创建一个map。看看第4行getMap(t)做了啥:
 //=========ThreadLocal=======源码5.2

 /**

  * Get the map associated with a ThreadLocal.

  * ......

  */

 ThreadLocalMap getMap(Thread t) {

     return t.threadLocals;

 }

 /**

  * ThreadLocalMap is a customized hash map suitable only for

  * maintaining thread local values......

  */

 static class ThreadLocalMap {

      ......

 }

 //==========Thread========

 ThreadLocal.ThreadLocalMap threadLocals = null;
getMap()返回的是指定线程(也就是当前线程)的threadLocals变量,这个变量是ThreadLocal.ThreadLocalMap类型的,而ThreadLocalMap是一个仅适用于维护线程本地变量值的自定义的HashMap。简单来说,就是返回当前线程下的一个自定义HashMap。
下面我抽取了ThreadLocalMap的部分代码,先来总体上认识它(这里我们不需要读懂其中的每一行代码,知道它里面主要做了哪些事就可以了):
 //=========源码5.3========

 static class ThreadLocalMap {

     static class Entry extends WeakReference<ThreadLocal<?>> {

         /** The value associated with this ThreadLocal. */

         Object value;

         Entry(ThreadLocal<?> k, Object v) {

             super(k);

             value = v;

         }

     }

     /**

      * The initial capacity -- MUST be a power of two.

      */

     private static final int INITIAL_CAPACITY = 16;

     /**

      * The table, resized as necessary.

      * table.length MUST always be a power of two.

      */

     private Entry[] table;

     /**

      * The number of entries in the table.

      */

     private int size = 0;

     /**

      * The next size value at which to resize.

      */

     private int threshold; // Default to 0

     /**

      * Set the resize threshold to maintain at worst a 2/3 load factor.

      */

     private void setThreshold(int len) {

         threshold = len * 2 / 3;

     }

     ThreadLocalMap(ThreadLocal<?> firstKey, Object firstValue) {

         table = new Entry[INITIAL_CAPACITY];

         int i = firstKey.threadLocalHashCode & (INITIAL_CAPACITY - 1);

         table[i] = new Entry(firstKey, firstValue);

         size = 1;

         setThreshold(INITIAL_CAPACITY);

     }

     /**

      * Get the entry associated with key.

      * ......

      */

     private Entry getEntry(ThreadLocal<?> key) {

         int i = key.threadLocalHashCode & (table.length - 1);

         Entry e = table[i];

         if (e != null && e.get() == key)

             return e;

         else

             return getEntryAfterMiss(key, i, e);

     }

     /**

      * Set the value associated with key.

      * ......

      */

     private void set(ThreadLocal<?> key, Object value) {

         // We don't use a fast path as with get() because it is at

         // least as common to use set() to create new entries as

         // it is to replace existing ones, in which case, a fast

         // path would fail more often than not.

         Entry[] tab = table;

         int len = tab.length;

         int i = key.threadLocalHashCode & (len-1);

         for (Entry e = tab[i];

              e != null;

              e = tab[i = nextIndex(i, len)]) {

             ThreadLocal<?> k = e.get();

             if (k == key) {

                 e.value = value;

                 return;

             }

             if (k == null) {

                 replaceStaleEntry(key, value, i);

                 return;

             }

         }

         tab[i] = new Entry(key, value);

         int sz = ++size;

         if (!cleanSomeSlots(i, sz) && sz >= threshold)

             rehash();

     }

     /**

      * Remove the entry for key.

      */

     private void remove(ThreadLocal<?> key) {

         Entry[] tab = table;

         int len = tab.length;

         int i = key.threadLocalHashCode & (len-1);

         for (Entry e = tab[i];

              e != null;

              e = tab[i = nextIndex(i, len)]) {

             if (e.get() == key) {

                 e.clear();

                 expungeStaleEntry(i);

                 return;

             }

         }

     }

     /**

      * Double the capacity of the table.

      */

     private void resize() {

        ......

     }

 }
这里面维护了一个Entry[] table数组,初始容量为16,当数据超过当前容量的2/3时,就开始扩容,容量增大一倍。每一个Entry的K为ThreadLocal对象,V为要存储的值。每一个Entry在数组中的位置,是根据其K(即ThreadLocal对象)的hashCode & (len - 1)来确定,如第44行所示,这里K的hashCode是系统给出的一个算法计算得到的。如果碰到K的hashCode值相同,即hash碰撞的场景,会采用尾插法形成链表。当对这个map进行set,get,remove操作的时候,也是通过K的hashCode来确定该Entry在table中的位置的,采用hashCode来查找数据,效率比较高。这也是HashMap底层实现的基本原理,如果研究过HashMap源码,这段代码就应该比较容易理解了。
继续看源码5.1,第一次调用的时候,显然map应该是null,就要执行第8行createMap了,
 //==========ThreadLocal=========源码5.4

 void createMap(Thread t, T firstValue) {

     t.threadLocals = new ThreadLocalMap(this, firstValue);

 }
结合ThreadLocalMap源码第41行的构造方法,就清楚了这个方法创建了一个ThreadLocalMap对象,并存储了一个Entry<当前的ThreadLocal对象,value>。此时,在当前的线程下拥有了一个ThreadLocalMap,这个ThreadLocalMap中维护了一个容量为16的table,table中存储了一个以当前的ThreadLocal对象为K,value值为V的Entry。Thread、ThreadLocalMap、ThreadLocal、Entry之间的关系可以表示为下图:
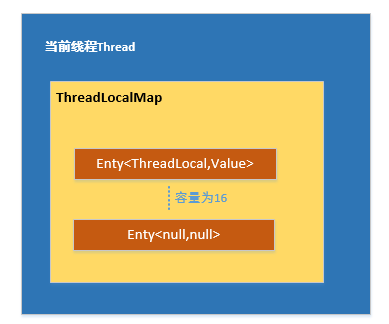
图5.1
而如果当前Thread的map已经存在了,源码5.1就会执行第6行了,进而执行ThreadLocalMap中的set方法。结合前面对ThreadLocalMap的介绍,想必这个set方法也容易理解了,大致过程是:
1)根据Thread找到map;
2)通过传入的this(即ThreadLocal对象),得到hashCode;
3)根据hashCode & (len - 1)确定对应Entry在table中的位置;
4)如果该Entry存在,则替换Value,否则新建(ThreadLocalMap源码第78~92行表示在具有相同hashCode的Entry链表上找到对应的Entry,这和hash碰撞有关)。
在调用ThreadLocal的get方法时又做了什么呢?看看其源码:
 //=========ThreadLocal======源码5.5

 public T get() {

     Thread t = Thread.currentThread();

     ThreadLocalMap map = getMap(t);

     if (map != null) {

         ThreadLocalMap.Entry e = map.getEntry(this);

         if (e != null) {

             @SuppressWarnings("unchecked")

             T result = (T)e.value;

             return result;

         }

     }

     return setInitialValue();

 }
现在,第12行及以前的代码应该很容易理解了,结合ThreadLocalMap中的get源码,我们再梳理一下:
1)根据Thread找到自己的map;
2)在map中通过this(即ThreadLocal对象)得到hashCode;
3)通过hashCode & (len-1)找到对应Entry在table中的位置;
4)返回Entry的value。
而如果map为null,或者在map中找到的Entry为null,那么就执行第20行了。
 //==========ThreadLocal========源码5.6

 private T setInitialValue() {

     T value = initialValue();

     Thread t = Thread.currentThread();

     ThreadLocalMap map = getMap(t);

     if (map != null)

         map.set(this, value);

     else

         createMap(t, value);

     return value;

 }

 protected T initialValue() {

     return null;

 }
第13行的initialValue()方法,前面介绍过,可以让子类重写,即给ThreadLocal指定初始值;如果没有重写,那返回值就是null。第4~9行前面也介绍过了,使用或者创建map来存入该值。
最后还一个remove()方法
 //======ThreadLocal======

 public void remove() {

     ThreadLocalMap m = getMap(Thread.currentThread());

     if (m != null)

         m.remove(this);

 }
结合ThrealLocalMap中的remove方法,完成对ThreadLocal值的删除。其大致流程为:
1)根据当前Thread找到其map;
2)根据ThreadLocal对象得到hashCode;
3)通过hashCode & (len -1)找到在table中的位置;
4)在table中查找对应的Entry,如果存在则删除。
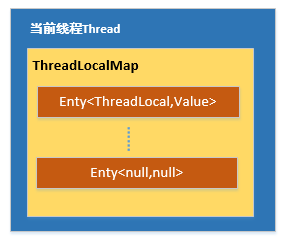
总结:通过对提供的4个接口方法的分析,我们应该就能清楚了,ThreadLocal之所以能够为每一个线程维护一个副本,是因为每个线程都拥有一个map,这个map就是每个线程的专属空间。也就是存在下面的关系图(不用怀疑,该图和图5.1相比,只是少了容量大小):
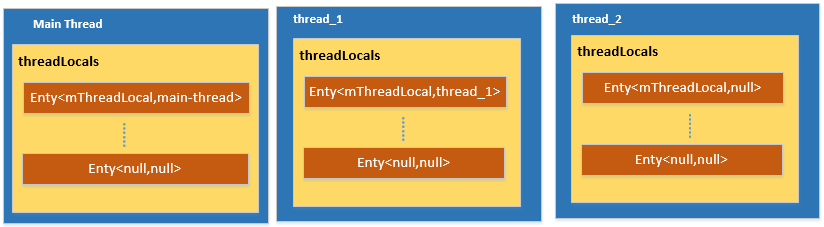
结合这一节对ThreadLocal机制的介绍,实例3.1执行后的就存在如下的数据结构了:
6、ThreadLocal在Looper中的使用
ThreadLocal在系统源码中有很多地方使用,最典型的地方就是Handler的Looper中了。这里结合Looper中的源码,来了解一下ThreadLocal在系统源码中的使用。
我们知道,在一个App进程启动的时候,会在ActiivtyThread类的main方法,也就是App的入口方法中,会为主线程准备一个Looper,如下代码所示:
 //======ActivityTread======源码6.1

 public static void main(String[] args) {

       ......

       Looper.prepareMainLooper();

       ......

 }
而在子线程中实例Handler的时候,总是需要显示调用Looper.prepare()方法来为当前线程生成一个Looper对象,以及通过Looper.myLooper()来得到自己线程的Looper来传递给Handler。
Looper中相关的关键源码如下:
 //==========Looper========源码6.2

 // sThreadLocal.get() will return null unless you've called prepare().

 static final ThreadLocal<Looper> sThreadLocal = new ThreadLocal<Looper>();

 private static Looper sMainLooper;

 /**

  * Initialize the current thread as a looper, marking it as an

  * application's main looper. The main looper for your application

  * is created by the Android environment, so you should never need

  * to call this function yourself.  See also: {@link #prepare()}

  */

 public static void prepareMainLooper() {

     prepare(false);

     synchronized (Looper.class) {

         if (sMainLooper != null) {

             throw new IllegalStateException("The main Looper has already been prepared.");

         }

         sMainLooper = myLooper();

     }

 }

 /**

  * Return the Looper object associated with the current thread.  Returns

  * null if the calling thread is not associated with a Looper.

  */

 public static @Nullable Looper myLooper() {

     return sThreadLocal.get();

 }

 /** Initialize the current thread as a looper.

   * ......

   */

 public static void prepare() {

     prepare(true);

 }

 private static void prepare(boolean quitAllowed) {

     if (sThreadLocal.get() != null) {

         throw new RuntimeException("Only one Looper may be created per thread");

     }

     sThreadLocal.set(new Looper(quitAllowed));

 }

 /**

  * Returns the application's main looper, which lives in the main thread of the application.

  */

 public static Looper getMainLooper() {

     synchronized (Looper.class) {

         return sMainLooper;

     }

 }
我们可以看到不少ThreadLocal的影子,Looper也正是通过ThreadLocal来为每个线程维护一份Looper实例的。通过我们前文的介绍,这里应该能够轻而易举理解其中的运作机制了吧,这里就再不啰嗦了。
7、实践是检验真理的唯一标准
前面介绍了ThreadLocal提供的四个接口,以及详细讲解了它的工作原理。现在我们将实例3.1做一些修改,将各个接口的功能都包含进来,并稍微增加一点复杂度,如果能够看懂这个实例,就算是真的理解ThreadLocal了。
 //=========实例7.1=======

 private ThreadLocal<String> mStrThreadLocal = new ThreadLocal<String>() {

     @Override

     protected String initialValue() {

         Log.i("threadlocaldemo", "initialValue");

         return "initName";

     }

 };

 private ThreadLocal<Long> mLongThreadLocal = new ThreadLocal<>();

 private void testThreadLocal() throws InterruptedException {

     mStrThreadLocal.set("main-thread");

     mLongThreadLocal.set(Thread.currentThread().getId());

     Log.i("threadlocaldemo", "result-1:name=" + mStrThreadLocal.get() + ";id=" + mLongThreadLocal.get());

     Thread thread_1 = new Thread() {

         @Override

         public void run() {

             super.run();

             mStrThreadLocal.set("thread_1");

             mLongThreadLocal.set(Thread.currentThread().getId());

             Log.i("threadlocaldemo", "result-2:name=" + mStrThreadLocal.get() + ";id=" + mLongThreadLocal.get());

         }

     };

     thread_1.start();

     //该句表示thread_1执行完后才会继续执行

     thread_1.join();

     Thread thread_2 = new Thread() {

         @Override

         public void run() {

             super.run();

             Log.i("threadlocaldemo", "result-3:name=" + mStrThreadLocal.get() + ";id=" + mLongThreadLocal.get());

         }

     };

     thread_2.start();

     //该句表示thread_2执行完后才会继续执行

     thread_2.join();

     mStrThreadLocal.remove();

     Log.i("threadlocaldemo", "result-4:name=" + mStrThreadLocal.get() + ";id=" + mLongThreadLocal.get());

 }
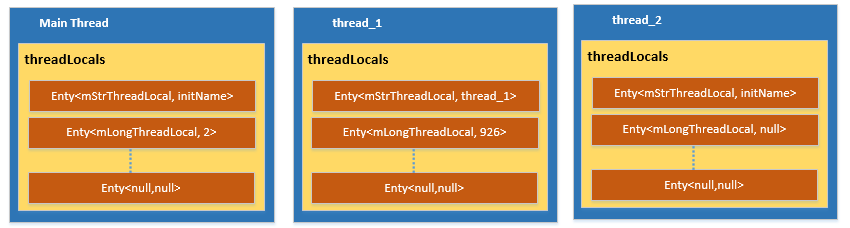
在主线程中运行该方法,执行结果为:
 12-14 16:25:40.662 4844-4844/com.example.demos I/threadlocaldemo: result-1:name=main-thread;id=2

 12-14 16:25:40.668 4844-5351/com.example.demos I/threadlocaldemo: result-2:name=thread_1;id=926

 12-14 16:25:40.669 4844-5353/com.example.demos I/threadlocaldemo: initialValue

 12-14 16:25:40.669 4844-5353/com.example.demos I/threadlocaldemo: result-3:name=initName;id=null

 12-14 16:25:40.669 4844-4844/com.example.demos I/threadlocaldemo: initialValue

 12-14 16:25:40.669 4844-4844/com.example.demos I/threadlocaldemo: result-4:name=initName;id=2
此时存在的数据结构为:
对于这份log和数据结构图,这里就不再一一讲解了,如果前面都看懂了,这些都是小菜一碟。
结语
对ThreadLocal的讲解这里就结束了,能读到这里,也足以说明你是人才,一定前途无量,祝你好运,早日走上人生巅峰!
由于经验和水平有限,有描述不当或不准确的地方,还请不吝赐教,谢谢!
赌十包辣条,你一定没见过这么通透的ThreadLocal讲解的更多相关文章
- 这是你没见过的不一样的redis
转: 这是你没见过的不一样的redis 提到Redis,大家一定会想到的几个点是什么呢? 高并发,KV存储,内存数据库,丰富的数据结构,单线程(6版本之前) 那么,接下来,上面提到的这些,都会一一给大 ...
- 超赞!12套你没见过的社交媒体 & 社交网站图标
如今,社交网络成为我们信息获取和传播的重要途径,很多网站都有把内容分享到社交媒体的功能.社交媒体图标作为向用户传递信息的重要媒介,不管是在网页还是 Web 应用程序中都非常需要.今天这篇文章和大家分享 ...
- Qt国际化相关类(以前没见过codec->toUnicode,QTextCodec,QLocale.toString和QLocale::setDefault,QInputMethod::locale())
QTextCodec QTextCodec为文本编码之间提供转换. Qt用Unicode 来存储,绘制和操作字符串.在很多情况下你可能希望操作不同编码的数据.例如,大部分日本文档是以Shift-JIS ...
- 一封来自恶魔的挑战邀请函,那些你见过或者没见过的C语言指针都在这里了
前言 相信大多数的同学都是第一门能接触到语言是C/C++,其中的指针也是比较让人头疼的部分了,因为光是指针都能专门出一本叫<C和指针>的书籍,足见指针的强大.但如果不慎误用指针,这些指针很 ...
- 吐槽Windows 8,就没见过这么烂的平板操作系统
本文带有严重个人情感色彩,反感者慎入. CSDN 博文大赛得了个奖品,联想的平板电脑, MIIX2 8 .系统是 Windows 8 . 今天媳妇再次使用它,惹得我再次吐槽. 一句话.Windows ...
- WinAPI你知道多少?!(上千个,好多都没见过)
http://www.cnblogs.com/vanver/archive/2013/06/13/NO-2013_06_13pm.html 播客开篇,讲讲废话:本篇播客只是推荐给热与钻研的同学们... ...
- Qt国际化(Q_DECLARE_TR_FUNCTIONS() 宏给非Qt类添加翻译支持,以前没见过QTextEncoder和QTextDecoder和QLibraryInfo::location()和QEvent::LanguageChange)
Internationalization with Qt 应用程序的国际化就是使得程序能在国际间可用而不仅仅是在本国可用的过程. Relevant Qt Classes andAPIs 以下的类支持Q ...
- 手把手教学在Springboot中搭建使用Guava cache,包教包会,不会我输一包辣条给你
guava cache使用简介 概述 缓存是日常开发中经常应用到的一种技术手段,合理的利用缓存可以极大的改善应用程序的性能. Guava官方对Cache的描述连接 缓存在各种各样的用例中非常有用.例 ...
- 你没见过的python语法
目录: 1.不一样的列表 2.改变type中的规则,创建类:类属性大写 3.%s字串格式化,不用元组用字典 4.没有参数抛出异常 5.字符串签名加f 格式化字符串 6.attr库 1.不一样的列表 l ...
随机推荐
- layer弹框的上面各个属性 -可配置
<script type="text/javascript"> 12 //eg 13 layer.open({ 14 title:"标题信息提示", ...
- ajax传出数组到后台
var vote = new Array(); $("input[name='option_name']").each(function(i){ if($(th ...
- element 动态合并表格
前言 element 官方的例子太简单了,不满足实际的需求 数据肯定是动态的,合并的行数,列数都是动态的,该如何知道每一行的合并数呢 需求 动态合并表格,数据来源于数据库 正文 一开始,我的数据源是单 ...
- poj 3281 Dining (Dinic)
Dining Time Limit: 2000MS Memory Limit: 65536K Total Submissions: 22572 Accepted: 10015 Descript ...
- 领扣(LeetCode)翻转二叉树 个人题解
翻转一棵二叉树. 示例: 输入: 4 / \ 2 7 / \ / \ 1 3 6 9 输出: 4 / \ 7 2 / \ / \ 9 6 3 1 备注:这个问题是受到 Max Howell的 原问题 ...
- 移动端viewport模版
<!DOCTYPE html> <html> <head> <meta charset="utf-8"> <meta cont ...
- 性能测试——记XX银行电票系统上线后宕机问题诊断优化
四月份我们公司负责的电票系统上线了,这个系统上线比客户方其他系统上线还特殊,是二期改造项目,旧系统数据还要整合抽取到新系统中继续使用,而且该系统不是增量型方式开发上线的,而且全部开发完后全国上线的,这 ...
- F#周报2019年第48期
新闻 拥抱可空引用类型 介绍Orleans 3.0 视频及幻灯片 组合的力量 关于.NET:探索新的用于.NET的Azure .NET SDK .NET设计审查:GitHub快速审查 FableCon ...
- All-in-one 的Serving分析
export_func.export(model, sess, signature_name=mission, version=fold + 1) def export(model, sess, si ...
- vscode vue模版
{ "Print to console": { "prefix": "vue", "body": [ "< ...