NLP标注工具brat 配置文件说明
快速搭建brat
通过docker:
docker run --name=brat -d -p 38080:80 -e BRAT_USERNAME=brat -e BRAT_PASSWORD=brat -e BRAT_EMAIL=brat@example.com cassj/brat
启动会拉取镜像,耐心等待,然后打开IP:38080,使用brat,brat登录
braf 的四类配置文件
the configuration of an annotation project is controlled by four files:
- annotation.conf: 标记类型 configuration
- visual.conf: annotation显示配置
- tools.conf: annotation工具配置
- kb_shortcuts.conf: 键盘快捷键 keyboard shortcut tool configuration
annotation.conf
标记配置文件
# 实体类型

[entities]

# 每行一个实体类型

Protein

Simple_chemical

Complex

Organism

# 事件

[events]

# 事件名称  参数名称:参数类型

Gene_expression Theme:Protein

Binding Theme+:Protein

Positive_regulation Theme:<EVENT>|Protein, Cause?:<EVENT>|Protein

Negative_regulation Theme:<EVENT>|Protein, Cause?:<EVENT>|Protein

# 关系

[relations]

# 关系名称 关系的属性,syntax ARG:TYPE (where ARG are, by convention, Arg1 and Arg2)

Part-of Arg1:Protein, Arg2:Complex

Member-of Arg1:Protein, Arg2:Complex

# TODO: Should these really be called "Equivalent" instead of "Equiv"?

Equiv Arg1:Protein, Arg2:Protein, <REL-TYPE>:symmetric-transitive

Equiv Arg1:Simple_chemical, Arg2:Simple_chemical, <REL-TYPE>:symmetric-transitive

Equiv Arg1:Organism, Arg2:Organism, <REL-TYPE>:symmetric-transitive

# 属性定义

[attributes]

# 名称  参数

Negation        Arg:<EVENT>

Confidence        Arg:<EVENT>, Value:Possible|Likely|Certain
Visual configuration (visual.conf)
可视化configuration包含两部分
- [labels]
- [drawing]
The [labels] 定义标记类型UI上如何显示:
Simple_chemical | Simple chemical | Chemical

标记类型  |   全称  |  显示文字
使用"|"隔开,第一部分是里定义的
The [drawing] 用于定义显示样式,比如定义标记的颜色等
[labels]

Simple_chemical | Simple chemical | Chemical

Protein | Protein

Complex | Complex

Organism | Organism

Gene_expression | Gene expression | Expression | Expr

Binding | Binding

Regulation | Regulation

Positive_regulation | Positive regulation | +Regulation

Negative_regulation | Negative regulation | -Regulation

Phosphorylation | Phosphorylation | Phos

Equiv | Equiv

Theme  | Theme

Cause  | Cause

Participant | Participant

[drawing]

SPAN_DEFAULT	fgColor:black, bgColor:lightgreen, borderColor:darken

ARC_DEFAULT	color:black, arrowHead:triangle-5

ATTRIBUTE_DEFAULT	glyph:*

Protein	bgColor:#7fa2ff

Simple_chemical	bgColor:#8fcfff

Complex	bgColor:#8f97ff

Organism	bgColor:#ffccaa

Positive_regulation	bgColor:#e0ff00

Regulation	bgColor:#ffff00

Negative_regulation	bgColor:#ffe000

Cause	color:#007700

Equiv	dashArray:3-3, arrowHead:none

Negation	box:crossed, glyph:<NONE>, dashArray:<NONE>

Confidence	dashArray:3-6|3-3|-, glyph:<NONE>
工具栏配置 (tools.conf)
The annotation tool configuration file, tools.conf, is divided into the following sections:
- [options]
- [search]
- [normalization]
- [annotators]
- [disambiguators]
These sections are all optional: an empty file is a vali
Option configuration ([options] section)
[options] 用来配置服务端如何处理分词、分局、验证、日志等:
Tokens tokenizer:VALUE, whereVALUE=whitespace: split by whitespace characters in source text (only)ptblike: emulate Penn Treebank tokenizationmecab: perform Japanese tokenization using MeCab
Sentences splitter:VALUE, whereVALUE=regex: regular expression-based sentence splittingnewline: split by newline characters in source text (only)
Validation validate:VALUE, whereVALUE=all: perform full validationnone: don't perform any validation
Annotation-log logfile:VALUE, whereVALUE=<NONE>: no annotation loggingNAME: log into file NAME (e.g. "/home/brat/work/annotation.log")
For example, the following [options] section gives the default brat configuration before v1.3:
|
| [options] | |
|---|---|
| Tokens | tokenizer:whitespace |
| Sentences | splitter:regex |
| Validation | validate:none |
| Annotation-log | logfile: |
The following [options] section enables Japanese tokenization using MeCab, sentence splitting only by newlines, full validation, and annotation logging into the given file. (In setting Annotation-log logfile, remember to make sure the web server has appropriate write permissions to the file.)
|
| [options] | |
|---|---|
| Tokens | tokenizer:mecab |
| Sentences | splitter:newline |
| Validation | validate:all |
| Annotation-log | logfile:/home/brat/work/annotation.log |
Normalization DB configuration ([normalization] section)
The [normalization] section defines the normalization resources that are available. For information on setting up normalization DBs, see the brat normalization documentation.
Each line in the [normalization] section has the following syntax:
DBNAME DB:DBPATH, <URL>:HOMEURL, <URLBASE>:ENTRYURL
Here, DB, <URL>, <URLBASE> and <PATH> are literal strings (they should appear as written here), while "DBNAME", "DBPATH", "HOMEURL" and "ENTRYURL" should be replaced with specific values appropriate for the database being configured:
DBNAME: sets the database name (e.g. "Wiki", "GO"). The name can be otherwise freely selected, but should not contain characters other than alphanumeric ("a"-"z", "A"-"Z", "0"-"9"), hyphen ("-") and underscore ("_"). This name will be used both in the brat UI and in the annotation file to identify the DB.DBPATH(optional): provides the file system path to the normalization DB data on the server, relative to the brat server root. IfDBPATHisn't set, the system assumes the DB can be found in the default location under the givenDBNAME.HOMEURL: sets the URL for the home page of the normalization resource (e.g. "http://en.wikipedia.org/wiki/"). Used both to identify the resource more specifically thanDBNAMEand to provide a link in the annotation UI for accessing the resource.URLBASE(optional): sets a URL template (e.g. "http://en.wikipedia.org/?curid=%s") that can be filled in to generate a direct link in the annotation UI to an entry in the normalization resource. The value should contain the characters "%s" as a placeholder that will be replaced with the ID of the entry.
The following example shows examples of configured normalization DBs.
|
| [normalization] | |
|---|---|
| Wiki | DB:dbs/wiki, :http://en.wikipedia.org, :http://en.wikipedia.org/?curid=%s |
| UniProt | :http://www.uniprot.org/, :http://www.uniprot.org/uniprot/%s |
The first line sets configuration for a database called "Wiki", found as "dbs/wiki" in the brat server directory, and the second for a DB called "UniProt", found in the default location for a DB with this name.
搜索配置 ([search] section)
The [search] 用来配置在线搜索,这样选中一个词语后,可以点击搜索链接进行搜索。
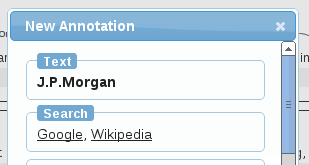
Each line in the [search] section contains the name used in the user interface for the search service, and a single key:value pair. The key should have the special value "" and its value should be the URL URL of the search service with the string to query for replaced by "%s".
The following example shows a simple [search] section.
|
| [search] | |
|---|---|
| :http://www.google.com/search?q=%s | |
| Wikipedia | :http://en.wikipedia.org/wiki/%s |
When selecting a span or editing an annotation, these search options will then be shown in the brat annotation dialog.
Annotation tool configuration ([annotators] section)
The [annotators] section defines automatic annotation services that can be invoked from brat.
Each line in the [annotators] section contains a unique name for the service and key:value pairs defining the way it is presented in the user interface and the URL of the web service for the tool. Values should be given for "tool", "model" and "" (the first two are used for the user interface only).
The following example shows a simple [annotators] section.
|
| [annotators] | |
|---|---|
| SNER-CoNLL | tool:Stanford_NER, model:CoNLL, :http://example.com:80/tagger/ |
Disambiguation tool configuration ([disambiguators] section)
The [disambiguators] section defines automatic semantic class (annotation type) disambiguation services that can be invoked from brat.
Each line in the [disambiguators] section contains a unique name for the service and key:value pairs defining the way it is presented in the user interface and the URL of the web service for the tool. Values should be given for "tool", "model" and "" (the first two are used for the user interface only).
The following example shows a simple [disambiguators] section.
|
| [disambiguators] | |
|---|---|
| simsem-MUC | tool:simsem, model:MUC, :http://example.com:80/simsem/%s |
As for search, the string to query for is identified by "%s" in the URL.
来看一个demo:
[options]

# Possible values for validate:

# - all: perform full validation

# - none: don't perform any validation

Validation	validate:all

# Possible values for tokenizer

# - ptblike: emulate Penn Treebank tokenization

# - mecab: perform Japanese tokenization using MeCab

# - whitespace: split by whitespace characters in source text (only)

Tokens	   tokenizer:whitespace

# Possible values for splitter:

# - regex  : regular expression-based sentence splitting

# - newline: split by newline characters in source text (only)

Sentences	splitter:newline

# Possible values for logfile:

# - <NONE> : no annotation logging

# - NAME : log into file NAME (e.g. "/home/brat/annotation.log")

Annotation-log logfile:<NONE>

[search]

# Search option configuration. Configured queries will be available in

# text span annotation dialogs. When selected on the UI, these open

# the given URL ("<URL>") with the string "%s" replaced with the

# selected text span.

Google       <URL>:http://www.google.com/search?q=%s

Wikipedia    <URL>:http://en.wikipedia.org/wiki/Special:Search?search=%s

UniProt      <URL>:http://www.uniprot.org/uniprot/?sort=score&query=%s

EntrezGene   <URL>:http://www.ncbi.nlm.nih.gov/gene?term=%s

GeneOntology <URL>:http://amigo.geneontology.org/cgi-bin/amigo/search.cgi?search_query=%s&action=new-search&search_constraint=term

ALC          <URL>:http://eow.alc.co.jp/%s

[annotators]

# Automatic annotation service configuration. The values of "tool" and

# "model" are required for the UI, and "<URL>" should be filled with

# the URL of the web service. See the brat documentation for more

# information.

# Examples:

# Random              tool:Random, model:Random, <URL>:http://localhost:47111/

# Stanford-CoNLL-MUC  tool:Stanford_NER, model:CoNLL+MUC, <URL>:http://127.0.0.1:47111/

# NERtagger-GENIA     tool:NERtagger, model:GENIA, <URL>:http://example.com:8080/tagger/

[disambiguators]

# Automatic semantic disambiguation service configuration. The values

# of "tool" and "model" are required for the UI, and "<URL>" should be

# filled with the URL of the web service. See the brat documentation

# for more information.

# Example:

# simsem-GENIA    tool:simsem, model:GENIA, <URL>:http://example.com:8080/tagger/%s

[normalization]

# Configuration for normalization against external resources. The

# resource name (first field of each line) should match that of a

# normalization DB on the brat server (see tools/norm_db_init.py),

# "<URL>" should be filled with the URL of the resource (preferably

# one providing a serach interface), and "<URLBASE>" should be a

# string containing "%s" that, when replacing "%s" with an ID in

# the external resource, becomes a link to a page representing

# the entry corresponding to the ID in that resource.

# Example

#UniProt    <URL>:http://www.uniprot.org/, <URLBASE>:http://www.uniprot.org/uniprot/%s

#GO    <URL>:http://www.geneontology.org/, <URLBASE>:http://amigo.geneontology.org/cgi-bin/amigo/term_details?term=GO:%s

#FMA    <URL>:http://fme.biostr.washington.edu/FME/index.html, <URLBASE>:http://www.ebi.ac.uk/ontology-lookup/browse.do?ontName=FMA&termId=FMA:%s
快捷键
选中标记后,键盘上按快捷键,可以快速切换选项
P       Protein

S Simple_chemical

X Complex

O Organism

C Cause

T Theme
作者:Jadepeng
出处:jqpeng的技术记事本--http://www.cnblogs.com/xiaoqi
您的支持是对博主最大的鼓励,感谢您的认真阅读。
本文版权归作者所有,欢迎转载,但未经作者同意必须保留此段声明,且在文章页面明显位置给出原文连接,否则保留追究法律责任的权利。
NLP标注工具brat 配置文件说明的更多相关文章
- 用深度学习做命名实体识别(二):文本标注工具brat
本篇文章,将带你一步步的安装文本标注工具brat. brat是一个文本标注工具,可以标注实体,事件.关系.属性等,只支持在linux下安装,其使用需要webserver,官方给出的教程使用的是Apac ...
- 自然语言处理标注工具——Brat(安装、测试、使用)
一.Brat标注工具安装 1.安装条件: (1)运行于Linux系统(window系统下虚拟机内linux系统安装也可以) (2)目前brat最新版本(v1.3p1)仅支持python2版本运行使用( ...
- NLP+VS︱深度学习数据集标注工具、方法摘录,欢迎补充~~
~~因为不太会使用opencv.matlab工具,所以在找一些比较简单的工具. . . 一.NLP标注工具BRAT BRAT是一个基于web的文本标注工具,主要用于对文本的结构化标注,用BRAT生成的 ...
- 推荐 | 中文文本标注工具Chinese-Annotator(转载)
自然语言处理的大部分任务是监督学习问题.序列标注问题如中文分词.命名实体识别,分类问题如关系识别.情感分析.意图分析等,均需要标注数据进行模型训练.深度学习大行其道的今天,基于深度学习的 NLP 模型 ...
- [分享] 封装工具ES4配置文件解释
[分享] 封装工具ES4配置文件解释 LiQiang 发表于 2015-2-3 14:41:21 https://www.itsk.com/thread-346132-1-4.html [分享] 封装 ...
- 开源图像标注工具labelme的安装使用及汉化
一 LabelMe简介 labelme是麻省理工(MIT)的计算机科学和人工智能实验室(CSAIL)研发的图像标注工具,人们可以使用该工具创建定制化标注任务或执行图像标注,项目源代码已经开源. 项目开 ...
- PDF文件如何标注,怎么使用PDF标注工具
我们在使用文件的时候需要给文件的部分添加标注,能够更加直观的了解文件,但是有很多小伙伴们对于PDF文件怎么添加标注都不知道,也不知道PDF标注工具要怎么使用,那么下面就跟大家分享一下怎么使用PDF标注 ...
- 深度学习标注工具 LabelMe 的使用教程(Windows 版本)
深度学习标注工具 LabelMe 的使用教程(Windows 版本) 2018-11-21 20:12:53 精灵标注助手:http://www.jinglingbiaozhu.com/ LabelM ...
- CocoStuff—基于Deeplab训练数据的标定工具【三、标注工具的使用】
一.说明 本文为系列博客第三篇,主要展示COCO-Stuff 10K标注工具的使用过程及效果. 本文叙述的步骤默认在完成系列文章[二]的一些下载数据集.生成超像素处理文件的步骤,如果过程中有提示缺少那 ...
随机推荐
- 程序员需要掌握的七种 Python 代码更易维护的武器
检查你的代码风格 PEP 8 是 Python 代码风格规范,它规定了类似行长度.缩进.多行表达式.变量命名约定等内容.尽管你的团队自身可能也会有稍微不同于 PEP 8 的代码风格规范,但任何代码风格 ...
- 23种GoF设计模式的分类
GoF设计模式一共有23个.一般可以按目的和作用范围来进行划分,具体划分方法如下: 第一,这些模式按目的(即完成什么样任务)来划分为创建型.结构型和行为型这三种模式: 创建型:用来创建对象.单例.原型 ...
- 查找节点(getAttribute())
getAttribute():方法将返回一个给定元素的一个给定属性节点的值: attributeValue = element.getAttribute(attributeName); 给定属性的名字 ...
- Kotlin Coroutines在Android中的实践
Coroutines在Android中的实践 前面两篇文章讲了协程的基础知识和协程的通信. 见: Kotlin Coroutines不复杂, 我来帮你理一理 Kotlin协程通信机制: Channel ...
- vue 结合 Echarts 实现半开环形图
Echarts 实现半开环形图 1.先看看实现的图 2.HTML部分 创建id 是 chart 的div标签. <div class="content-item"> & ...
- JavaScript如何创建一个对象
我们可以利用JavaScript的语法特征,以类的思想来创建对象. 方法一:原始方法代码如下: <script> var obj = new Object(); obj.name = &q ...
- JS 输出指定范围内的随机数
/* 自定义函数 */ function GetRandomNum(Min,Max){ var Range = Max - Min; var Rand = Math.random(); return( ...
- AQS系列(一)- ReentrantLock的加锁
前言 AQS即AbstractQueuedSynchronizer,是JUC包中的一个核心抽象类,JUC包中的绝大多数功能都是直接或间接通过它来实现的.本文是AQS系列的第一篇,后面会持续更新多篇,争 ...
- React - 组件:类组件
目录: 1. 类组件有自己的状态 2. 继承React.Component-会有生命周期和this 3. 内部需要一个render函数(类组件会默认调用render方法,但不会默认添加,需要手动填写r ...
- NAT的三种类型
一.静态NAT 内部本地地址一对一转换成内部全局地址,相当内部本地的每一台PC都绑定了一个全局地址,即使这个地址没有被使用,其他的电脑也不能拿来转换使用,这样容易造成IP地址的资源浪费,一般是用于在内 ...